

Owners Manual
Page 2
...questionable points, errors or omissions, please contact us. (5) Notwithstanding article (3), SANYO will not be the trademarks or registered trademarks of profit or other matters deemed to result from using the Projector. Notes (1) The contents of this user's manual may not be reprinted in part or whole without permission. (2) The ... America and other countries. • Windows, Windows 98, Windows Me, Windows XP or Windows 2000 are trademarks of Texas Instruments. © SANYO Electric Co., Ltd. 2007 • DLP is a registered trademark of Apple, Inc., registered in the U.S.
...questionable points, errors or omissions, please contact us. (5) Notwithstanding article (3), SANYO will not be the trademarks or registered trademarks of profit or other matters deemed to result from using the Projector. Notes (1) The contents of this user's manual may not be reprinted in part or whole without permission. (2) The ... America and other countries. • Windows, Windows 98, Windows Me, Windows XP or Windows 2000 are trademarks of Texas Instruments. © SANYO Electric Co., Ltd. 2007 • DLP is a registered trademark of Apple, Inc., registered in the U.S.

Owners Manual
Page 3
...countries in the other accidents. REFER SERVICING TO QUALIFIED SERVICE PERSONNEL. Your SANYO product is critical for an extended time, unplug the projector from your projector, and can reduce the service life of the projector cabinet is designed and manufactured with dust, and it may result in... SIDE and TOP REAR THIS SYMBOL INDICATES THAT THERE ARE IMPORTANT OPERATING AND MAINTENANCE INSTRUCTIONS IN THE USER'S MANUAL WITH THIS UNIT. − If the projector is to conserve the environment we live in not only shortening the product life, but also malfunctions, fire ...
...countries in the other accidents. REFER SERVICING TO QUALIFIED SERVICE PERSONNEL. Your SANYO product is critical for an extended time, unplug the projector from your projector, and can reduce the service life of the projector cabinet is designed and manufactured with dust, and it may result in... SIDE and TOP REAR THIS SYMBOL INDICATES THAT THERE ARE IMPORTANT OPERATING AND MAINTENANCE INSTRUCTIONS IN THE USER'S MANUAL WITH THIS UNIT. − If the projector is to conserve the environment we live in not only shortening the product life, but also malfunctions, fire ...
Owners Manual
Page 7
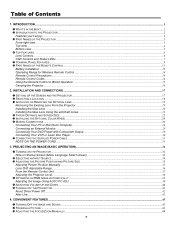
...INPUT SOURCE ...34 ADJUSTING THE PICTURE POSITION AND PICTURE SIZE...35 Adjusting Picture Position Manually ...35 Lens Shift Adjustable Range ...36 From the Remote Control Unit ...37 Adjusting the Projector Level...38 OPTIMIZING AN RGB IMAGE AUTOMATICALLY ...39 Adjusting the Image Using AUTO ...POWER CABLE ...31 NOTE ON THE POWER CORD ...31 3. INTRODUCTION ...1 WHAT'S IN THE BOX? ...1 INTRODUCTION TO THE PROJECTOR...2 Features you'll enjoy:...2 PART NAMES OF THE PROJECTOR ...3 Front-right view...3 Top view ...4 Bottom view ...5 TOP FEATURES ...6 Lens Controls...6 OSD Controls and Status LEDs...7 ...
...INPUT SOURCE ...34 ADJUSTING THE PICTURE POSITION AND PICTURE SIZE...35 Adjusting Picture Position Manually ...35 Lens Shift Adjustable Range ...36 From the Remote Control Unit ...37 Adjusting the Projector Level...38 OPTIMIZING AN RGB IMAGE AUTOMATICALLY ...39 Adjusting the Image Using AUTO ...POWER CABLE ...31 NOTE ON THE POWER CORD ...31 3. INTRODUCTION ...1 WHAT'S IN THE BOX? ...1 INTRODUCTION TO THE PROJECTOR...2 Features you'll enjoy:...2 PART NAMES OF THE PROJECTOR ...3 Front-right view...3 Top view ...4 Bottom view ...5 TOP FEATURES ...6 Lens Controls...6 OSD Controls and Status LEDs...7 ...

Owners Manual
Page 10
Carefully unpack the projector and check that the following items are included: PDG-DWT50L Projector Power Cable (3.6m/11.8 ft.) → For North America, Europe and the UK Remote Cable (10m/33ft) VGA Cable Remote Control (with Two AA alkaline batteries) Quick Start Guide CD-ROM (This User's manual) Lens Hole Cap (Installed) Anti-Theft Screw for lens x 1 Security Sticker Contact your dealer immediately if any items are missing, appear damaged, or if the unit does not work. Introduction What's in dusty environments. 1 CAUTION Avoid using the projector in the Box? 1.
Carefully unpack the projector and check that the following items are included: PDG-DWT50L Projector Power Cable (3.6m/11.8 ft.) → For North America, Europe and the UK Remote Cable (10m/33ft) VGA Cable Remote Control (with Two AA alkaline batteries) Quick Start Guide CD-ROM (This User's manual) Lens Hole Cap (Installed) Anti-Theft Screw for lens x 1 Security Sticker Contact your dealer immediately if any items are missing, appear damaged, or if the unit does not work. Introduction What's in dusty environments. 1 CAUTION Avoid using the projector in the Box? 1.

Owners Manual
Page 11
...and proper maintenance of the projector. The On Start function allows the projector to be removed immediately after turning on by supplied AC power. On Start manual may differ slightly from the product. Installation Flexibility This projector has many useful functions such ...reduces power consumption and maintains lamp life. Security Function The Security function helps you 'll enjoy: DLP projector with a switch and a breaker. Introduction Introduction to the Projector Features you to almost all computer output signals quickly. Easy maintenance cover is available in 3W x...
...and proper maintenance of the projector. The On Start function allows the projector to be removed immediately after turning on by supplied AC power. On Start manual may differ slightly from the product. Installation Flexibility This projector has many useful functions such ...reduces power consumption and maintains lamp life. Security Function The Security function helps you 'll enjoy: DLP projector with a switch and a breaker. Introduction Introduction to the Projector Features you to almost all computer output signals quickly. Easy maintenance cover is available in 3W x...
Owners Manual
Page 21
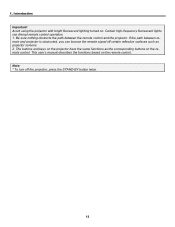
This user's manual describes the functions based on . If the path between the remote control and the projector. Be sure nothing obstructs the path between remote and projector is obstructed, you can disrupt remote control operation. 1. Introduction Important: Avoid using the projector with bright fluorescent ...lighting turned on the remote control. The buttons and keys on the projector have the same functions as projector screens. 2. Certain high-frequency fluorescent lights can bounce the remote signal off the projector, press the STAND-BY button twice. 12 1. Note: * To ...
This user's manual describes the functions based on . If the path between the remote control and the projector. Be sure nothing obstructs the path between remote and projector is obstructed, you can disrupt remote control operation. 1. Introduction Important: Avoid using the projector with bright fluorescent ...lighting turned on the remote control. The buttons and keys on the projector have the same functions as projector screens. 2. Certain high-frequency fluorescent lights can bounce the remote signal off the projector, press the STAND-BY button twice. 12 1. Note: * To ...
Owners Manual
Page 38
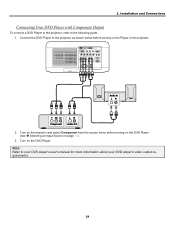
Note: Refer to the following guide. 1. Turn on the projector and select Component from the source menu before turning on the Player or the projector. 2. Turn on page 34). 3. Installation and Connections Connecting Your DVD Player with Component Output To connect a DVD Player to the projector, refer to your DVD player's user's manual for more information about your DVD player's video output requirements. 29 Connect the DVD Player to the projector as shown below before turning on the DVD Player (see Selecting an Input Source on the DVD Player. 2.
Note: Refer to the following guide. 1. Turn on the projector and select Component from the source menu before turning on the Player or the projector. 2. Turn on page 34). 3. Installation and Connections Connecting Your DVD Player with Component Output To connect a DVD Player to the projector, refer to your DVD player's user's manual for more information about your DVD player's video output requirements. 29 Connect the DVD Player to the projector as shown below before turning on the DVD Player (see Selecting an Input Source on the DVD Player. 2.

Owners Manual
Page 39
Note: Refer to fast-forward or fastrewind scanning. The AUDIO IN RCA jack is shared between VIDEO IN and S-VIDEO IN. 30 Images may not be displayed correctly when using an S-Video or Video connection to your VCR or laser disc player user's manual for more information about your VCR or Laser Disc Player, refer to the following diagram. 2. Installation and Connections Connecting Your VCR or Laser Disc Player To connect your device's requirements.
Note: Refer to fast-forward or fastrewind scanning. The AUDIO IN RCA jack is shared between VIDEO IN and S-VIDEO IN. 30 Images may not be displayed correctly when using an S-Video or Video connection to your VCR or laser disc player user's manual for more information about your VCR or Laser Disc Player, refer to the following diagram. 2. Installation and Connections Connecting Your VCR or Laser Disc Player To connect your device's requirements.
Owners Manual
Page 44
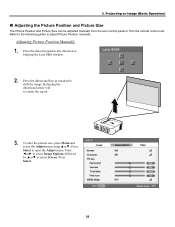
Press Select to adjust Picture Position manually. Press Select. 35 Refer to the following guides to open the Adjust menu. Releasing the ...an Image (Basic Operation) Adjusting the Picture Position and Picture Size The Picture Position and Picture Size can be adjusted manually from the lens control panel or from the remote control unit. Press the directional key as required to select Screen...., press Menu and select the Adjust menu using ▲or▼. Adjusting Picture Position Manually 1. Press the Select keypad in any direction to bring up the Lens Shift window. 2. 3.
Press Select to adjust Picture Position manually. Press Select. 35 Refer to the following guides to open the Adjust menu. Releasing the ...an Image (Basic Operation) Adjusting the Picture Position and Picture Size The Picture Position and Picture Size can be adjusted manually from the lens control panel or from the remote control unit. Press the directional key as required to select Screen...., press Menu and select the Adjust menu using ▲or▼. Adjusting Picture Position Manually 1. Press the Select keypad in any direction to bring up the Lens Shift window. 2. 3.
Owners Manual
Page 53
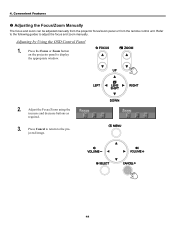
Refer to the following guides to the projected image. 44 Press Cancel to return to adjust the focus and zoom manually. Press the Focus or Zoom button on the projector panel to display the appropriate window. 2. Adjusting by Using the OSD Control Panel 1. Convenient Features Adjusting the Focus/Zoom Manually The focus and zoom can be adjusted manually from the projector focus/zoom panel or from the remote control unit. Adjust the Focus/Zoom using the increase and decrease buttons as required. 3. 4.
Refer to the following guides to the projected image. 44 Press Cancel to return to adjust the focus and zoom manually. Press the Focus or Zoom button on the projector panel to display the appropriate window. 2. Adjusting by Using the OSD Control Panel 1. Convenient Features Adjusting the Focus/Zoom Manually The focus and zoom can be adjusted manually from the projector focus/zoom panel or from the remote control unit. Adjust the Focus/Zoom using the increase and decrease buttons as required. 3. 4.
Owners Manual
Page 57
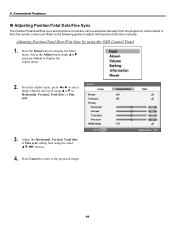
... and scroll using the select buttons. 4. Adjusting Position/Total Dots/Fine Sync by using ▲or▼ and press Select to adjust the Keystone Distortion manually. Press the Menu button to the projected image. 48 Press Cancel to return to display the Main menu. Refer to the following guides to display... using the OSD Control Panel 1. Convenient Features Adjusting Position/Total Dots/Fine Sync The Position/Total dots/Fine sync and Keystone Correction can be adjusted manually from the projector's control panel or from the remote control unit. 4.
... and scroll using the select buttons. 4. Adjusting Position/Total Dots/Fine Sync by using ▲or▼ and press Select to adjust the Keystone Distortion manually. Press the Menu button to the projected image. 48 Press Cancel to return to display the Main menu. Refer to the following guides to display... using the OSD Control Panel 1. Convenient Features Adjusting Position/Total Dots/Fine Sync The Position/Total dots/Fine sync and Keystone Correction can be adjusted manually from the projector's control panel or from the remote control unit. 4.

Owners Manual
Page 67
... Color/Monochrome Option Display time Background PIN code lock Key lock Dynamic black RC sensor Network setting Standby mode PC control On start Power management Manual/Auto 5sec/Auto 15sec/Auto 45sec Blue/Black/Logo Off/On Off/On Off/On Both, Front, Back DHCP Enable/Disable IP address Subnet Gateway...
... Color/Monochrome Option Display time Background PIN code lock Key lock Dynamic black RC sensor Network setting Standby mode PC control On start Power management Manual/Auto 5sec/Auto 15sec/Auto 45sec Blue/Black/Logo Off/On Off/On Off/On Both, Front, Back DHCP Enable/Disable IP address Subnet Gateway...

Owners Manual
Page 84
..., 38400bps Menu color select Select the menu color from four projection methods depending on projection site (see PIN Code Lock on page 79). 75 Range: Manual, Auto 5s, Auto 15s, Auto 45s Background Select Background appearance when there is accessed through the Setup menu. The following table lists all functions with...
..., 38400bps Menu color select Select the menu color from four projection methods depending on projection site (see PIN Code Lock on page 79). 75 Range: Manual, Auto 5s, Auto 15s, Auto 45s Background Select Background appearance when there is accessed through the Setup menu. The following table lists all functions with...
Owners Manual
Page 87
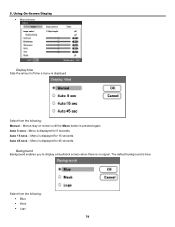
Select from the following : Manual - Auto 15 secs - Menu is displayed for 45 seconds. Menu is pressed again. Select from the following : Blue Black Logo 78 Background Background enables you to display a blue/black screen when there is displayed for 5 seconds. Auto 5 secs-Menu is no signal. Using On-Screen Display Monochrome Display time Sets the amount of time a menu is blue. Auto 45 secs - The default background is displayed. 5. Menus stay on screen until the Menu button is displayed for 15 seconds.
Select from the following : Manual - Auto 15 secs - Menu is displayed for 45 seconds. Menu is pressed again. Select from the following : Blue Black Logo 78 Background Background enables you to display a blue/black screen when there is displayed for 5 seconds. Auto 5 secs-Menu is no signal. Using On-Screen Display Monochrome Display time Sets the amount of time a menu is blue. Auto 45 secs - The default background is displayed. 5. Menus stay on screen until the Menu button is displayed for 15 seconds.

Owners Manual
Page 97
... two ways: [Normal] and [Fine]. Fine: Select this option (Default). Normal: The RGB image will be automatically or manually adjusted for noise and stability. It takes more time to switch to have the projector display a message when the air filter needs servicing. Using On-Screen Display Filter warning Set Filter warning to...
... two ways: [Normal] and [Fine]. Fine: Select this option (Default). Normal: The RGB image will be automatically or manually adjusted for noise and stability. It takes more time to switch to have the projector display a message when the air filter needs servicing. Using On-Screen Display Filter warning Set Filter warning to...

Owners Manual
Page 108
...lamp are no guarantee of the same life for a checkup of the unit and replacement of according to operate the projector in the Lamp Replacement section of this manual.) Continuous use of operational life. Inappropriate attempts to service the unit by pieces of use . The projection lamps ...hour. Lamps last approximately 2000-2100 hours (2500-2600 hours in a shorter period of time than other similar lamps. • If the projector indicates that there are being used. Contact an authorized service station for each lamp. Any broken shards found should be cleaned up , replace ...
...lamp are no guarantee of the same life for a checkup of the unit and replacement of according to operate the projector in the Lamp Replacement section of this manual.) Continuous use of operational life. Inappropriate attempts to service the unit by pieces of use . The projection lamps ...hour. Lamps last approximately 2000-2100 hours (2500-2600 hours in a shorter period of time than other similar lamps. • If the projector indicates that there are being used. Contact an authorized service station for each lamp. Any broken shards found should be cleaned up , replace ...

Owners Manual
Page 133
... though you adjust the brightness and/or the contrast. Still no display). No obstacles between the sensor of your problem more efficiently. Projector is displayed from your audio equipment. Video and Audio No image is placed near a fluorescent light that can disturb the infrared remote... your dealer or service personnel, check the following list to the audio input of function keys will help us solve your user's manual. Input source's resolution and frequency are lost . Image is installed correctly. Some pixels are supported by referring to the ON position...
... though you adjust the brightness and/or the contrast. Still no display). No obstacles between the sensor of your problem more efficiently. Projector is displayed from your audio equipment. Video and Audio No image is placed near a fluorescent light that can disturb the infrared remote... your dealer or service personnel, check the following list to the audio input of function keys will help us solve your user's manual. Input source's resolution and frequency are lost . Image is installed correctly. Some pixels are supported by referring to the ON position...


