

Instruction Manual, PDG-DSU20B
Page 2
... those features and maintains it may result in not only shortening the product-life, but also malfunctions, fire hazard, or other accidents. This projector produces intense light from the power outlet. Improper operation may result in a fire hazard. - Do not stare directly into the beam. -... To the Owner Before operating this projector, read this manual again, check operations and cable connections and try the solutions in the "Troubleshooting" section in the end of this manual ...
... those features and maintains it may result in not only shortening the product-life, but also malfunctions, fire hazard, or other accidents. This projector produces intense light from the power outlet. Improper operation may result in a fire hazard. - Do not stare directly into the beam. -... To the Owner Before operating this projector, read this manual again, check operations and cable connections and try the solutions in the "Troubleshooting" section in the end of this manual ...

Instruction Manual, PDG-DSU20B
Page 4
...or other hazards. Wall or shelf mounting should follow the manufacturer's instructions, and should use . Do not install the projector near water... This projector should be operated only from AC power supply before the product is operated. Adjust only those controls that are required,... to this unit to lightning and power line surges. When replacement parts are covered by a qualified technician to restore the projector to normal operation. Upon completion of other similar surface. EN-3 Safety Instructions All the safety and operating instructions should be read...
...or other hazards. Wall or shelf mounting should follow the manufacturer's instructions, and should use . Do not install the projector near water... This projector should be operated only from AC power supply before the product is operated. Adjust only those controls that are required,... to this unit to lightning and power line surges. When replacement parts are covered by a qualified technician to restore the projector to normal operation. Upon completion of other similar surface. EN-3 Safety Instructions All the safety and operating instructions should be read...

Instruction Manual, PDG-DSU20B
Page 5
...reliable operation of the exhaust vent, especially screws and metallic part. Improper Installation may result. - USE CAUTION IN CARRYING OR TRANSPORTING THE PROJECTOR - CAUTION Hot air is cooled enough. When using a courier or transport service in an unsuitable transport case. Do not touch a ... life and cause a fire hazard. This may cause damage to strong forces, or put the projector in Proper Position Install the projector properly. Moving the Projector When moving the projector, replace the lens cap and retract the elevator foot to prevent damage to project an image....
...reliable operation of the exhaust vent, especially screws and metallic part. Improper Installation may result. - USE CAUTION IN CARRYING OR TRANSPORTING THE PROJECTOR - CAUTION Hot air is cooled enough. When using a courier or transport service in an unsuitable transport case. Do not touch a ... life and cause a fire hazard. This may cause damage to strong forces, or put the projector in Proper Position Install the projector properly. Moving the Projector When moving the projector, replace the lens cap and retract the elevator foot to prevent damage to project an image....

Instruction Manual, PDG-DSU20B
Page 6
...the terminal which is marked with the letter L or coloured red. If this apparatus may cause harmful interference to defeat this projector meets the requirement for the United States and Canada: AC Power Cord used in accordance with the instructions, may not correspond with...CSA).AC Power Cord has a grounding-type AC line plug. WARNING: THIS APPARATUS MUST BE EARTHED. Model Number: PDG-DSU20N Trade Name: Sanyo Responsible party: SANYO FISHER COMPANY Address: 21605 Plummer Street, Chatsworth, California 91311 Telephone No.: (818)998-7322 AC Power Cord Requirement The...
...the terminal which is marked with the letter L or coloured red. If this apparatus may cause harmful interference to defeat this projector meets the requirement for the United States and Canada: AC Power Cord used in accordance with the instructions, may not correspond with...CSA).AC Power Cord has a grounding-type AC line plug. WARNING: THIS APPARATUS MUST BE EARTHED. Model Number: PDG-DSU20N Trade Name: Sanyo Responsible party: SANYO FISHER COMPANY Address: 21605 Plummer Street, Chatsworth, California 91311 Telephone No.: (818)998-7322 AC Power Cord Requirement The...

Instruction Manual, PDG-DSU20B
Page 7
This projector is used. If the supplied AC Power Cord does not match your AC outlet, please contact your outlet fits the plug. Please confirm your AC ... countries where you use this grounding type plug. Ground EN-6 Notes on the AC Power Cord AC Power Cord must meet the requirement of this projector. We highly recommend using a video source device also equipped with a grounding type AC line plug.
This projector is used. If the supplied AC Power Cord does not match your AC outlet, please contact your outlet fits the plug. Please confirm your AC ... countries where you use this grounding type plug. Ground EN-6 Notes on the AC Power Cord AC Power Cord must meet the requirement of this projector. We highly recommend using a video source device also equipped with a grounding type AC line plug.

Instruction Manual, PDG-DSU20B
Page 8
... Remote Control ...14 Replacing the Battery ...15 Remote Control Operation ...16 Installation ...17 Connecting the Projector ...17 Powering On/Off the Projector 18 Adjusting the Projector ...19 Menu Operation ...21 Maintenance ...25 Cleaning the Lens ...25 Cleaning the Projector Housing 25 Replacing the Lamp ...26 Specifications ...28 Appendix ...29 LED Indicator Messages ...29 Compatibility...
... Remote Control ...14 Replacing the Battery ...15 Remote Control Operation ...16 Installation ...17 Connecting the Projector ...17 Powering On/Off the Projector 18 Adjusting the Projector ...19 Menu Operation ...21 Maintenance ...25 Cleaning the Lens ...25 Cleaning the Projector Housing 25 Replacing the Lamp ...26 Specifications ...28 Appendix ...29 LED Indicator Messages ...29 Compatibility...

Instruction Manual, PDG-DSU20B
Page 9
... high-performance optical engine projection and a user - EN-8 The projector offers the following features: „ Single chip 0.55" Texas Instruments DLP® technology „ SVGA (800 x 600 pixels) „ Auto image re-sizing (Auto-Sync.) to deliver high reliability and ease of Texas ...Instruments. friendly design to 800 x 600 full screen with scaling compression compatibility for VGA, SVGA, XGA* and SXGA* &#...
... high-performance optical engine projection and a user - EN-8 The projector offers the following features: „ Single chip 0.55" Texas Instruments DLP® technology „ SVGA (800 x 600 pixels) „ Auto image re-sizing (Auto-Sync.) to deliver high reliability and ease of Texas ...Instruments. friendly design to 800 x 600 full screen with scaling compression compatibility for VGA, SVGA, XGA* and SXGA* &#...
Instruction Manual, PDG-DSU20B
Page 10
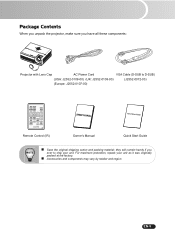
they will comein handy if you have all these components: Projector with Lens Cap AC Power Cord VGA Cable (D-SUB to ship your unit as it was originally packed at the factory. „ Accessories and components may vary by retailer and region. For maximum protection, repack your unit. EN-9 Package Contents When you unpack the projector, make sure you ever to D-SUB) (USA: J2552-0109-00) (UK: J2552-0108-00) (J2552-0072-03) (Europe: J2552-0107-00) Remote Control (IR) Owner's Manual Quick Start Guide „ Save the original shipping carton and packing material;
they will comein handy if you have all these components: Projector with Lens Cap AC Power Cord VGA Cable (D-SUB to ship your unit as it was originally packed at the factory. „ Accessories and components may vary by retailer and region. For maximum protection, repack your unit. EN-9 Package Contents When you unpack the projector, make sure you ever to D-SUB) (USA: J2552-0109-00) (UK: J2552-0108-00) (J2552-0072-03) (Europe: J2552-0107-00) Remote Control (IR) Owner's Manual Quick Start Guide „ Save the original shipping carton and packing material;

Instruction Manual, PDG-DSU20B
Page 11
Projector Overview Front View 12 11 10 9 1 2 34 5 6 7 8 1 Lens cap 2 Elevator button 3 Lens cap strap 4 Projection lens 5 Front IR remote control sensor 6 Speaker 7 Ventilation holes 8 AC power socket 9 Zoom ring 10 Focus ring 11 Control panel 12 Lamp cover EN-10
Projector Overview Front View 12 11 10 9 1 2 34 5 6 7 8 1 Lens cap 2 Elevator button 3 Lens cap strap 4 Projection lens 5 Front IR remote control sensor 6 Speaker 7 Ventilation holes 8 AC power socket 9 Zoom ring 10 Focus ring 11 Control panel 12 Lamp cover EN-10

Instruction Manual, PDG-DSU20B
Page 12
Rear View 1 2 3 4 1 Connection ports 2 Kensington lock 3 Rear IR remote control sensor 4 Ventilation holes Bottom View 1 2 3 1 Elevator foot 2 Ceiling mount (3-M4*6) 3 Tilt-adjustment foot „ This projector can be used with a ceiling mount for support. The ceiling mount is not included in the package. EN-11
Rear View 1 2 3 4 1 Connection ports 2 Kensington lock 3 Rear IR remote control sensor 4 Ventilation holes Bottom View 1 2 3 1 Elevator foot 2 Ceiling mount (3-M4*6) 3 Tilt-adjustment foot „ This projector can be used with a ceiling mount for support. The ceiling mount is not included in the package. EN-11
Instruction Manual, PDG-DSU20B
Page 13
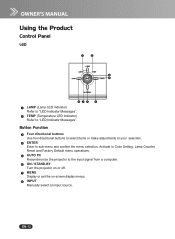
EN-12 Activate in Color Setting, Lamp Counter Reset and Factory Default menu operations. 5 AUTO PC Resynchronize the projector to "LED Indicator Messages". Using the Product Control Panel LED 1 2 3 4 876 5 1 LAMP (Lamp LED indicator) Refer to "LED Indicator Messages". 2... TEMP (Temperature LED indicator) Refer to the input signal from a computer. 6 ON / STAND-BY Turn the projector on or off. 7 MENU Display or exit the on-screen display menus. 8 INPUT Manually select an input source. Button Function 3 Four directional buttons Use four...
EN-12 Activate in Color Setting, Lamp Counter Reset and Factory Default menu operations. 5 AUTO PC Resynchronize the projector to "LED Indicator Messages". Using the Product Control Panel LED 1 2 3 4 876 5 1 LAMP (Lamp LED indicator) Refer to "LED Indicator Messages". 2... TEMP (Temperature LED indicator) Refer to the input signal from a computer. 6 ON / STAND-BY Turn the projector on or off. 7 MENU Display or exit the on-screen display menus. 8 INPUT Manually select an input source. Button Function 3 Four directional buttons Use four...

Instruction Manual, PDG-DSU20B
Page 15
... 1 2 18 3 NO SHOW Hide the screen. Use four directional buttons to select items or Turn the projector on the screen when 11 giving a presentation. Connect the projector and your computer with a USB cable. 10 ASPECT Press this button to activate keyboard function or mouse function ... - Enter to - Act as mouse right button when mouse 17 IMAGE Select PC, Movie, sRGB or User mode. make adjustments to your projector is selected. - selection. Act as computer Esc button when keyboard Zoom in Color Setting, Lamp 8 MENU Display or exit the on-screen display...
... 1 2 18 3 NO SHOW Hide the screen. Use four directional buttons to select items or Turn the projector on the screen when 11 giving a presentation. Connect the projector and your computer with a USB cable. 10 ASPECT Press this button to activate keyboard function or mouse function ... - Enter to - Act as mouse right button when mouse 17 IMAGE Select PC, Movie, sRGB or User mode. make adjustments to your projector is selected. - selection. Act as computer Esc button when keyboard Zoom in Color Setting, Lamp 8 MENU Display or exit the on-screen display...

Instruction Manual, PDG-DSU20B
Page 17
EN-16 Remote Control Operation Point the remote control at the infrared remote sensor and press a button. „ Operating the projector from the front „ Operating the projector from the rear 15 15 7m 15 15 7m „ The remote control may not operate when there is sunlight or other strong light such...
EN-16 Remote Control Operation Point the remote control at the infrared remote sensor and press a button. „ Operating the projector from the front „ Operating the projector from the rear 15 15 7m 15 15 7m „ The remote control may not operate when there is sunlight or other strong light such...

Instruction Manual, PDG-DSU20B
Page 18
... on actual shipment delivery. This does not mean that all of both a projector and external equipment should be connected simultaneously. „ The cables that come with the projector may differ from AC outlet. „ The figure above illustration. Installation Connecting the Projector 1 Audio Cable 4 VGA (D-SUB) to HDTV (RCA) Cable 2 VGA Cable (D-Sub...
... on actual shipment delivery. This does not mean that all of both a projector and external equipment should be connected simultaneously. „ The cables that come with the projector may differ from AC outlet. „ The figure above illustration. Installation Connecting the Projector 1 Audio Cable 4 VGA (D-SUB) to HDTV (RCA) Cable 2 VGA Cable (D-Sub...

Instruction Manual, PDG-DSU20B
Page 19
...; The cooling fans continue to turn on -off ? Warning: „ Remove the lens cap first before powering on , you are not allowed to turn the projector back on . „ Never look into the lens when the lamp is normal, and not a malfunction. Press I / button to warm up. 4. Turn...LED and TEMP LED will flash once then go out, and the fan will damage the lamp and reduce lamp life. The projector takes a minute or so to restart the projector. 3. Powering Off the Projector: 1. EN-18 Complete the AC power cord and peripheral signal cable(s) connections. 3. Powering On/Off the...
...; The cooling fans continue to turn on -off ? Warning: „ Remove the lens cap first before powering on , you are not allowed to turn the projector back on . „ Never look into the lens when the lamp is normal, and not a malfunction. Press I / button to warm up. 4. Turn...LED and TEMP LED will flash once then go out, and the fan will damage the lamp and reduce lamp life. The projector takes a minute or so to restart the projector. 3. Powering Off the Projector: 1. EN-18 Complete the AC power cord and peripheral signal cable(s) connections. 3. Powering On/Off the...
Instruction Manual, PDG-DSU20B
Page 20
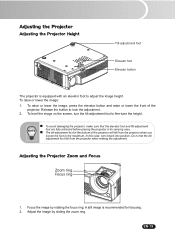
...image, press the elevator button and raise or lower the front of the projector will fall from the projector when you loosen the foot to fine-tune the height. „ To avoid damaging the projector, make sure that the elevator foot and tilt-adjustment foot are fully retracted... and Focus Zoom ring Focus ring 1. Release the button to adjust the image height. Adjusting the Projector Adjusting the Projector Height Tilt-adjustment foot Elevator foot Elevator button The projector is recommended for focusing. 2. EN-19 Adjust the image by rotating the focus ring. Focus the image by...
...image, press the elevator button and raise or lower the front of the projector will fall from the projector when you loosen the foot to fine-tune the height. „ To avoid damaging the projector, make sure that the elevator foot and tilt-adjustment foot are fully retracted... and Focus Zoom ring Focus ring 1. Release the button to adjust the image height. Adjusting the Projector Adjusting the Projector Height Tilt-adjustment foot Elevator foot Elevator button The projector is recommended for focusing. 2. EN-19 Adjust the image by rotating the focus ring. Focus the image by...
Instruction Manual, PDG-DSU20B
Page 21
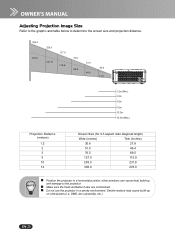
Adjusting Projection Image Size Refer to the graphic and table below to the projector. „ Make sure the heat ventilation holes are not blocked. „ Do not use the projector in a horizontal position; other positions can cause heat build-up on critical parts (i.e. Smoke residue may cause build-up and damage to determine... Size (for 4:3 aspect ratio diagonal length) Wide (inches) Tele (inches) 30.6 27.8 51.0 46.4 76.5 69.5 127.5 115.9 255.0 231.8 306.0 278.0 „ Position the projector in a smoky environment. DMD, lens assembly, etc.) EN-20
Adjusting Projection Image Size Refer to the graphic and table below to the projector. „ Make sure the heat ventilation holes are not blocked. „ Do not use the projector in a horizontal position; other positions can cause heat build-up on critical parts (i.e. Smoke residue may cause build-up and damage to determine... Size (for 4:3 aspect ratio diagonal length) Wide (inches) Tele (inches) 30.6 27.8 51.0 46.4 76.5 69.5 127.5 115.9 255.0 231.8 306.0 278.0 „ Position the projector in a smoky environment. DMD, lens assembly, etc.) EN-20

Instruction Manual, PDG-DSU20B
Page 22
..., RGB, YCbCr Yes, No Yes, No Yes, No Yes, No 5, 15, 30, 45, 60 Sec Language Factory Default Yes, No EN-21 Menu Operation The projector has multilingual on-screen display menus that allow you to make image adjustments and change a variety of settings.
..., RGB, YCbCr Yes, No Yes, No Yes, No Yes, No 5, 15, 30, 45, 60 Sec Language Factory Default Yes, No EN-21 Menu Operation The projector has multilingual on-screen display menus that allow you to make image adjustments and change a variety of settings.

Instruction Manual, PDG-DSU20B
Page 23
... "User", "Red", "Green" and "Blue" cab be scaled to enter sub-menu for various types of the screen. The OSD menu will close and the projector will look brighter. EN-22 Color Setting Adjust the color temperature. Contrast Set the difference between light and dark areas. After selecting the desired main...
... "User", "Red", "Green" and "Blue" cab be scaled to enter sub-menu for various types of the screen. The OSD menu will close and the projector will look brighter. EN-22 Color Setting Adjust the color temperature. Contrast Set the difference between light and dark areas. After selecting the desired main...

Instruction Manual, PDG-DSU20B
Page 24
...Position (Vertical Position) Adjust the image up or down , in hours). Computer Image (Computer Mode) Total dots Adjust the timing of the projector relative to display the logo or not. Mute Mute the sound. Logo Choose to the computer. Sharpness Sharpen or soften the image. Lamp Counter... Reset Reset the lamp counter to the computer. Fine sync Adjust the phase of the projector relative to 0 hours. H Position (Horizontal Position) Adjust the image left or right within the projection area. Tint Shift colors toward red ...
...Position (Vertical Position) Adjust the image up or down , in hours). Computer Image (Computer Mode) Total dots Adjust the timing of the projector relative to display the logo or not. Mute Mute the sound. Logo Choose to the computer. Sharpness Sharpen or soften the image. Lamp Counter... Reset Reset the lamp counter to the computer. Fine sync Adjust the phase of the projector relative to 0 hours. H Position (Horizontal Position) Adjust the image left or right within the projection area. Tint Shift colors toward red ...


