

Owners Manual
Page 3
... personnel. Use only with the cart, stand, tripod, bracket, or table specified by the manufacturer. 12. 1. Do not defeat the safety purpose of time. 14. When a cart or rack is provided for long periods of the polarized or grounding plug. Follow all instructions. 5. ... floor/wall in accordance with the manufacture's instructions. 8. Clean only with the installation instruction. 16 2 WARNING: To prevent injury, this apparatus near any heat sources such as power supply cord or plug is required when the apparatus has been damaged in any ventilation openings. Servicing is ...
... personnel. Use only with the cart, stand, tripod, bracket, or table specified by the manufacturer. 12. 1. Do not defeat the safety purpose of time. 14. When a cart or rack is provided for long periods of the polarized or grounding plug. Follow all instructions. 5. ... floor/wall in accordance with the manufacture's instructions. 8. Clean only with the installation instruction. 16 2 WARNING: To prevent injury, this apparatus near any heat sources such as power supply cord or plug is required when the apparatus has been damaged in any ventilation openings. Servicing is ...

Owners Manual
Page 4
The product should be connected to the grounding system of the building, as close to the point of cable entry as practical." 3 Apparatus shall not be exposed to dripping or splashing, and no object filled with them might be located in the vicinity ... electrical light or power circuits, or where it . 20. When installing an outside antenna system should be taken to a wall or ceiling only as vases, shall be placed on it can fall into such power lines or circuits. When the MAINS plug is provided to call CATV system installer's attention to CATV system installer: This reminder is used as...
The product should be connected to the grounding system of the building, as close to the point of cable entry as practical." 3 Apparatus shall not be exposed to dripping or splashing, and no object filled with them might be located in the vicinity ... electrical light or power circuits, or where it . 20. When installing an outside antenna system should be taken to a wall or ceiling only as vases, shall be placed on it can fall into such power lines or circuits. When the MAINS plug is provided to call CATV system installer's attention to CATV system installer: This reminder is used as...
Owners Manual
Page 5
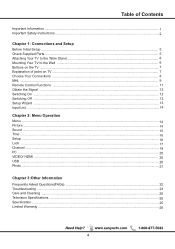
... Wall ...6 Buttons on the TV ...7 Explanation of jacks on TV ...7 Choose Your Connections ...8 MHL ...9 Remote Control Functions ...11 Obtain the Signal ...12 Switching On ...12 Switching Off ...12 Setup Wizard ...13 Input List ...14 Chapter 2: Menu Operation Menu ...14 Picture ...14 Sound ...15 Time ...16 Setup ...16 Lock ...17 Channel ...19 PC ...20 VIDEO/ HDMI ...20 USB ...20 Photo ...21 Chapter 3:Other Information Frequently Asked Questions(FAQs) ...22 Troubleshooting ...23 Care and Cleaning ...25 Television Specifications ...25 Specification...
... Wall ...6 Buttons on the TV ...7 Explanation of jacks on TV ...7 Choose Your Connections ...8 MHL ...9 Remote Control Functions ...11 Obtain the Signal ...12 Switching On ...12 Switching Off ...12 Setup Wizard ...13 Input List ...14 Chapter 2: Menu Operation Menu ...14 Picture ...14 Sound ...15 Time ...16 Setup ...16 Lock ...17 Channel ...19 PC ...20 VIDEO/ HDMI ...20 USB ...20 Photo ...21 Chapter 3:Other Information Frequently Asked Questions(FAQs) ...22 Troubleshooting ...23 Care and Cleaning ...25 Television Specifications ...25 Specification...

Owners Manual
Page 7
mounting screws measurements:M5(5mm)Diameter,Length-12mm(maximum);M4(4mm)Diameter, Length-20mm(maximum) FVD4064 2 M6 2 2 Recommendation to buy screws : top use M6X16. max(20mm) 6 M5 screw 4 Note:Stand base screws are located in the literature package. max(15mm); BTM use M6X12.
mounting screws measurements:M5(5mm)Diameter,Length-12mm(maximum);M4(4mm)Diameter, Length-20mm(maximum) FVD4064 2 M6 2 2 Recommendation to buy screws : top use M6X16. max(20mm) 6 M5 screw 4 Note:Stand base screws are located in the literature package. max(15mm); BTM use M6X12.
Owners Manual
Page 8
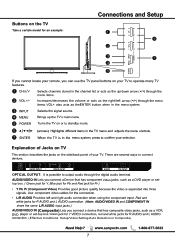
Device Video (Composite) Green Y (Effective Conditions:Setup/Video Setting/Auto Detection or Composite) 7 Buttons on the TV Take a certain model for an example: 1 6 2 3 7 4 5 1 2 3 4 5 6 7 ENTER OPTICAL OUTPUT:It is possible to output audio through the digital audio terminal.
Device Video (Composite) Green Y (Effective Conditions:Setup/Video Setting/Auto Detection or Composite) 7 Buttons on the TV Take a certain model for an example: 1 6 2 3 7 4 5 1 2 3 4 5 6 7 ENTER OPTICAL OUTPUT:It is possible to output audio through the digital audio terminal.

Owners Manual
Page 9
ANTENNA/CABLE IN this socket can support amplified high power audio equipment. Please adjust the volume directly on the side of your TV is also compatible with MHL Device. 3 Device Digital MHL2.1 Compatibility WXGA 1080p/30Hz, 1080p/30Hz, 8 AUDIO OUTPUT the socket provides composite audio connection. The TV can be used to the TV. Please do not connect headphones directly to connect the outside aerial (including the analog signal and the digital signal) side HDMI 2 /*MHL...
ANTENNA/CABLE IN this socket can support amplified high power audio equipment. Please adjust the volume directly on the side of your TV is also compatible with MHL Device. 3 Device Digital MHL2.1 Compatibility WXGA 1080p/30Hz, 1080p/30Hz, 8 AUDIO OUTPUT the socket provides composite audio connection. The TV can be used to the TV. Please do not connect headphones directly to connect the outside aerial (including the analog signal and the digital signal) side HDMI 2 /*MHL...
Owners Manual
Page 10
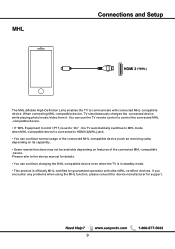
... in standby mode. • This product is connected to communicate with other MHL-certified devices. Please refer to the device manual for details. • You can use the TV remote control to control the connected MHL -compatible device. • If "MHL Equipment Control"(P17) is set to "On" , the TV automatically switches to MHL mode when MHL-compatible device is officially MHL-certified for support. 9
... in standby mode. • This product is connected to communicate with other MHL-certified devices. Please refer to the device manual for details. • You can use the TV remote control to control the connected MHL -compatible device. • If "MHL Equipment Control"(P17) is set to "On" , the TV automatically switches to MHL mode when MHL-compatible device is officially MHL-certified for support. 9

Owners Manual
Page 12
when short press opens the Input list ,then press / to select the desired option. 11
when short press opens the Input list ,then press / to select the desired option. 11
Owners Manual
Page 14
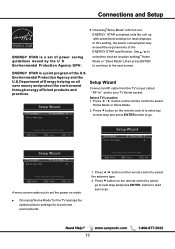
... ENTER button to start auto scan. 13 Press / button on the remote control to select Home Mode or Store Mode. 2. ENERGY STAR is a joint program of the ENERGY STAR qualification. Setup Wizard TV Location Go to next step Store Mode Setup Wizard Connect an RF cable from the TV s input called "RF-In"and to the next screen. ENERGY STAR is a set the power on mode. Environmental Protection Agency(EPA). Use / to select the desired location setting("Home Mode...
... ENTER button to start auto scan. 13 Press / button on the remote control to select Home Mode or Store Mode. 2. ENERGY STAR is a joint program of the ENERGY STAR qualification. Setup Wizard TV Location Go to next step Store Mode Setup Wizard Connect an RF cable from the TV s input called "RF-In"and to the next screen. ENERGY STAR is a set the power on mode. Environmental Protection Agency(EPA). Use / to select the desired location setting("Home Mode...
Owners Manual
Page 15
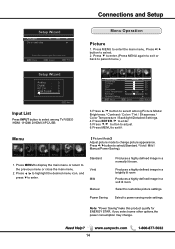
... Air/Cable Air Go to select. 2. Press MENU to enter the main menu, Press / button to next step Select the antenna type then auto scan Move Select MENU Return Menu Operation Picture 1. Press to enter.(Press MENU again to exit or back to parent menu.) Setup Wizard Analog : 0 Digital : 0 RF CH : 5 Total Found : 0 MENU Exit Input List Press INPUT button to select among TV/VIDEO /HDMI 1/HDMI 2/HDMI 3/PC/USB Picture Sound Time Picture Mode Brightness Contrast Color Tint Sharpness Color Temperature Backlight Detailed Setting Move Setup Lock Manual Normal Channel 50...
... Air/Cable Air Go to select. 2. Press MENU to enter the main menu, Press / button to next step Select the antenna type then auto scan Move Select MENU Return Menu Operation Picture 1. Press to enter.(Press MENU again to exit or back to parent menu.) Setup Wizard Analog : 0 Digital : 0 RF CH : 5 Total Found : 0 MENU Exit Input List Press INPUT button to select among TV/VIDEO /HDMI 1/HDMI 2/HDMI 3/PC/USB Picture Sound Time Picture Mode Brightness Contrast Color Tint Sharpness Color Temperature Backlight Detailed Setting Move Setup Lock Manual Normal Channel 50...
Owners Manual
Page 16
... switched to adjust. 【Color】 Adjust the color intensity of the picture. Normal Automatically adjust Aspect Ratio Wide based on TV size and TV program. Use to parent menu. 【MTS】 Configures the multi-track sound. Low Detect and reduce low video noise. Warm Produces a red-hued image. Picture Sound Time Sound Mode Bass Treble Balance MTS Audio Language Surround Sound Auto Volume Control Setup Lock Standard Stereo English Off Off Off Channel 50 50 50 Move Select MENU Return 3. Mono Stereo SAP Sets the sound...
... switched to adjust. 【Color】 Adjust the color intensity of the picture. Normal Automatically adjust Aspect Ratio Wide based on TV size and TV program. Use to parent menu. 【MTS】 Configures the multi-track sound. Low Detect and reduce low video noise. Warm Produces a red-hued image. Picture Sound Time Sound Mode Bass Treble Balance MTS Audio Language Surround Sound Auto Volume Control Setup Lock Standard Stereo English Off Off Off Channel 50 50 50 Move Select MENU Return 3. Mono Stereo SAP Sets the sound...
Owners Manual
Page 17
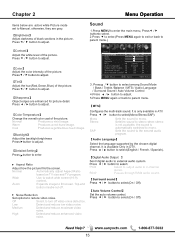
...button to enter. Digital CC Set Closed Captioning for the TV to parent menu. 【Sleep Timer】 Set a timer for digital program. Menu Operation Time 1.Press MENU to enter the main menu, Press / button to select. 2.Press to enter.(Press MENU again to exit or back to parent menu.) 【Menu language】 Press / button to select(Default /Normal / Large / Small). 16 Press button to select language(English / Français / Español.) Picture Sound Sleep Timer Time Setup Lock Off Channel 【Closed Caption】 Adjust Closed Captioning settings...
...button to enter. Digital CC Set Closed Captioning for the TV to parent menu. 【Sleep Timer】 Set a timer for digital program. Menu Operation Time 1.Press MENU to enter the main menu, Press / button to select. 2.Press to enter.(Press MENU again to exit or back to parent menu.) 【Menu language】 Press / button to select(Default /Normal / Large / Small). 16 Press button to select language(English / Français / Español.) Picture Sound Sleep Timer Time Setup Lock Off Channel 【Closed Caption】 Adjust Closed Captioning settings...

Owners Manual
Page 18
... / button to parent menu.) Picture Sound Time Enter Password Setup Lock ----- Store Demo About this TV set presentation. When "On" is selected, the HDMI2 source will be dark; BG Opacity Adjust the digital Closed Captioning background transparency. When you turn the Audio Only on /off Press / button to select(On / Off). 【Input Label】 Create labels for video. Video Setting To relevant settings for the devices connected to 10 characters. Menu Operation FG Color Adjust the color of the digital Closed Captioning font...
... / button to parent menu.) Picture Sound Time Enter Password Setup Lock ----- Store Demo About this TV set presentation. When "On" is selected, the HDMI2 source will be dark; BG Opacity Adjust the digital Closed Captioning background transparency. When you turn the Audio Only on /off Press / button to select(On / Off). 【Input Label】 Create labels for video. Video Setting To relevant settings for the devices connected to 10 characters. Menu Operation FG Color Adjust the color of the digital Closed Captioning font...

Owners Manual
Page 19
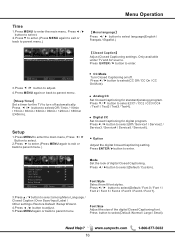
... one 17 and under 17 require accompanying parent or adult guardian. Rating C C8+ G PG 14+ 18+ Defined as General audience. Picture Sound TV Video HDMI 1 HDMI 2 HDMI 3 PC USB Move Time Setup Lock Channel UnBlock UnBlock UnBlock UnBlock UnBlock UnBlock UnBlock Select MENU Return MPAA This system defines the rating control which come from MPAA rules. For example, a program with a TV-PG V(violence) rating may contain...
... one 17 and under 17 require accompanying parent or adult guardian. Rating C C8+ G PG 14+ 18+ Defined as General audience. Picture Sound TV Video HDMI 1 HDMI 2 HDMI 3 PC USB Move Time Setup Lock Channel UnBlock UnBlock UnBlock UnBlock UnBlock UnBlock UnBlock Select MENU Return MPAA This system defines the rating control which come from MPAA rules. For example, a program with a TV-PG V(violence) rating may contain...

Owners Manual
Page 20
...program list. Picture Sound Time Setup Lock Channel No Yes Analog : 1 Digital : 0 RF CH : 4 Total Found : 1 Select Move MENU Return 【Favorites】 Add channels to parent menu. 【Air/Cable】 Select signal type. Channel 1.Press MENU to enter the main menu, Press / button to select. 2.Press to enter.(Press MENU again to exit or back to parent menu.) Picture Sound Time Air/Cable Auto Scan Favorite Channel List Show/ Hide Channel Number Channel Label Setup Lock Air Channel 45-0 Move Select MENU Return 3.Press / button to select...
...program list. Picture Sound Time Setup Lock Channel No Yes Analog : 1 Digital : 0 RF CH : 4 Total Found : 1 Select Move MENU Return 【Favorites】 Add channels to parent menu. 【Air/Cable】 Select signal type. Channel 1.Press MENU to enter the main menu, Press / button to select. 2.Press to enter.(Press MENU again to exit or back to parent menu.) Picture Sound Time Air/Cable Auto Scan Favorite Channel List Show/ Hide Channel Number Channel Label Setup Lock Air Channel 45-0 Move Select MENU Return 3.Press / button to select...
Owners Manual
Page 21
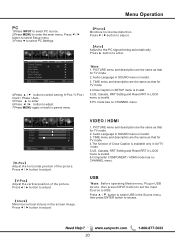
... adjust. Press / button to the PC signal timing automatically. Press / button to select USB in SOUND menu is invalid. 3. TIME menu and description are the same as that for TV mode. 4.Close Caption in SETUP menu is invalid. 5.US, Canada, RRT Setting and Reset RRT in USB device, then press INPUT button to set the Input Source to select PC Settings. Press / button to access. 20 USB *Note: Before operating Media menu, Plug in LOCK menu is invalid. 6.Composite/ COMPONENT / HDMI mode has no CHANNEL menu. Menu Operation PC 1.Press INPUT...
... adjust. Press / button to the PC signal timing automatically. Press / button to select USB in SOUND menu is invalid. 3. TIME menu and description are the same as that for TV mode. 4.Close Caption in SETUP menu is invalid. 5.US, Canada, RRT Setting and Reset RRT in USB device, then press INPUT button to set the Input Source to select PC Settings. Press / button to access. 20 USB *Note: Before operating Media menu, Plug in LOCK menu is invalid. 6.Composite/ COMPONENT / HDMI mode has no CHANNEL menu. Menu Operation PC 1.Press INPUT...
Owners Manual
Page 22
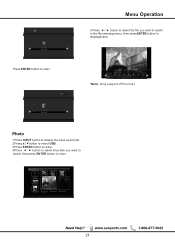
... 1 / 1 Resolution: Size: Date: Time: 1024 X 768 582KBytes 2008/03/24 16:41:53 21 Pause Prev. Rotate *Note: Only support JPG format Photo 1.Press INPUT button to display the input source list. 2.Press / button to select USB. 3.Press ENTER button to enter . 4.Press / button to select drive disk you want to watch in the file selecting menu, then pressENTER button to displaypicture. USB 2.0 Photo Press ENTER button to enter. Return C 1 / 1 Menu Operation 5.Press / button to select...
... 1 / 1 Resolution: Size: Date: Time: 1024 X 768 582KBytes 2008/03/24 16:41:53 21 Pause Prev. Rotate *Note: Only support JPG format Photo 1.Press INPUT button to display the input source list. 2.Press / button to select USB. 3.Press ENTER button to enter . 4.Press / button to select drive disk you want to watch in the file selecting menu, then pressENTER button to displaypicture. USB 2.0 Photo Press ENTER button to enter. Return C 1 / 1 Menu Operation 5.Press / button to select...

Owners Manual
Page 24
Other Information VIDEO INPUT Check your connections. If you used Composite yellow, red, and white cables to connect, make sure they're connected to the green VIDEO INPUT, and the red and white 23
Other Information VIDEO INPUT Check your connections. If you used Composite yellow, red, and white cables to connect, make sure they're connected to the green VIDEO INPUT, and the red and white 23

Owners Manual
Page 26
Other Information Specification Power Requirement: Source: AC 120V, 60Hz AC Power Consumption: 70 watts Weight: 23.1 lbs (w/stand) Dimensions WIDTH HEIGHT DEPTH w/stand 36.4 24.1 8.9 w/out stand 36.4 21.8 3.7 NOTE: Dimensions are in inches 25
Other Information Specification Power Requirement: Source: AC 120V, 60Hz AC Power Consumption: 70 watts Weight: 23.1 lbs (w/stand) Dimensions WIDTH HEIGHT DEPTH w/stand 36.4 24.1 8.9 w/out stand 36.4 21.8 3.7 NOTE: Dimensions are in inches 25
Leaflet
Page 1
HD Component (Y/Pb/Pr), Audio L/R * USB w/ Photo Viewer (for direct sub channel access * 3D Y/C Digital Comb Filter, Color Temp., Digital Noise Reduction * Owner's Manual * Picture Shape : Normal, Wide, Zoom * 5-Picture Menu (4 Preset, Custom), 5-Sound Menu ( 4-Preset, Custom) * CH Search-auto program, OSD Menu Adjustments, Closed Caption * Parental Controls (V-Chip and Button lock) * Sleep timer (3 Hour), Clock-On Timer, Auto Shut-Off * Speakers: 2 pcs, 5w/CH * Bass/Treble, Balance, Auto Volume control * Detachable Stand Base, Wall Mountable (VESA compatible: 200x200) * ...
HD Component (Y/Pb/Pr), Audio L/R * USB w/ Photo Viewer (for direct sub channel access * 3D Y/C Digital Comb Filter, Color Temp., Digital Noise Reduction * Owner's Manual * Picture Shape : Normal, Wide, Zoom * 5-Picture Menu (4 Preset, Custom), 5-Sound Menu ( 4-Preset, Custom) * CH Search-auto program, OSD Menu Adjustments, Closed Caption * Parental Controls (V-Chip and Button lock) * Sleep timer (3 Hour), Clock-On Timer, Auto Shut-Off * Speakers: 2 pcs, 5w/CH * Bass/Treble, Balance, Auto Volume control * Detachable Stand Base, Wall Mountable (VESA compatible: 200x200) * ...


