
Owner's Manual for POA-LN01
Page 1
... control and set up a monitor via a network. OWNERʼS MANUAL This manual explains the installation of the PJNet Organizer This PJ-Net Organizer is only used for Monitors that have a terminal for the PJ-Net Organizer. POA-LN01 Preparation Installation Basic Setting and Operation Controlling the Monitor Serial Port Use Appendix INSTALLATION and OPERATION of the PJ-Net Organizer and its operation. This product is an optional product to the monitor and connect a network cable...
... control and set up a monitor via a network. OWNERʼS MANUAL This manual explains the installation of the PJNet Organizer This PJ-Net Organizer is only used for Monitors that have a terminal for the PJ-Net Organizer. POA-LN01 Preparation Installation Basic Setting and Operation Controlling the Monitor Serial Port Use Appendix INSTALLATION and OPERATION of the PJ-Net Organizer and its operation. This product is an optional product to the monitor and connect a network cable...
Owner's Manual for POA-LN01
Page 2
... of the FCC Rules. Connect the equipment into an outlet on , the user is required to comply with class B limits in the manual. Consult the dealer or an experienced radio/TV technician for a Class B digital device, pursuant to part 15 of FCC Rules. Reorient or relocate the receiving antenna. - This equipment generates, uses SANYO POA-LN01 Tested To Comply...
... of the FCC Rules. Connect the equipment into an outlet on , the user is required to comply with class B limits in the manual. Consult the dealer or an experienced radio/TV technician for a Class B digital device, pursuant to part 15 of FCC Rules. Reorient or relocate the receiving antenna. - This equipment generates, uses SANYO POA-LN01 Tested To Comply...
Owner's Manual for POA-LN01
Page 4
... Control the monitor 34 1 Power 34 2 Input 35 3 Wide Mode 35 4 Other 1 36 5 Other 2 36 Make a memo 37 Use other command 37 4 Serial Port Use 39 Example of Connection 40 Specification and Setting of RS232C Terminal . . .40 Command for controlling the monitor 41 How to set network congiguration on network board to default 42 5 Appendix 43 Examples of Connection 44 Direct connection 44 The gateway (Router) installed in the network . . .45 Web browser setting...
... Control the monitor 34 1 Power 34 2 Input 35 3 Wide Mode 35 4 Other 1 36 5 Other 2 36 Make a memo 37 Use other command 37 4 Serial Port Use 39 Example of Connection 40 Specification and Setting of RS232C Terminal . . .40 Command for controlling the monitor 41 How to set network congiguration on network board to default 42 5 Appendix 43 Examples of Connection 44 Direct connection 44 The gateway (Router) installed in the network . . .45 Web browser setting...
Owner's Manual for POA-LN01
Page 6
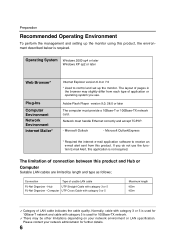
... Organizer - Microsoft OutlookExpress * Required the internet e-mail application software to control and set up the monitor using this application is not required. Connection Type of connection between this product. Hub UTP Straight Cable with category 3 or 5 Maximum length 100m 100m ✐ Category of application or operating system you do not use . Please contact your network environment or LAN specification. Operating System Windows 2000 sp4 or...
... Organizer - Microsoft OutlookExpress * Required the internet e-mail application software to control and set up the monitor using this application is not required. Connection Type of connection between this product. Hub UTP Straight Cable with category 3 or 5 Maximum length 100m 100m ✐ Category of application or operating system you do not use . Please contact your network environment or LAN specification. Operating System Windows 2000 sp4 or...
Owner's Manual for POA-LN01
Page 8
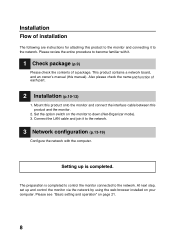
... monitor connected to the network. Mount this product onto the monitor and connect the interface cable between this manual). Setting up and control the monitor via the network by using the web browser installed on your computer. Connect the LAN cable and join it to become familiar with the computer. Installation Flow of installation The following are instructions for attaching this product to the monitor and connecting it to the network. Please review...
... monitor connected to the network. Mount this product onto the monitor and connect the interface cable between this manual). Setting up and control the monitor via the network by using the web browser installed on your computer. Connect the LAN cable and join it to become familiar with the computer. Installation Flow of installation The following are instructions for attaching this product to the monitor and connecting it to the network. Please review...
Owner's Manual for POA-LN01
Page 9
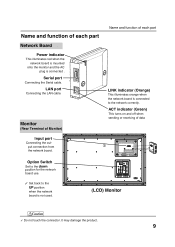
... (Green) This turns on and off when sending or receiving of each part LINK indicator (Orange) This illuminates orange when the network board is connected to the UP position when the network board is not used. (LCD) Monitor ! LAN port Connecting the LAN cable. Name and function of data Option Switch Set to the down position for the network board use. ✐ Set back to the network correctly. Serial port Connecting the Serial cable.
... (Green) This turns on and off when sending or receiving of each part LINK indicator (Orange) This illuminates orange when the network board is connected to the UP position when the network board is not used. (LCD) Monitor ! LAN port Connecting the LAN cable. Name and function of data Option Switch Set to the down position for the network board use. ✐ Set back to the network correctly. Serial port Connecting the Serial cable.
Owner's Manual for POA-LN01
Page 15
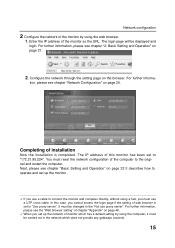
... cannot access the login page if the setting of web browser is completed. Completing of installation Now the installation is set up the monitor . ✐ If you must use a UTP cross cable. The IP address of this case, you set to "Use proxy server". It must be carried out in the network which has a default setting by using the computer, it must be displayed and...
... cannot access the login page if the setting of web browser is completed. Completing of installation Now the installation is set up the monitor . ✐ If you must use a UTP cross cable. The IP address of this case, you set to "Use proxy server". It must be carried out in the network which has a default setting by using the computer, it must be displayed and...
Owner's Manual for POA-LN01
Page 24
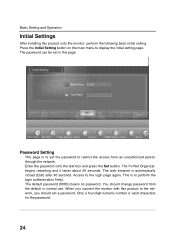
... change password from an unauthorized person through the network. Password Setting This page is to the login page again. Access to perform the login authentication firmly. You should set a password. Only a four-digit numeric number is automatically closed (Quit) after 40 seconds. This is to set in normal use. The default password [0000] means no password. Basic Setting and Operation Initial Settings After installing this product to the network, you connect the monitor...
... change password from an unauthorized person through the network. Password Setting This page is to the login page again. Access to perform the login authentication firmly. You should set a password. Only a four-digit numeric number is automatically closed (Quit) after 40 seconds. This is to set in normal use. The default password [0000] means no password. Basic Setting and Operation Initial Settings After installing this product to the network, you connect the monitor...
Owner's Manual for POA-LN01
Page 26
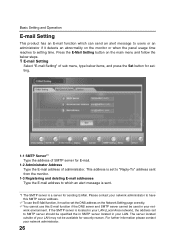
... monitor or when the panel usage time reaches to have this SMTP server address. ✐ To use this E-mail function if the DNS server and SMTP server cannot be used in your network administrator. 26 Press the E-Mail Setting button on the main menu and follow the below steps. 1 E-mail Setting Select "E-mail Setting" of sub menu, type below items, and press the Set button...
... monitor or when the panel usage time reaches to have this SMTP server address. ✐ To use this E-mail function if the DNS server and SMTP server cannot be used in your network administrator. 26 Press the E-Mail Setting button on the main menu and follow the below steps. 1 E-mail Setting Select "E-mail Setting" of sub menu, type below items, and press the Set button...
Owner's Manual for POA-LN01
Page 34
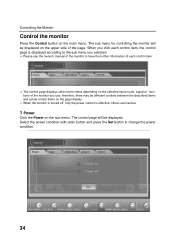
... displays valid control items depending on the selected input mode, signal or functions of the monitor you use, therefore, there may be different controls between the described items and actual control items on the upper side of the monitor to change the power condition. 34 The sub menu for controlling the monitor will be displayed on the page display. ✐ When the monitor is turned off, only the power control is displayed...
... displays valid control items depending on the selected input mode, signal or functions of the monitor you use, therefore, there may be different controls between the described items and actual control items on the upper side of the monitor to change the power condition. 34 The sub menu for controlling the monitor will be displayed on the page display. ✐ When the monitor is turned off, only the power control is displayed...
Owner's Manual for POA-LN01
Page 48
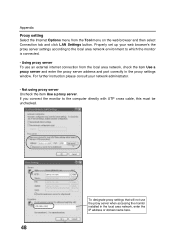
... server when accessing the monitor installed in the proxy settings window. To designate proxy settings that will not use an external internet connection from the Tool menu on the web browser and then select Connection tab and click LAN Settings button. If you connect the monitor to which the monitor is connected. - Not using proxy server Uncheck the item Use a proxy server. Properly set up your network administrator. - For further instruction please...
... server when accessing the monitor installed in the proxy settings window. To designate proxy settings that will not use an external internet connection from the Tool menu on the web browser and then select Connection tab and click LAN Settings button. If you connect the monitor to which the monitor is connected. - Not using proxy server Uncheck the item Use a proxy server. Properly set up your network administrator. - For further instruction please...
Owner's Manual for POA-LN01
Page 49
...-45) Network protocol TCP/IP specification TCP/IP Serial interface RS232C Baud rate 19.2Kbps (Fixed) Terminal D sub 9-pin Power source Supplied from the LCD monitor Power consumption 3.0 watts Dimensions (W x H x D)........4.2" x 1.4" x 5.3" (107 x 34.9 x 135mm) Weight 0.92 lbs (420 g) Operating temperature ..........41˚F ~ 95 ˚F (5˚C ~ 35 ˚C) Storage temperature 14˚F ~ 140˚F (-10˚C ~ 60˚C) Accessories Owner's Manual * The specifications are subject to change without notice...
...-45) Network protocol TCP/IP specification TCP/IP Serial interface RS232C Baud rate 19.2Kbps (Fixed) Terminal D sub 9-pin Power source Supplied from the LCD monitor Power consumption 3.0 watts Dimensions (W x H x D)........4.2" x 1.4" x 5.3" (107 x 34.9 x 135mm) Weight 0.92 lbs (420 g) Operating temperature ..........41˚F ~ 95 ˚F (5˚C ~ 35 ˚C) Storage temperature 14˚F ~ 140˚F (-10˚C ~ 60˚C) Accessories Owner's Manual * The specifications are subject to change without notice...

Print Specs
Page 1
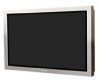
... monitor and control the display's properties. Using in direct sunlight may cause a black shadow to monitor ceiling mounting. There are also jacks for the panel surface in the public display circumstance. Specifications Type Screen Size Aspect Ratio Resolution Brightness Contrast Ratio Viewing Angle Panel tilt angle Response Time Computer Compatibility Audio Amp Speaker Input Terminals AV1 AV2 AV3 Computer 1 HDMI RS-232 Output Terminals AV2 AV3 Audio Monitor Output RS-232 Power Supply Power Consumption Operation Temperature Operation Altitude Dimensions (WxHxD) Net Weight...
... monitor and control the display's properties. Using in direct sunlight may cause a black shadow to monitor ceiling mounting. There are also jacks for the panel surface in the public display circumstance. Specifications Type Screen Size Aspect Ratio Resolution Brightness Contrast Ratio Viewing Angle Panel tilt angle Response Time Computer Compatibility Audio Amp Speaker Input Terminals AV1 AV2 AV3 Computer 1 HDMI RS-232 Output Terminals AV2 AV3 Audio Monitor Output RS-232 Power Supply Power Consumption Operation Temperature Operation Altitude Dimensions (WxHxD) Net Weight...
Owner's manual
Page 2
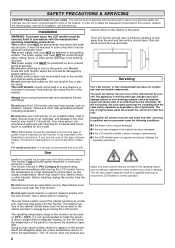
... on the lifetime of the monitor. A special wall mounting kit is working with the same safety standards as radiators, heaters, stoves and other controls may result in accordance with the manufacturers mounting installation instructions. He will reduce the life of the panel. Do not apply liquid cleaners or aerosol cleaners directly onto the LCD monitor. The power supply cord must NOT be attached to...
... on the lifetime of the monitor. A special wall mounting kit is working with the same safety standards as radiators, heaters, stoves and other controls may result in accordance with the manufacturers mounting installation instructions. He will reduce the life of the panel. Do not apply liquid cleaners or aerosol cleaners directly onto the LCD monitor. The power supply cord must NOT be attached to...
Owner's manual
Page 3
... rights in the Software to use the Product. General 1. The End-User and Sanyo agree that may not cause harmful interference, and (2) this LCD monitor meets the requirement for purpose and non-infringement (save to comply with the Product. 2. Operation is ' and SANYO and its licensors. AC Power Cord Requirement The AC Power Cord supplied with any computer hardware other programs developed by (or...
... rights in the Software to use the Product. General 1. The End-User and Sanyo agree that may not cause harmful interference, and (2) this LCD monitor meets the requirement for purpose and non-infringement (save to comply with the Product. 2. Operation is ' and SANYO and its licensors. AC Power Cord Requirement The AC Power Cord supplied with any computer hardware other programs developed by (or...
Owner's manual
Page 4
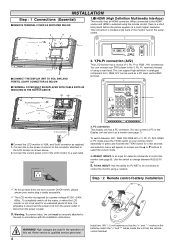
Serial port PJ-net Service Serial Port-IN Peritel (Scart) Serial Port-OUT 3. RS232C IN/OUT: Is an input for external commands to control the monitor (see page 7). Step : 2 Remote control battery installation ✐ As this set. WARNING! PJ Net box Security fixing point Wall mount fixing positions Switch HDMI Services AV3 IN/Out BNC AV2 IN/ Out BNC AV2 audio IN Audio monitor Out RS232C Serial ports IN/ Out In-line connector ■ Connect the LCD monitor to disconnect the power cord from...
Serial port PJ-net Service Serial Port-IN Peritel (Scart) Serial Port-OUT 3. RS232C IN/OUT: Is an input for external commands to control the monitor (see page 7). Step : 2 Remote control battery installation ✐ As this set. WARNING! PJ Net box Security fixing point Wall mount fixing positions Switch HDMI Services AV3 IN/Out BNC AV2 IN/ Out BNC AV2 audio IN Audio monitor Out RS232C Serial ports IN/ Out In-line connector ■ Connect the LCD monitor to disconnect the power cord from...
Owner's manual
Page 5
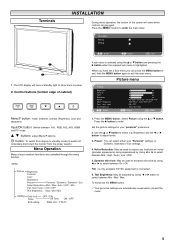
... power supply) Menu Operation Many of cabinet) Menu/F button: rotate between contrast, Brightness, color and sharpness Input/OK button: switch between Mid / High / Auto / Low / OFF. 5. Control buttons (bottom edge of your "personal" preference. 2. To exit press the MENU button. ✐ Your personal settings are controlled through the menu function. Press the u button to select e.g. Noise Reduction: May be used. Picture menu Picture Brightness Contrast Color Sharpness Preset Noise Reduction Dyn. e d buttons: adjust Menu/F options 4 button: To switch from display...
... power supply) Menu Operation Many of cabinet) Menu/F button: rotate between contrast, Brightness, color and sharpness Input/OK button: switch between Mid / High / Auto / Low / OFF. 5. Control buttons (bottom edge of your "personal" preference. 2. To exit press the MENU button. ✐ Your personal settings are controlled through the menu function. Press the u button to select e.g. Noise Reduction: May be used. Picture menu Picture Brightness Contrast Color Sharpness Preset Noise Reduction Dyn. e d buttons: adjust Menu/F options 4 button: To switch from display...
Owner's manual
Page 7
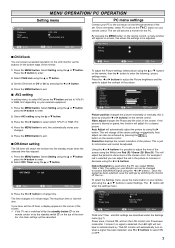
... MENU button. Select AV2 setting using the 8 button. The time changes in the corner of the monitor ,the timer settings will turn on the remote control or by using the e or d buttons to select ON or OFF. 7 For example if red is 120 minutes. Auto Adjust will change time. MENU OPERATION/ PC OPERATION Setting Child lock Timer AV2 setting : Select Setting menu OFF / ON Y,Pb,Pr/RGB, H/V : Adjust MENU : Exit PC menu settings Connect your external equipment. 1. Press the MENU button. Picture Brightness Contrast Position Video Adjust Auto Adjust Resolution White Tone R White...
... MENU button. Select AV2 setting using the 8 button. The time changes in the corner of the monitor ,the timer settings will turn on the remote control or by using the e or d buttons to select ON or OFF. 7 For example if red is 120 minutes. Auto Adjust will change time. MENU OPERATION/ PC OPERATION Setting Child lock Timer AV2 setting : Select Setting menu OFF / ON Y,Pb,Pr/RGB, H/V : Adjust MENU : Exit PC menu settings Connect your external equipment. 1. Press the MENU button. Picture Brightness Contrast Position Video Adjust Auto Adjust Resolution White Tone R White...
Owner's manual
Page 8
...: initial setting value is 'FFF', all monitor sets will be changed by one command, one line that is provided with carriage return.(0 x0D) The Monitor starts to the monitor sets. 8 The Address format command is used for switching the LCD monitor off but is now operating. ■ Use of Audio Output Jacks The audio monitor out sockets on the remote control and hold for 5 seconds. Connection The Designated RS-232C serial cable that...
...: initial setting value is 'FFF', all monitor sets will be changed by one command, one line that is provided with carriage return.(0 x0D) The Monitor starts to the monitor sets. 8 The Address format command is used for switching the LCD monitor off but is now operating. ■ Use of Audio Output Jacks The audio monitor out sockets on the remote control and hold for 5 seconds. Connection The Designated RS-232C serial cable that...
Owner's manual
Page 10
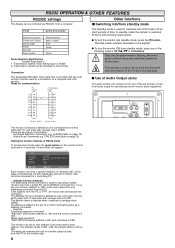
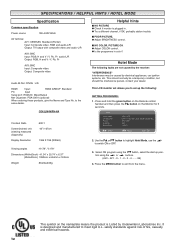
... : Adjust MENU : Exit 2. This symbol on the Monitor for 5 seconds. Hotel Mode The following : SETTING PROCEDURE: 1 . It is plugged in. ● Try a different channel, if OK, probably station trouble. ■ POOR PICTURE, ● Adjust BRIGHTNESS control. ■ NO COLOR, PICTURE OK ● Adjust COLOR control. ● Is the programme in color? SPECIFICATIONS / HELPFUL HINTS / HOTEL MODE Specification Common specification Power source 100~240V 60Hz AV terminal AV1: CENELEC Standard (Peritel) Input: Composite video, RGB and audio-L/R Output: TV-output...
... : Adjust MENU : Exit 2. This symbol on the Monitor for 5 seconds. Hotel Mode The following : SETTING PROCEDURE: 1 . It is plugged in. ● Try a different channel, if OK, probably station trouble. ■ POOR PICTURE, ● Adjust BRIGHTNESS control. ■ NO COLOR, PICTURE OK ● Adjust COLOR control. ● Is the programme in color? SPECIFICATIONS / HELPFUL HINTS / HOTEL MODE Specification Common specification Power source 100~240V 60Hz AV terminal AV1: CENELEC Standard (Peritel) Input: Composite video, RGB and audio-L/R Output: TV-output...


