Owner's Manual for POA-LN01
Page 4
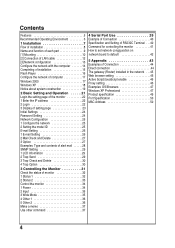
... Name and function of each part 9 [1] Mounting 10 [2] Connection of LAN cable 12 [3] ... page of the monitor 22 1 Enter the IP address 22 2 Login 22 3 Display of setting page 23 Initial Settings 24 Password Setting 24 Network Configuration 25 1 Configure...Examples: Type and contents of alert mail . . . . . .28 SNMP Setting 29 1 LCD Information 29 2 Trap Send 29 3 Trap Check and Delete 30 4 Trap Option 30 3 ...the monitor 41 How to set network congiguration on network board to default 42 5 Appendix 43 Examples of Connection 44 Direct connection 44 The gateway ...
... Name and function of each part 9 [1] Mounting 10 [2] Connection of LAN cable 12 [3] ... page of the monitor 22 1 Enter the IP address 22 2 Login 22 3 Display of setting page 23 Initial Settings 24 Password Setting 24 Network Configuration 25 1 Configure...Examples: Type and contents of alert mail . . . . . .28 SNMP Setting 29 1 LCD Information 29 2 Trap Send 29 3 Trap Check and Delete 30 4 Trap Option 30 3 ...the monitor 41 How to set network congiguration on network board to default 42 5 Appendix 43 Examples of Connection 44 Direct connection 44 The gateway ...
Owner's Manual for POA-LN01
Page 8
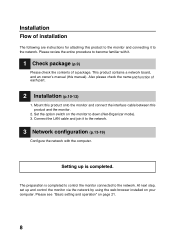
... completed. Connect the LAN cable and join it to the network. 3 Network configuration (p.13-19) Configure the network with it to down (Net-Organizer mode). 3. Mount this product onto the monitor and connect the interface cable between this manual). Installation Flow of each part. 2 Installation (p.10-12) 1.
... completed. Connect the LAN cable and join it to the network. 3 Network configuration (p.13-19) Configure the network with it to down (Net-Organizer mode). 3. Mount this product onto the monitor and connect the interface cable between this manual). Installation Flow of each part. 2 Installation (p.10-12) 1.
Owner's Manual for POA-LN01
Page 9
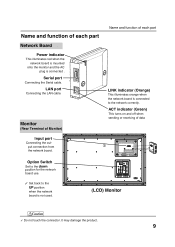
... of each part Network Board Power indicator This illuminates red when the network board is mounted onto the monitor and the AC plug is connected to the UP position when the network board is not used. (LCD) Monitor ! Name and function of each part LINK indicator (Orange) This illuminates orange when the...
... of each part Network Board Power indicator This illuminates red when the network board is mounted onto the monitor and the AC plug is connected to the UP position when the network board is not used. (LCD) Monitor ! Name and function of each part LINK indicator (Orange) This illuminates orange when the...
Owner's Manual for POA-LN01
Page 10
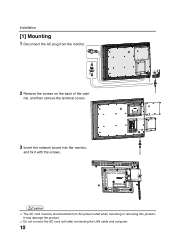
Caution ✐ The AC cord must be disconnected from the monitor. 2 Remove the screws on the back of the cabi- Installation [1] Mounting 1 Disconnect the AC plug from AC power outlet when mounting or removing this product. net, and then remove the terminal covers. 3 Insert the network board into the monitor, and fix it with the screws. ! It may damage the product. ✐ Do not connect the AC cord until after connecting the LAN cable and computer. 10
Caution ✐ The AC cord must be disconnected from the monitor. 2 Remove the screws on the back of the cabi- Installation [1] Mounting 1 Disconnect the AC plug from AC power outlet when mounting or removing this product. net, and then remove the terminal covers. 3 Insert the network board into the monitor, and fix it with the screws. ! It may damage the product. ✐ Do not connect the AC cord until after connecting the LAN cable and computer. 10
Owner's Manual for POA-LN01
Page 11
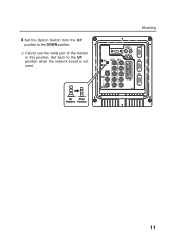
IN R R SERIAL PORT-IN SERVICE G YG Y AV3 VIDEO-IN AV3 VIDEO-OUT B PB B PB AV1 H/V H/V V V N4JF SERIAL PORT-OUT 11 Set back to the DOWN position. ✐ Cannot use the serial port of the monitor in this position. 4 Set the Option Switch from the UP position to the UP position when the network board is not used. Up Down Position Position Mounting L H D M I L SERIAL PORT NET Organizer AV2-OUT AV2-IN R PR R PR PC -
IN R R SERIAL PORT-IN SERVICE G YG Y AV3 VIDEO-IN AV3 VIDEO-OUT B PB B PB AV1 H/V H/V V V N4JF SERIAL PORT-OUT 11 Set back to the DOWN position. ✐ Cannot use the serial port of the monitor in this position. 4 Set the Option Switch from the UP position to the UP position when the network board is not used. Up Down Position Position Mounting L H D M I L SERIAL PORT NET Organizer AV2-OUT AV2-IN R PR R PR PC -
Print Specs
Page 1
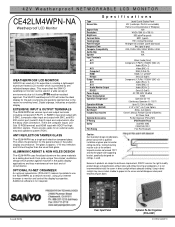
... and will make the ideal display for the pub courtyards and gardens (perfect due to monitor and control the display's properties. It is used. 42V Weatherproof NETWORKABLE LCD MONITOR CE42LM4WPN-NA Weatherproof LCD Monitor WEATHERPROOF LCD MONITOR SANYO has used all of environments due...black shadow to install the screen in the public display circumstance. The SANYO weatherproof LCD will disappear when panel temperature goes down. There are subject to continuous improvement, SANYO reserves the right to monitor ceiling mounting. ANTI REFLECTION TAMPER GLASS The 42LM4WPN has a ...
... and will make the ideal display for the pub courtyards and gardens (perfect due to monitor and control the display's properties. It is used. 42V Weatherproof NETWORKABLE LCD MONITOR CE42LM4WPN-NA Weatherproof LCD Monitor WEATHERPROOF LCD MONITOR SANYO has used all of environments due...black shadow to install the screen in the public display circumstance. The SANYO weatherproof LCD will disappear when panel temperature goes down. There are subject to continuous improvement, SANYO reserves the right to monitor ceiling mounting. ANTI REFLECTION TAMPER GLASS The 42LM4WPN has a ...
Owner's manual
Page 2
...operation. For added protection it can be operated only from the wall outlet and refer servicing to assure your LCD monitor on the lifetime of the panel. Do not mount near any way. This unit has been engineered and manufactured to qualified service personnel under the following conditions: &#...monitor or as indicated in liquid. Do not apply liquid cleaners or aerosol cleaners directly onto the LCD monitor. Heat build up will be mounted in performance. ■ If the LCD monitor does not operate normally by people walking on the screen, which may result in this ...
...operation. For added protection it can be operated only from the wall outlet and refer servicing to assure your LCD monitor on the lifetime of the panel. Do not mount near any way. This unit has been engineered and manufactured to qualified service personnel under the following conditions: &#...monitor or as indicated in liquid. Do not apply liquid cleaners or aerosol cleaners directly onto the LCD monitor. Heat build up will be mounted in performance. ■ If the LCD monitor does not operate normally by people walking on the screen, which may result in this ...
Owner's manual
Page 4
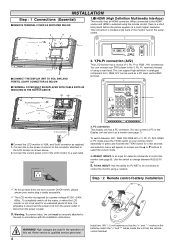
... used for a power voltage AC100 ~240V, 60Hz. PJ Net box Security fixing point Wall mount fixing positions Switch HDMI Services AV3 IN/Out BNC AV2 IN/ Out BNC AV2 audio IN ...at the back of time, it as required. 1. To completely switch off the mains, or when the LCD monitor is not to control the monitor (see page 7). High voltages are used as shown above. 2. ... that the "+" and "-" marks on screen use it is located at a much higher resolution. PC connection This display unit has a PC connector. Use the switch to change between AV1, RGB, AV2 RGB H/V or Y, Pb,...
... used for a power voltage AC100 ~240V, 60Hz. PJ Net box Security fixing point Wall mount fixing positions Switch HDMI Services AV3 IN/Out BNC AV2 IN/ Out BNC AV2 audio IN ...at the back of time, it as required. 1. To completely switch off the mains, or when the LCD monitor is not to control the monitor (see page 7). High voltages are used as shown above. 2. ... that the "+" and "-" marks on screen use it is located at a much higher resolution. PC connection This display unit has a PC connector. Use the switch to change between AV1, RGB, AV2 RGB H/V or Y, Pb,...


