

User Manual Ver.1.0 (English)
Page 9
... • Viewing files by category 83 • Deleting all files on the memory 86 • Viewing files as a slide show 88 • Viewing files on a TV or HDTV 95 • Connecting your camera to a computer 97 • Adjusting sound and volume 106 • Adjusting the brightness of the display 107 • Changing the display language 108 • Setting the date and time 108...
... • Viewing files by category 83 • Deleting all files on the memory 86 • Viewing files as a slide show 88 • Viewing files on a TV or HDTV 95 • Connecting your camera to a computer 97 • Adjusting sound and volume 106 • Adjusting the brightness of the display 107 • Changing the display language 108 • Setting the date and time 108...

User Manual Ver.1.0 (English)
Page 10
... a lens cap 19 Inserting the battery and memory card 20 Charging the battery and turning on your camera 21 Charging the battery 21 Turning on your camera 21 Performing the initial setup 22 Learning icons ...24 Using the Mode screen 26 Selecting a Mode Screen 26 Icons on the Mode screen 27 Selecting options or menus 28 Using [MENU] ...28 Using [Fn] ...30 Setting the display and sound 31 Setting the display type 31 Setting the sound ...32 Capturing photos ...33 Zooming ...34 Reducing camera shake...
... a lens cap 19 Inserting the battery and memory card 20 Charging the battery and turning on your camera 21 Charging the battery 21 Turning on your camera 21 Performing the initial setup 22 Learning icons ...24 Using the Mode screen 26 Selecting a Mode Screen 26 Icons on the Mode screen 27 Selecting options or menus 28 Using [MENU] ...28 Using [Fn] ...30 Setting the display and sound 31 Setting the display type 31 Setting the sound ...32 Capturing photos ...33 Zooming ...34 Reducing camera shake...

User Manual Ver.1.0 (English)
Page 11
... Shot mode 48 Using the Photo Filter mode 49 Using the Movie Filter mode 50 Using the Movie mode 51 Recording high-speed videos 53 Using the Smart Scene Detection mode 54 Shooting options...55 Selecting a resolution and quality 56 Selecting a resolution 56 Selecting an image quality 57 Using the timer ...58 Shooting in the dark 59 Preventing red-eye 59 How to use the flash 59 Using the flash ...60 Adjusting the ISO sensitivity 62 Changing the camera's focus 63 Using macro ...63 Changing...
... Shot mode 48 Using the Photo Filter mode 49 Using the Movie Filter mode 50 Using the Movie mode 51 Recording high-speed videos 53 Using the Smart Scene Detection mode 54 Shooting options...55 Selecting a resolution and quality 56 Selecting a resolution 56 Selecting an image quality 57 Using the timer ...58 Shooting in the dark 59 Preventing red-eye 59 How to use the flash 59 Using the flash ...60 Adjusting the ISO sensitivity 62 Changing the camera's focus 63 Using macro ...63 Changing...

User Manual Ver.1.0 (English)
Page 12
... eye blinking 68 Tips for detecting faces 69 Adjusting brightness and color 70 Adjusting the exposure manually (EV 70 Locking the exposure value (AEL 71 Compensating for backlighting (ACB 71 Changing the metering option 72 Selecting a White Balance setting 72 Using burst modes (Continuous/Precapture/Bracket 75 Capturing continuous photos 75 Capturing photos in the Precapture mode 76 Capturing bracketed photos 76 Adjusting images ...78 Reducing the sound of the zoom 79 Playback/Editing...80 Viewing photos or videos...
... eye blinking 68 Tips for detecting faces 69 Adjusting brightness and color 70 Adjusting the exposure manually (EV 70 Locking the exposure value (AEL 71 Compensating for backlighting (ACB 71 Changing the metering option 72 Selecting a White Balance setting 72 Using burst modes (Continuous/Precapture/Bracket 75 Capturing continuous photos 75 Capturing photos in the Precapture mode 76 Capturing bracketed photos 76 Adjusting images ...78 Reducing the sound of the zoom 79 Playback/Editing...80 Viewing photos or videos...
User Manual Ver.1.0 (English)
Page 13
Contents Settings...104 Settings menu ...105 Accessing the settings menu 105 Sounds ...106 Display ...106 Connectivity ...107 General ...108 Appendixes...110 Error messages ...111 Camera maintenance 112 Cleaning your camera 112 Using or storing the camera 113 About memory cards 115 About the battery 118 Before contacting a service center 122 Camera specifications 125 Glossary ...129 FCC notice ...134 Index ...135 12
Contents Settings...104 Settings menu ...105 Accessing the settings menu 105 Sounds ...106 Display ...106 Connectivity ...107 General ...108 Appendixes...110 Error messages ...111 Camera maintenance 112 Cleaning your camera 112 Using or storing the camera 113 About memory cards 115 About the battery 118 Before contacting a service center 122 Camera specifications 125 Glossary ...129 FCC notice ...134 Index ...135 12
User Manual Ver.1.0 (English)
Page 14
... a lens cap 19 Inserting the battery and memory card 20 Charging the battery and turning on your camera 21 Charging the battery 21 Turning on your camera's layout, icons, and basic functions for getting a clearer photo 37 Basic functions Learn about your camera 21 Performing the initial setup 22 Learning icons 24 Using the Mode screen 26 Selecting a Mode Screen 26 Icons on the Mode screen 27 Selecting options or menus 28 Using [MENU 28 Using [Fn 30 Setting the display and sound...
... a lens cap 19 Inserting the battery and memory card 20 Charging the battery and turning on your camera 21 Charging the battery 21 Turning on your camera's layout, icons, and basic functions for getting a clearer photo 37 Basic functions Learn about your camera 21 Performing the initial setup 22 Learning icons 24 Using the Mode screen 26 Selecting a Mode Screen 26 Icons on the Mode screen 27 Selecting options or menus 28 Using [MENU 28 Using [Fn 30 Setting the display and sound...
User Manual Ver.1.0 (English)
Page 18
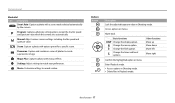
...c Change the macro option. t Change the timer and burst options. Magic Plus: Capture a photo with options preset for a specific scene. Move back. Manual: Adjust various camera settings including shutter speed and aperture value. Enter Playback mode. • Access options in Shooting mode. • Delete files in Shooting mode. Scene: Capture a photo with various effects. Settings: Adjust settings to create a panoramic image. F Change the flash option. Basic functions 17 Program: Capture a photo by the camera. Movie: Customize settings to record a video. Access...
...c Change the macro option. t Change the timer and burst options. Magic Plus: Capture a photo with options preset for a specific scene. Move back. Manual: Adjust various camera settings including shutter speed and aperture value. Enter Playback mode. • Access options in Shooting mode. • Delete files in Shooting mode. Scene: Capture a photo with various effects. Settings: Adjust settings to create a panoramic image. F Change the flash option. Basic functions 17 Program: Capture a photo by the camera. Movie: Customize settings to record a video. Access...
User Manual Ver.1.0 (English)
Page 28
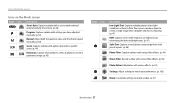
... a specific scene. (p. 44) Panorama: Capture and combine a series of photos to record a video. (p. 51) Basic functions 27 Using the Mode screen Icons on mid-tones, by the camera. (p. 40) Program: Capture a photo with settings you have adjusted manually. (p. 42) Manual: Adjust both the aperture value and the shutter speed manually. (p. 43) Scene: Capture a photo with various effects. (p. 91) Settings: Adjust settings to match your preferences. (p. 105) Movie: Customize settings to create a panoramic image. (p. 45) Mode Icon Description Low Light Shot: Capture multiple photos in...
... a specific scene. (p. 44) Panorama: Capture and combine a series of photos to record a video. (p. 51) Basic functions 27 Using the Mode screen Icons on mid-tones, by the camera. (p. 40) Program: Capture a photo with settings you have adjusted manually. (p. 42) Manual: Adjust both the aperture value and the shutter speed manually. (p. 43) Scene: Capture a photo with various effects. (p. 91) Settings: Adjust settings to match your preferences. (p. 105) Movie: Customize settings to create a panoramic image. (p. 45) Mode Icon Description Low Light Shot: Capture multiple photos in...
User Manual Ver.1.0 (English)
Page 38
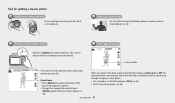
When you shoot in the dark, avoid setting the flash option to capture the photo if the focus frame appears in green. • Change the composition and half-press [Shutter] again if the focus frame appears in . (p. 60) • Set ISO sensitivity options. (p. 62) Basic functions 37 Reducing camera shake Set the Optical Image Stabilization option to Fill in red. Camera shake The camera sets the aperture value and shutter speed automatically. Focus frame...
When you shoot in the dark, avoid setting the flash option to capture the photo if the focus frame appears in green. • Change the composition and half-press [Shutter] again if the focus frame appears in . (p. 60) • Set ISO sensitivity options. (p. 62) Basic functions 37 Reducing camera shake Set the Optical Image Stabilization option to Fill in red. Camera shake The camera sets the aperture value and shutter speed automatically. Focus frame...
User Manual Ver.1.0 (English)
Page 48
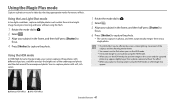
... [Shutter] to focus. 4 Press [Shutter] to save a photo using the HDR mode, an afterimage may appear. ▲ Without HDR effect ▲ With HDR effect Extended functions 47 Using the Magic Plus mode Capture a photo or record a video by camera shake, lighting, movement of the overexposed photo. Using the Low Light Shot mode In low light conditions, capture multiple photos and combin them into a single photo. • The HDR effect may take longer to capture the photo. Using...
... [Shutter] to focus. 4 Press [Shutter] to save a photo using the HDR mode, an afterimage may appear. ▲ Without HDR effect ▲ With HDR effect Extended functions 47 Using the Magic Plus mode Capture a photo or record a video by camera shake, lighting, movement of the overexposed photo. Using the Low Light Shot mode In low light conditions, capture multiple photos and combin them into a single photo. • The HDR effect may take longer to capture the photo. Using...
User Manual Ver.1.0 (English)
Page 56
... to set the options in the Precapture mode ......... 76 Capturing bracketed photos 76 Adjusting images 78 Reducing the sound of the zoom 79 Shooting options Learn how to use the flash 59 Using the flash 60 Adjusting the ISO sensitivity 62 Changing the camera's focus 63 Using macro 63 Changing the focus option 63 Adjusting the focus area 64 Using Face Detection 67 Detecting faces 67 Capturing a self portrait shot 67 Capturing a smile shot 68 Detecting eye blinking 68...
... to set the options in the Precapture mode ......... 76 Capturing bracketed photos 76 Adjusting images 78 Reducing the sound of the zoom 79 Shooting options Learn how to use the flash 59 Using the flash 60 Adjusting the ISO sensitivity 62 Changing the camera's focus 63 Using macro 63 Changing the focus option 63 Adjusting the focus area 64 Using Face Detection 67 Detecting faces 67 Capturing a self portrait shot 67 Capturing a smile shot 68 Detecting eye blinking 68...
User Manual Ver.1.0 (English)
Page 62
... the dark 3 Select an option. Shooting in your photo. • In some modes, you can also set burst options or select Blink Detection. • Make sure that your subjects are within the recommended distance from the flash. (p. 126) • If light from blurring. • The camera will display the shake warning when you are Auto: The flash will fire automatically when the...
... the dark 3 Select an option. Shooting in your photo. • In some modes, you can also set burst options or select Blink Detection. • Make sure that your subjects are within the recommended distance from the flash. (p. 126) • If light from blurring. • The camera will display the shake warning when you are Auto: The flash will fire automatically when the...

User Manual Ver.1.0 (English)
Page 80
Icon Description Zoom Mute: The camera stops recording sound temporarily when you use the Voice function. • Recordings made with sound. • Do not block the microphone when you use the zoom while recording videos, the camera can record the sound of the zoom When you use the zoom. Shooting options 79 Use the Zoom Mute function not to record zoom noise. 1 In Shooting mode, press [m]. 2 Select Voice. 3 Select an option. Off: Record a video without sound. On: Record a video with Voice may differ from actual sounds. Reducing the sound of the zoom.
Icon Description Zoom Mute: The camera stops recording sound temporarily when you use the Voice function. • Recordings made with sound. • Do not block the microphone when you use the zoom while recording videos, the camera can record the sound of the zoom When you use the zoom. Shooting options 79 Use the Zoom Mute function not to record zoom noise. 1 In Shooting mode, press [m]. 2 Select Voice. 3 Select an option. Off: Record a video without sound. On: Record a video with Voice may differ from actual sounds. Reducing the sound of the zoom.
User Manual Ver.1.0 (English)
Page 108
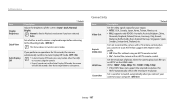
... HDTV remote control. Connectivity Item Video Out * Default Description Set the video signal output for 30 seconds, the camera automatically switches to Auto Display Off mode. (Off*, On) • In Auto Display Off mode, press any button other than [X] to an HDTV that supports the Anynet+(CEC) profile. • Off: View files without using the camera. • Even if you have selected Auto. Set whether or not to review a captured image before returning to the Shooting mode...
... HDTV remote control. Connectivity Item Video Out * Default Description Set the video signal output for 30 seconds, the camera automatically switches to Auto Display Off mode. (Off*, On) • In Auto Display Off mode, press any button other than [X] to an HDTV that supports the Anynet+(CEC) profile. • Off: View files without using the camera. • Even if you have selected Auto. Set whether or not to review a captured image before returning to the Shooting mode...

User Manual Ver.1.0 (English)
Page 110
... printer models may not print the date and time properly. • The photo will not display the date and time if: -- Formatting will delete all files, including protected files. (Yes, No) Errors can occur if you replace the battery. • The camera will not be displayed on in dark places to a computer and while you focus. (Off, On*) Item Format * Default Description Format the internal memory and the memory card. Date and time, language, and video output settings will not automatically turn on...
... printer models may not print the date and time properly. • The photo will not display the date and time if: -- Formatting will delete all files, including protected files. (Yes, No) Errors can occur if you replace the battery. • The camera will not be displayed on in dark places to a computer and while you focus. (Off, On*) Item Format * Default Description Format the internal memory and the memory card. Date and time, language, and video output settings will not automatically turn on...

User Manual Ver.1.0 (English)
Page 111
Appendixes Get information about error messages, specifications, and maintenance. Error messages 111 Camera maintenance 112 Cleaning your camera 112 Using or storing the camera 113 About memory cards 115 About the battery 118 Before contacting a service center 122 Camera specifications 125 Glossary 129 FCC notice 134 Index 135
Appendixes Get information about error messages, specifications, and maintenance. Error messages 111 Camera maintenance 112 Cleaning your camera 112 Using or storing the camera 113 About memory cards 115 About the battery 118 Before contacting a service center 122 Camera specifications 125 Glossary 129 FCC notice 134 Index 135

User Manual Ver.1.0 (English)
Page 112
... following error messages appear, try these remedies. Then, open the Settings menu and select General → File No. → Reset. (p. 108) Error message File Error File system not supported. Insert a charged battery or recharge the battery. Unlock the card when shooting. Card not supported. File names do not match the DCF standard. Appendixes 111 Delete unnecessary files or insert a new memory card. Transfer the files from being deleted. Format the memory card on again. • Remove your computer and format the card. You can lock...
... following error messages appear, try these remedies. Then, open the Settings menu and select General → File No. → Reset. (p. 108) Error message File Error File system not supported. Insert a charged battery or recharge the battery. Unlock the card when shooting. Card not supported. File names do not match the DCF standard. Appendixes 111 Delete unnecessary files or insert a new memory card. Transfer the files from being deleted. Format the memory card on again. • Remove your computer and format the card. You can lock...
User Manual Ver.1.0 (English)
Page 125
... functioning properly • End i-Launcher and restart the program. • Make sure that i-Launcher is set to the TV with the A/V cable. • Make sure that your memory card contains photos. • Make sure that the USB cable is connected correctly. • Make sure that your camera is compatible with the exFAT file stored on a Windows XP computer, download and update the exFAT file system driver from the Microsoft website. Before contacting a service...
... functioning properly • End i-Launcher and restart the program. • Make sure that i-Launcher is set to the TV with the A/V cable. • Make sure that your memory card contains photos. • Make sure that the USB cable is connected correctly. • Make sure that your camera is compatible with the exFAT file stored on a Windows XP computer, download and update the exFAT file system driver from the Microsoft website. Before contacting a service...

User Manual Ver.1.0 (English)
Page 136
... Auto Contrast Balance (ACB) Playback mode 93 Shooting mode 71 Auto Display Off 107 A/V port 15 B Battery Caution 119 Charging 21 Inserting 20 Blink Detection 68 Brightness Playback mode 93 Shooting mode 70 Burst modes Bracket 76 Continuous 75 Precapture 76 C Camera maintenance 112 Camera specifications 125 Capturing an image from video 90 Charging 21 Cleaning Camera body 112 Display 112 Lens 112 Connecting to a computer Mac 98 Windows 100 Contrast Playback mode 93 Shooting mode 78 D Date/Time Set 108 Deleting files 85 Digital zoom 34 Disconnecting the camera 97 Display...
... Auto Contrast Balance (ACB) Playback mode 93 Shooting mode 71 Auto Display Off 107 A/V port 15 B Battery Caution 119 Charging 21 Inserting 20 Blink Detection 68 Brightness Playback mode 93 Shooting mode 70 Burst modes Bracket 76 Continuous 75 Precapture 76 C Camera maintenance 112 Camera specifications 125 Capturing an image from video 90 Charging 21 Cleaning Camera body 112 Display 112 Lens 112 Connecting to a computer Mac 98 Windows 100 Contrast Playback mode 93 Shooting mode 78 D Date/Time Set 108 Deleting files 85 Digital zoom 34 Disconnecting the camera 97 Display...
User Manual Ver.1.0 (English)
Page 138
... mode 42 Protecting files 84 Q Quick view 107 R REC button 15 Red-eye Playback mode 94 Shooting mode 59 Reset 109 Resolution Playback mode 91 Shooting mode 56 Retouching faces 94 Rotating 91 S Saturation Playback mode 93 Shooting mode 78 Scene mode 44 Self portrait 67 Service center 122 Settings 108 Sharpness 78 Shooting portraits Blink Detection 68 Face Detection 67 Red-eye 61 Red-eye fix 61 Self portrait 67 Smile Shot 68 Shutter button 15 Slide show 88 Smart Auto mode 40 Smart Filter Photo shooting mode 49 Playback mode 92 Video recording mode...
... mode 42 Protecting files 84 Q Quick view 107 R REC button 15 Red-eye Playback mode 94 Shooting mode 59 Reset 109 Resolution Playback mode 91 Shooting mode 56 Retouching faces 94 Rotating 91 S Saturation Playback mode 93 Shooting mode 78 Scene mode 44 Self portrait 67 Service center 122 Settings 108 Sharpness 78 Shooting portraits Blink Detection 68 Face Detection 67 Red-eye 61 Red-eye fix 61 Self portrait 67 Smile Shot 68 Shutter button 15 Slide show 88 Smart Auto mode 40 Smart Filter Photo shooting mode 49 Playback mode 92 Video recording mode...


