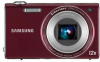
User Manual (user Manual) (ver.1.2) (English)
Page 1
User Manual WB210 This user manual includes detailed usage instructions for your camera. Please read this manual thoroughly. Ä Click a topic Basic troubleshooting Quick reference Contents Basic functions Extended functions Shooting options Playback/Editing Settings Appendixes Index
User Manual (user Manual) (ver.1.2) (English)
Page 2
... these materials near flammable or explosive gases and liquids. Do not handle your camera away from small children and pets. This may result in close to your camera's internal components. The camera may overheat, which may cause a fire or explosion. Do not use the...temperatures for an extended period of time. Keep your camera and all power sources, such as well. If liquid or foreign objects enter your camera. This may present physical dangers as the battery or charger, and then contact a Samsung service center. 1 Small parts may cause a fi...
User Manual (user Manual) (ver.1.2) (English)
Page 3
...AC charger. Health and safety information Caution-situations that could cause damage to your camera or other equipment Remove the batteries from the wall socket when not in use. Use only Samsung-approved batteries, chargers, cables and accessories. • Using unauthorized batteries, chargers, ...cables or accessories can cause batteries to do so may burn your camera when storing it fires. Failing to explode, damage your camera, or cause injury. • Samsung is very hot when fired and may result in fire or electric shock....
User Manual (user Manual) (ver.1.2) (English)
Page 4
..., battery, or memory card. The manufacturer is not responsible for any loss of files or damage that the camera is reversed, it may result from the camera case. This may be damaged or erased. If you force the connectors, improperly connect cables, or improperly install batteries...with the indicator light (S) into your files. Never use . Check that may damage your camera. You must plug the end of the USB cable with magnetic strips away from camera malfunction or improper use. The manufacturer takes no responsibility for any loss of data. 3 Health and...
User Manual (user Manual) (ver.1.2) (English)
Page 5
...registered trademarks of HDMI Licensing LLC. • Trademarks and trade names used in this manual are the property of their respective owners. • Camera specifications or contents of this manual may be changed without prior permission. • For Open Source License information, refer to the '... play back photos, videos, or voice memos and edit photos or videos. Outline of this manual without prior notice due to upgrade of camera functions. • You are not allowed to reuse or distribute any part of the User Manual Basic functions 12 Learn about error messages,...
User Manual (user Manual) (ver.1.2) (English)
Page 6
... to perform a step, for Standardization Optical Image Stabilization White Balance 5 Annotation Abbreviations used in this manual Icon [] () * Function Additional information Safety warnings and precautions Camera buttons.
User Manual (user Manual) (ver.1.2) (English)
Page 7
By altering the exposure, your camera determines the exposure. Half-press [Shutter] Press [Shutter] Normal exposure Subject, background, and composition • Subject: the main object in this manual Pressing the shutter ...
User Manual (user Manual) (ver.1.2) (English)
Page 8
... when you capture photos in the edit menu. (p. 92) Photos have dust spots. If dust particles are present in the air, you may result in camera shake. • Select Night Shot mode. (p. 39) • Turn on the flash. (p. 53) • Set ISO sensitivity options. (p. 55) • Use ...a tripod to prevent your camera from the camera flash off the flash or avoid capturing photos in the center of backlighting. Blurring can make it difficult to hold...
User Manual (user Manual) (ver.1.2) (English)
Page 9
... Contrast, or Sharpness) f 72 Applying different effects to videos • Smart Filter (movie) mode f 44 • Palette Effect Recording mode f 46 Reducing camera shake • Optical Image Stabilization (OIS) f 30 • Viewing files by category in Smart album f 80 • Viewing files as ... f 83 • Viewing files as a slide show f 85 • Viewing files on a TV or HDTV f 93 • Connecting your camera to a computer f 95 • Adjusting sound and volume f 105 • Adjusting the brightness of the display f 105 • Changing the display language f...
User Manual (user Manual) (ver.1.2) (English)
Page 10
... 14 Inserting the battery and memory card 16 Charging the battery and turning on your camera ...... 17 Charging the battery 17 Turning on your camera 17 Performing the initial setup 18 Learning icons 20 Using the touch screen 21 Setting the touch screen and sound 23 Setting the ...24 Rearranging icons 25 Using the Help mode 26 Viewing the Application description 26 Viewing the Operation guide 26 Capturing photos 27 Zooming 28 Reducing camera shake (OIS 30 Tips for getting a clearer photo 31 Extended functions 33 Using shooting modes 34 Using the Easy Shot mode 34 Using the...
User Manual (user Manual) (ver.1.2) (English)
Page 11
... Selecting image quality 51 Shooting in the dark 53 Preventing red-eye 53 Using the flash 53 Adjusting the ISO sensitivity 55 Changing the camera's focus 56 Using macro 56 Using smart touch focus 57 Adjusting the focus area 58 Using face detection 59 Detecting faces 59 Capturing a self portrait...
User Manual (user Manual) (ver.1.2) (English)
Page 12
...les to your Windows computer 95 Transferring files with Intelli-studio 96 Transferring files by connecting the camera as a removable disk 98 Disconnecting the camera (for Windows XP 99 Transferring files to your Mac computer 100 Printing photos with a PictBridge photo printer ... Connectivity 106 General 107 Appendixes 110 Error messages 111 Camera maintenance 112 Cleaning your camera 112 Using or storing the camera 113 About memory cards 114 About the battery 116 Before contacting a service center 120 Camera specifications 123 Glossary 127 FCC notice 132...
User Manual (user Manual) (ver.1.2) (English)
Page 13
... 14 Inserting the battery and memory card ... 16 Charging the battery and turning on your camera 17 Charging the battery 17 Turning on the Home screen 24 Rearranging icons 25 Using the Help mode 26 Viewing the Application description ......... 26 ...Viewing the Operation guide 26 Capturing photos 27 Zooming 28 Reducing camera shake (OIS 30 Tips for shooting. Basic functions Learn about your camera 17 Performing the initial setup 18 Learning icons 20 Using the touch screen 21 Setting the touch screen and sound...
User Manual (user Manual) (ver.1.2) (English)
Page 14
Optional accessories Camera AC adapter/USB cable Camera case A/V cable HDMI cable Rechargeable battery Strap User Manual CD-ROM Quick Start Manual Battery charger Memory card/ Memory card adapter The illustrations may differ slightly from the items shipped with your product box. Basic functions 13 Unpacking The following items are included in your product.
User Manual (user Manual) (ver.1.2) (English)
Page 15
Camera layout Before you start, familiarize yourself with your camera's parts and their functions. POWER button Shutter button Flash Lens Speaker AF-assist light/Timer lamp USB and A/V port Accepts USB cable and A/V cable HDMI port Accepts HDMI cable Basic functions 14 Tripod mount Battery chamber cover Insert a memory card and battery
User Manual (user Manual) (ver.1.2) (English)
Page 16
Camera layout Playback button Microphone Touch screen Zoom button • In Shooting mode: Zoom in or out • In Playback mode: Zoom in on part of a photo or view files as thumbnails Status lamp • Blinking: When the camera is saving a photo or video, being read by a computer or printer, or out of focus • Steady: When the camera is connecting to a computer or in focus Attaching the strap x y Home button Basic functions 15
User Manual (user Manual) (ver.1.2) (English)
Page 17
... up . Basic functions 16 Insert the battery with the gold-colored contacts facing up. Insert a memory card with the Samsung logo facing up to insert the battery and an optional memory card into the camera. Removing the battery and memory card Memory card Push the card gently until it disengages from the... camera, and then pull it out of the slot. Rechargeable battery Rechargeable battery You can use the internal memory for temporary storage if a memory card is ...
User Manual (user Manual) (ver.1.2) (English)
Page 18
... must charge the battery. Charging the battery and turning on your camera by pressing and holding [Playback] for the first time. (p. 18) Turning on your camera. Basic functions 17 Attach the USB cable to turn your camera on or off. • The initial setup screen appears when... you turn on your camera Charging the battery Before you use the camera for the first time, you turn on the camera for about 5 seconds, the camera does not emit any sounds. Turning on and immediately accesses Playback mode. The camera turns on your camera Press [POWER] to the AC...
User Manual (user Manual) (ver.1.2) (English)
Page 19
Basic functions 18 Performing the initial setup When the initial setup screen appears, follow the steps below to configure the camera's basic settings. 1 Touch Language. 4 Touch Home, and then drag your finger toward z or x to select a time zone. • When you travel to save. 6 Touch Date/Time Set. 3 Touch Time Zone. Time Zone 2 Select a language, and then touch o. London 5 Touch o to another country, touch Visit, and then select a new time zone.
User Manual (user Manual) (ver.1.2) (English)
Page 21
Learning icons The icons the camera displays on the screen change according to the mode you select or the options you set. 1 2 3 1 Option icons (touch) Icon Description Flash option Auto focus ... m Shooting options Display type 2 Status icons Icon Description Shooting mode Current date Icon Description Current time Aperture value Shutter speed Voice memo Auto focus frame Camera shake Zoom indicator Zoom ratio Photo resolution when Intelli zoom is on Grid lines 3 Status icons Icon Description Available number of photos Available recording time...