User Manual Ver.1.0 (English)
Page 2
... to the Home Page 2 Searching the Index 2 Searching Pages 2 Closing the e-Manual 2 Jumping to a Menu Item 2 Updating the e-Manual Getting Started Antenna Connection 3 For the LED 7450/7500, 8000 and PDP 8500 series models 3 For the S9 models Video Device Connections HDMI Connection 5 For the... LED 7450/7500, 8000 and PDP 8500 series models 6 For the S9 models Component Connection 7 For the LED 7450/7500 series models 8 For the LED 8000 and PDP 8500 series models 9 For the S9 models AV Connection 10 For...
... to the Home Page 2 Searching the Index 2 Searching Pages 2 Closing the e-Manual 2 Jumping to a Menu Item 2 Updating the e-Manual Getting Started Antenna Connection 3 For the LED 7450/7500, 8000 and PDP 8500 series models 3 For the S9 models Video Device Connections HDMI Connection 5 For the... LED 7450/7500, 8000 and PDP 8500 series models 6 For the S9 models Component Connection 7 For the LED 7450/7500 series models 8 For the LED 8000 and PDP 8500 series models 9 For the S9 models AV Connection 10 For...
User Manual Ver.1.0 (English)
Page 3
Network Configuration 32 Wired Network 32 For the LED 7450/7500, 8000 and PDP 8500 series models 33 For the S9 models 34 Wireless Network 34 Wireless Network Precautions 34 Network Security Protocols Wired ... Control Panel 55 Using the Quick Access Panel 55 Adjusting the virtual remote panel Universal Remote Setup 56 Connecting the IR Extender 56 For the LED 7450/7500, 8000 and PDP 8500 series models 57 For the S9 models 57 Add the External Device 57 Using the Universal Remote Control 57...
Network Configuration 32 Wired Network 32 For the LED 7450/7500, 8000 and PDP 8500 series models 33 For the S9 models 34 Wireless Network 34 Wireless Network Precautions 34 Network Security Protocols Wired ... Control Panel 55 Using the Quick Access Panel 55 Adjusting the virtual remote panel Universal Remote Setup 56 Connecting the IR Extender 56 For the LED 7450/7500, 8000 and PDP 8500 series models 57 For the S9 models 57 Add the External Device 57 Using the Universal Remote Control 57...
User Manual Ver.1.0 (English)
Page 10
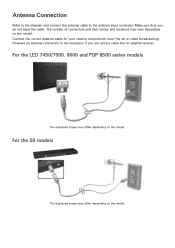
For the LED 7450/7500, 8000 and PDP 8500 series models The displayed image may differ depending on the model. For the S9 models The displayed image may ...
For the LED 7450/7500, 8000 and PDP 8500 series models The displayed image may differ depending on the model. For the S9 models The displayed image may ...

User Manual Ver.1.0 (English)
Page 12
HDMI Connection For the LED 7450/7500, 8000 and PDP 8500 series models Refer to the diagram and connect the HDMI cable to different HDMI specifications. "" This TV does not ...
HDMI Connection For the LED 7450/7500, 8000 and PDP 8500 series models Refer to the diagram and connect the HDMI cable to different HDMI specifications. "" This TV does not ...
User Manual Ver.1.0 (English)
Page 14
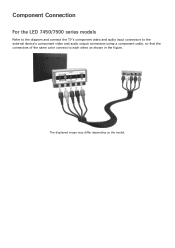
The displayed image may differ depending on the model. Component Connection For the LED 7450/7500 series models Refer to the diagram and connect the TV's component video and audio input connectors to the external device's component video and audio output connectors using a component cable, so that the connectors of the same color connect to each other, as shown in the figure.
The displayed image may differ depending on the model. Component Connection For the LED 7450/7500 series models Refer to the diagram and connect the TV's component video and audio input connectors to the external device's component video and audio output connectors using a component cable, so that the connectors of the same color connect to each other, as shown in the figure.
User Manual Ver.1.0 (English)
Page 15
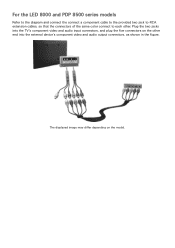
Plug the two jacks into the TV's component video and audio input connectors, and plug the five connectors on the model. For the LED 8000 and PDP 8500 series models Refer to the diagram and connect the connect a component cable to the provided two jack to-RCA extension cables, so that the connectors of the same color connect to each other end into the external device's component video and audio output connectors, as shown in the figure. The displayed image may differ depending on the other .
Plug the two jacks into the TV's component video and audio input connectors, and plug the five connectors on the model. For the LED 8000 and PDP 8500 series models Refer to the diagram and connect the connect a component cable to the provided two jack to-RCA extension cables, so that the connectors of the same color connect to each other end into the external device's component video and audio output connectors, as shown in the figure. The displayed image may differ depending on the other .
User Manual Ver.1.0 (English)
Page 17
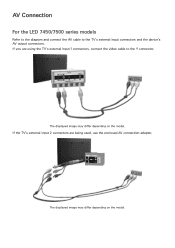
AV Connection For the LED 7450/7500 series models Refer to the diagram and connect the AV cable to the Y connector. If the TV's external input 2 connectors are using the TV's external input 1 connectors, connect the video cable to the TV's external input connectors and the device's AV output connectors. The displayed image may differ depending on the model. The displayed image may differ depending on the model. If you are being used, use the enclosed AV connection adapter.
AV Connection For the LED 7450/7500 series models Refer to the diagram and connect the AV cable to the Y connector. If the TV's external input 2 connectors are using the TV's external input 1 connectors, connect the video cable to the TV's external input connectors and the device's AV output connectors. The displayed image may differ depending on the model. The displayed image may differ depending on the model. If you are being used, use the enclosed AV connection adapter.
User Manual Ver.1.0 (English)
Page 18
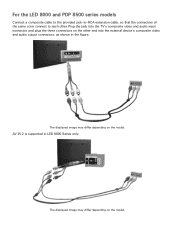
The displayed image may differ depending on the model. Plug the jack into the TV's composite video and audio input connector, and plug the three connectors on the model. The displayed image may differ depending on the other . AV IN 2 is supported in the figure. For the LED 8000 and PDP 8500 series models Connect a composite cable to the provided jack-to-RCA extension cable, so that the connectors of the same color connect to each other end into the external device's composite video and audio output connectors, as shown in LED 8000 Series only.
The displayed image may differ depending on the model. Plug the jack into the TV's composite video and audio input connector, and plug the three connectors on the model. The displayed image may differ depending on the other . AV IN 2 is supported in the figure. For the LED 8000 and PDP 8500 series models Connect a composite cable to the provided jack-to-RCA extension cable, so that the connectors of the same color connect to each other end into the external device's composite video and audio output connectors, as shown in LED 8000 Series only.

User Manual Ver.1.0 (English)
Page 21
The displayed image may differ depending on the model. For the LED 7450/7500, 8000 and PDP 8500 series models Refer to the diagram and connect the optical cable to the One Connect digital audio output connector and the device's digital audio input connector. The displayed image may differ depending on the model. For the S9 models Refer to the diagram and connect the optical cable to the TV's digital audio output connector and the device's digital audio input connector.
The displayed image may differ depending on the model. For the LED 7450/7500, 8000 and PDP 8500 series models Refer to the diagram and connect the optical cable to the One Connect digital audio output connector and the device's digital audio input connector. The displayed image may differ depending on the model. For the S9 models Refer to the diagram and connect the optical cable to the TV's digital audio output connector and the device's digital audio input connector.

User Manual Ver.1.0 (English)
Page 22
The displayed image may differ depending on the model. For the S9 models Refer to the diagram and connect the audio cable to the TV's audio output connector and the device's audio input connector. Audio Output Connection For the LED 7450/7500, 8000 series models Refer to the diagram and connect the audio cable to the One Connect audio output connector and the device's audio input connector. The displayed image may differ depending on the model.
The displayed image may differ depending on the model. For the S9 models Refer to the diagram and connect the audio cable to the TV's audio output connector and the device's audio input connector. Audio Output Connection For the LED 7450/7500, 8000 series models Refer to the diagram and connect the audio cable to the One Connect audio output connector and the device's audio input connector. The displayed image may differ depending on the model.
User Manual Ver.1.0 (English)
Page 23
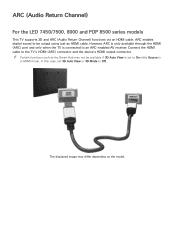
ARC (Audio Return Channel) For the LED 7450/7500, 8000 and PDP 8500 series models This TV supports 3D and ARC (Audio Return Channel) functions via an HDMI cable. However, ARC is ...
ARC (Audio Return Channel) For the LED 7450/7500, 8000 and PDP 8500 series models This TV supports 3D and ARC (Audio Return Channel) functions via an HDMI cable. However, ARC is ...

User Manual Ver.1.0 (English)
Page 25
HDMI Connection For the LED 7450/7500, 8000 and PDP 8500 series models Refer to the diagram and connect the HDMI cable to the TV. Refer to the "Display Resolution" for connect the computer. Computer Connection This TV supports the HDMI/DVI port for information on the model. The displayed image may differ depending on the resolution settings supported to the TV's HDMI input port and the computer's HDMI output port. In this case, use an HDMI-to-DVI cable to connect the computer to the TV. Not all computers are HDMI-enabled.
HDMI Connection For the LED 7450/7500, 8000 and PDP 8500 series models Refer to the diagram and connect the HDMI cable to the TV. Refer to the "Display Resolution" for connect the computer. Computer Connection This TV supports the HDMI/DVI port for information on the model. The displayed image may differ depending on the resolution settings supported to the TV's HDMI input port and the computer's HDMI output port. In this case, use an HDMI-to-DVI cable to connect the computer to the TV. Not all computers are HDMI-enabled.
User Manual Ver.1.0 (English)
Page 27
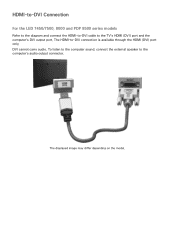
The displayed image may differ depending on the model. The HDMI-to the TV's HDMI (DVI) port and the computer's DVI output port. HDMI-to-DVI Connection For the LED 7450/7500, 8000 and PDP 8500 series models Refer to the diagram and connect the HDMI-to-DVI cable to -DVI connection is available through the HDMI (DVI) port only. DVI cannot carry audio. To listen to the computer sound, connect the external speaker to the computer's audio output connector.
The displayed image may differ depending on the model. The HDMI-to the TV's HDMI (DVI) port and the computer's DVI output port. HDMI-to-DVI Connection For the LED 7450/7500, 8000 and PDP 8500 series models Refer to the diagram and connect the HDMI-to-DVI cable to -DVI connection is available through the HDMI (DVI) port only. DVI cannot carry audio. To listen to the computer sound, connect the external speaker to the computer's audio output connector.

User Manual Ver.1.0 (English)
Page 29
... manually in conjunction with an MHL-enabled mobile device. Smartphone Connection This TV supports MHL (Mobile High-definition Link) via an MHL cable. For the LED 7450/7500, 8000 and PDP 8500 series models Refer to the diagram and connect the MHL cable to Screen Fit. "" Connecting the MHL-to-HDMI...
... manually in conjunction with an MHL-enabled mobile device. Smartphone Connection This TV supports MHL (Mobile High-definition Link) via an MHL cable. For the LED 7450/7500, 8000 and PDP 8500 series models Refer to the diagram and connect the MHL cable to Screen Fit. "" Connecting the MHL-to-HDMI...

User Manual Ver.1.0 (English)
Page 39
Network Configuration Connecting the TV to a network gives you access to a Local Area Network (LAN). ●● External Modem ●● ① IP Router + ② External Modem ●● Wall-mounted LAN Outlet Wired Network For the LED 7450/7500, 8000 and PDP 8500 series models There are three ways to connect the TV to online services such as the Smart Hub as well as software updates.
Network Configuration Connecting the TV to a network gives you access to a Local Area Network (LAN). ●● External Modem ●● ① IP Router + ② External Modem ●● Wall-mounted LAN Outlet Wired Network For the LED 7450/7500, 8000 and PDP 8500 series models There are three ways to connect the TV to online services such as the Smart Hub as well as software updates.
User Manual Ver.1.0 (English)
Page 63
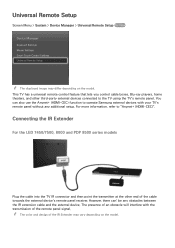
The presence of the remote panel signal. Connecting the IR Extender For the LED 7450/7500, 8000 and PDP 8500 series models Plug the cable into the TV IR connector and then point the transmitter at the other third-... Settings Mouse Settings Smart Touch Control Settings Universal Remote Setup "" The displayed image may vary depending on the model. For more information, refer to operate Samsung external devices with the transmission of an obstacle will interfere with your TV's remote panel without any obstacles between the IR extension cable and the...
The presence of the remote panel signal. Connecting the IR Extender For the LED 7450/7500, 8000 and PDP 8500 series models Plug the cable into the TV IR connector and then point the transmitter at the other third-... Settings Mouse Settings Smart Touch Control Settings Universal Remote Setup "" The displayed image may vary depending on the model. For more information, refer to operate Samsung external devices with the transmission of an obstacle will interfere with your TV's remote panel without any obstacles between the IR extension cable and the...

User Manual Ver.1.0 (English)
Page 91
...: Adjusts the 3D perspective. This function is not available if 3D mode is set to (Normal) or (Off). If the screen is available for LED 7450/7500, 8000 series models only. If some applications are several adjustments that can not switch 3D. Try Now ●● 3D Auto View: ... Try Now ●● Depth: Adjusts the 3D depth. In this case, close the application and then watch the 3D. This function is available for LED 7450/7500, 8000 series models only. ●● 3D Light control: Adjust the brightness of 3D images. This function is too dark, select High. ...
...: Adjusts the 3D perspective. This function is not available if 3D mode is set to (Normal) or (Off). If the screen is available for LED 7450/7500, 8000 series models only. If some applications are several adjustments that can not switch 3D. Try Now ●● 3D Auto View: ... Try Now ●● Depth: Adjusts the 3D depth. In this case, close the application and then watch the 3D. This function is available for LED 7450/7500, 8000 series models only. ●● 3D Light control: Adjust the brightness of 3D images. This function is too dark, select High. ...

User Manual Ver.1.0 (English)
Page 97
... PDP TVs. ●● Movie: Darkens the screen and reduces glare. This functions is not available on the model. This mode is only available for LED TVs only. ●● Relax: Consumes less power and reduces eye strain. This mode is only available when connected to a computer via an HDMI-to...
... PDP TVs. ●● Movie: Darkens the screen and reduces glare. This functions is not available on the model. This mode is only available for LED TVs only. ●● Relax: Consumes less power and reduces eye strain. This mode is only available when connected to a computer via an HDMI-to...
User Manual Ver.1.0 (English)
Page 98
... effect the next time the source is only available for PDP TVs. ●● Contrast Adjusts the screen contrast. This option is only available for LED TVs. ●● Cell Light Adjusts the brightness of objects. Decreasing the brightness reduces power consumption. Try Now ●● Sharpness Sharpens or dulls the...
... effect the next time the source is only available for PDP TVs. ●● Contrast Adjusts the screen contrast. This option is only available for LED TVs. ●● Cell Light Adjusts the brightness of objects. Decreasing the brightness reduces power consumption. Try Now ●● Sharpness Sharpens or dulls the...

User Manual Ver.1.0 (English)
Page 99
... and in HDMI mode. ●● Smart View 2: Reduces a 16:9 picture by the warranty. This is only available for LED TVs and in 4:3 mode for an extended period. Enjoy 4:3 images as undistorted 16:9 images. ●● 4:3: Sets the picture to up and down. ●● ...
... and in HDMI mode. ●● Smart View 2: Reduces a 16:9 picture by the warranty. This is only available for LED TVs and in 4:3 mode for an extended period. Enjoy 4:3 images as undistorted 16:9 images. ●● 4:3: Sets the picture to up and down. ●● ...


