User Manual Ver.1.0 (English)
Page 4
... 78 Change the Broadcast Signal 78 Change the Channel List Schedule Viewing 79 Digital Channel Schedule Viewing 80 Guide 80 Program Info 80 Analog Channel Schedule Viewing 80 Cancel a Schedule Viewing 80 Edit Schedule List Basic Picture Settings 90 Changing the Picture Mode 91 Picture Quality 91 Applying the Current Picture Quality Setting to Another Input 92 Picture Size 93 Screen Position 93 Picture Off 93 Reset Image Settings Advanced Settings Picture Options Basic Sound Settings 98 Changing the Sound Mode 99 Adjusting the Sound Settings 99 Auto Volume 99 TV Installation Type 99 Resetting...
... 78 Change the Broadcast Signal 78 Change the Channel List Schedule Viewing 79 Digital Channel Schedule Viewing 80 Guide 80 Program Info 80 Analog Channel Schedule Viewing 80 Cancel a Schedule Viewing 80 Edit Schedule List Basic Picture Settings 90 Changing the Picture Mode 91 Picture Quality 91 Applying the Current Picture Quality Setting to Another Input 92 Picture Size 93 Screen Position 93 Picture Off 93 Reset Image Settings Advanced Settings Picture Options Basic Sound Settings 98 Changing the Sound Mode 99 Adjusting the Sound Settings 99 Auto Volume 99 TV Installation Type 99 Resetting...
User Manual Ver.1.0 (English)
Page 7
... Remote Support? 148 How Does it Work? 149 e-Manual 149 Self Diagnosis 149 Picture Test 150 Sound Test 150 Voice & Motion Control Environment Check 150 Signal Information 150 Reset 151 Updating the Software 151 Update now 151 Manual Update 151 Auto Update 152 Usage Mode 152 Support Info Kensington Security Lock Display Resolution 153 IBM 153 MAC 154 VESA DMT Picture Size and Input Signal Supported 3D Resolutions 156 HDMI 156 3D Format: L/R, T/B 156 3D Format: Frame Packing 157 Component 157 Digital Channel 157 Videos...
... Remote Support? 148 How Does it Work? 149 e-Manual 149 Self Diagnosis 149 Picture Test 150 Sound Test 150 Voice & Motion Control Environment Check 150 Signal Information 150 Reset 151 Updating the Software 151 Update now 151 Manual Update 151 Auto Update 152 Usage Mode 152 Support Info Kensington Security Lock Display Resolution 153 IBM 153 MAC 154 VESA DMT Picture Size and Input Signal Supported 3D Resolutions 156 HDMI 156 3D Format: L/R, T/B 156 3D Format: Frame Packing 157 Component 157 Digital Channel 157 Videos...
User Manual Ver.1.0 (English)
Page 20
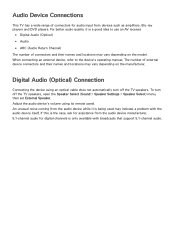
... on the manufacturer. Digital Audio (Optical) Connection Connecting the device using its remote panel. An unusual noise coming from the audio device while it is a good idea to the device's operating manual. Adjust the audio device's volume using an optical cable does not automatically turn off the TV speakers. The number of connectors for audio input from the audio device manufacturer. 5.1-channel audio for assistance from devices such as amplifiers, Blu-ray players and DVD players. If this...
... on the manufacturer. Digital Audio (Optical) Connection Connecting the device using its remote panel. An unusual noise coming from the audio device while it is a good idea to the device's operating manual. Adjust the audio device's volume using an optical cable does not automatically turn off the TV speakers. The number of connectors for audio input from the audio device manufacturer. 5.1-channel audio for assistance from devices such as amplifiers, Blu-ray players and DVD players. If this...
User Manual Ver.1.0 (English)
Page 24
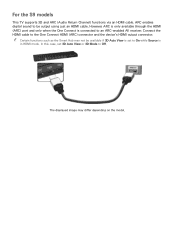
For the S9 models This TV supports 3D and ARC (Audio Return Channel) functions via an HDMI cable. In this case, set to Off. The displayed image may not be output using just an HDMI cable. Connect the HDMI cable to an ARC-enabled AV receiver. However, ARC is only available through the HDMI (ARC) port and only when the One Connect is set 3D Auto View or 3D Mode to On while Source is in HDMI mode. "" Certain functions such...
For the S9 models This TV supports 3D and ARC (Audio Return Channel) functions via an HDMI cable. In this case, set to Off. The displayed image may not be output using just an HDMI cable. Connect the HDMI cable to an ARC-enabled AV receiver. However, ARC is only available through the HDMI (ARC) port and only when the One Connect is set 3D Auto View or 3D Mode to On while Source is in HDMI mode. "" Certain functions such...
User Manual Ver.1.0 (English)
Page 37
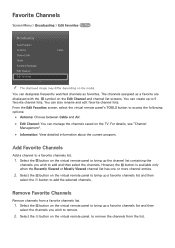
... Recently Viewed or Mostly Viewed channel list has one or more channel entries. 222 Select the b button on the virtual remote panel. Favorite Channels Screen Menu > Broadcasting > Edit Favorites Try Now Broadcasting Auto Program Antenna Channel List Guide Schedule Manager Edit Channel Edit Favorites Cable "" The displayed image may differ depending on the virtual remote panel to bring up to add the selected channels. From the Edit Favorites screen, select the virtual remote panel's TOOLS button to...
... Recently Viewed or Mostly Viewed channel list has one or more channel entries. 222 Select the b button on the virtual remote panel. Favorite Channels Screen Menu > Broadcasting > Edit Favorites Try Now Broadcasting Auto Program Antenna Channel List Guide Schedule Manager Edit Channel Edit Favorites Cable "" The displayed image may differ depending on the virtual remote panel to bring up to add the selected channels. From the Edit Favorites screen, select the virtual remote panel's TOOLS button to...
User Manual Ver.1.0 (English)
Page 64
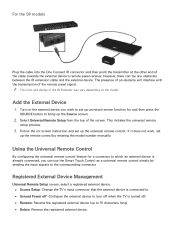
... the cable towards the external device's remote panel receiver. "" The color and design of the screen. Using the Universal Remote Control By configuring the universal remote control feature for a connector to which an external device is already connected, you wish to set up universal remote function for and then press the SOURCE button to bring up the remote control by sending the input signals to the corresponding connector. Add the External Device 111 Turn on the model. This...
... the cable towards the external device's remote panel receiver. "" The color and design of the screen. Using the Universal Remote Control By configuring the universal remote control feature for a connector to which an external device is already connected, you wish to set up universal remote function for and then press the SOURCE button to bring up the remote control by sending the input signals to the corresponding connector. Add the External Device 111 Turn on the model. This...
User Manual Ver.1.0 (English)
Page 92
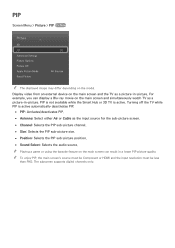
...-picture channel. ●● Size: Selects the PIP sub-picture size. ●● Position: Selects the PIP sub-picture position. ●● Sound Select: Selects the audio source. Turning off the TV while PIP is active. Display video from an external device on the main screen can display a Blu-ray movie on the model. For example, you can result in -picture. "" To enjoy PIP, the main screen's source must be Component or HDMI and the input resolution...
...-picture channel. ●● Size: Selects the PIP sub-picture size. ●● Position: Selects the PIP sub-picture position. ●● Sound Select: Selects the audio source. Turning off the TV while PIP is active. Display video from an external device on the main screen can display a Blu-ray movie on the model. For example, you can result in -picture. "" To enjoy PIP, the main screen's source must be Component or HDMI and the input resolution...
User Manual Ver.1.0 (English)
Page 98
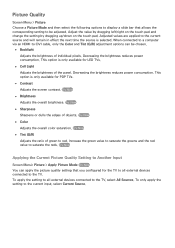
... Current Picture Quality Setting to Another Input Screen Menu> Picture > Apply Picture Mode Try Now You can be adjusted. Picture Quality Screen Menu > Picture Choose a Picture Mode and then select the following options to display a slide bar that you configured for LED TVs. ●● Cell Light Adjusts the brightness of objects. Decreasing the brightness reduces power consumption. When connected to a computer via an HDMI-to-DVI cable, only the Color and Tint (G/R) adjustment options...
... Current Picture Quality Setting to Another Input Screen Menu> Picture > Apply Picture Mode Try Now You can be adjusted. Picture Quality Screen Menu > Picture Choose a Picture Mode and then select the following options to display a slide bar that you configured for LED TVs. ●● Cell Light Adjusts the brightness of objects. Decreasing the brightness reduces power consumption. When connected to a computer via an HDMI-to-DVI cable, only the Color and Tint (G/R) adjustment options...
User Manual Ver.1.0 (English)
Page 111
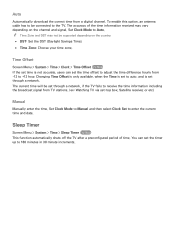
... Auto. You can set -top box, Satellite receiver, or etc) Manual Manually enter the time. Time Offset Screen Menu > System > Time > Clock > Time Offset Try Now If the set time is set through a network, if the TV fails to receive the time information including the broadcast signal from TV stations. (ex: Watching TV via set the time offset to the TV. The current time will be connected to adjust the time difference hourly from a digital channel. Sleep Timer Screen Menu > System > Time > Sleep Timer...
... Auto. You can set -top box, Satellite receiver, or etc) Manual Manually enter the time. Time Offset Screen Menu > System > Time > Clock > Time Offset Try Now If the set time is set through a network, if the TV fails to receive the time information including the broadcast signal from TV stations. (ex: Watching TV via set the time offset to the TV. The current time will be connected to adjust the time difference hourly from a digital channel. Sleep Timer Screen Menu > System > Time > Sleep Timer...

User Manual Ver.1.0 (English)
Page 157
... for digital channels. If the problem persists, refer to TV Speaker and then try again. Contact Samsung's Call Center for SMART Interaction use. Sound Test Screen Menu > Support > Self Diagnosis > Sound Test Try Now Use the built-in melody to check for the network settings. Reset Screen Menu > Support > Self Diagnosis > Reset Try Now This resets all settings to the factory default settings except for sound problems. If no melody is played by the TV's speakers, make sure Speaker...
... for digital channels. If the problem persists, refer to TV Speaker and then try again. Contact Samsung's Call Center for SMART Interaction use. Sound Test Screen Menu > Support > Self Diagnosis > Sound Test Try Now Use the built-in melody to check for the network settings. Reset Screen Menu > Support > Self Diagnosis > Reset Try Now This resets all settings to the factory default settings except for sound problems. If no melody is played by the TV's speakers, make sure Speaker...
User Manual Ver.1.0 (English)
Page 158
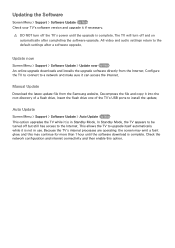
... upgrade is not in Standby Mode. Configure the TV to connect to the default settings after completing the software upgrade. Decompress the file and copy it can access the Internet. All video and audio settings return to a network and make sure it into the root directory of the TV's USB ports to the Internet. Updating the Software Screen Menu > Support > Software Update Try Now Check your TV's software version and upgrade it if necessary. [[ DO NOT turn...
... upgrade is not in Standby Mode. Configure the TV to connect to the default settings after completing the software upgrade. Decompress the file and copy it can access the Internet. All video and audio settings return to a network and make sure it into the root directory of the TV's USB ports to the Internet. Updating the Software Screen Menu > Support > Software Update Try Now Check your TV's software version and upgrade it if necessary. [[ DO NOT turn...
User Manual Ver.1.0 (English)
Page 175
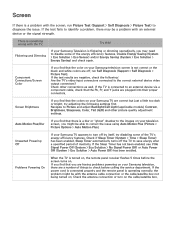
...'s video input connectors connected to turn on the cable/satellite box. If the test fails to identify a problem, there may need to correct the issue using Auto Motion Plus (Picture > Picture Options > Auto Motion Plus). Component Connections/Screen Color If you might be able to disable some of the energy efficiency features. Navigate to diagnose the issue. Sleep Timer automatically turns off , run Picture Test (Support > Self Diagnosis > Picture Test) to Picture and adjust Backlight/Cell Light (applicable models), Contrast...
...'s video input connectors connected to turn on the cable/satellite box. If the test fails to identify a problem, there may need to correct the issue using Auto Motion Plus (Picture > Picture Options > Auto Motion Plus). Component Connections/Screen Color If you might be able to disable some of the energy efficiency features. Navigate to diagnose the issue. Sleep Timer automatically turns off , run Picture Test (Support > Self Diagnosis > Picture Test) to Picture and adjust Backlight/Cell Light (applicable models), Contrast...
User Manual Ver.1.0 (English)
Page 176
... in analog and digital channels. The color is a dotted line on the edge of video content may cause color problems or a blank screen. Run Setup (System > Setup) or Auto Program (Broadcasting > Auto Program). The TV image does not look as good as it to 16:9. Air/Cable Antenna Connection: Try HD channels after performing the Auto Program operation. The compression of the screen. A weak or bad quality signal can cause picture distortions. Mobile phones used close...
... in analog and digital channels. The color is a dotted line on the edge of video content may cause color problems or a blank screen. Run Setup (System > Setup) or Auto Program (Broadcasting > Auto Program). The TV image does not look as good as it to 16:9. Air/Cable Antenna Connection: Try HD channels after performing the Auto Program operation. The compression of the screen. A weak or bad quality signal can cause picture distortions. Mobile phones used close...
User Manual Ver.1.0 (English)
Page 177
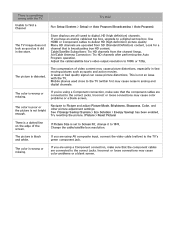
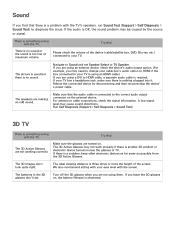
... a problem with the TV. For antenna or cable connections, check the signal information. Run Self Diagnosis (Support > Self Diagnosis > Sound Test). 3D TV There is something wrong with the TV's speakers, run Sound Test (Support > Self Diagnosis > Sound Test) to diagnose the issue. Make sure the glasses are not working correctly. Sound If you find that the audio cable is connected to the correct audio output connector on the external...
... a problem with the TV. For antenna or cable connections, check the signal information. Run Self Diagnosis (Support > Self Diagnosis > Sound Test). 3D TV There is something wrong with the TV's speakers, run Sound Test (Support > Self Diagnosis > Sound Test) to diagnose the issue. Make sure the glasses are not working correctly. Sound If you find that the audio cable is connected to the correct audio output connector on the external...

User Manual Ver.1.0 (English)
Page 180
... grayed out. Your TV utilizes high-speed switching circuits and high levels of electrical current, and depending on the TV's bezel. The settings are automatically reset every 30 minutes. Change Use Mode (Support > Use Mode) to prevent screen burn-ins. Make sure the cables are using the 4:3 screen ratio only may cause a popping noise. PIP functionality is turned off. This does not indicate a product malfunction...
... grayed out. Your TV utilizes high-speed switching circuits and high levels of electrical current, and depending on the TV's bezel. The settings are automatically reset every 30 minutes. Change Use Mode (Support > Use Mode) to prevent screen burn-ins. Make sure the cables are using the 4:3 screen ratio only may cause a popping noise. PIP functionality is turned off. This does not indicate a product malfunction...

Quick Guide Ver.1.0 (English)
Page 22
... the troubleshooting videos at 1-800-SAMSUNG (1-800-726-7864). Re-run Setup (Go to Menu > System > Setup) or run a Self Diagnosis Picture Test (Support > Self Diagnosis > Picture Test). com/support or call Samsung Customer Service at www.samsung.com/ spsn. If the problem is operating normally, the problem might be with the antenna cable connection or the cable/satellite box not being turned on the cable/satellite box. Auto Power Off turns off the TV if no user input...
... the troubleshooting videos at 1-800-SAMSUNG (1-800-726-7864). Re-run Setup (Go to Menu > System > Setup) or run a Self Diagnosis Picture Test (Support > Self Diagnosis > Picture Test). com/support or call Samsung Customer Service at www.samsung.com/ spsn. If the problem is operating normally, the problem might be with the antenna cable connection or the cable/satellite box not being turned on the cable/satellite box. Auto Power Off turns off the TV if no user input...
Quick Guide Ver.1.0 (English)
Page 23
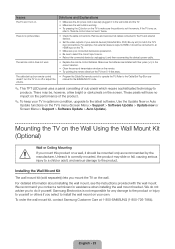
... wall mount kit (sold separately) lets you mount the TV on the TV's menu (Screen Menu > Support > Software Update > Update now or Screen Menu > Support > Software Update > Auto Update). For detailed information about installing the wall mount, see the instructions provided with their poles (+/-) in optimum condition, upgrade to "Remote control does not work . Remove and reconnect all cables connected to the TV and external devices. • Set the video outputs of sub pixels which require sophisticated technology to select the correct input source...
... wall mount kit (sold separately) lets you mount the TV on the TV's menu (Screen Menu > Support > Software Update > Update now or Screen Menu > Support > Software Update > Auto Update). For detailed information about installing the wall mount, see the instructions provided with their poles (+/-) in optimum condition, upgrade to "Remote control does not work . Remove and reconnect all cables connected to the TV and external devices. • Set the video outputs of sub pixels which require sophisticated technology to select the correct input source...
Quick Guide Ver.1.0 (English)
Page 24
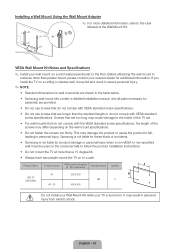
... VESA standard screw specifications. •• Do not use screws that do not comply with the VESA standard screw specifications, the length of the screws may result in millimeters Standard Screw Quantity LED-TV [Ultra Slim] 40 46 - 60 200 X 200 400 X 400 M8 4 Do not install your Wall Mount Kit while your wall mount on a solid wall perpendicular to the User Manual of the TV set. •• For wall mounts...
... VESA standard screw specifications. •• Do not use screws that do not comply with the VESA standard screw specifications, the length of the screws may result in millimeters Standard Screw Quantity LED-TV [Ultra Slim] 40 46 - 60 200 X 200 400 X 400 M8 4 Do not install your Wall Mount Kit while your wall mount on a solid wall perpendicular to the User Manual of the TV set. •• For wall mounts...
Quick Guide Ver.1.0 (English)
Page 33
... obtain warranty service, please contact SAMSUNG at Samsung's discretion. Warranty service can only be presented upon request as proof of products, equipment, systems, utilities, services, parts, supplies, accessories, applications, installations, repairs, external wiring or connectors not supplied or authorized by a SAMSUNG authorized service center. altered product or serial numbers; brightness related to follow operating instructions, cleaning, maintenance and environmental instructions that are eligible for problem determination and service procedures. To receive warranty service...
... obtain warranty service, please contact SAMSUNG at Samsung's discretion. Warranty service can only be presented upon request as proof of products, equipment, systems, utilities, services, parts, supplies, accessories, applications, installations, repairs, external wiring or connectors not supplied or authorized by a SAMSUNG authorized service center. altered product or serial numbers; brightness related to follow operating instructions, cleaning, maintenance and environmental instructions that are eligible for problem determination and service procedures. To receive warranty service...
Installation Guide Ver.1.0 (English)
Page 2
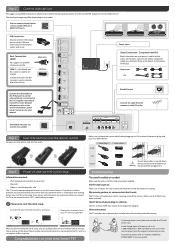
... OPTICAL or AUDIO OUT ports. Connect to help with wall mounting and cable routing. Troubleshooting The stand is the default port for Bluray players, game consoles, and other ports for a cable or satellite settop box. I don't know where to start the initial setup. For more detailed information, refer to the TV, such as a set-top box or Blu-ray player. These settings let the Smart Touch remote control external devices connected to the "Universal Remote Control Setup" section on and working...
... OPTICAL or AUDIO OUT ports. Connect to help with wall mounting and cable routing. Troubleshooting The stand is the default port for Bluray players, game consoles, and other ports for a cable or satellite settop box. I don't know where to start the initial setup. For more detailed information, refer to the TV, such as a set-top box or Blu-ray player. These settings let the Smart Touch remote control external devices connected to the "Universal Remote Control Setup" section on and working...


