User Manual Ver.1.0 (English)
Page 2
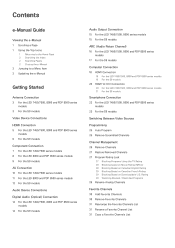
... the Home Page 2 Searching the Index 2 Searching Pages 2 Closing the e-Manual 2 Jumping to a Menu Item 2 Updating the e-Manual Getting Started Antenna Connection 3 For the LED 7450/7500, 8000 and PDP 8500 series models 3 For the S9 models Video Device Connections HDMI Connection 5 For the... 22 For the LED 7450/7500, 8000 and PDP 8500 series models 23 For the S9 models Switching Between Video Sources Programming 25 Auto Program 25 Remove Scrambled Channels Channel Management 26 Remove Channels 27 Restore Removed Channels 27 Program Rating Lock 27 Blocking Programs Using the TV Rating 28 Blocking...
... the Home Page 2 Searching the Index 2 Searching Pages 2 Closing the e-Manual 2 Jumping to a Menu Item 2 Updating the e-Manual Getting Started Antenna Connection 3 For the LED 7450/7500, 8000 and PDP 8500 series models 3 For the S9 models Video Device Connections HDMI Connection 5 For the... 22 For the LED 7450/7500, 8000 and PDP 8500 series models 23 For the S9 models Switching Between Video Sources Programming 25 Auto Program 25 Remove Scrambled Channels Channel Management 26 Remove Channels 27 Restore Removed Channels 27 Program Rating Lock 27 Blocking Programs Using the TV Rating 28 Blocking...
User Manual Ver.1.0 (English)
Page 3
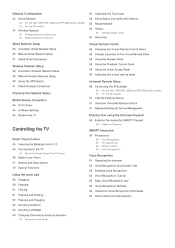
...Panel 55 Using the Quick Access Panel 55 Adjusting the virtual remote panel Universal Remote Setup 56 Connecting the IR Extender 56 For the LED 7450/7500, 8000 and PDP 8500 series models 57 For the S9 models 57 Add the External Device 57 Using the Universal Remote Control...Entering Text using the Onscreen Keypad 58 Entering Text using the QWERTY Keypad 58 Additional Features SMART Interaction 59 Precautions 59 Face Recognition 59 TV Camera Use 60 Motion Control 60 Voice Recognition Voice Recognition 61 Operating Environment 62 Voice Recognition Environment Test 62 Enabling Voice Recognition 62 ...
...Panel 55 Using the Quick Access Panel 55 Adjusting the virtual remote panel Universal Remote Setup 56 Connecting the IR Extender 56 For the LED 7450/7500, 8000 and PDP 8500 series models 57 For the S9 models 57 Add the External Device 57 Using the Universal Remote Control...Entering Text using the Onscreen Keypad 58 Entering Text using the QWERTY Keypad 58 Additional Features SMART Interaction 59 Precautions 59 Face Recognition 59 TV Camera Use 60 Motion Control 60 Voice Recognition Voice Recognition 61 Operating Environment 62 Voice Recognition Environment Test 62 Enabling Voice Recognition 62 ...

User Manual Ver.1.0 (English)
Page 12
One of 14 mm or less. HDMI Connection For the LED 7450/7500, 8000 and PDP 8500 series models Refer to the diagram and connect the HDMI cable to different HDMI specifications. The displayed image may ... HDMI cable types is recommended: ●● High-Speed HDMI Cable ●● High-Speed HDMI Cable with Ethernet Use an HDMI cable with the TV due to the video device's HDMI output connector and the TV's HDMI input connector. Using a non-certified HDMI cable may differ depending on the model. "" This...
One of 14 mm or less. HDMI Connection For the LED 7450/7500, 8000 and PDP 8500 series models Refer to the diagram and connect the HDMI cable to different HDMI specifications. The displayed image may ... HDMI cable types is recommended: ●● High-Speed HDMI Cable ●● High-Speed HDMI Cable with Ethernet Use an HDMI cable with the TV due to the video device's HDMI output connector and the TV's HDMI input connector. Using a non-certified HDMI cable may differ depending on the model. "" This...
User Manual Ver.1.0 (English)
Page 14
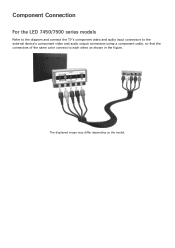
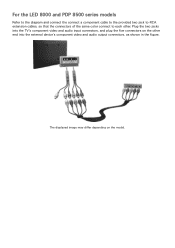
Component Connection For the LED 7450/7500 series models Refer to the diagram and connect the TV's component video and audio input connectors to the external device's component video and audio output connectors using a component cable, so that the connectors of the same color connect to each other, as shown in the figure. The displayed image may differ depending on the model.
Component Connection For the LED 7450/7500 series models Refer to the diagram and connect the TV's component video and audio input connectors to the external device's component video and audio output connectors using a component cable, so that the connectors of the same color connect to each other, as shown in the figure. The displayed image may differ depending on the model.
User Manual Ver.1.0 (English)
Page 15
Plug the two jacks into the external device's component video and audio output connectors, as shown in the figure. The displayed image may differ depending on the other . For the LED 8000 and PDP 8500 series models Refer to the diagram and connect the connect a component cable to the provided two jack to-RCA extension cables, so that the connectors of the same color connect to each other end into the TV's component video and audio input connectors, and plug the five connectors on the model.
Plug the two jacks into the external device's component video and audio output connectors, as shown in the figure. The displayed image may differ depending on the other . For the LED 8000 and PDP 8500 series models Refer to the diagram and connect the connect a component cable to the provided two jack to-RCA extension cables, so that the connectors of the same color connect to each other end into the TV's component video and audio input connectors, and plug the five connectors on the model.
User Manual Ver.1.0 (English)
Page 17
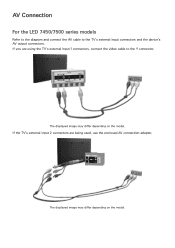
The displayed image may differ depending on the model. AV Connection For the LED 7450/7500 series models Refer to the diagram and connect the AV cable to the Y connector. The displayed image may differ depending on the model. If the TV's external input 2 connectors are using the TV's external input 1 connectors, connect the video cable to the TV's external input connectors and the device's AV output connectors. If you are being used, use the enclosed AV connection adapter.
The displayed image may differ depending on the model. AV Connection For the LED 7450/7500 series models Refer to the diagram and connect the AV cable to the Y connector. The displayed image may differ depending on the model. If the TV's external input 2 connectors are using the TV's external input 1 connectors, connect the video cable to the TV's external input connectors and the device's AV output connectors. If you are being used, use the enclosed AV connection adapter.
User Manual Ver.1.0 (English)
Page 18
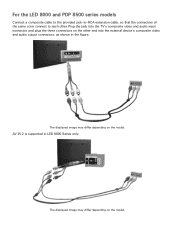
Plug the jack into the external device's composite video and audio output connectors, as shown in LED 8000 Series only. The displayed image may differ depending on the model. AV IN 2 is supported in the figure. The displayed image may differ depending on the model. For the LED 8000 and PDP 8500 series models Connect a composite cable to the provided jack-to-RCA extension cable, so that the connectors of the same color connect to each other end into the TV's composite video and audio input connector, and plug the three connectors on the other .
Plug the jack into the external device's composite video and audio output connectors, as shown in LED 8000 Series only. The displayed image may differ depending on the model. AV IN 2 is supported in the figure. The displayed image may differ depending on the model. For the LED 8000 and PDP 8500 series models Connect a composite cable to the provided jack-to-RCA extension cable, so that the connectors of the same color connect to each other end into the TV's composite video and audio input connector, and plug the three connectors on the other .

User Manual Ver.1.0 (English)
Page 21
The displayed image may differ depending on the model. For the LED 7450/7500, 8000 and PDP 8500 series models Refer to the diagram and connect the optical cable to the One Connect digital audio output connector and the device's digital audio input connector. For the S9 models Refer to the diagram and connect the optical cable to the TV's digital audio output connector and the device's digital audio input connector. The displayed image may differ depending on the model.
The displayed image may differ depending on the model. For the LED 7450/7500, 8000 and PDP 8500 series models Refer to the diagram and connect the optical cable to the One Connect digital audio output connector and the device's digital audio input connector. For the S9 models Refer to the diagram and connect the optical cable to the TV's digital audio output connector and the device's digital audio input connector. The displayed image may differ depending on the model.

User Manual Ver.1.0 (English)
Page 22
The displayed image may differ depending on the model. Audio Output Connection For the LED 7450/7500, 8000 series models Refer to the diagram and connect the audio cable to the One Connect audio output connector and the device's audio input connector. For the S9 models Refer to the diagram and connect the audio cable to the TV's audio output connector and the device's audio input connector. The displayed image may differ depending on the model.
The displayed image may differ depending on the model. Audio Output Connection For the LED 7450/7500, 8000 series models Refer to the diagram and connect the audio cable to the One Connect audio output connector and the device's audio input connector. For the S9 models Refer to the diagram and connect the audio cable to the TV's audio output connector and the device's audio input connector. The displayed image may differ depending on the model.
User Manual Ver.1.0 (English)
Page 23
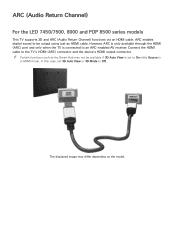
... mode. "" Certain functions such as the Smart Hub may differ depending on the model. ARC (Audio Return Channel) For the LED 7450/7500, 8000 and PDP 8500 series models This TV supports 3D and ARC (Audio Return Channel) functions via an HDMI cable. Connect the HDMI cable to an ARC-enabled AV... digital sound to be available if 3D Auto View is set 3D Auto View or 3D Mode to On while Source is connected to the TV's HDMI (ARC) connector and the device's HDMI output connector.
... mode. "" Certain functions such as the Smart Hub may differ depending on the model. ARC (Audio Return Channel) For the LED 7450/7500, 8000 and PDP 8500 series models This TV supports 3D and ARC (Audio Return Channel) functions via an HDMI cable. Connect the HDMI cable to an ARC-enabled AV... digital sound to be available if 3D Auto View is set 3D Auto View or 3D Mode to On while Source is connected to the TV's HDMI (ARC) connector and the device's HDMI output connector.

User Manual Ver.1.0 (English)
Page 97
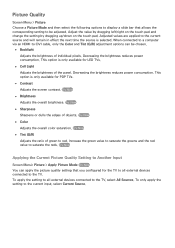
...It is most suitable for bright environments. ●● Standard: This is the default mode. ●● Natural: This is available for LED TVs only. ●● Relax: Consumes less power and reduces eye strain. Appropriate for darkened rooms, for watching movies, and when experiencing eye ...fatigue. ●● Entertain: Sharpens images for your TV viewing conditions. This mode is turned on the TV screen. This mode is useful for PDP TVs. ●● Movie: Darkens the screen and reduces glare. When connected to a Computer ...
...It is most suitable for bright environments. ●● Standard: This is the default mode. ●● Natural: This is available for LED TVs only. ●● Relax: Consumes less power and reduces eye strain. Appropriate for darkened rooms, for watching movies, and when experiencing eye ...fatigue. ●● Entertain: Sharpens images for your TV viewing conditions. This mode is turned on the TV screen. This mode is useful for PDP TVs. ●● Movie: Darkens the screen and reduces glare. When connected to a Computer ...
User Manual Ver.1.0 (English)
Page 98
... all external devices connected to the current source and will remain in effect the next time the source is only available for LED TVs. ●● Cell Light Adjusts the brightness of objects. Decreasing the brightness reduces power consumption. Try Now ●● Color Adjusts... the overall color saturation. When connected to a computer via an HDMI-to the TV. Try Now Applying the Current Picture Quality Setting to Another Input Screen Menu> Picture > Apply Picture Mode Try Now You can be adjusted....
... all external devices connected to the current source and will remain in effect the next time the source is only available for LED TVs. ●● Cell Light Adjusts the brightness of objects. Decreasing the brightness reduces power consumption. Try Now ●● Color Adjusts... the overall color saturation. When connected to a computer via an HDMI-to the TV. Try Now Applying the Current Picture Quality Setting to Another Input Screen Menu> Picture > Apply Picture Mode Try Now You can be adjusted....

User Manual Ver.1.0 (English)
Page 99
... right/top and bottom of the picture so it fits the entire screen. This is only available for LED TVs and in HDMI mode. ●● Smart View 2: Reduces a 16:9 picture by 25%. ""...option is not available with images in the UHD resolution because the supported screen size is only available for LED TVs and in HDMI or DTV mode. A magnified picture can be moved up and down. ●●... Zoom2: Magnifies the Zoom1 screen size to basic 4:3 mode. [[ Do not leave the TV in full screen, but some programs and videos don't fit the screen. A magnified picture can change the ...
... right/top and bottom of the picture so it fits the entire screen. This is only available for LED TVs and in HDMI mode. ●● Smart View 2: Reduces a 16:9 picture by 25%. ""...option is not available with images in the UHD resolution because the supported screen size is only available for LED TVs and in HDMI or DTV mode. A magnified picture can be moved up and down. ●●... Zoom2: Magnifies the Zoom1 screen size to basic 4:3 mode. [[ Do not leave the TV in full screen, but some programs and videos don't fit the screen. A magnified picture can change the ...

User Manual Ver.1.0 (English)
Page 104
...Custom, you can configure the afterimage and screen trembling removal ratio and you can view a sharper image through the LED Clear Motion function. This feature is only available for PDP TVs. ●● Black optimizer Adjust overall black color depth to give a change to picture depth. Use this ...for PDP 8500 series. This function is not the same as a computer display. This feature is only available when watching TV or when the input signal is only available for LED TVs. The Cinema Smooth option is AV, Component (480i, 1080i), or HDMI (1080i). Try Now ●● Motion Judder...
...Custom, you can configure the afterimage and screen trembling removal ratio and you can view a sharper image through the LED Clear Motion function. This feature is only available for PDP TVs. ●● Black optimizer Adjust overall black color depth to give a change to picture depth. Use this ...for PDP 8500 series. This function is not the same as a computer display. This feature is only available when watching TV or when the input signal is only available for LED TVs. The Cinema Smooth option is AV, Component (480i, 1080i), or HDMI (1080i). Try Now ●● Motion Judder...

User Manual Ver.1.0 (English)
Page 115
... after-image is set pattern. Side Gray Screen Menu > System > Screen Burn Protection > Side Gray This allows selection of time, the TV will automatically activate the Screen Burn Protection function to 4:3. Scrolling Screen Menu > System > Screen Burn Protection > Scrolling This removes after-images .... The after-image removal function has to effectively remove after-images. This feature is only available for approximately 1 hour to be executed for LED TVs. Auto Protection Time Screen Menu > System > Auto Protection Time Select a time from the list. Press any button to a set to...
... after-image is set pattern. Side Gray Screen Menu > System > Screen Burn Protection > Side Gray This allows selection of time, the TV will automatically activate the Screen Burn Protection function to 4:3. Scrolling Screen Menu > System > Screen Burn Protection > Scrolling This removes after-images .... The after-image removal function has to effectively remove after-images. This feature is only available for approximately 1 hour to be executed for LED TVs. Auto Protection Time Screen Menu > System > Auto Protection Time Select a time from the list. Press any button to a set to...

User Manual Ver.1.0 (English)
Page 162
...) 16:9, Wide Fit, 4:3 Component (1080i, 1080p) 16:9, Wide Fit, 4:3, Screen Fit HDMI (720p, 1080i, 1080p) 16:9, Wide Fit, 4:3, Screen Fit, Smart View 1 (for LED TV), Smart View 2 (for LED TV) HDMI (2160p) (for UHD S9 Series model) Screen Fit The Picture Size setting is applied to the current source and the applied Picture Size...
...) 16:9, Wide Fit, 4:3 Component (1080i, 1080p) 16:9, Wide Fit, 4:3, Screen Fit HDMI (720p, 1080i, 1080p) 16:9, Wide Fit, 4:3, Screen Fit, Smart View 1 (for LED TV), Smart View 2 (for LED TV) HDMI (2160p) (for UHD S9 Series model) Screen Fit The Picture Size setting is applied to the current source and the applied Picture Size...
User Manual Ver.1.0 (English)
Page 164
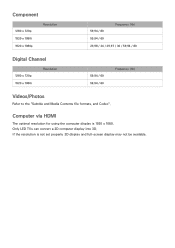
If the resolution is 1920 x 1080. Only LED TVs can convert a 2D computer display into 3D. Computer via HDMI The optimal resolution for using the computer display is not set properly, 3D display and full-screen display may not be available. Component 1280 x 720p 1920 x 1080i 1920 x 1080p Resolution 59.94 / 60 Frequency (Hz) 59.94 / 60 23.98 / 24 / 29.97 / 30 / 59.94 / 60 Digital Channel 1280 x 720p 1920 x 1080i Resolution 59.94 / 60 59.94 / 60 Frequency (Hz) Videos/Photos Refer to the "Subtitle and Media Contents file formats, and Codec".
If the resolution is 1920 x 1080. Only LED TVs can convert a 2D computer display into 3D. Computer via HDMI The optimal resolution for using the computer display is not set properly, 3D display and full-screen display may not be available. Component 1280 x 720p 1920 x 1080i 1920 x 1080p Resolution 59.94 / 60 Frequency (Hz) 59.94 / 60 23.98 / 24 / 29.97 / 30 / 59.94 / 60 Digital Channel 1280 x 720p 1920 x 1080i Resolution 59.94 / 60 59.94 / 60 Frequency (Hz) Videos/Photos Refer to the "Subtitle and Media Contents file formats, and Codec".
Quick Guide Ver.1.0 (English)
Page 1
... 1-800-SAMSUNG (726-7864) 1-800-SAMSUNG (726-7864) Web Site Address www.samsung.com/ca (English) Samsung Electronics Canada Inc., Customer www.samsung.com/ca_fr (French) Service 55 Standish Court Mississauga, Ontario L5R 4B2 Canada www.samsung.com Samsung Electronics America, Inc. 85 Challenger Road Ridgefield Park, NJ 07660 LED TV user manual © 2013 Samsung Electronics Co...
... 1-800-SAMSUNG (726-7864) 1-800-SAMSUNG (726-7864) Web Site Address www.samsung.com/ca (English) Samsung Electronics Canada Inc., Customer www.samsung.com/ca_fr (French) Service 55 Standish Court Mississauga, Ontario L5R 4B2 Canada www.samsung.com Samsung Electronics America, Inc. 85 Challenger Road Ridgefield Park, NJ 07660 LED TV user manual © 2013 Samsung Electronics Co...
Quick Guide Ver.1.0 (English)
Page 24
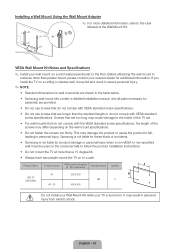
...severe personal injury. ✎✎ NOTE •• Standard dimensions for wall mount kits are shown in the table below. •• Samsung wall mount kits contain a detailed installation manual, and all parts necessary for assembly are provided. •• Do not use screws that do... leading to surfaces other than the standard length or do not comply with VESA standard screw specifications. This may result in millimeters Standard Screw Quantity LED-TV [Ultra Slim] 40 46 - 60 200 X 200 400 X 400 M8 4 Do not install your Wall Mount Kit while your nearest dealer...
...severe personal injury. ✎✎ NOTE •• Standard dimensions for wall mount kits are shown in the table below. •• Samsung wall mount kits contain a detailed installation manual, and all parts necessary for assembly are provided. •• Do not use screws that do... leading to surfaces other than the standard length or do not comply with VESA standard screw specifications. This may result in millimeters Standard Screw Quantity LED-TV [Ultra Slim] 40 46 - 60 200 X 200 400 X 400 M8 4 Do not install your Wall Mount Kit while your nearest dealer...
Quick Guide Ver.1.0 (English)
Page 33
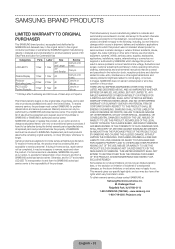
... not supplied or authorized by SAMSUNG against manufacturing defects in the United States. This limited warranty covers manufacturing defects in materials and workmanship encountered in normal, and except to the extent otherwise expressly provided for Commercial Use Categories Parts LCD/LED TV 1 Year Plasma Display 1 Year...for a limited warranty period of 90 Days Parts and Labor for in -home service, the product must contact SAMSUNG for 37" and smaller LCD/LED TV, transportation to the original consumer purchaser, is longer. If in-home service is valid only on how long ...
... not supplied or authorized by SAMSUNG against manufacturing defects in the United States. This limited warranty covers manufacturing defects in materials and workmanship encountered in normal, and except to the extent otherwise expressly provided for Commercial Use Categories Parts LCD/LED TV 1 Year Plasma Display 1 Year...for a limited warranty period of 90 Days Parts and Labor for in -home service, the product must contact SAMSUNG for 37" and smaller LCD/LED TV, transportation to the original consumer purchaser, is longer. If in-home service is valid only on how long ...

