User Manual Ver.1.0 (English)
Page 2
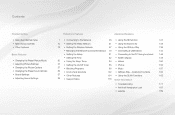
...Other Features Basic Features • Changing the Preset Picture Mode • Adjusting Picture Settings • Changing the Picture Options • Changing the Preset Sound Modes • Sound Settings • Adjusting Sound Settings Preference Features Advanced Features 1 • Connecting to the Network 45 • ...Using the 3D function 127 14 • Setting the Wired Network 61 • Using the Explore 3D 138 18 • Setting the Wireless Network 67 • Using the AllShare Play 139 • Managing the Network Connected...
...Other Features Basic Features • Changing the Preset Picture Mode • Adjusting Picture Settings • Changing the Picture Options • Changing the Preset Sound Modes • Sound Settings • Adjusting Sound Settings Preference Features Advanced Features 1 • Connecting to the Network 45 • ...Using the 3D function 127 14 • Setting the Wired Network 61 • Using the Explore 3D 138 18 • Setting the Wireless Network 67 • Using the AllShare Play 139 • Managing the Network Connected...

User Manual Ver.1.0 (English)
Page 7
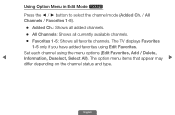
Use the arrow buttons to activate the option or change its settings. ●● Program View (digital channels only): Displays the program when digital ◀ channel is selected. ▶ English Select an option, and then press ENTERE to select a channel, and then press the TOOLS button. 2. Using Option Menu t Manage channels using the Channel List menu options (Program View, Edit Favorites, Channel Name Edit, Delete, Information, Change Antenna, Edit Mode). 1.
Use the arrow buttons to activate the option or change its settings. ●● Program View (digital channels only): Displays the program when digital ◀ channel is selected. ▶ English Select an option, and then press ENTERE to select a channel, and then press the TOOLS button. 2. Using Option Menu t Manage channels using the Channel List menu options (Program View, Edit Favorites, Channel Name Edit, Delete, Information, Change Antenna, Edit Mode). 1.

User Manual Ver.1.0 (English)
Page 8
...;/▼ buttons, and then press ENTERE. 3. Select OK, and then press ENTERE twice. ◀ NN If you watch frequently as being Favorites, change its ▶ settings in Favorites 1-5. 1. English Select Edit Favorites, and then press the ENTERE button. The Edit Favorites screen appears. 2. You can add a favorite channel to edit or... delete the channel as favorites. Add or delete the selected channel in Edit Favorites screen. ●● Edit Favorites t: Set channels you want to any one of the groups.
...;/▼ buttons, and then press ENTERE. 3. Select OK, and then press ENTERE twice. ◀ NN If you watch frequently as being Favorites, change its ▶ settings in Favorites 1-5. 1. English Select Edit Favorites, and then press the ENTERE button. The Edit Favorites screen appears. 2. You can add a favorite channel to edit or... delete the channel as favorites. Add or delete the selected channel in Edit Favorites screen. ●● Edit Favorites t: Set channels you want to any one of the groups.
User Manual Ver.1.0 (English)
Page 10
English Set each channel using Edit Favorites. The option menu items that appear may ▶ differ depending on the channel status and type. Using Option Menu in ...
English Set each channel using Edit Favorites. The option menu items that appear may ▶ differ depending on the channel status and type. Using Option Menu in ...

User Manual Ver.1.0 (English)
Page 11
... (Favorites 1, Favorites 2, etc.). A check box appears to the left of the groups. Press the TOOLS button, then select a function and change its settings. ◀ ●● Edit Favorites: Set the selected channels you 've selected. Press the TOOLS button in Channel List screen, then select the Edit Mode. 1. You can select more...
... (Favorites 1, Favorites 2, etc.). A check box appears to the left of the groups. Press the TOOLS button, then select a function and change its settings. ◀ ●● Edit Favorites: Set the selected channels you 've selected. Press the TOOLS button in Channel List screen, then select the Edit Mode. 1. You can select more...
User Manual Ver.1.0 (English)
Page 13
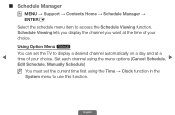
Set each channel using the Time → Clock function in the System menu to access the Schedule Viewing function. Schedule Viewing lets you display the channel ... → ENTERE Select the schedule menu item to use this function. Using Option Menu t You can set the current time first using the menu options (Cancel Schedule, ▶ Edit Schedule, Manually Schedule) NN You must set the TV to display a desired channel automatically on a day and at the time of your choice...
Set each channel using the Time → Clock function in the System menu to access the Schedule Viewing function. Schedule Viewing lets you display the channel ... → ENTERE Select the schedule menu item to use this function. Using Option Menu t You can set the current time first using the menu options (Cancel Schedule, ▶ Edit Schedule, Manually Schedule) NN You must set the TV to display a desired channel automatically on a day and at the time of your choice...
User Manual Ver.1.0 (English)
Page 14
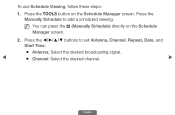
Press the Manually Schedule to set Antenna, Channel, Repeat, Date, and Start Time. ●● Antenna: Select the desired broadcasting signal. ◀ ●● Channel: Select the desired channel. ▶ English Press the buttons to add a scheduled viewing. To use Schedule Viewing, follow these steps: 1. Press the TOOLS button on the Schedule Manager screen. 2. NN You can press the a (Manually Schedule) directly on the Schedule Manager screen.
Press the Manually Schedule to set Antenna, Channel, Repeat, Date, and Start Time. ●● Antenna: Select the desired broadcasting signal. ◀ ●● Channel: Select the desired channel. ▶ English Press the buttons to add a scheduled viewing. To use Schedule Viewing, follow these steps: 1. Press the TOOLS button on the Schedule Manager screen. 2. NN You can press the a (Manually Schedule) directly on the Schedule Manager screen.
User Manual Ver.1.0 (English)
Page 15
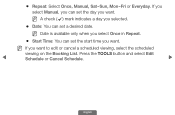
NN Date is available only when you select Once in Repeat. ●● Start Time: You can set the day you want to edit or cancel a scheduled viewing, select the scheduled viewing on the Booking List. Press the TOOLS button and select Edit ◀ Schedule or Cancel Schedule. ▶ English If you select Manual, you can set a desired date. NN If you selected. ●● Date: You can set the start time you want. NN A check (c) mark indicates a day you want . ●● Repeat: Select Once, Manual, Sat~Sun, Mon~Fri or Everyday.
NN Date is available only when you select Once in Repeat. ●● Start Time: You can set the day you want to edit or cancel a scheduled viewing, select the scheduled viewing on the Booking List. Press the TOOLS button and select Edit ◀ Schedule or Cancel Schedule. ▶ English If you select Manual, you can set a desired date. NN If you selected. ●● Date: You can set the start time you want. NN A check (c) mark indicates a day you want . ●● Repeat: Select Once, Manual, Sat~Sun, Mon~Fri or Everyday.
User Manual Ver.1.0 (English)
Page 23
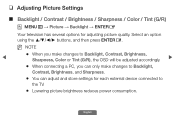
❑❑ Adjusting Picture Settings ■■ Backlight / Contrast / Brightness / Sharpness / Color / Tint (G/R) OO MENUm → Picture → Backlight → ENTERE Your television has several options for each external device ... accordingly. ▶ ●● When connecting a PC, you can only make changes to Backlight, Contrast, Brightness, and Sharpness. ●● You can adjust and store settings for adjusting picture quality.
❑❑ Adjusting Picture Settings ■■ Backlight / Contrast / Brightness / Sharpness / Color / Tint (G/R) OO MENUm → Picture → Backlight → ENTERE Your television has several options for each external device ... accordingly. ▶ ●● When connecting a PC, you can only make changes to Backlight, Contrast, Brightness, and Sharpness. ●● You can adjust and store settings for adjusting picture quality.

User Manual Ver.1.0 (English)
Page 24
... an option using the buttons, and then press ENTERE. ●● Picture Size: If you use your TV's 16:9 mode most of the time. 16:9: Sets the picture to 16:9 wide screen mode. ◀ Zoom1: Magnifies the picture moderately. However, we highly recommend you have a cable box or satellite receiver, it...
... an option using the buttons, and then press ENTERE. ●● Picture Size: If you use your TV's 16:9 mode most of the time. 16:9: Sets the picture to 16:9 wide screen mode. ◀ Zoom1: Magnifies the picture moderately. However, we highly recommend you have a cable box or satellite receiver, it...

User Manual Ver.1.0 (English)
Page 25
For analog TV programs. NN Do not set your TV inputs HDMI (720p / 1080i / 1080p) or Component (1080i / 1080p) signals, displays the full image without any cut-off. English Screen Fit: When your ...; Smart View 1 is enabled only in HDMI mode. ●● Smart View 2 is not covered by 50%. Smart View 1: Reduces original screen by the warranty. 4:3: Sets the picture to 4:3 format for a long time. The borders displayed on the left and right, or top and bottom of the screen may cause image...
For analog TV programs. NN Do not set your TV inputs HDMI (720p / 1080i / 1080p) or Component (1080i / 1080p) signals, displays the full image without any cut-off. English Screen Fit: When your ...; Smart View 1 is enabled only in HDMI mode. ●● Smart View 2 is not covered by 50%. Smart View 1: Reduces original screen by the warranty. 4:3: Sets the picture to 4:3 format for a long time. The borders displayed on the left and right, or top and bottom of the screen may cause image...

User Manual Ver.1.0 (English)
Page 26
.... The picture will be reset to its default position. Select the Position button, and then press ENTERE. 3. Position is only available if Picture size is set to move the picture up or down. ◀ 4. Press the ▲ or ▼ button to Zoom1, Zoom2, Wide Fit, or Screen fit...
.... The picture will be reset to its default position. Select the Position button, and then press ENTERE. 3. Position is only available if Picture size is set to move the picture up or down. ◀ 4. Press the ▲ or ▼ button to Zoom1, Zoom2, Wide Fit, or Screen fit...

User Manual Ver.1.0 (English)
Page 28
... can vary depending on the input resolution when you have connected to an input on the TV. NN The picture size can adjust and store settings for each external device you play content using Videos in AllShare Play.
... can vary depending on the input resolution when you have connected to an input on the TV. NN The picture size can adjust and store settings for each external device you play content using Videos in AllShare Play.

User Manual Ver.1.0 (English)
Page 29
NN When connecting a PC, you can only make changes to White Balance and ◀ Gamma. ▶ English To use, select an option using the buttons, and then press ENTERE. ❑❑ Changing the Picture Options ■■ Advanced Settings OO MENUm → Picture → Advanced Settings → ENTERE Advanced Settings are available in the Standard and Movie modes.
NN When connecting a PC, you can only make changes to White Balance and ◀ Gamma. ▶ English To use, select an option using the buttons, and then press ENTERE. ❑❑ Changing the Picture Options ■■ Advanced Settings OO MENUm → Picture → Advanced Settings → ENTERE Advanced Settings are available in the Standard and Movie modes.

User Manual Ver.1.0 (English)
Page 30
●● Dynamic Contrast (Off / Low / Medium / High): Advanced Settings Adjusts the screen contrast. English RGB Only Mode Off ●● Flesh Tone: Emphasizes pink "Flesh Tone." Dynamic Contrast Medium ●● Black Tone (Off / ...
●● Dynamic Contrast (Off / Low / Medium / High): Advanced Settings Adjusts the screen contrast. English RGB Only Mode Off ●● Flesh Tone: Emphasizes pink "Flesh Tone." Dynamic Contrast Medium ●● Black Tone (Off / ...
User Manual Ver.1.0 (English)
Page 31
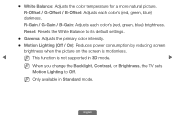
... picture. NN Only available in 3D mode. ▶ NN When you change the Backlight, Contrast, or Brightness, the TV sets Motion Lighting to Off. Reset: Resets the White Balance to its default settings. ●● Gamma: Adjusts the primary color intensity. ●● Motion Lighting (Off / On): Reduces power consumption by reducing...
... picture. NN Only available in 3D mode. ▶ NN When you change the Backlight, Contrast, or Brightness, the TV sets Motion Lighting to Off. Reset: Resets the White Balance to its default settings. ●● Gamma: Adjusts the primary color intensity. ●● Motion Lighting (Off / On): Reduces power consumption by reducing...
User Manual Ver.1.0 (English)
Page 32
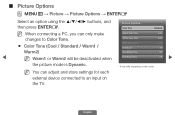
...; ENTERE Select an option using the buttons, and then press ENTERE. Picture Options Color Tone Standard NN When connecting a PC, you can adjust and store settings for each external device connected to Color Tone. MPEG Noise Filter Auto ●● Color Tone (Cool / Standard / Warm1 / HDMI Black Level Low Film Mode...
...; ENTERE Select an option using the buttons, and then press ENTERE. Picture Options Color Tone Standard NN When connecting a PC, you can adjust and store settings for each external device connected to Color Tone. MPEG Noise Filter Auto ●● Color Tone (Cool / Standard / Warm1 / HDMI Black Level Low Film Mode...

User Manual Ver.1.0 (English)
Page 34
NN Available only in ATV, AV, Component (480i / 1080i) and HDMI (1080i). NN Available in HDMI mode (RGB signals). ●● Film Mode (Off / Auto1 / Auto2): Sets the TV so that it senses and then processes film signals from all sources automatically and adjusts the picture for optimum quality. NN If the screen does not seem natural, change its option to adjust the screen depth. ●● HDMI Black Level (Low / Normal): Lets you select the black level on the screen to Off / Auto1 / ◀ Auto2 in Film Mode. ▶ English
NN Available only in ATV, AV, Component (480i / 1080i) and HDMI (1080i). NN Available in HDMI mode (RGB signals). ●● Film Mode (Off / Auto1 / Auto2): Sets the TV so that it senses and then processes film signals from all sources automatically and adjusts the picture for optimum quality. NN If the screen does not seem natural, change its option to adjust the screen depth. ●● HDMI Black Level (Low / Normal): Lets you select the black level on the screen to Off / Auto1 / ◀ Auto2 in Film Mode. ▶ English

User Manual Ver.1.0 (English)
Page 35
If Auto Motion Plus is displaying when you can set Auto Motion Plus to default values. Judder Reduction: Adjusts the judder reduction level of the incoming video signal (60Hz). ●● Auto Motion Plus (Off / ... sources playing movies. This frequency is not the frequency of the picture the TV is set to Custom, you have Auto Motion Plus on. Reset: Restores settings to Off. NN The info screen on the screen, please set Blur Reduction, ◀ Judder Reduction, Reset manually. ▶ Blur Reduction: Adjusts the blur reduction level...
If Auto Motion Plus is displaying when you can set Auto Motion Plus to default values. Judder Reduction: Adjusts the judder reduction level of the incoming video signal (60Hz). ●● Auto Motion Plus (Off / ... sources playing movies. This frequency is not the frequency of the picture the TV is set to Custom, you have Auto Motion Plus on. Reset: Restores settings to Off. NN The info screen on the screen, please set Blur Reduction, ◀ Judder Reduction, Reset manually. ▶ Blur Reduction: Adjusts the blur reduction level...

User Manual Ver.1.0 (English)
Page 36
NN It will be deactivated when the picture mode is set to provide a clear picture. NN The screen may become slightly darker when you play LED Motion Plus. ◀ ▶ English ●● LED Motion Plus (Off / On): Removes drag from fast scenes with a lot of movement to Natural.
NN It will be deactivated when the picture mode is set to provide a clear picture. NN The screen may become slightly darker when you play LED Motion Plus. ◀ ▶ English ●● LED Motion Plus (Off / On): Removes drag from fast scenes with a lot of movement to Natural.


