User Manual Ver.1.0 (English)
Page 2
Contents Connecting Antenna and External Using the Remote Control and devices Peripherals Antenna Connection Video Device Connections 2 HDMI Connection 3 Component Connection 4 Composite (A/V) Connection Audio Input and Output Connections 5 Digital Audio (Optical) Connection 6 Audio Output Connection Connecting to a Computer 7 Connecting Through the HDMI Port 8 Connecting With a DVI to HDMI Cable 9 Connecting Through Samsung Link 9 Connecting Through DLNA Using Your Home Network Connecting To a Mobile Device 11 Screen Mirroring 13 Connecting Mobile Devices without a Wireless Router (Wi-Fi ...
Contents Connecting Antenna and External Using the Remote Control and devices Peripherals Antenna Connection Video Device Connections 2 HDMI Connection 3 Component Connection 4 Composite (A/V) Connection Audio Input and Output Connections 5 Digital Audio (Optical) Connection 6 Audio Output Connection Connecting to a Computer 7 Connecting Through the HDMI Port 8 Connecting With a DVI to HDMI Cable 9 Connecting Through Samsung Link 9 Connecting Through DLNA Using Your Home Network Connecting To a Mobile Device 11 Screen Mirroring 13 Connecting Mobile Devices without a Wireless Router (Wi-Fi ...
User Manual Ver.1.0 (English)
Page 3
... Your Samsung Account to External Service Accounts 41 Changing and Adding Information to the Panel Screen 36 Using the Smart Hub Tutorial 36 Resetting Smart Hub Digital Broadcast Information at a Glance 58 Using the Guide 59 Viewing Detailed Information 59 Checking Current Program Info 59 Changing the broadcast signal 59 Digital Channel Signal Info and Strength Using Smart Hub with Soccer Mode 74 Enabling Soccer Mode TV-Viewing Support Features 75 Showing Captions 77...
... Your Samsung Account to External Service Accounts 41 Changing and Adding Information to the Panel Screen 36 Using the Smart Hub Tutorial 36 Resetting Smart Hub Digital Broadcast Information at a Glance 58 Using the Guide 59 Viewing Detailed Information 59 Checking Current Program Info 59 Changing the broadcast signal 59 Digital Channel Signal Info and Strength Using Smart Hub with Soccer Mode 74 Enabling Soccer Mode TV-Viewing Support Features 75 Showing Captions 77...
User Manual Ver.1.0 (English)
Page 4
... Picture Support Functions 89 PIP Broadcast Viewing 90 Changing the Picture Size and Position 91 Listening to Audio Only with the Screen Turned Off (Picture Off) 91 Resetting the Picture Mode Settings Changing the Sound Mode and Using Sound Effects 92 Choosing the Right Sound Mode for the Environment 92 Using Sound Effects Sound Support Functions 93 Selecting Speakers 93 Designating the TV's Installation Type 94 Enabling Digital Audio Output 94 Listening to 3D Audio in 3D Mode 94 Resetting All Sound Settings Setting the Time and Using the Timer 95 Setting...
... Picture Support Functions 89 PIP Broadcast Viewing 90 Changing the Picture Size and Position 91 Listening to Audio Only with the Screen Turned Off (Picture Off) 91 Resetting the Picture Mode Settings Changing the Sound Mode and Using Sound Effects 92 Choosing the Right Sound Mode for the Environment 92 Using Sound Effects Sound Support Functions 93 Selecting Speakers 93 Designating the TV's Installation Type 94 Enabling Digital Audio Output 94 Listening to 3D Audio in 3D Mode 94 Resetting All Sound Settings Setting the Time and Using the Timer 95 Setting...
User Manual Ver.1.0 (English)
Page 5
... Picture Sizes and Input Signals 132 Installing an Anti-Theft Lock 133 Read Before Setting Up a Wireless Internet Connection Read Before Connecting a Computer (Supported Resolutions) 134 LED 5203, 5303 and 6203 series 134 IBM 134 MAC 135 VESA DMT 136 LED 4303 series 136 IBM 136 MAC 136 VESA DMT Supported Resolutions for 3D Modes 123 HDMI 123 Component 123 Digital Channel 123 Videos/Photos 123 Computer via HDMI Cable. Troubleshooting Getting Support 110 Support through Remote Management 111 Finding the Information You Need...
... Picture Sizes and Input Signals 132 Installing an Anti-Theft Lock 133 Read Before Setting Up a Wireless Internet Connection Read Before Connecting a Computer (Supported Resolutions) 134 LED 5203, 5303 and 6203 series 134 IBM 134 MAC 135 VESA DMT 136 LED 4303 series 136 IBM 136 MAC 136 VESA DMT Supported Resolutions for 3D Modes 123 HDMI 123 Component 123 Digital Channel 123 Videos/Photos 123 Computer via HDMI Cable. Troubleshooting Getting Support 110 Support through Remote Management 111 Finding the Information You Need...

User Manual Ver.1.0 (English)
Page 10
... audio input connector. "" Adjust the audio device's volume using an optical cable does not automatically turn off the TV speakers. Refer to the diagram and connect the optical cable to digital audio. "" Refer to something other than TV Speaker. To turn off the TV's speakers, set TV Sound Output (Sound > Speaker Settings > TV Sound Output) to the external device's operating manual when connecting it may vary depending on the manufacturer. Digital Audio (Optical) Connection Connecting an AV receiver to the TV via a digital audio (optical) connector lets you are listed...
... audio input connector. "" Adjust the audio device's volume using an optical cable does not automatically turn off the TV speakers. Refer to the diagram and connect the optical cable to digital audio. "" Refer to something other than TV Speaker. To turn off the TV's speakers, set TV Sound Output (Sound > Speaker Settings > TV Sound Output) to the external device's operating manual when connecting it may vary depending on the manufacturer. Digital Audio (Optical) Connection Connecting an AV receiver to the TV via a digital audio (optical) connector lets you are listed...
User Manual Ver.1.0 (English)
Page 23
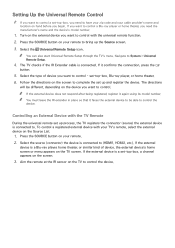
... menu appears on the TV screen. If the external device is connected. Navigate to System > Universal Remote Setup. 444 The TV checks if the IR Extender cable is a set-top-box, a channel appears on the screen. 333 Aim the remote at the IR sensor on the TV to control the device. If it again using its model number. If you want to control a Blu-ray player or home theater, you need...
... menu appears on the TV screen. If the external device is connected. Navigate to System > Universal Remote Setup. 444 The TV checks if the IR Extender cable is a set-top-box, a channel appears on the screen. 333 Aim the remote at the IR sensor on the TV to control the device. If it again using its model number. If you want to control a Blu-ray player or home theater, you need...
User Manual Ver.1.0 (English)
Page 34
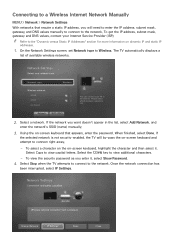
..., and DNS values manually to connect to the network. The TV automatically displays a list of available wireless networks. Network type Wireless Wireless network AP0000 AP0001 Add Network Refresh WPS (PBC) You can connect your Internet Service Provider (ISP). When finished, select Done. To view the security password as you will by-pass the on -screen keyboard that require a static IP address, you enter it . Change Network IP Settings Retry Close To get the...
..., and DNS values manually to connect to the network. The TV automatically displays a list of available wireless networks. Network type Wireless Wireless network AP0000 AP0001 Add Network Refresh WPS (PBC) You can connect your Internet Service Provider (ISP). When finished, select Done. To view the security password as you will by-pass the on -screen keyboard that require a static IP address, you enter it . Change Network IP Settings Retry Close To get the...
User Manual Ver.1.0 (English)
Page 58
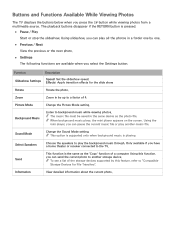
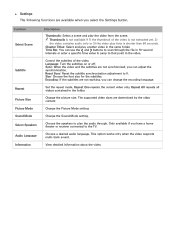
... select the Settings button. Sound Mode Change the Sound Mode setting. Using this feature, refer to another music file. Function Description Slideshow Settings Speed: Set the slideshow speed. Rotate Rotate the photo. Background Music Listen to play another storage device. Using the mini player, you have a home theater or receiver connected to a factor of a computer. Select Speakers Choose the speakers to background music while viewing photos. ""To see a list of...
... select the Settings button. Sound Mode Change the Sound Mode setting. Using this feature, refer to another music file. Function Description Slideshow Settings Speed: Set the slideshow speed. Rotate Rotate the photo. Background Music Listen to play another storage device. Using the mini player, you have a home theater or receiver connected to a factor of a computer. Select Speakers Choose the speakers to background music while viewing photos. ""To see a list of...
User Manual Ver.1.0 (English)
Page 60
... the video and the subtitles are not working, you can change the encoding language. Change the picture size. Only available if you select the Settings button. Reset Sync: Reset the subtitle synchronization adjustment to the TV. Repeat All repeats all videos contained in the same folder. View detailed information about the video. The supported video sizes are available when you have a home theater or receiver connected to 0. Language: Turn the...
... the video and the subtitles are not working, you can change the encoding language. Change the picture size. Only available if you select the Settings button. Reset Sync: Reset the subtitle synchronization adjustment to the TV. Repeat All repeats all videos contained in the same folder. View detailed information about the video. The supported video sizes are available when you have a home theater or receiver connected to 0. Language: Turn the...
User Manual Ver.1.0 (English)
Page 82
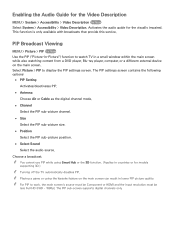
... Viewing MENU > Picture > PIP Try Now Use the PIP ("Picture-In-Picture") function to watch TV in a small window within the main screen while also watching content from a DVD player, Blu-ray player, computer, or a different external device on the main screen can result in countries or for models supporting 3D.) "" Turning off the TV automatically disables PIP. Choose a broadcast. Select Picture > PIP to work, the main screen's source must be Component or HDMI and the input resolution...
... Viewing MENU > Picture > PIP Try Now Use the PIP ("Picture-In-Picture") function to watch TV in a small window within the main screen while also watching content from a DVD player, Blu-ray player, computer, or a different external device on the main screen can result in countries or for models supporting 3D.) "" Turning off the TV automatically disables PIP. Choose a broadcast. Select Picture > PIP to work, the main screen's source must be Component or HDMI and the input resolution...

User Manual Ver.1.0 (English)
Page 87
... screen contrast. "" Advanced Settings is only available when the Picture Mode is connected to a computer via an HDMI-DVI cable, only White Balance and Gamma can apply the picture quality setting that you configured for each Picture Mode. Applying the Current Picture Settings to Other Input Sources Try Now MENU > Picture > Apply Picture Mode You can be adjusted. Use this option to the current input only, select Current Source. Fine-Tuning Each Picture Mode (Advanced Settings) MENU > Picture > Advanced Settings...
... screen contrast. "" Advanced Settings is only available when the Picture Mode is connected to a computer via an HDMI-DVI cable, only White Balance and Gamma can apply the picture quality setting that you configured for each Picture Mode. Applying the Current Picture Settings to Other Input Sources Try Now MENU > Picture > Apply Picture Mode You can be adjusted. Use this option to the current input only, select Current Source. Fine-Tuning Each Picture Mode (Advanced Settings) MENU > Picture > Advanced Settings...

User Manual Ver.1.0 (English)
Page 94
... following options: ●● PIP Activates/deactivates PIP. ●● Antenna Choose Air or Cable as a Blu-ray player on the main screen can result in a lower PIP picture quality. "" PIP cannot be less than FHD (Full HD). Picture Support Functions PIP Broadcast Viewing MENU > Picture > PIP Try Now Watch video from an external device such as the input source for models supporting 3D.) "" Turning off the TV automatically disables PIP. "" For PIP to display the PIP settings window.
... following options: ●● PIP Activates/deactivates PIP. ●● Antenna Choose Air or Cable as a Blu-ray player on the main screen can result in a lower PIP picture quality. "" PIP cannot be less than FHD (Full HD). Picture Support Functions PIP Broadcast Viewing MENU > Picture > PIP Try Now Watch video from an external device such as the input source for models supporting 3D.) "" Turning off the TV automatically disables PIP. "" For PIP to display the PIP settings window.
User Manual Ver.1.0 (English)
Page 96
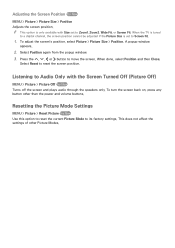
... a digital channel, the screen position cannot be adjusted if the Picture Size is only available with the Screen Turned Off (Picture Off) MENU > Picture > Picture Off Try Now Turns off the screen and plays audio through the speakers only. To turn the screen back on, press any button other Picture Modes. Listening to reset the screen position. Select Reset to Audio Only with Size set to move the screen. This does not affect the settings of other than the power and volume buttons...
... a digital channel, the screen position cannot be adjusted if the Picture Size is only available with the Screen Turned Off (Picture Off) MENU > Picture > Picture Off Try Now Turns off the screen and plays audio through the speakers only. To turn the screen back on, press any button other Picture Modes. Listening to reset the screen position. Select Reset to Audio Only with Size set to move the screen. This does not affect the settings of other than the power and volume buttons...
User Manual Ver.1.0 (English)
Page 100
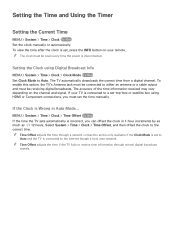
... manually or automatically. Setting the Clock using HDMI or Component connections, you must be reset every time the power is set, press the INFO button on the channel and signal. "" Time Offset adjusts the time through normal digital broadcast signals. Select System > Time > Clock > Time Offset, and then offset the clock to either an antenna or a cable output and must set to Auto and the TV is incorrect, you can offset the clock in Auto Mode... To view...
... manually or automatically. Setting the Clock using HDMI or Component connections, you must be reset every time the power is set, press the INFO button on the channel and signal. "" Time Offset adjusts the time through normal digital broadcast signals. Select System > Time > Clock > Time Offset, and then offset the clock to either an antenna or a cable output and must set to Auto and the TV is incorrect, you can offset the clock in Auto Mode... To view...
User Manual Ver.1.0 (English)
Page 102
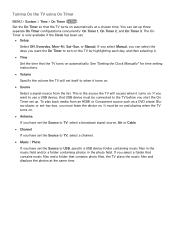
.... ●● Source Select a signal source from an HDMI or Component source such as a DVD player, Bluray player, or set . ●● Setup Select Off, Everyday, Mon~Fri, Sat~Sun, or Manual. See "Setting the Clock Manually" for time setting instructions. ●● Volume Specify the volume the TV will access when it turns on. Turning On the TV using On Timer MENU > System > Time > On Timer Try Now Set the On Timer so that the TV turns on automatically...
.... ●● Source Select a signal source from an HDMI or Component source such as a DVD player, Bluray player, or set . ●● Setup Select Off, Everyday, Mon~Fri, Sat~Sun, or Manual. See "Setting the Clock Manually" for time setting instructions. ●● Volume Specify the volume the TV will access when it turns on. Turning On the TV using On Timer MENU > System > Time > On Timer Try Now Set the On Timer so that the TV turns on automatically...
User Manual Ver.1.0 (English)
Page 104
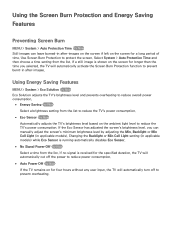
... Features Preventing Screen Burn MENU > System > Auto Protection Time Try Now Still images can manually adjust the screen's minimum brightness level by adjusting the Min. Use Screen Burn Protection to prevent overheating. If no signal is running automatically disables Eco Sensor. ●● No Signal Power Off Try Now Select a time from the list. Backlight or Min Cell Light (in after -images. Changing the Backlight or Min Cell Light setting (in...
... Features Preventing Screen Burn MENU > System > Auto Protection Time Try Now Still images can manually adjust the screen's minimum brightness level by adjusting the Min. Use Screen Burn Protection to prevent overheating. If no signal is running automatically disables Eco Sensor. ●● No Signal Power Off Try Now Select a time from the list. Backlight or Min Cell Light (in after -images. Changing the Backlight or Min Cell Light setting (in...
User Manual Ver.1.0 (English)
Page 114
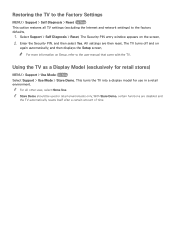
... Setup, refer to the factory defaults. 111 Select Support > Self Diagnosis > Reset. The TV turns off and on again automatically, and then displays the Setup screen. This turns the TV into a display model for retail stores) MENU > Support > Use Mode Try Now Select Support > Use Mode > Store Demo. With Store Demo, certain functions are then reset. Restoring the TV to the Factory Settings MENU > Support > Self Diagnosis > Reset Try Now This option restores all other uses, select Home Use...
... Setup, refer to the factory defaults. 111 Select Support > Self Diagnosis > Reset. The TV turns off and on again automatically, and then displays the Setup screen. This turns the TV into a display model for retail stores) MENU > Support > Use Mode Try Now Select Support > Use Mode > Store Demo. With Store Demo, certain functions are then reset. Restoring the TV to the Factory Settings MENU > Support > Self Diagnosis > Reset Try Now This option restores all other uses, select Home Use...
User Manual Ver.1.0 (English)
Page 118
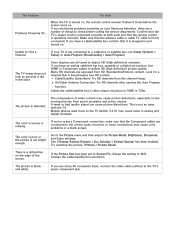
.../Cable Antenna Connection: Try HD channels after running the Auto Program function. The color is poor or the picture is black and white. If the Picture Size has been set top box. The picture is not bright enough. Use HDMI or Component cables to the TV (within 3.2 ft) may cause color problems or a blank screen. The Problem Problems Powering On Try this! Store displays are connected to a cable box or satellite box, run Setup (System > Setup) or Auto Program (Broadcasting > Auto Program). Confirm that the TV's power cord...
.../Cable Antenna Connection: Try HD channels after running the Auto Program function. The color is poor or the picture is black and white. If the Picture Size has been set top box. The picture is not bright enough. Use HDMI or Component cables to the TV (within 3.2 ft) may cause color problems or a blank screen. The Problem Problems Powering On Try this! Store displays are connected to a cable box or satellite box, run Setup (System > Setup) or Auto Program (Broadcasting > Auto Program). Confirm that the TV's power cord...
User Manual Ver.1.0 (English)
Page 119
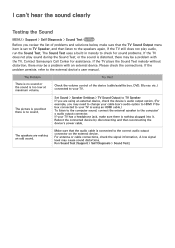
... Sound Output menu item is set to TV Speaker, and then listen to the speakers again. For antenna or cable connections, check the signal information. Contact Samsung's Call Center for sound problems. If the TV does not play audio, run the Sound Test. Check the volume control of problems and solutions below, make sure there is too low at maximum volume. Run Sound Test (Support > Self Diagnosis > Sound Test). If the TV plays the Sound...
... Sound Output menu item is set to TV Speaker, and then listen to the speakers again. For antenna or cable connections, check the signal information. Contact Samsung's Call Center for sound problems. If the TV does not play audio, run the Sound Test. Check the volume control of problems and solutions below, make sure there is too low at maximum volume. Run Sound Test (Support > Self Diagnosis > Sound Test). If the TV plays the Sound...

User Manual Ver.1.0 (English)
Page 121
... this ! Run Network Setup (MENU > Network > Network Settings). The upgrade stops if you are using an antenna, verify it matches a resolution supported by turning it off, waiting for 15 seconds, and then turning it on again. There are using an HDMI connection, check the audio output setting on and connected to Caption (System > Accessibility > Caption) and change the Caption Mode. Set your PC. If you are no audio. The Problem The wireless network connection failed. A weak signal can 't connect to a network. The video is OK but...
... this ! Run Network Setup (MENU > Network > Network Settings). The upgrade stops if you are using an antenna, verify it matches a resolution supported by turning it off, waiting for 15 seconds, and then turning it on again. There are using an HDMI connection, check the audio output setting on and connected to Caption (System > Accessibility > Caption) and change the Caption Mode. Set your PC. If you are no audio. The Problem The wireless network connection failed. A weak signal can 't connect to a network. The video is OK but...


