

Open Source Guide (ENGLISH)
Page 1
... exchange for software interchange; This product use of the Program is derived from the Program or any part thereof, to be licensed as separate works. The original manual has wrong versions of this free software. This product uses some software programs which are distributed under the Independent JPEG Group. When we speak of free software, we are referring to control compilation and installation of that they...
... exchange for software interchange; This product use of the Program is derived from the Program or any part thereof, to be licensed as separate works. The original manual has wrong versions of this free software. This product uses some software programs which are distributed under the Independent JPEG Group. When we speak of free software, we are referring to control compilation and installation of that they...

Open Source Guide (ENGLISH)
Page 2
...free software that everyone can do so by permitting redistribution under these terms, attach the following notices to where the full notice is safest to attach them to the start of each file should have at least the "copyright" line and a pointer to the library. It is found. You can redistribute and change... PERMITTED ABOVE, BE LIABLE TO YOU FOR DAMAGES, INCLUDING ANY GENERAL, SPECIAL, INCIDENTAL OR CONSEQUENTIAL DAMAGES ARISING OUT OF THE USE OR INABILITY TO USE THE LIBRARY (INCLUDING BUT NOT LIMITED TO LOSS OF DATA OR DATA BEING RENDERED INACCURATE OR LOSSES SUSTAINED BY YOU OR THIRD...
...free software that everyone can do so by permitting redistribution under these terms, attach the following notices to where the full notice is safest to attach them to the start of each file should have at least the "copyright" line and a pointer to the library. It is found. You can redistribute and change... PERMITTED ABOVE, BE LIABLE TO YOU FOR DAMAGES, INCLUDING ANY GENERAL, SPECIAL, INCIDENTAL OR CONSEQUENTIAL DAMAGES ARISING OUT OF THE USE OR INABILITY TO USE THE LIBRARY (INCLUDING BUT NOT LIMITED TO LOSS OF DATA OR DATA BEING RENDERED INACCURATE OR LOSSES SUSTAINED BY YOU OR THIRD...
User Manual (user Manual) (ver.1.0) (English)
Page 2
... is dangerous to come. We are proud to replace your Monitor. A falling Monitor can increase the risk of power source indicated on an unstable cart, stand, tripod, bracket, table, or floor where it near bath tubs, sinks, washing machines, swimming pools, etc. • Do not place the Monitor on the marking label. This plug will provide convenient, dependable service and enjoyment for...
... is dangerous to come. We are proud to replace your Monitor. A falling Monitor can increase the risk of power source indicated on an unstable cart, stand, tripod, bracket, table, or floor where it near bath tubs, sinks, washing machines, swimming pools, etc. • Do not place the Monitor on the marking label. This plug will provide convenient, dependable service and enjoyment for...
User Manual (user Manual) (ver.1.0) (English)
Page 3
... requirements for additional suggestions. European Notice Products with the CE Marking comply with Part 15 of antenna discharge unit, connection to service the Monitor yourself. when the power-supply cord or plug is a Class B product. Before making the connection, make adjustments yourself, adjust only those that have fallen into such power lines or circuits. This device complies with both the EMC Directive (89/336...
... requirements for additional suggestions. European Notice Products with the CE Marking comply with Part 15 of antenna discharge unit, connection to service the Monitor yourself. when the power-supply cord or plug is a Class B product. Before making the connection, make adjustments yourself, adjust only those that have fallen into such power lines or circuits. This device complies with both the EMC Directive (89/336...
User Manual (user Manual) (ver.1.0) (English)
Page 4
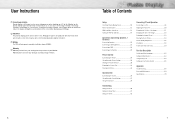
... ft. Table of Contents Setup Your New Plasma Display Panel 10 Remote Control Buttons 12 Wall Installation Instructions 14 Turning the PDP On and Off 18 Connection (Connecting Speakers / Receiver) Connecting Speakers 22 Connecting a VCR/Cable Box 23 Connecting a DVD 24 Connecting a Set-Top Box 25 Picture Control Customizing the Picture 28 Using Automatic Picture Settings 29 Viewing the Picture-in-Picture 30 Changing the Screen Size 33 Freezing the Picture 34 Sound Control Customizing the Sound 36 Using Automatic Sound Settings 37 Using the Surround 38 Time Setting Setting the...
... ft. Table of Contents Setup Your New Plasma Display Panel 10 Remote Control Buttons 12 Wall Installation Instructions 14 Turning the PDP On and Off 18 Connection (Connecting Speakers / Receiver) Connecting Speakers 22 Connecting a VCR/Cable Box 23 Connecting a DVD 24 Connecting a Set-Top Box 25 Picture Control Customizing the Picture 28 Using Automatic Picture Settings 29 Viewing the Picture-in-Picture 30 Changing the Screen Size 33 Freezing the Picture 34 Sound Control Customizing the Sound 36 Using Automatic Sound Settings 37 Using the Surround 38 Time Setting Setting the...

User Manual (user Manual) (ver.1.0) (English)
Page 5
PLASMA DISPLAY PANEL Setup Your New Plasma Display Panel 10 Remote Control Buttons 12 Wall Installation Instructions 14 Turning the PDP On and Off 18
PLASMA DISPLAY PANEL Setup Your New Plasma Display Panel 10 Remote Control Buttons 12 Wall Installation Instructions 14 Turning the PDP On and Off 18
User Manual (user Manual) (ver.1.0) (English)
Page 6
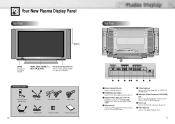
... to turn the PDP on and off. Your New Plasma Display Panel Front Panel Speakers POWER Press to your PC. ˇ Component Video Input jacks ( Y/Pb/Pr) Component 1 inputs are for 480i/480p. Checking Accessories Remote Control/ AAA Batteries PC Cable Video/Audio Cables Video Cable Power Cord S-VIDEO Cable Ferrite Cores(2EA) Owner's Instructions 10 Rear Panel Œ External Speaker Out jacks Connect external speakers. ´ PC(RGB) Input jack (15pin) Connect to the video output jack on the Monitor. " Power Input jack Connect the supplied power cord. 11 SOURCE, MENU, VOLUME...
... to turn the PDP on and off. Your New Plasma Display Panel Front Panel Speakers POWER Press to your PC. ˇ Component Video Input jacks ( Y/Pb/Pr) Component 1 inputs are for 480i/480p. Checking Accessories Remote Control/ AAA Batteries PC Cable Video/Audio Cables Video Cable Power Cord S-VIDEO Cable Ferrite Cores(2EA) Owner's Instructions 10 Rear Panel Œ External Speaker Out jacks Connect external speakers. ´ PC(RGB) Input jack (15pin) Connect to the video output jack on the Monitor. " Power Input jack Connect the supplied power cord. 11 SOURCE, MENU, VOLUME...
User Manual (user Manual) (ver.1.0) (English)
Page 7
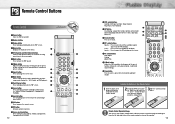
... setup of this remote control, so that it will work compatibly with the diagram inside the compartment. 3Slide the cover back into place. You can use your personal, customized picture settings.) " Aspect button Press to change the screen size. ' Mode button Selects a target device to be controlled by the Samsung remote control (ie., VCR, Cable, or DVD players). ˝ Clock Display button Press to display clock on the PDP screen. Ô Source button Press to display all of the available video sources...
... setup of this remote control, so that it will work compatibly with the diagram inside the compartment. 3Slide the cover back into place. You can use your personal, customized picture settings.) " Aspect button Press to change the screen size. ' Mode button Selects a target device to be controlled by the Samsung remote control (ie., VCR, Cable, or DVD players). ˝ Clock Display button Press to display clock on the PDP screen. Ô Source button Press to display all of the available video sources...
User Manual (user Manual) (ver.1.0) (English)
Page 8
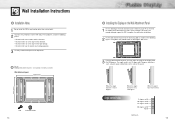
... any location other than vertical walls. 2 To protect the performance of the PDP and prevent problems, avoid the following places: • Do not install next to smoke and fire detectors. • Do not install in an area subjected to vibration. • Do not install in the following figure: Fixing bolts must protrude from the wall appox. 0.6 inches. 3 Using the wall attachment panel, you may adjust the...
... any location other than vertical walls. 2 To protect the performance of the PDP and prevent problems, avoid the following places: • Do not install next to smoke and fire detectors. • Do not install in an area subjected to vibration. • Do not install in the following figure: Fixing bolts must protrude from the wall appox. 0.6 inches. 3 Using the wall attachment panel, you may adjust the...
User Manual (user Manual) (ver.1.0) (English)
Page 10
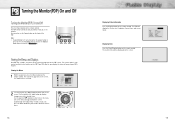
... menu. 18 Displaying Status Information Press the Display button on the screen. Notes: • If your remote control to use menu system that appears on when the power button is selected. DISPLAY Main SUB P.MODE Scaling S.MODE Resolution : Video : Not Available : Custom : Wide : Custom : 720 X 480 60Hz 10 : 30 AM 19 The main menu appears on the remote control. The PDP will display the Screen size, Resolution, Current time, and screen mode. The PDP will be displayed on the remote control. Viewing...
... menu. 18 Displaying Status Information Press the Display button on the screen. Notes: • If your remote control to use menu system that appears on when the power button is selected. DISPLAY Main SUB P.MODE Scaling S.MODE Resolution : Video : Not Available : Custom : Wide : Custom : 720 X 480 60Hz 10 : 30 AM 19 The main menu appears on the remote control. The PDP will display the Screen size, Resolution, Current time, and screen mode. The PDP will be displayed on the remote control. Viewing...
User Manual (user Manual) (ver.1.0) (English)
Page 12
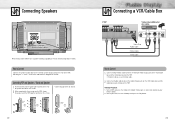
... Stands. 22 Guide pole Guide pole Guide pole Power Plug Audio Cable S-Video Cable Video Cable How to the external speaker output jack on the rear of the PDP, matching the "+" and "-" ends of 7 watts minimum(impedance 8ohm). Turn on PDP and press the Video or S-Video(if S-Video jack is connected.) button on the PDP. How to Connect Connect the speaker audio cable to Connect 1 Connect Video/S-Video cable between the Video/S-Video Output jack on the VCR/Cable box and the Video Input jack on the PDP. • For better video, use an S-Video cable. 2 Connect...
... Stands. 22 Guide pole Guide pole Guide pole Power Plug Audio Cable S-Video Cable Video Cable How to the external speaker output jack on the rear of the PDP, matching the "+" and "-" ends of 7 watts minimum(impedance 8ohm). Turn on PDP and press the Video or S-Video(if S-Video jack is connected.) button on the PDP. How to Connect Connect the speaker audio cable to Connect 1 Connect Video/S-Video cable between the Video/S-Video Output jack on the VCR/Cable box and the Video Input jack on the PDP. • For better video, use an S-Video cable. 2 Connect...
User Manual (user Manual) (ver.1.0) (English)
Page 13
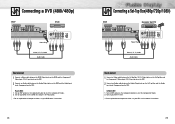
... video, see your DVD owner's instructions. 24 Connecting a Set-Top Box(480p/720p/1080i) Power Plug Video (Y, Pb, Pr) Cable Audio Cable How to Connect 1 Connect a Video cable between the Set-Top Box (Y,Pb,Pr) Output jacks on the Set-Top Box and the Component 2 Video Input (Y,Pb,Pr) Input jacks on the PDP. 2 Connect an Audio cable between the Audio Output jacks on the DVD and the Audio Input jacks (Component) on PDP and press the Component button to select the Component1 mode. 2. Turn on your DVD, insert a DVD...
... video, see your DVD owner's instructions. 24 Connecting a Set-Top Box(480p/720p/1080i) Power Plug Video (Y, Pb, Pr) Cable Audio Cable How to Connect 1 Connect a Video cable between the Set-Top Box (Y,Pb,Pr) Output jacks on the Set-Top Box and the Component 2 Video Input (Y,Pb,Pr) Input jacks on the PDP. 2 Connect an Audio cable between the Audio Output jacks on the DVD and the Audio Input jacks (Component) on PDP and press the Component button to select the Component1 mode. 2. Turn on your DVD, insert a DVD...
User Manual (user Manual) (ver.1.0) (English)
Page 22
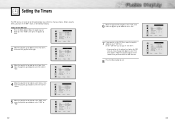
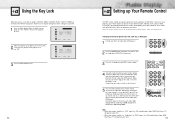
... to select "On time volume". Setting the On/Off Timer 1 Press the Menu button. Set the "Off Time" just as described previously. Before using the timers, you want when the PDP turns on or off automatically at specific times that you choose. Move the joystick up or down to turn on . 8 Press the Menu button to select "Off Time". TIME Clock On time Off time On time volume Sleep Timer Clock Display 10 : 30 AM...
... to select "On time volume". Setting the On/Off Timer 1 Press the Menu button. Set the "Off Time" just as described previously. Before using the timers, you want when the PDP turns on or off automatically at specific times that you choose. Move the joystick up or down to turn on . 8 Press the Menu button to select "Off Time". TIME Clock On time Off time On time volume Sleep Timer Clock Display 10 : 30 AM...

User Manual (user Manual) (ver.1.0) (English)
Page 24
... Configuration • 15Pin Signal Cable (based on protruded pin) Setting up Your Monitor (Plug and Play) Our adoption of Component video, see your monitor in a Plug and Play compatible system, without the usual setup hassles and confusion. This monitor automatically tells the PC system its Extended Display Identification data (EDID) using Display Data Channel (DDC) protocols. 47 Adjust the PC screen. (Refer to install your PC owner's instructions. 2 Connect a Audio cable between the Video Output jack on the...
... Configuration • 15Pin Signal Cable (based on protruded pin) Setting up Your Monitor (Plug and Play) Our adoption of Component video, see your monitor in a Plug and Play compatible system, without the usual setup hassles and confusion. This monitor automatically tells the PC system its Extended Display Identification data (EDID) using Display Data Channel (DDC) protocols. 47 Adjust the PC screen. (Refer to install your PC owner's instructions. 2 Connect a Audio cable between the Video Output jack on the...
User Manual (user Manual) (ver.1.0) (English)
Page 25
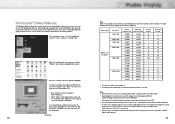
... interlace mode is not supported. • The PDP operates abnormally if a non-standard video format is a typical screen for a typical computer are "resolution" and "colors." When the control panel screen appears, click on your display settings dialog box, the correct value is connected. • Connect only a PC monitor to a PDP. • If a vertical and horizontal frequency-select mode exists, select 60Hz (vertical) and 31.5kHZ (horizontal). • In some cases, abnormal signals...
... interlace mode is not supported. • The PDP operates abnormally if a non-standard video format is a typical screen for a typical computer are "resolution" and "colors." When the control panel screen appears, click on your display settings dialog box, the correct value is connected. • Connect only a PC monitor to a PDP. • If a vertical and horizontal frequency-select mode exists, select 60Hz (vertical) and 31.5kHZ (horizontal). • In some cases, abnormal signals...

User Manual (user Manual) (ver.1.0) (English)
Page 26
... guide. 5 Press the Menu button to exit. 50 VIDEO Select Contrast Brightness Color Control Custom 100 50 Move Adjust Exit VIDEO Select Contrast Brightness Color Control Custom 100 50 Move Adjust Exit VIDEO R 50 G 50 B 50 Move Adjust Exit VIDEO R 70 G 50 B 50 Move Adjust Exit Changing the Position of the Image After connecting the PDP to your PC, adjust the position of screen by using the joystick button. 3 Press the Menu button to exit. Adjust...
... guide. 5 Press the Menu button to exit. 50 VIDEO Select Contrast Brightness Color Control Custom 100 50 Move Adjust Exit VIDEO Select Contrast Brightness Color Control Custom 100 50 Move Adjust Exit VIDEO R 50 G 50 B 50 Move Adjust Exit VIDEO R 70 G 50 B 50 Move Adjust Exit Changing the Position of the Image After connecting the PDP to your PC, adjust the position of screen by using the joystick button. 3 Press the Menu button to exit. Adjust...
User Manual (user Manual) (ver.1.0) (English)
Page 30
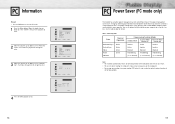
... PC mode. 1 Press the Menu button. This power management system operates with a VESA DPMS compliant video card installed in power management system called Power Saver. Power-saving modes State Normal Operation Horizontal Sync Vertical Sync Video Power Indicator Active Active Active Green Power-saving Function Mode Standby Mode Suspend Mode Power-off Mode Position A1 Position A2 Inactive Active Inactive Active Inactive Inactive Blanked Blanked Blanked Red Blinking Red Blinking Red Blinking (1 sec Interval) (1 sec Interval) (1 sec Interval) Notes: • This monitor...
... PC mode. 1 Press the Menu button. This power management system operates with a VESA DPMS compliant video card installed in power management system called Power Saver. Power-saving modes State Normal Operation Horizontal Sync Vertical Sync Video Power Indicator Active Active Active Green Power-saving Function Mode Standby Mode Suspend Mode Power-off Mode Position A1 Position A2 Inactive Active Inactive Active Inactive Inactive Blanked Blanked Blanked Red Blinking Red Blinking Red Blinking (1 sec Interval) (1 sec Interval) (1 sec Interval) Notes: • This monitor...
User Manual (user Manual) (ver.1.0) (English)
Page 33
... Lock OFF . 1 Press the Menu button. However, these modes, and control whichever piece of equipment you to switch between these buttons will not operate. If no other codes listed for your brand of VCR (or Cable box, DVD player). S.Sel 3 Press the Set button on your PDP's remote control. 4 Using the number buttons on your remote control is in four different modes :Monitor, VCR, Cable, or DVD. Notes • When your remote control, enter three digits of the VCR (or Cable box, DVD) code listed...
... Lock OFF . 1 Press the Menu button. However, these modes, and control whichever piece of equipment you to switch between these buttons will not operate. If no other codes listed for your brand of VCR (or Cable box, DVD player). S.Sel 3 Press the Set button on your PDP's remote control. 4 Using the number buttons on your remote control is in four different modes :Monitor, VCR, Cable, or DVD. Notes • When your remote control, enter three digits of the VCR (or Cable box, DVD) code listed...
User Manual (user Manual) (ver.1.0) (English)
Page 35
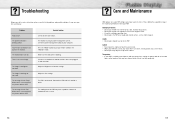
... call a service technician, please scan this list of problems and possible solutions. The message "Check Fan" blinks on the screen and then the picture switches OFF. Check the power management utility on . Adjust the Size settings. The PDP is too light or too dark. Cabinet • Never open the cabinet or touch the parts inside the unit can dry completely. 68 69 Your Remote control does not...
... call a service technician, please scan this list of problems and possible solutions. The message "Check Fan" blinks on the screen and then the picture switches OFF. Check the power management utility on . Adjust the Size settings. The PDP is too light or too dark. Cabinet • Never open the cabinet or touch the parts inside the unit can dry completely. 68 69 Your Remote control does not...
User Manual (user Manual) (ver.1.0) (English)
Page 36
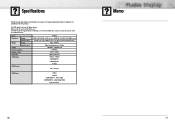
Model Dimensions Display Remote Control Weight Display Remote Control Voltage Power Consumption Number of EMI. This PDP applies to improve the performance of this product. So it can be used in terms of Pixels Screen Size AUDIO input AUDIO output SPL4225 1038.8 (W) X 89 (D) X 635 (H) mm ; 40.90 (W) X 3.50 (D) X 25.00(H) inches 54 (W) X 31.5 (D) X 220 (H) mm ; 2.13 (W) X 1.24 (D) X 8.66 (H) inches 32kg ; 70.55lbs 150g (including batteries) ; 0.33lbs 100-240V~, 50/60Hz, 4A 310 Watts 852...
Model Dimensions Display Remote Control Weight Display Remote Control Voltage Power Consumption Number of EMI. This PDP applies to improve the performance of this product. So it can be used in terms of Pixels Screen Size AUDIO input AUDIO output SPL4225 1038.8 (W) X 89 (D) X 635 (H) mm ; 40.90 (W) X 3.50 (D) X 25.00(H) inches 54 (W) X 31.5 (D) X 220 (H) mm ; 2.13 (W) X 1.24 (D) X 8.66 (H) inches 32kg ; 70.55lbs 150g (including batteries) ; 0.33lbs 100-240V~, 50/60Hz, 4A 310 Watts 852...


