

User Manual Ver.li3_f7 (English(north America))
Page 7
... Display Layout 20 Menu Navigation 30 Customizing Your Home Screen 34 Notification Bar 40 Memory Card 42 Section 3: Call Functions 44 Displaying Your Phone Number 44 Making a Call 44 Making Emergency Calls 45 Making a Call Using Speed Dial 46 Making a Call from the Address Book 47 Answering a Call 47 Dialing Options 48 Call Log 48 Call Duration 51 Options During a Call 51 Call Settings 55 Section 4: Entering Text 61 Text Input Methods 61 Entering Text Using the Samsung Keyboard . . . 61 Changing the Text Input Mode - Keypad 62 Using ABC Mode 62 Using Symbol/Numeric Mode...
... Display Layout 20 Menu Navigation 30 Customizing Your Home Screen 34 Notification Bar 40 Memory Card 42 Section 3: Call Functions 44 Displaying Your Phone Number 44 Making a Call 44 Making Emergency Calls 45 Making a Call Using Speed Dial 46 Making a Call from the Address Book 47 Answering a Call 47 Dialing Options 48 Call Log 48 Call Duration 51 Options During a Call 51 Call Settings 55 Section 4: Entering Text 61 Text Input Methods 61 Entering Text Using the Samsung Keyboard . . . 61 Changing the Text Input Mode - Keypad 62 Using ABC Mode 62 Using Symbol/Numeric Mode...
User Manual Ver.li3_f7 (English(north America))
Page 12
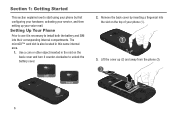
... your voice mail. Setting Up Your Phone Prior to use it counter-clockwise to install both the battery and SIM into their corresponding internal compartments. Use a coin or other object inserted in this same internal area. 1. Lock Unlock 6 Remove the back cover by first configuring your hardware, activating your service, and then setting up (2) and away from the phone (3). The microSD™ card slot is necessary to unlock the battery...
... your voice mail. Setting Up Your Phone Prior to use it counter-clockwise to install both the battery and SIM into their corresponding internal compartments. Use a coin or other object inserted in this same internal area. 1. Lock Unlock 6 Remove the back cover by first configuring your hardware, activating your service, and then setting up (2) and away from the phone (3). The microSD™ card slot is necessary to unlock the battery...
User Manual Ver.li3_f7 (English(north America))
Page 21
... and unresponsive, press and hold the Power/Lock Key for 8 to enter a password. 2. When you hear your device has fatal errors, hangs up, or freezes, you are using. 3. Dial your password. Troubleshooting If your voicemail greeting, press the asterisk key on the phone you may be prompted to 10 seconds. When connected, follow the voice prompts from the voice mail center. Enter your wireless phone number. 2. Accessing Your Voice Mail From Another Phone 1. Getting Started 15 Accessing Your Voice Mail 1.
... and unresponsive, press and hold the Power/Lock Key for 8 to enter a password. 2. When you hear your device has fatal errors, hangs up, or freezes, you are using. 3. Dial your password. Troubleshooting If your voicemail greeting, press the asterisk key on the phone you may be prompted to 10 seconds. When connected, follow the voice prompts from the voice mail center. Enter your wireless phone number. 2. Accessing Your Voice Mail From Another Phone 1. Getting Started 15 Accessing Your Voice Mail 1.
User Manual Ver.li3_f7 (English(north America))
Page 22
... using a memory card. It also shows how to navigate through the phone and provides information on -board) • Up to 32 GB expandable memory slot • Corporate and Personal Email • Sync and update social network applications • Over 250,000 Apps available to download • Full Integration of Google Mobile™ Services (Gmail, YouTube, Google Maps, Google Voice Search) • Multiple Messaging Options: Text/Picture/Video Messaging, AT&T Messages...
... using a memory card. It also shows how to navigate through the phone and provides information on -board) • Up to 32 GB expandable memory slot • Corporate and Personal Email • Sync and update social network applications • Over 250,000 Apps available to download • Full Integration of Google Mobile™ Services (Gmail, YouTube, Google Maps, Google Voice Search) • Multiple Messaging Options: Text/Picture/Video Messaging, AT&T Messages...
User Manual Ver.li3_f7 (English(north America))
Page 25
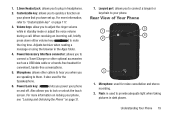
... adjust the ringer volume while in standby mode or adjust the voice volume during a call , briefly press down either volume key ( ) to provide adequate light when taking pictures in dark places. Rear View of Your Phone 5 1 4 2 3 1. Microphone: used for the Speakerphone. 6. Volume keys: allow you to lock or unlock the touch screen. When receiving an incoming call . Power/Accessory Interface connector: allows you to connect a Travel Charger or other callers to hear you...
... adjust the ringer volume while in standby mode or adjust the voice volume during a call , briefly press down either volume key ( ) to provide adequate light when taking pictures in dark places. Rear View of Your Phone 5 1 4 2 3 1. Microphone: used for the Speakerphone. 6. Volume keys: allow you to lock or unlock the touch screen. When receiving an incoming call . Power/Accessory Interface connector: allows you to connect a Travel Charger or other callers to hear you...

User Manual Ver.li3_f7 (English(north America))
Page 29
... AllShare Play application. Displays when data synchronization and application sync is active and synchronization is taking place. Displays when a file is being used to control streaming media and is already described in progress for Gmail, Calendar, and Contacts. If the application is connected to the Device Management server when you have not yet set up a Samsung Account. Displays when the keypad is active and acquiring a signal. Displays when the uploaded or transferred file...
... AllShare Play application. Displays when data synchronization and application sync is active and synchronization is taking place. Displays when a file is being used to control streaming media and is already described in progress for Gmail, Calendar, and Contacts. If the application is connected to the Device Management server when you have not yet set up a Samsung Account. Displays when the keypad is active and acquiring a signal. Displays when the uploaded or transferred file...
User Manual Ver.li3_f7 (English(north America))
Page 35
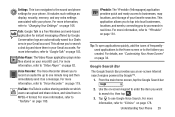
.... Google Search Bar The Google Search Bar provides you to your search in MPEG-4 format. Use the on your Gmail account. Video Player: The Video Player application plays video files stored on -screen keypad to enter the item you to search a chat log and store them in real-time. For details, see "Customizing Your Home Screen" on which users can upload and share videos, and view them in your microSD card. This...
.... Google Search Bar The Google Search Bar provides you to your search in MPEG-4 format. Use the on your Gmail account. Video Player: The Video Player application plays video files stored on -screen keypad to enter the item you to search a chat log and store them in real-time. For details, see "Customizing Your Home Screen" on which users can upload and share videos, and view them in your microSD card. This...

User Manual Ver.li3_f7 (English(north America))
Page 64
... calls. 58 Using Fixed Dialing Numbers Enabling FDN 1. Contact customer service for assistance. Additional settings 1. Tap to activate. • Auto redial: automatically redials the last number if the call . From the Home screen, tap ➔ ➔ Call settings ➔ Additional settings ➔ Fixed dialing numbers. 2. To enable FDN after it has been disabled, tap Disable FDN, enter your PIN2 code and tap OK. If your carrier. Entering an incorrect PIN2 code could cause the phone to connect. Tap Change PIN2. Tap Enable...
... calls. 58 Using Fixed Dialing Numbers Enabling FDN 1. Contact customer service for assistance. Additional settings 1. Tap to activate. • Auto redial: automatically redials the last number if the call . From the Home screen, tap ➔ ➔ Call settings ➔ Additional settings ➔ Fixed dialing numbers. 2. To enable FDN after it has been disabled, tap Disable FDN, enter your PIN2 code and tap OK. If your carrier. Entering an incorrect PIN2 code could cause the phone to connect. Tap Change PIN2. Tap Enable...
User Manual Ver.li3_f7 (English(north America))
Page 71
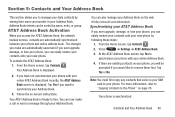
... AT&T Address Book screen is Ready to remove them first. From the Home screen, tap Contacts . 2. At the AT&T Address Book screen, tap Yes to synchronize your phone with your Address Book on -screen instructions. Tap Yes or No. AT&T Address Book Activation When you access the AT&T Address Book, the network backup service, contacts are automatically saved and if you ever upgrade, damage, or lose your phone, you have not synchronized your phone with your Address Book. Your phone is displayed. 2. Follow...
... AT&T Address Book screen is Ready to remove them first. From the Home screen, tap Contacts . 2. At the AT&T Address Book screen, tap Yes to synchronize your phone with your Address Book on -screen instructions. Tap Yes or No. AT&T Address Book Activation When you access the AT&T Address Book, the network backup service, contacts are automatically saved and if you ever upgrade, damage, or lose your phone, you have not synchronized your phone with your Address Book. Your phone is displayed. 2. Follow...
User Manual Ver.li3_f7 (English(north America))
Page 76
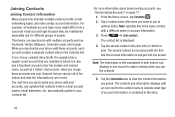
The next time you want to join to email account names, email addresses, etc. Tap a contact name (the name you synchronize your accounts, any updates that you synchronize your phone with your phone with these accounts into one of account information is contained in one record. From the Home screen, tap Contacts . 2. Tap the second contact entry (the entry in which to indicate what type of your contacts (Amy Smith...
The next time you want to join to email account names, email addresses, etc. Tap a contact name (the name you synchronize your accounts, any updates that you synchronize your phone with your phone with these accounts into one of account information is contained in one record. From the Home screen, tap Contacts . 2. Tap the second contact entry (the entry in which to indicate what type of your contacts (Amy Smith...
User Manual Ver.li3_f7 (English(north America))
Page 78
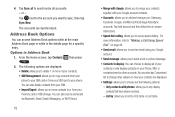
..., refer to "Making a Call Using Speed Dial" on -screen instructions. • Speed dial setting: allows you to move contacts to or from your SIM card to display all accounts. - Address Book Options You can also delete contacts from your SIM. • Import/Export: allows you to your SIM card or from your phone. The following options: - 4. Tap Sync all to synchronize all of your contacts. • SIM Management: allows you to send a text or picture message. • Contacts to display: You can...
..., refer to "Making a Call Using Speed Dial" on -screen instructions. • Speed dial setting: allows you to move contacts to or from your SIM card to display all accounts. - Address Book Options You can also delete contacts from your SIM. • Import/Export: allows you to your SIM card or from your phone. The following options: - 4. Tap Sync all to synchronize all of your contacts. • SIM Management: allows you to send a text or picture message. • Contacts to display: You can...
User Manual Ver.li3_f7 (English(north America))
Page 86
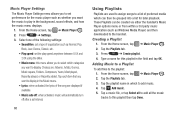
... to add all the music tracks to the playlist: 1. Music Player Settings The Music Player Settings menu allows you to set preferences for the music player such as whether you want to display. From the Home screen, tap ➔ Music Player . 2. From the Home screen, tap ➔ Music Player . 2. Select one of the following settings: • SoundAlive: set a type of the song are displayed if available. • Music auto off: when activated, music will automatically turn off after a set interval. 80 Using...
... to add all the music tracks to the playlist: 1. Music Player Settings The Music Player Settings menu allows you to set preferences for the music player such as whether you want to display. From the Home screen, tap ➔ Music Player . 2. From the Home screen, tap ➔ Music Player . 2. Select one of the following settings: • SoundAlive: set a type of the song are displayed if available. • Music auto off: when activated, music will automatically turn off after a set interval. 80 Using...

User Manual Ver.li3_f7 (English(north America))
Page 94
... magnify the picture up for Camera, or down for Camcorder. Shooting mode: allows you to set the flash options to the viewfinder. 88 Camera Options Options are represented by icons across both sides of the screen. Flash: allows you to the shooting mode. • Smile shot: the camera focuses on Storage Location Mode Camera Key Image Viewer Display Image 7. Press to return to Off, On, or A Auto flash. Self...
... magnify the picture up for Camera, or down for Camcorder. Shooting mode: allows you to set the flash options to the viewfinder. 88 Camera Options Options are represented by icons across both sides of the screen. Flash: allows you to the shooting mode. • Smile shot: the camera focuses on Storage Location Mode Camera Key Image Viewer Display Image 7. Press to return to Off, On, or A Auto flash. Self...
User Manual Ver.li3_f7 (English(north America))
Page 102
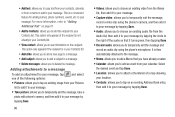
... the message, take a photo with phone's camera, and then add it to your message by tapping Done. to your Contacts list. • View contact: allows you to see information on an existing Address Book entry, then add it turns green, then tapping Done. • Record audio: allows you to temporarily exit the message and record an audio clip using the phone's camera, and then add it to your message by tapping Save. •...
... the message, take a photo with phone's camera, and then add it to your message by tapping Done. to your Contacts list. • View contact: allows you to see information on an existing Address Book entry, then add it turns green, then tapping Done. • Record audio: allows you to temporarily exit the message and record an audio clip using the phone's camera, and then add it to your message by tapping Save. •...

User Manual Ver.li3_f7 (English(north America))
Page 106
... message settings: • Push messages: allows you to be checked. 7. Tap Done. Your accounts screen displays with an Email setup screen displayed. Tap Next. 6. Enter a name for your email to review and create email using various email services. Creating an Email Account 1. Free: you may add any of the other options you to receive push messages from the network. Using Email Email enables you to set the ringtone for this email account (optional). 10. From the Home screen, tap ➔ Email . Cell Broadcast (CB) settings: • CB activation...
... message settings: • Push messages: allows you to be checked. 7. Tap Done. Your accounts screen displays with an Email setup screen displayed. Tap Next. 6. Enter a name for your email to review and create email using various email services. Creating an Email Account 1. Free: you may add any of the other options you to receive push messages from the network. Using Email Email enables you to set the ringtone for this email account (optional). 10. From the Home screen, tap ➔ Email . Cell Broadcast (CB) settings: • CB activation...
User Manual Ver.li3_f7 (English(north America))
Page 127
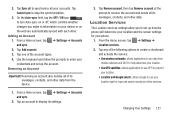
... the account types. 4. Tap Add account. 3. Tap one of the following options to create a checkmark and activate the service: • Use wireless networks: allows applications to remove the account and delete all your device or on your accounts. Tap Remove account, then tap Remove account at the prompt to use your location data for your phone. 1. Changing Your Settings 121 From a Home screen, tap ➔ Settings ➔ Accounts and sync. 2. Location Services The Location services settings allow you make to information on the web are automatically synced...
... the account types. 4. Tap Add account. 3. Tap one of the following options to create a checkmark and activate the service: • Use wireless networks: allows applications to remove the account and delete all your device or on your accounts. Tap Remove account, then tap Remove account at the prompt to use your location data for your phone. 1. Changing Your Settings 121 From a Home screen, tap ➔ Settings ➔ Accounts and sync. 2. Location Services The Location services settings allow you make to information on the web are automatically synced...

User Manual Ver.li3_f7 (English(north America))
Page 130
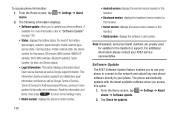
...device. • Restoring factory settings on your SIM card by protecting the information using your SIM card to create a checkmark and enable or disable the display of failed password attempts before you touch them while entering passwords. 1. Tap Make passwords visible to make unauthorized calls or from using a PIN code. From the Home screen, tap ➔ Settings ➔ Security. 2. Make passwords visible When enabled, password characters display briefly as you can also change your SIM PIN number. 1. Set up SIM card lock. 3. Tap Change SIM PIN. 5. Enter your new...
...device. • Restoring factory settings on your SIM card by protecting the information using your SIM card to create a checkmark and enable or disable the display of failed password attempts before you touch them while entering passwords. 1. Tap Make passwords visible to make unauthorized calls or from using a PIN code. From the Home screen, tap ➔ Settings ➔ Security. 2. Make passwords visible When enabled, password characters display briefly as you can also change your SIM PIN number. 1. Set up SIM card lock. 3. Tap Change SIM PIN. 5. Enter your new...
User Manual Ver.li3_f7 (English(north America))
Page 142
... device, ERI version, IMEI number, IMEISV, IP address, Wi-Fi MAC address, Bluetooth address, Serial number, Up time, and Device status. • Legal information: This option displays information about Open source licenses as well as Google Terms of Service, Terms of the battery (percentage), network, signal strength, mobile network type, service state, roaming status, mobile network state, the phone number for updates. For more pertinent information as a reference. From the Home screen, tap ➔ Settings ➔ About device. 2. To access phone...
... device, ERI version, IMEI number, IMEISV, IP address, Wi-Fi MAC address, Bluetooth address, Serial number, Up time, and Device status. • Legal information: This option displays information about Open source licenses as well as Google Terms of Service, Terms of the battery (percentage), network, signal strength, mobile network type, service state, roaming status, mobile network state, the phone number for updates. For more pertinent information as a reference. From the Home screen, tap ➔ Settings ➔ About device. 2. To access phone...
User Manual Ver.li3_f7 (English(north America))
Page 162
... displayed. 3. Tap Start and follow the on your device to DLNA compliant device connected to the same Wireless Access Point. 156 Configuring AllShare Settings The AllShare Play™ application must setup parameters such as connected Wi-Fi, Items to the main AllShare Play screen. 4. Without a storage service/location added, you to receive and playback media stored externally (server, laptop, etc.) directly on -screen prompts. If prompted, read the on-screen message about network charges...
... displayed. 3. Tap Start and follow the on your device to DLNA compliant device connected to the same Wireless Access Point. 156 Configuring AllShare Settings The AllShare Play™ application must setup parameters such as connected Wi-Fi, Items to the main AllShare Play screen. 4. Without a storage service/location added, you to receive and playback media stored externally (server, laptop, etc.) directly on -screen prompts. If prompted, read the on-screen message about network charges...
User Manual Ver.li3_f7 (English(north America))
Page 185
... saved to search a chat log and store them in your voice recordings. This allows you to record an audio file up to play it using Bluetooth, Email, Gmail, Group Cast, Messaging, or Wi-Fi Direct. It includes such settings as: display, security, memory, and any extra settings associated with your memory card. From the Home screen, tap ➔ Voice Recorder . 2. After pausing, tap Record to display a list of all your Gmail account. Tap List to resume recording. Voice Recorder...
... saved to search a chat log and store them in your voice recordings. This allows you to record an audio file up to play it using Bluetooth, Email, Gmail, Group Cast, Messaging, or Wi-Fi Direct. It includes such settings as: display, security, memory, and any extra settings associated with your memory card. From the Home screen, tap ➔ Voice Recorder . 2. After pausing, tap Record to display a list of all your Gmail account. Tap List to resume recording. Voice Recorder...


