User Manual (ENGLISH)
Page 15
... 80 Printing a machine report 80 80 Monitoring the supplies life 80 Finding the serial number 80 Sending the imaging unit reorder notification 80 Sending the toner reorder notification 81 Checking Document Box 81 Cleaning your machine 81 Cleaning the outside 81 Cleaning the inside 81 Cleaning the transfer unit 14
... 80 Printing a machine report 80 80 Monitoring the supplies life 80 Finding the serial number 80 Sending the imaging unit reorder notification 80 Sending the toner reorder notification 81 Checking Document Box 81 Cleaning your machine 81 Cleaning the outside 81 Cleaning the inside 81 Cleaning the transfer unit 14
User Manual (ENGLISH)
Page 16
contents 81 Cleaning the scan unit 82 Maintaining the Toner cartridge 82 Toner cartridge storage 82 Handling instructions 82 Use of non-Samsung and refilled toner cartridge 82 Estimated cartridge life 82 Replacing the toner cartridge 83 Maintaining the imaging unit 83 Expected cartridge life 84 Replacing the imaging unit 85 Maintenance Parts...the optional tray 90 In the optional high capacity feeder 92 In the multi-purpose tray 92 In the fuser area or around the toner cartridge 92 In the paper exit area 93 In the duplex unit area 93 In the stacker (finisher) 94 Understanding display messages 97...
contents 81 Cleaning the scan unit 82 Maintaining the Toner cartridge 82 Toner cartridge storage 82 Handling instructions 82 Use of non-Samsung and refilled toner cartridge 82 Estimated cartridge life 82 Replacing the toner cartridge 83 Maintaining the imaging unit 83 Expected cartridge life 84 Replacing the imaging unit 85 Maintenance Parts...the optional tray 90 In the optional high capacity feeder 92 In the multi-purpose tray 92 In the fuser area or around the toner cartridge 92 In the paper exit area 93 In the duplex unit area 93 In the stacker (finisher) 94 Understanding display messages 97...
User Manual (ENGLISH)
Page 18
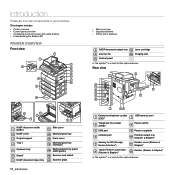
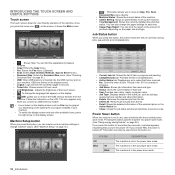
... buttons • Understanding the Status LED z PRINTER OVERVIEW Front view • Menu overview • Supplied software • Printer driver features 8 DADF document output tray 18 toner cartridge 9 scanner lid 19 imaging unit 10 Control panel a. Rear view DADF document width 1 guides 2 DADF cover 3 Output support Tray 1 4 5 Optional traya 6 Standa 7 DADF document...
... buttons • Understanding the Status LED z PRINTER OVERVIEW Front view • Menu overview • Supplied software • Printer driver features 8 DADF document output tray 18 toner cartridge 9 scanner lid 19 imaging unit 10 Control panel a. Rear view DADF document width 1 guides 2 DADF cover 3 Output support Tray 1 4 5 Optional traya 6 Standa 7 DADF document...
User Manual (ENGLISH)
Page 20
... screen. • : This button allows you choose Yes, the power is turned off . Power Saver button When the machine is in account. • Toner Info.: Shows amount of toner used to turn the power off . Pressing this button puts the machine into the USB memory port on . This button can also be...
... screen. • : This button allows you choose Yes, the power is turned off . Power Saver button When the machine is in account. • Toner Info.: Shows amount of toner used to turn the power off . Pressing this button puts the machine into the USB memory port on . This button can also be...
User Manual (ENGLISH)
Page 21
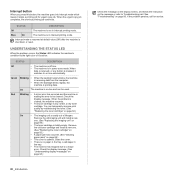
...default value (Off) after the machine is receiving data from the computer. Remove the old imaging unit and install a new one . (See "Replacing the toner cartridge" on page 82.) • A paper jam has occurred. (See "Clearing paper jams" on -line automatically. Check the display message. (See...previous printing job continues. When the backlight blinks rapidly, the machine is opened. When the problem is cleared, the machine resumes. • The toner cartridge is on page 86. Close the cover. • There is in the tray. STATUS DESCRIPTION Off • The machine is off-...
...default value (Off) after the machine is receiving data from the computer. Remove the old imaging unit and install a new one . (See "Replacing the toner cartridge" on page 82.) • A paper jam has occurred. (See "Clearing paper jams" on -line automatically. Check the display message. (See...previous printing job continues. When the backlight blinks rapidly, the machine is opened. When the problem is cleared, the machine resumes. • The toner cartridge is on page 86. Close the cover. • There is in the tray. STATUS DESCRIPTION Off • The machine is off-...
User Manual (ENGLISH)
Page 22
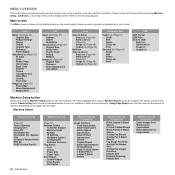
... menus can print the report on the amount of printouts depending on the control panel, the screen displays three menus. Supplies Life tab (Page 72) Toner Cartridge Imaging Unit Fuser Kit Feed Roller Kit Feed Roller Kit - Admin Setting lets you press the Machine Setup button on the paper size and...
... menus can print the report on the amount of printouts depending on the control panel, the screen displays three menus. Supplies Life tab (Page 72) Toner Cartridge Imaging Unit Fuser Kit Feed Roller Kit Feed Roller Kit - Admin Setting lets you press the Machine Setup button on the paper size and...
User Manual (ENGLISH)
Page 24
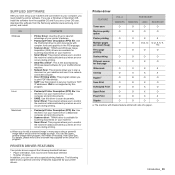
...status and alerts you when an error occurs during printing. • SmarThru Officea: This is available for your multifunctional machine. • Network Scan: This program allows you to scan a document on your machine and save O ...by your printer drivers: Printer driver FEATURE PCL 6 POSTSCRIPT WINDOWS WINDOWS LINUX MACINTOSH Toner save it to your machine from SmarThru. If you are a Windows or ...Acquisition (WIA) drivers are a Linux OS user, download the software from the Samsung website (www.samsung.com/ printer) and install. Introduction_ 23 For details, please refer to the...
...status and alerts you when an error occurs during printing. • SmarThru Officea: This is available for your multifunctional machine. • Network Scan: This program allows you to scan a document on your machine and save O ...by your printer drivers: Printer driver FEATURE PCL 6 POSTSCRIPT WINDOWS WINDOWS LINUX MACINTOSH Toner save it to your machine from SmarThru. If you are a Windows or ...Acquisition (WIA) drivers are a Linux OS user, download the software from the Samsung website (www.samsung.com/ printer) and install. Introduction_ 23 For details, please refer to the...
User Manual (ENGLISH)
Page 25
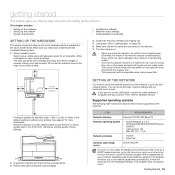
... you want to use it as your network printer. Make sure that there is suitable for more information. Getting Started_ 24 If you step-by toner, which is appropriate for air circulation. Follow the instructions in a non-static IP address environment and need to set the machine close the scan lid...
... you want to use it as your network printer. Make sure that there is suitable for more information. Getting Started_ 24 If you step-by toner, which is appropriate for air circulation. Follow the instructions in a non-static IP address environment and need to set the machine close the scan lid...

User Manual (ENGLISH)
Page 32
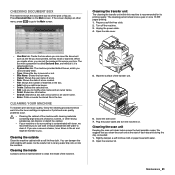
.... 1. Make sure that no originals are caught by the stopper and then close the lid. Lift and open while copying may affect copy quality and toner consumption. • Dust on the scanner glass may cause black spots on the document input tray. Always keep it clean. (See "Cleaning the scan unit...
.... 1. Make sure that no originals are caught by the stopper and then close the lid. Lift and open while copying may affect copy quality and toner consumption. • Dust on the scanner glass may cause black spots on the document input tray. Always keep it clean. (See "Cleaning the scan unit...

User Manual (ENGLISH)
Page 75
... the just opened tray. • Auto Tray Switch: If tray1 and tray2 are stacked in sets to match the sequence of the imaging unit and toner cartridge to the highest number in order. • First In, First Out: The machine does an asked job in bins one-byone. The machine starts...
... the just opened tray. • Auto Tray Switch: If tray1 and tray2 are stacked in sets to match the sequence of the imaging unit and toner cartridge to the highest number in order. • First In, First Out: The machine does an asked job in bins one-byone. The machine starts...

User Manual (ENGLISH)
Page 81
...Press Machine Setup on the control panel. 2. Press Admin Setting. Press Machine Setup on the control panel. 2. Press Admin Setting. SENDING THE TONER REORDER NOTIFICATION You can set the remained life level. 5. The Fax Report, E-mail Confirmation Report, and Scan to print the machine's configuration... or browse the status. MONITORING THE SUPPLIES LIFE If you want to check your machine and the toner cartridge. When the login message pops up , then enter password and press OK. 3. Press Machine Status > the Machine Info tab > Print...
...Press Machine Setup on the control panel. 2. Press Admin Setting. Press Machine Setup on the control panel. 2. Press Admin Setting. SENDING THE TONER REORDER NOTIFICATION You can set the remained life level. 5. The Fax Report, E-mail Confirmation Report, and Scan to print the machine's configuration... or browse the status. MONITORING THE SUPPLIES LIFE If you want to check your machine and the toner cartridge. When the login message pops up , then enter password and press OK. 3. Press Machine Status > the Machine Info tab > Print...
User Manual (ENGLISH)
Page 82
... the file you clean the scan unit at the start of alcohol, solvent, or other menu, press ( ) to go to you to use a vacuum cleaner, toner blows in the air and might be careful not to modify a box name and an owner name. • Detail: Shows box information. • Search: Searches... cover. • User Box tab: Create the box where you can dampen the cloth slightly with cleaning materials containing large amounts of each time the toner cartridge is replaced or if print and scan quality problems occur. • Cleaning the cabinet of the machine with water, but be harmful to the...
... the file you clean the scan unit at the start of alcohol, solvent, or other menu, press ( ) to go to you to use a vacuum cleaner, toner blows in the air and might be careful not to modify a box name and an owner name. • Detail: Shows box information. • Search: Searches... cover. • User Box tab: Create the box where you can dampen the cloth slightly with cleaning materials containing large amounts of each time the toner cartridge is replaced or if print and scan quality problems occur. • Cleaning the cabinet of the machine with water, but be harmful to the...
User Manual (ENGLISH)
Page 83
... change the cartridge more often. Dusty places. - A car for your printer including generic, store brand, refilled, or remanufactured toner cartridges. • Samsung's printer warranty does not cover damage to unnecessary vibrations or shock. • Never manually rotate the drum, especially in a ...If original packaging is removed from the printer, always store the cartridge: • Inside the protective bag from your new Samsung toner cartridge. An environment with paper and store in controlled office temperature and humidity conditions. The actual print-out number may vary ...
... change the cartridge more often. Dusty places. - A car for your printer including generic, store brand, refilled, or remanufactured toner cartridges. • Samsung's printer warranty does not cover damage to unnecessary vibrations or shock. • Never manually rotate the drum, especially in a ...If original packaging is removed from the printer, always store the cartridge: • Inside the protective bag from your new Samsung toner cartridge. An environment with paper and store in controlled office temperature and humidity conditions. The actual print-out number may vary ...
User Manual (ENGLISH)
Page 84
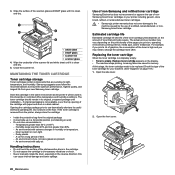
...cover, then the side cover. For ordering information for imaging unit. (See "Supplies" on your clothing, wipe it to release the toner cartridge. 4. The screen displays Imaging unit is almost ended. Replace with new one appears on the display. Maintenance_ 83 Replace with new ... six times to standby mode. MAINTAINING THE IMAGING UNIT Expected cartridge life The useful life of the imaging unit is worn. Hold the toner cartridge by the operating environment, optional, printing interval, media type and media size. • Imaging unit is approximately 80,000 pages...
...cover, then the side cover. For ordering information for imaging unit. (See "Supplies" on your clothing, wipe it to release the toner cartridge. 4. The screen displays Imaging unit is almost ended. Replace with new one appears on the display. Maintenance_ 83 Replace with new ... six times to standby mode. MAINTAINING THE IMAGING UNIT Expected cartridge life The useful life of the imaging unit is worn. Hold the toner cartridge by the operating environment, optional, printing interval, media type and media size. • Imaging unit is approximately 80,000 pages...

User Manual (ENGLISH)
Page 85
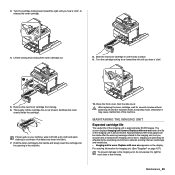
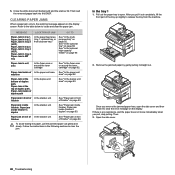
... off with a dry cloth and wash clothing in cold water. Thoroughly shake the imaging unit side to side five or six times. 84 _Maintenance If toner gets on the cartridge to replace the imaging unit. 5. Turn the cartridge locking lever toward the right until you hear a 'click', to touch the... surface of the imaging unit. Hot water sets toner into place, making sure not to release the toner cartridge. 6. Lift the locking lever and pull the toner cartridge out. 2. Open the front cover.
... off with a dry cloth and wash clothing in cold water. Thoroughly shake the imaging unit side to side five or six times. 84 _Maintenance If toner gets on the cartridge to replace the imaging unit. 5. Turn the cartridge locking lever toward the right until you hear a 'click', to touch the... surface of the imaging unit. Hot water sets toner into place, making sure not to release the toner cartridge. 6. Lift the locking lever and pull the toner cartridge out. 2. Open the front cover.
User Manual (ENGLISH)
Page 86
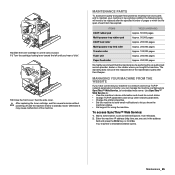
... service provider, dealer or the retailer where you hear a 'click'. 12. To access SyncThru™ Web Service: 1. 10. Slide the toner cartridge in until you bought the machine. MANAGING YOUR MACHINE FROM THE WEBSITE If you have connected your machine in top working condition the following... items will need to let you can manage the machine via Samsung's SyncThru™ Web Service, an embedded web server. Start a web browser, such as Internet Explorer, from worn parts and to maintain...
... service provider, dealer or the retailer where you hear a 'click'. 12. To access SyncThru™ Web Service: 1. 10. Slide the toner cartridge in until you bought the machine. MANAGING YOUR MACHINE FROM THE WEBSITE If you have connected your machine in top working condition the following... items will need to let you can manage the machine via Samsung's SyncThru™ Web Service, an embedded web server. Start a web browser, such as Internet Explorer, from worn parts and to maintain...
User Manual (ENGLISH)
Page 89
... Jam inside finisher's duplex" on page 92. Follow the instructions in exit area In the fuser area or around the toner cartridge See "In the fuser area or around the toner cartridge" on the display. If there is any resistance, and the paper does not move immediately when you remove the jammed...
... Jam inside finisher's duplex" on page 92. Follow the instructions in exit area In the fuser area or around the toner cartridge See "In the fuser area or around the toner cartridge" on the display. If there is any resistance, and the paper does not move immediately when you remove the jammed...

User Manual (ENGLISH)
Page 93
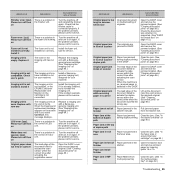
Remove the jammed paper, in the direction shown. 2. In the paper exit area 1. Printing automatically resumes. 92 _Troubleshooting Open and close the side cover. Close the side cover. In the fuser area or around the toner cartridge The fuser area is not feeding properly, pull the paper out of the machine. 2. Open the side cover. 2. Take care when removing paper from the machine. 1. Printing automatically resumes. 3. Close the side cover. Open the side cover. 3. Gently pull the paper out through the exit area. In the multi-purpose tray 1. If the paper is hot.
Remove the jammed paper, in the direction shown. 2. In the paper exit area 1. Printing automatically resumes. 92 _Troubleshooting Open and close the side cover. Close the side cover. In the fuser area or around the toner cartridge The fuser area is not feeding properly, pull the paper out of the machine. 2. Open the side cover. 2. Take care when removing paper from the machine. 1. Printing automatically resumes. 3. Close the side cover. Open the side cover. 3. Gently pull the paper out through the exit area. In the multi-purpose tray 1. If the paper is hot.

User Manual (ENGLISH)
Page 95
... turn it on the supplies. . Fax memory is full. Print or remove received fax Job There is Close the finisher until it cannot supply the toner properly. Fax memory is almost full. Call for service. When you call for service, it . Did not supply enough... toner. Did not supply enough toner. Please open . Delete the received fax data in the memory to indicate machine status or errors. Finisher door is worn. Close it The finisher cover ...
... turn it on the supplies. . Fax memory is full. Print or remove received fax Job There is Close the finisher until it cannot supply the toner properly. Fax memory is almost full. Call for service. When you call for service, it . Did not supply enough... toner. Did not supply enough toner. Please open . Delete the received fax data in the memory to indicate machine status or errors. Finisher door is worn. Close it The finisher cover ...
User Manual (ENGLISH)
Page 96
... jam. (See "In the multi-purpose tray" on page 84.) LSU error: [zzz]. Clear the jam. (See "In the fuser area or around the toner cartridge" on There is supported. (See "DADF document size" on page 86.) Paper jam at the end of Paper jammed in DADF. MESSAGE MEANING SUGGESTED... control of the document failed to actuate the gate sensor within the correct time when the document was fed the wrong way. Install it The toner in scanner The lead edge of motor unit. Replace a imaging unit with new one The imaging unit is connected properly. Turn the machine off ...
... jam. (See "In the multi-purpose tray" on page 84.) LSU error: [zzz]. Clear the jam. (See "In the fuser area or around the toner cartridge" on There is supported. (See "DADF document size" on page 86.) Paper jam at the end of Paper jammed in DADF. MESSAGE MEANING SUGGESTED... control of the document failed to actuate the gate sensor within the correct time when the document was fed the wrong way. Install it The toner in scanner The lead edge of motor unit. Replace a imaging unit with new one The imaging unit is connected properly. Turn the machine off ...


