
User Manual (ENGLISH)
Page 138
... INDEX printing, use the DPOF INDEX printing (see page 142) or thumbnail printing on the LCD screen as PAPER SIZE, LAYOUT, PAPER TYPE, PRINT QUALITY, DATE PRINT, and FILE NAME imprint options, select the PRINTER SETUP menu. I Unsupported menu items are displayed on a PC. 11388 [Notas] I Aparece una lista con las opciones disponibles: DEFAULT (POR DEF.) y CUSTOMIZE (PERSONAL.). ENGLISH Digital Still Camera Mode : Advanced Techniques...
... INDEX printing, use the DPOF INDEX printing (see page 142) or thumbnail printing on the LCD screen as PAPER SIZE, LAYOUT, PAPER TYPE, PRINT QUALITY, DATE PRINT, and FILE NAME imprint options, select the PRINTER SETUP menu. I Unsupported menu items are displayed on a PC. 11388 [Notas] I Aparece una lista con las opciones disponibles: DEFAULT (POR DEF.) y CUSTOMIZE (PERSONAL.). ENGLISH Digital Still Camera Mode : Advanced Techniques...
User Manual (ENGLISH)
Page 14
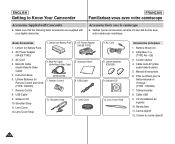
AC Cord 4. Multi-AV Cable (Audio/Video/S-Video Cable) 5. Lithium Batteries for Remote Control and Clock. (TYPE: CR2025) AD39-00119A 7. Remote Control 8. Instruction Book 8. Lithium Batteries (CR2025) 9.Software CD 12. E8) 3. Cordon du cache-objectif 14 ENGLISH Getting to Know Your Camcorder Accessories Supplied with Camcorder ✤ Make sure that the following basic accessories are supplied with your digital camcorder. AC Power Adapter (AA-E8 TYPE) 3. Instruction Book 6. USB Cable 9. Software CD 10. Lens Cover 12. USB Cable 11. Lens Cover 3. Câble USB 9. ...
AC Cord 4. Multi-AV Cable (Audio/Video/S-Video Cable) 5. Lithium Batteries for Remote Control and Clock. (TYPE: CR2025) AD39-00119A 7. Remote Control 8. Instruction Book 8. Lithium Batteries (CR2025) 9.Software CD 12. E8) 3. Cordon du cache-objectif 14 ENGLISH Getting to Know Your Camcorder Accessories Supplied with Camcorder ✤ Make sure that the following basic accessories are supplied with your digital camcorder. AC Power Adapter (AA-E8 TYPE) 3. Instruction Book 6. USB Cable 9. Software CD 10. Lens Cover 12. USB Cable 11. Lens Cover 3. Câble USB 9. ...
User Manual (ENGLISH)
Page 16
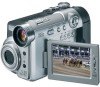
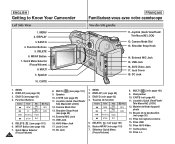
... (see page 101) 9. DELETE ( ) (voir page 101) 6. Molette de Mode Appareil photo 13. Cache-prises 18. Function Buttons 5. MULTI 9. USB Jack 16. EASY.Q (see page 49) 11. REC Search + PLAY/STILL FADE I STOP BLC (Play) REV FWD - 5. Sélecteur Quick Menu (Focus/Volume) 8. EASY.Q 4. DELETE 6. AV/S-Video Jack 17. MENU 2. Joystick (Quick View/Flash/ Tele Macro/AE LOCK) 12. DISPLAY (voir page 25) 3. EASY.Q (voir page 42) 4. Quick Menu Selector (Focus/Volume) 8. External MIC Jack 15. C.NITE...
... (see page 101) 9. DELETE ( ) (voir page 101) 6. Molette de Mode Appareil photo 13. Cache-prises 18. Function Buttons 5. MULTI 9. USB Jack 16. EASY.Q (see page 49) 11. REC Search + PLAY/STILL FADE I STOP BLC (Play) REV FWD - 5. Sélecteur Quick Menu (Focus/Volume) 8. EASY.Q 4. DELETE 6. AV/S-Video Jack 17. MENU 2. Joystick (Quick View/Flash/ Tele Macro/AE LOCK) 12. DISPLAY (voir page 25) 3. EASY.Q (voir page 42) 4. Quick Menu Selector (Focus/Volume) 8. External MIC Jack 15. C.NITE...

User Manual (ENGLISH)
Page 19
...-vous avec votre caméscope Télécommande 18. DISPLAY 17. F. A DUB (voir page 74) 7. (Av.Rapide) 8. (Ret.Rapide) 9. (PLAY) 10. / (Touches directionnelles) (voir page 72) 11. PHOTO 2. PHOTO (voir pages 67, 97) 2. ENGLISH Getting to Know Your Camcorder Remote Control 1. START/STOP 3. A.DUB (see page 74) 7. (FF) 8. (REW) 9. (PLAY) 10. / (Direction) (see page 72) 11. Zoom 18. ZERO MEMORY (voir page 44...
...-vous avec votre caméscope Télécommande 18. DISPLAY 17. F. A DUB (voir page 74) 7. (Av.Rapide) 8. (Ret.Rapide) 9. (PLAY) 10. / (Touches directionnelles) (voir page 72) 11. PHOTO 2. PHOTO (voir pages 67, 97) 2. ENGLISH Getting to Know Your Camcorder Remote Control 1. START/STOP 3. A.DUB (see page 74) 7. (FF) 8. (REW) 9. (PLAY) 10. / (Direction) (see page 72) 11. Zoom 18. ZERO MEMORY (voir page 44...
User Manual (ENGLISH)
Page 30
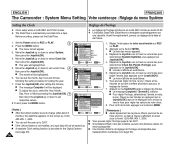
...(OK) après le réglage des minutes. l'appareil photo numérique (voir page 90). 30 ENGLISH FRANÇAIS The Camcorder : System Menu Setting Votre caméscope : Réglage du menu Système Setting the Clock Réglage de l'horloge ✤ Clock setup works in both REC and PLAY modes. ✤ The Date/Time is not installed, any input data will not be highlighted. 6.
...(OK) après le réglage des minutes. l'appareil photo numérique (voir page 90). 30 ENGLISH FRANÇAIS The Camcorder : System Menu Setting Votre caméscope : Réglage du menu Système Setting the Clock Réglage de l'horloge ✤ Clock setup works in both REC and PLAY modes. ✤ The Date/Time is not installed, any input data will not be highlighted. 6.

User Manual (ENGLISH)
Page 34
... sur le Joystick(OK). Set the Power switch to adjust (LCD Bright or LCD Color), then press the Joystick(OK). 5. ENGLISH FRANÇAIS The Camcorder : Display Menu Setting Votre caméscope : réglage du menu Affichage Adjusting the LCD Screen ✤ This function works in both REC and PLAY modes. ✤ Your Camcorder is equipped with a 2.5 inch color Liquid Crystal Display(LCD) screen, which enables you to view what you are recording or playing back directly. ✤ Depending on...
... sur le Joystick(OK). Set the Power switch to adjust (LCD Bright or LCD Color), then press the Joystick(OK). 5. ENGLISH FRANÇAIS The Camcorder : Display Menu Setting Votre caméscope : réglage du menu Affichage Adjusting the LCD Screen ✤ This function works in both REC and PLAY modes. ✤ Your Camcorder is equipped with a 2.5 inch color Liquid Crystal Display(LCD) screen, which enables you to view what you are recording or playing back directly. ✤ Depending on...
User Manual (ENGLISH)
Page 35
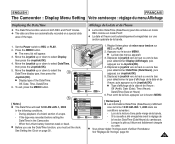
... le bouton MENU. 5 REC Mode √Display [ Remarques ] [ Notes ] LCD Bright I Les informations Date/Time (Date/Heure) s'affichent I Type d'affichage de la date et de l'heure : Off (Arrêt), Date (Date), Time (Heure), Move OK Select MENU Exit Date&Time (Date et Heure) 6. ENGLISH FRANÇAIS The Camcorder : Display Menu Setting Votre caméscope : réglage du menu Affichage Displaying the Date/Time ✤ The Date/Time function works in both REC and PLAY modes. ✤ The date and time are automatically recorded on page...
... le bouton MENU. 5 REC Mode √Display [ Remarques ] [ Notes ] LCD Bright I Les informations Date/Time (Date/Heure) s'affichent I Type d'affichage de la date et de l'heure : Off (Arrêt), Date (Date), Time (Heure), Move OK Select MENU Exit Date&Time (Date et Heure) 6. ENGLISH FRANÇAIS The Camcorder : Display Menu Setting Votre caméscope : réglage du menu Affichage Displaying the Date/Time ✤ The Date/Time function works in both REC and PLAY modes. ✤ The date and time are automatically recorded on page...
User Manual (ENGLISH)
Page 41
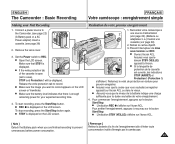
... Start/Stop. I Make sure the image you are finished recording to record appears on the LCD screen. I If the write protection tab of the cassette is enough remaining power for your First Recording 1. Placez l'interrupteur de mise sous tension sur REC. I L'indication REC G s'affiche sur l'écran ACL. ENGLISH The Camcorder : Basic Recording FRANÇAIS Votre caméscope : enregistrement simple Making your expected recording time...
... Start/Stop. I Make sure the image you are finished recording to record appears on the LCD screen. I If the write protection tab of the cassette is enough remaining power for your First Recording 1. Placez l'interrupteur de mise sous tension sur REC. I L'indication REC G s'affiche sur l'écran ACL. ENGLISH The Camcorder : Basic Recording FRANÇAIS Votre caméscope : enregistrement simple Making your expected recording time...
User Manual (ENGLISH)
Page 47
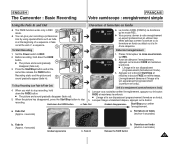
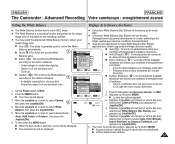
... In (Approx. 4 seconds) Gradual appearance b. ENGLISH The Camcorder : Basic Recording FRANÇAIS Votre caméscope : enregistrement simple Using the Fade In and Out Ouverture et fermeture en fondu ✤ The FADE function works only in REC 2 mode. ✤ You can give your recording a professional look by using special effects such as fade in ). 5 To Stop Recording (use Fade In/Fade Out) ➔...
... In (Approx. 4 seconds) Gradual appearance b. ENGLISH The Camcorder : Basic Recording FRANÇAIS Votre caméscope : enregistrement simple Using the Fade In and Out Ouverture et fermeture en fondu ✤ The FADE function works only in REC 2 mode. ✤ You can give your recording a professional look by using special effects such as fade in ). 5 To Stop Recording (use Fade In/Fade Out) ➔...
User Manual (ENGLISH)
Page 51
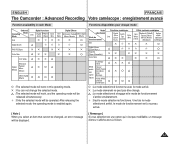
... be changed, an error message will be displayed. [ Remarque ] Si vous sélectionnez une option qui n'est pas modifiable, un message d'erreur s'affiche alors à l'écran. 51 ENGLISH FRANÇAIS The Camcorder : Advanced Recording Votre caméscope : enregistrement avancé Function availability in each Mode Fonctions disponibles pour chaque mode Selected Operating Mode Mode DIS Digital functions DIS Digital PHOTO Color Zoom (Tape) Nite ✕ ✩✕ Digital Zoom ✩✩ PHOTO(Tape...
... be changed, an error message will be displayed. [ Remarque ] Si vous sélectionnez une option qui n'est pas modifiable, un message d'erreur s'affiche alors à l'écran. 51 ENGLISH FRANÇAIS The Camcorder : Advanced Recording Votre caméscope : enregistrement avancé Function availability in each Mode Fonctions disponibles pour chaque mode Selected Operating Mode Mode DIS Digital functions DIS Digital PHOTO Color Zoom (Tape) Nite ✕ ✩✕ Digital Zoom ✩✩ PHOTO(Tape...
User Manual (ENGLISH)
Page 57
... used to control the White REC. ✤ La fonction White Balance (Bal. ENGLISH FRANÇAIS The Camcorder : Advanced Recording Votre caméscope : enregistrement avancé Setting the White Balance Réglage de la balance des blancs ✤ The White Balance function works only in any recording condition. ✤ You may select the appropriate White Balance mode to obtain good quality image color. In daylight, especially for close up or down to select Camera...
... used to control the White REC. ✤ La fonction White Balance (Bal. ENGLISH FRANÇAIS The Camcorder : Advanced Recording Votre caméscope : enregistrement avancé Setting the White Balance Réglage de la balance des blancs ✤ The White Balance function works only in any recording condition. ✤ You may select the appropriate White Balance mode to obtain good quality image color. In daylight, especially for close up or down to select Camera...

User Manual (ENGLISH)
Page 67
...;lécommande. ENGLISH FRANÇAIS The Camcorder : Advanced Recording Votre caméscope : enregistrement avancé Photo Image Recording Utilisation en tant qu'appareil photo ✤ Photo image recording works only in PLAY mode. ✤ You can use . Set the Power switch to search for a photo image. I The photo search process appears on LCD screen 6 while you are no still images recorded on the remote control. I L'enregistrement de photo alors que les modes EASY.Q, DIS ou Digital Zoom (Zoom Num.) sont...
...;lécommande. ENGLISH FRANÇAIS The Camcorder : Advanced Recording Votre caméscope : enregistrement avancé Photo Image Recording Utilisation en tant qu'appareil photo ✤ Photo image recording works only in PLAY mode. ✤ You can use . Set the Power switch to search for a photo image. I The photo search process appears on LCD screen 6 while you are no still images recorded on the remote control. I L'enregistrement de photo alors que les modes EASY.Q, DIS ou Digital Zoom (Zoom Num.) sont...
User Manual (ENGLISH)
Page 74
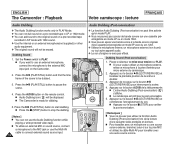
... utilize an external MIC or sound source, connect a microphone to the MIC jack or use an external microphone, 1 connect the microphone to pause the scene. 23 4. I Audio Dubbing icon ( ) will not be erased. ENGLISH The Camcorder : Playback FRANÇAIS Votre caméscope : lecture Audio Dubbing ✤ The Audio Dubbing function works only in PLAY Mode. ✤ You can not dub sound on a pre-recorded tape in SP mode with 12bit sound. ✤ Use the internal or an external microphone(not supplied...
... utilize an external MIC or sound source, connect a microphone to the MIC jack or use an external microphone, 1 connect the microphone to pause the scene. 23 4. I Audio Dubbing icon ( ) will not be erased. ENGLISH The Camcorder : Playback FRANÇAIS Votre caméscope : lecture Audio Dubbing ✤ The Audio Dubbing function works only in PLAY Mode. ✤ You can not dub sound on a pre-recorded tape in SP mode with 12bit sound. ✤ Use the internal or an external microphone(not supplied...
User Manual (ENGLISH)
Page 79
... Media Pro User's Manual is set to be viewed using the USB cable. 3) The SAMSUNG A/V Capture driver installation begins on the monitor. 2. Connect a Camcorder to your PC to complete the DV Driver installation. 1) Set the camcorder Power switch to REC. 2) Connect the camcorder to the PC using Acrobat Reader software, which is also included on the CD (D:\Support\AcrobatReader\AcroReader51_ENU_full.exe). (The Acrobat Reader is a freeware product of your computer. 3 Installation selection screen appears on the PC. ROM drive is in English...
... Media Pro User's Manual is set to be viewed using the USB cable. 3) The SAMSUNG A/V Capture driver installation begins on the monitor. 2. Connect a Camcorder to your PC to complete the DV Driver installation. 1) Set the camcorder Power switch to REC. 2) Connect the camcorder to the PC using Acrobat Reader software, which is also included on the CD (D:\Support\AcrobatReader\AcroReader51_ENU_full.exe). (The Acrobat Reader is a freeware product of your computer. 3 Installation selection screen appears on the PC. ROM drive is in English...
User Manual (ENGLISH)
Page 85
.... - Set the Power switch to apply your data stored in the sequence. 5. I File numbering for a Memory Card that contains image files from another device, will begin after moving the Joystick up or down . 6. SERIES: When there are displayed. - Press the Joystick(OK) to (CAMERA). 2. Press the MENU button to exit the menu screen. 1 SETUP FILE LANGUAGE FORMAT LCD USB [ Notes ] I The SETUP menu list will be named as the number |in the Memory Card to select (SETUP). I The RESET and...
.... - Set the Power switch to apply your data stored in the sequence. 5. I File numbering for a Memory Card that contains image files from another device, will begin after moving the Joystick up or down . 6. SERIES: When there are displayed. - Press the Joystick(OK) to (CAMERA). 2. Press the MENU button to exit the menu screen. 1 SETUP FILE LANGUAGE FORMAT LCD USB [ Notes ] I The SETUP menu list will be named as the number |in the Memory Card to select (SETUP). I The RESET and...
User Manual (ENGLISH)
Page 88
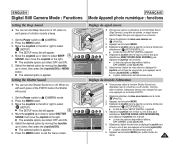
I La liste du menu SETUP (INSTALL.) apparaît. 2592 BACK: SET:OK ENGLISH FRANÇAIS ESPAÑOL DEUTSCH ITALIANO 4. Select the desired option by moving the Joystick up or down . SETUP FILE LANGUAGE FORMAT LCD USB 6. Press the MENU button to select (SETUP). I The available options for the OSD (On-screen Display) menu. ✤ Select the appropriate OSD Language from OSD List. Déplacez le joystick vers...
I La liste du menu SETUP (INSTALL.) apparaît. 2592 BACK: SET:OK ENGLISH FRANÇAIS ESPAÑOL DEUTSCH ITALIANO 4. Select the desired option by moving the Joystick up or down . SETUP FILE LANGUAGE FORMAT LCD USB 6. Press the MENU button to select (SETUP). I The available options for the OSD (On-screen Display) menu. ✤ Select the appropriate OSD Language from OSD List. Déplacez le joystick vers...
User Manual (ENGLISH)
Page 90
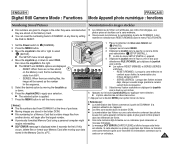
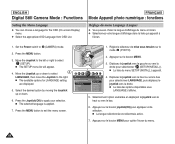
... the MENU button to select (SETUP). DD/MM/'YY (JJ/MM/AA) 8. ENGLISH FRANÇAIS Digital Still Camera Mode : Functions Mode Appareil photo numérique : fonctions Setting the Clock Réglage de l'horloge ✤ A built-in clock for Camera mode creates the Time Stamp. Pour davantage d'informations sur l'inscription de la date, reportez-vous à la page suivante. 1. I If you remove the batteries from the camcorder...
... the MENU button to select (SETUP). DD/MM/'YY (JJ/MM/AA) 8. ENGLISH FRANÇAIS Digital Still Camera Mode : Functions Mode Appareil photo numérique : fonctions Setting the Clock Réglage de l'horloge ✤ A built-in clock for Camera mode creates the Time Stamp. Pour davantage d'informations sur l'inscription de la date, reportez-vous à la page suivante. 1. I If you remove the batteries from the camcorder...
User Manual (ENGLISH)
Page 93
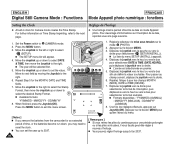
Set the Power switch to exit the menu screen. I L'option sélectionnée est désormais active. 6. Press the MENU button to (CAMERA). 2. Réglage du signal sonore 1 ✤ Vous pouvez activer ou désactiver la fonction Beep Sound (Sign Sonore). SETUP USB DATE&TIME IMPRINT WL.REMOTE BEEP SOUND 2592 BACK: SET:OK OFF ON 1. Appuyez sur le bouton MENU. 3. Déplacez le joystick vers le haut...
Set the Power switch to exit the menu screen. I L'option sélectionnée est désormais active. 6. Press the MENU button to (CAMERA). 2. Réglage du signal sonore 1 ✤ Vous pouvez activer ou désactiver la fonction Beep Sound (Sign Sonore). SETUP USB DATE&TIME IMPRINT WL.REMOTE BEEP SOUND 2592 BACK: SET:OK OFF ON 1. Appuyez sur le bouton MENU. 3. Déplacez le joystick vers le haut...
User Manual (ENGLISH)
Page 106
I In (Play) mode, the LCD screen may flash when you play back a moving image on the LCD screen or a connected TV, the sound is not played back. 4 Recorded sound is played back on a PC after copying or moving the moving images on a PC, install the Quick Time Player from STOP to PLAY. Press the √/» (PLAY/STILL) button to a PC. To resume playback, press the √/» (PLAY/STILL) button again. Au cours de la lecture, utilisez...
I In (Play) mode, the LCD screen may flash when you play back a moving image on the LCD screen or a connected TV, the sound is not played back. 4 Recorded sound is played back on a PC after copying or moving the moving images on a PC, install the Quick Time Player from STOP to PLAY. Press the √/» (PLAY/STILL) button to a PC. To resume playback, press the √/» (PLAY/STILL) button again. Au cours de la lecture, utilisez...

User Manual (ENGLISH)
Page 131
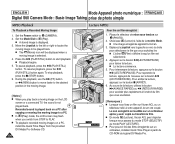
... appuyez sur Joystick(OK). Press the MENU button. 3. Move the Joystick to the left or right to (CAMERA). 1 2. I Formater ou supprimer la photo sur la carte mémoire n'affecte pas les images de démarrage. I Formatting or deleting the still image on . ✤ You can select and resize a still image to save in internal memory of the Camcorder. [ Remarques ] I L'option sélectionnée est...
... appuyez sur Joystick(OK). Press the MENU button. 3. Move the Joystick to the left or right to (CAMERA). 1 2. I Formater ou supprimer la photo sur la carte mémoire n'affecte pas les images de démarrage. I Formatting or deleting the still image on . ✤ You can select and resize a still image to save in internal memory of the Camcorder. [ Remarques ] I L'option sélectionnée est...


