

Instruction Booklet
Page 1
ENGLISH Digital Video Camcorder SCD55/D60 AF Auto Focus CCD Charge Coupled Device LCD Liquid Crystal Display Owner's Instruction Book Before operating the unit, please read this instruction book thoroughly, and retain it for future reference. US PATENT 4415844
ENGLISH Digital Video Camcorder SCD55/D60 AF Auto Focus CCD Charge Coupled Device LCD Liquid Crystal Display Owner's Instruction Book Before operating the unit, please read this instruction book thoroughly, and retain it for future reference. US PATENT 4415844
Instruction Booklet
Page 2
... Inserting and Ejecting a Cassette...28 Basic Recording Making your First Recording ...29 Hints for Stable Image Recording...30 Adjusting the LCD ...31 Using the VIEWFINDER ...31 Playing back a tape you have recorded on the LCD...32 Controlling Sound from the Speaker ...33 Advanced Recording Using Various Functions Setting the menu item ...34...
... Inserting and Ejecting a Cassette...28 Basic Recording Making your First Recording ...29 Hints for Stable Image Recording...30 Adjusting the LCD ...31 Using the VIEWFINDER ...31 Playing back a tape you have recorded on the LCD...32 Controlling Sound from the Speaker ...33 Advanced Recording Using Various Functions Setting the menu item ...34...
Instruction Booklet
Page 3
... Out ...48 PIP(Picture In Picture) ...49 Audio dubbing ...50 PHOTO ...51 Various Recording Techniques ...53 Lighting Techniques ...54 Playing back a Tape To watch with LCD ...55 To watch with TV monitor ...55 Playback ...56 Various Functions in PLAYER mode ...57 IEEE 1394 Data Transfer 58 RS-232C Data Transfer...
... Out ...48 PIP(Picture In Picture) ...49 Audio dubbing ...50 PHOTO ...51 Various Recording Techniques ...53 Lighting Techniques ...54 Playing back a Tape To watch with LCD ...55 To watch with TV monitor ...55 Playback ...56 Various Functions in PLAYER mode ...57 IEEE 1394 Data Transfer 58 RS-232C Data Transfer...
Instruction Booklet
Page 4
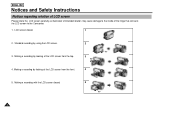
Unintended rotation may cause damage to the Camcorder. 1. Making a recording by looking at the LCD screen from the front. 5. Making a recording with the LCD screen closed . 1 2. LCD screen closed . 2 90° 3 90° 4 90° 5 90° 4 ENGLISH Notices and Safety Instructions Notices regarding rotation of the hinge that connects the LCD screen to the inside of LCD screen Please rotate the LCD screen carefully as illustrated. Standard recording by looking at the LCD screen from the top. 4. Making a recording by using the LCD screen. 3.
Unintended rotation may cause damage to the Camcorder. 1. Making a recording by looking at the LCD screen from the front. 5. Making a recording with the LCD screen closed . 1 2. LCD screen closed . 2 90° 3 90° 4 90° 5 90° 4 ENGLISH Notices and Safety Instructions Notices regarding rotation of the hinge that connects the LCD screen to the inside of LCD screen Please rotate the LCD screen carefully as illustrated. Standard recording by looking at the LCD screen from the top. 4. Making a recording by using the LCD screen. 3.

Instruction Booklet
Page 6
... adaptor, and leave the camcorder with the POWER switch set to PLAYER for more battery power. * When the battery reaches the end of the LCD when recording for more than 24 hours. 6 The batteries have to protect against unnecessary battery discharge. 1 Make sure that the battery pack is ... instead of its life, please contact your camcorder is in CAMERAmode, if it is left in STBY mode without operation for a long time, because the LCD uses up more than 3 minutes with a tape installed, it . 1 A brand new battery pack is supplied with as you are using the camcorder. 3. Dropping...
... adaptor, and leave the camcorder with the POWER switch set to PLAYER for more battery power. * When the battery reaches the end of the LCD when recording for more than 24 hours. 6 The batteries have to protect against unnecessary battery discharge. 1 Make sure that the battery pack is ... instead of its life, please contact your camcorder is in CAMERAmode, if it is left in STBY mode without operation for a long time, because the LCD uses up more than 3 minutes with a tape installed, it . 1 A brand new battery pack is supplied with as you are using the camcorder. 3. Dropping...

Instruction Booklet
Page 7
.... Direct sunlight can damage the inside of the viewfinder. Do not place the camcorder so that the viewfinder is manufactured using LCD 1. Direct sunlight can damage the LCD monitor. Notices regarding the hand strap 1 It is very important to see. Notices regarding the LENS 1 Do not shoot in... sunlight, it may damage the buckle. Direct sunlight can damage the CCD(Charge Coupled Device). In this case, we recommend that appear on the LCD monitor. Do not pick up the camcorder by a window. 2. Unintended rotation may be difficult to adjust the hand strap for better recording. 1...
.... Direct sunlight can damage the inside of the viewfinder. Do not place the camcorder so that the viewfinder is manufactured using LCD 1. Direct sunlight can damage the LCD monitor. Notices regarding the hand strap 1 It is very important to see. Notices regarding the LENS 1 Do not shoot in... sunlight, it may damage the buckle. Direct sunlight can damage the CCD(Charge Coupled Device). In this case, we recommend that appear on the LCD monitor. Do not pick up the camcorder by a window. 2. Unintended rotation may be difficult to adjust the hand strap for better recording. 1...

Instruction Booklet
Page 8
... not use a wet type cleaning cassette. ENGLISH Notices and Safety Instructions Notices regarding vibration of the speaker in playback 1 Speaker sound is muted when the LCD monitor is displayed during playback. 8 It may be dirty. If a square block-shaped noise distorts playback pictures, or if only a blue screen is turned off...
... not use a wet type cleaning cassette. ENGLISH Notices and Safety Instructions Notices regarding vibration of the speaker in playback 1 Speaker sound is muted when the LCD monitor is displayed during playback. 8 It may be dirty. If a square block-shaped noise distorts playback pictures, or if only a blue screen is turned off...
Instruction Booklet
Page 14
...Digital zoom Zooming is a recording technique that lets you change the size of the subject in the picture. • Color TFT LCD High resolution color TFT LCD (with 112,320 pixels) gives you clean, sharp images and a comfortable, stable position for shooting. • Digital Image Stabilizer ... DSE(Digital Special Effects) allows you to give your films a creative look by adding various special effects. • Intelligent-Back Light Compensation (SCD60 only) / Back Light Compensation When you shoot a subject with a light source or light background behind the subject, use the I-BLC/BLC function...
...Digital zoom Zooming is a recording technique that lets you change the size of the subject in the picture. • Color TFT LCD High resolution color TFT LCD (with 112,320 pixels) gives you clean, sharp images and a comfortable, stable position for shooting. • Digital Image Stabilizer ... DSE(Digital Special Effects) allows you to give your films a creative look by adding various special effects. • Intelligent-Back Light Compensation (SCD60 only) / Back Light Compensation When you shoot a subject with a light source or light background behind the subject, use the I-BLC/BLC function...
Instruction Booklet
Page 15
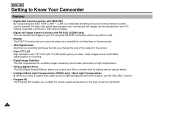
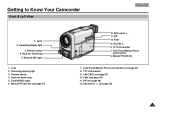
... display light 3. Manual FOCUS dial (see page 46) 8. Auto Focus/Manual Focus select button (see page 47) 12. Remote sensor 4. PIP 10. Fade 9. TFT LCD monitor 7. TFT LCD monitor 9. Lens 2. Hook for hand strap 5. Remote sensor 4. I -BLC/BLC 8. Getting to Know Your Camcorder Front & Left View ENGLISH 1. Lens 2. Recording display light 3. External...
... display light 3. Manual FOCUS dial (see page 46) 8. Auto Focus/Manual Focus select button (see page 47) 12. Remote sensor 4. PIP 10. Fade 9. TFT LCD monitor 7. TFT LCD monitor 9. Lens 2. Hook for hand strap 5. Remote sensor 4. I -BLC/BLC 8. Getting to Know Your Camcorder Front & Left View ENGLISH 1. Lens 2. Recording display light 3. External...
Instruction Booklet
Page 18
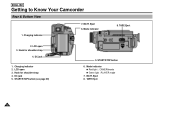
LCD open 3. DC jack 5. Eject 6. Hook for shoulder strap 4. Hook for shoulder strap 4. Eject 8. Charging indicator 2. Mode indicator Red light : CAMERAmode Green light : PLAYER mode 7. BATT. BATT. DC jack 1. START/STOP button 6. Mode indicator 8. START/STOP button (see page 29) 5. TAPE Eject 2. LCD open 3. TAPE Eject 18 Charging indicator 7. ENGLISH Getting to Know Your Camcorder Rear & Bottom View 1.
LCD open 3. DC jack 5. Eject 6. Hook for shoulder strap 4. Hook for shoulder strap 4. Eject 8. Charging indicator 2. Mode indicator Red light : CAMERAmode Green light : PLAYER mode 7. BATT. BATT. DC jack 1. START/STOP button 6. Mode indicator 8. START/STOP button (see page 29) 5. TAPE Eject 2. LCD open 3. TAPE Eject 18 Charging indicator 7. ENGLISH Getting to Know Your Camcorder Rear & Bottom View 1.
Instruction Booklet
Page 21
... on the left side panel. - Turning OSD (On Screen Display) on/off • Turning OSD on/off after blinking for 3 seconds in the viewfinder and LCD monitor. • Turning on the left side panel. - Self diagnosis (TAPE, TAPE END) Checks the operation of ( OFF DATE/TIME TIME DATE ). 21 Digital ...receiving mode is not affected by the OSD ON/OFF button. - Whenever you press the button, it selects the function repeatedly in the viewfinder or LCD monitor. Getting to turn off the DATE/TIME - If you turn the DATE/TIME on or off, please use the DATE/TIME button on /...
... on the left side panel. - Turning OSD (On Screen Display) on/off • Turning OSD on/off after blinking for 3 seconds in the viewfinder and LCD monitor. • Turning on the left side panel. - Self diagnosis (TAPE, TAPE END) Checks the operation of ( OFF DATE/TIME TIME DATE ). 21 Digital ...receiving mode is not affected by the OSD ON/OFF button. - Whenever you press the button, it selects the function repeatedly in the viewfinder or LCD monitor. Getting to turn off the DATE/TIME - If you turn the DATE/TIME on or off, please use the DATE/TIME button on /...

Instruction Booklet
Page 29
...? Make sure the image you to CAMERA. enables you to reverse and EDIT + enables you want to see the image in the Viewfinder, close the LCD monitor. Basic Recording Making your camcorder will play back in the STBY mode for over 3 minutes without being used, it again, push the START/STOP... button or set the Power switch to save battery power. To use it will be displayed) If you make these preparations. function in the LCD monitor or Viewfinder. button quickly in STBY mode, your First Recording Make sure that STBY is displayed in the OSD. (If the protection tab of...
...? Make sure the image you to CAMERA. enables you to reverse and EDIT + enables you want to see the image in the Viewfinder, close the LCD monitor. Basic Recording Making your camcorder will play back in the STBY mode for over 3 minutes without being used, it again, push the START/STOP... button or set the Power switch to save battery power. To use it will be displayed) If you make these preparations. function in the LCD monitor or Viewfinder. button quickly in STBY mode, your First Recording Make sure that STBY is displayed in the OSD. (If the protection tab of...

Instruction Booklet
Page 30
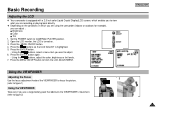
Place your side. 3. Place your right elbow against your eye firmly against your left hand under or beside the LCD to support and adjust it. Recording with the LCD monitor 1. Place your right elbow against the viewfinder eyecup. 6. Be sure not to figure) Recording with Viewfinder ... against a wall or on a table for greater stability. Choose a comfortable, stable position for the shots that you are taking . Use the LCD frame as a guide to hold the camcorder correctly. Do not touch the built-in microphone. 4. Hold the camcorder firmly using the hand strap....
Place your side. 3. Place your right elbow against your eye firmly against your left hand under or beside the LCD to support and adjust it. Recording with the LCD monitor 1. Place your right elbow against the viewfinder eyecup. 6. Be sure not to figure) Recording with Viewfinder ... against a wall or on a table for greater stability. Choose a comfortable, stable position for the shots that you are taking . Use the LCD frame as a guide to hold the camcorder correctly. Do not touch the built-in microphone. 4. Hold the camcorder firmly using the hand strap....
Instruction Booklet
Page 31
...focus the picture. (refer to figure 1) Using the VIEWFINDER Take care if you want to adjust. 6. Open the LCD monitor, the LCD is equipped with a 2.5 inch color Liquid Crystal Display(LCD) screen, which enables you to figure 2) ENGLISH 31 Using the , buttons, adjust the color, brightness or tint ...7. Press the MENU ON/OFF button to CAMERAor PLAYER position. 2. Set the POWER switch to finish the LCD ADJUSTMENT. Press the ENTER button again. - Basic Recording Adjusting the LCD 1 Your camcorder is turned on the conditions in which you are using the camcorder (indoors or outdoors for...
...focus the picture. (refer to figure 1) Using the VIEWFINDER Take care if you want to adjust. 6. Open the LCD monitor, the LCD is equipped with a 2.5 inch color Liquid Crystal Display(LCD) screen, which enables you to figure 2) ENGLISH 31 Using the , buttons, adjust the color, brightness or tint ...7. Press the MENU ON/OFF button to CAMERAor PLAYER position. 2. Set the POWER switch to finish the LCD ADJUSTMENT. Press the ENTER button again. - Basic Recording Adjusting the LCD 1 Your camcorder is turned on the conditions in which you are using the camcorder (indoors or outdoors for...

Instruction Booklet
Page 32
...to STOP mode automatically when the tape has reached its end position after connecting the camcorder to PLAYER position. 1 2. Adjust the angle of the LCD monitor and set it to a TV or VCR (see the picture you recorded on a TV screen, after rewinding. 5. ENGLISH Basic Recording ...Playing back a tape you have just recorded. 3. You can also monitor the picture on the LCD. - You can monitor the playback picture on the Power switch, set the brightness or the color if necessary. 4. While pressing the red button ...
...to STOP mode automatically when the tape has reached its end position after connecting the camcorder to PLAYER position. 1 2. Adjust the angle of the LCD monitor and set it to a TV or VCR (see the picture you recorded on a TV screen, after rewinding. 5. ENGLISH Basic Recording ...Playing back a tape you have just recorded. 3. You can also monitor the picture on the LCD. - You can monitor the playback picture on the Power switch, set the brightness or the color if necessary. 4. While pressing the red button ...

Instruction Booklet
Page 33
...of the Speaker is highlighted. 3. Press the ENTER button. - If the speaker does not work properly, check these points; Basic Recording Adjusting the LCD during PLAY. 1 The adjustment method is the same as with the CAMERAoperation. (see page 31) Controlling Sound from the Speaker The Speaker works ... controlled by the VOLUME CONTROL in the Menu using the ENTER button. - Is the LCD monitor closed? Is the volume adjusted to finish the VOLUME CONTROL. - ENGLISH 33 If you can adjust the LCD during PLAY 1 You can hear sound from the Speaker, set to OFF in the menu...
...of the Speaker is highlighted. 3. Press the ENTER button. - If the speaker does not work properly, check these points; Basic Recording Adjusting the LCD during PLAY. 1 The adjustment method is the same as with the CAMERAoperation. (see page 31) Controlling Sound from the Speaker The Speaker works ... controlled by the VOLUME CONTROL in the Menu using the ENTER button. - Is the LCD monitor closed? Is the volume adjusted to finish the VOLUME CONTROL. - ENGLISH 33 If you can adjust the LCD during PLAY 1 You can hear sound from the Speaker, set to OFF in the menu...
Instruction Booklet
Page 34
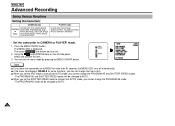
.... Press the MENU ON/OFF button. The MENU OSD is displayed. ENGLISH Advanced Recording Using Various Functions Setting the menu item C A M E R Am o d e PLAYER mode F u n c t i o n s i n m e n u LCD ADJUST, DIS, DIGITALZOOM, ZERO MEM, PROGRAM AE, DSE, WHITE BALANCE, SHUTTER SPEED, IRIS, AUDIO MODE, PHOTO MODE, CLOCK SETTING... LCD ADJUST, ZERO MEM, AUDIO OUTPUT, VOLUME CONTROL PHOTO SEARCH, SPEAKER • Set the camcorder to AUTO. 34 When you set the IRIS mode to ...
.... Press the MENU ON/OFF button. The MENU OSD is displayed. ENGLISH Advanced Recording Using Various Functions Setting the menu item C A M E R Am o d e PLAYER mode F u n c t i o n s i n m e n u LCD ADJUST, DIS, DIGITALZOOM, ZERO MEM, PROGRAM AE, DSE, WHITE BALANCE, SHUTTER SPEED, IRIS, AUDIO MODE, PHOTO MODE, CLOCK SETTING... LCD ADJUST, ZERO MEM, AUDIO OUTPUT, VOLUME CONTROL PHOTO SEARCH, SPEAKER • Set the camcorder to AUTO. 34 When you set the IRIS mode to ...
Instruction Booklet
Page 35
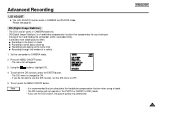
... page 31. If you use the DIS function, set the DIS menu to use the DIS function, the picture quality may deteriorate. Advanced Recording LCD ADJUST 1 The LCD ADJUST function works in mode Recording a small object close-up Recording and walking at the same time Recording through the window of the hand...
... page 31. If you use the DIS function, set the DIS menu to use the DIS function, the picture quality may deteriorate. Advanced Recording LCD ADJUST 1 The LCD ADJUST function works in mode Recording a small object close-up Recording and walking at the same time Recording through the window of the hand...

Instruction Booklet
Page 52
The still picture appears on the LCD monitor or viewfinder. - To record the still picture, you must press the START/STOP button. - The menu list will not operate in the GHOST mode(...
The still picture appears on the LCD monitor or viewfinder. - To record the still picture, you must press the START/STOP button. - The menu list will not operate in the GHOST mode(...

Instruction Booklet
Page 53
... the front. Unintended rotation may be used as a convenient alternative. 53 Self record 4 Making a recording by looking at the LCD screen from the top. 3. Note - Recording with Viewfinder In circumstances where it is difficult to the Camcorder. 1. Advanced Recording ... techniques may cause damage to the inside of the hinge that connects the LCD screen to use the LCD monitor, the viewfinder can be required for more dramatic results. Please rotate the LCD screen carefully. When the LCD screen faces front, indications are turned off. 5 5. Downward recording 2 ...
... the front. Unintended rotation may be used as a convenient alternative. 53 Self record 4 Making a recording by looking at the LCD screen from the top. 3. Note - Recording with Viewfinder In circumstances where it is difficult to the Camcorder. 1. Advanced Recording ... techniques may cause damage to the inside of the hinge that connects the LCD screen to use the LCD monitor, the viewfinder can be required for more dramatic results. Please rotate the LCD screen carefully. When the LCD screen faces front, indications are turned off. 5 5. Downward recording 2 ...


