
Instruction Booklet
Page 2
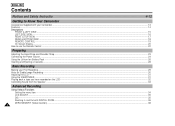
... Connecting the Power Source ...24 Using the Lithium Ion Battery Pack ...26 Inserting and Ejecting a Cassette...28 Basic Recording Making your First Recording ...29 Hints for Stable Image Recording...30 Adjusting the LCD ...31 Using the VIEWFINDER ...31 Playing back a tape you have recorded on the LCD...32 Controlling Sound from the Speaker ...33 Advanced Recording Using Various Functions Setting the menu item ...34 LCD ADJUST...35 DIS...35 Zooming In and Out with DIGITAL ZOOM...36 ZERO MEMORY (Video insertion...
... Connecting the Power Source ...24 Using the Lithium Ion Battery Pack ...26 Inserting and Ejecting a Cassette...28 Basic Recording Making your First Recording ...29 Hints for Stable Image Recording...30 Adjusting the LCD ...31 Using the VIEWFINDER ...31 Playing back a tape you have recorded on the LCD...32 Controlling Sound from the Speaker ...33 Advanced Recording Using Various Functions Setting the menu item ...34 LCD ADJUST...35 DIS...35 Zooming In and Out with DIGITAL ZOOM...36 ZERO MEMORY (Video insertion...
Instruction Booklet
Page 5
... you press the RESET button, all the settings including the date and time, return to default.) Please make sure that the condensation has disappeared completely. Notices regarding moisture condensation 1. For example, in a parked car in atmospheric temperature may be repaired. 5 Do not leave the camcorder exposed to warm inside the camcorder. ENGLISH Notices regarding CAMCORDER 1. Keep the camcorder away from rain...
... you press the RESET button, all the settings including the date and time, return to default.) Please make sure that the condensation has disappeared completely. Notices regarding moisture condensation 1. For example, in a parked car in atmospheric temperature may be repaired. 5 Do not leave the camcorder exposed to warm inside the camcorder. ENGLISH Notices regarding CAMCORDER 1. Keep the camcorder away from rain...

Instruction Booklet
Page 6
... the camcorder is discharged. - Connect the camcorder to an AC outlet using the supplied AC power adaptor, and leave the camcorder with the POWER switch set to protect against unnecessary battery discharge. 1 Make sure that the battery pack is left in STBY mode without operation for a long time, because the LCD uses up more than 3 minutes with a tape installed, it will be dealt with a lithium battery installed. 2. The battery will automatically turn...
... the camcorder is discharged. - Connect the camcorder to an AC outlet using the supplied AC power adaptor, and leave the camcorder with the POWER switch set to protect against unnecessary battery discharge. 1 Make sure that the battery pack is left in STBY mode without operation for a long time, because the LCD uses up more than 3 minutes with a tape installed, it will be dealt with a lithium battery installed. 2. The battery will automatically turn...
Instruction Booklet
Page 11
... dangerous voltage or other controls may touch dangerous voltage points or short out a part that the CAMCORDER is in safe operating order. 11 SERVICING: Do not attempt to service this indicates a need for long periods of time, unplug it checked by a technician before use. 18. Opening or removing covers may result in fire, electric shock or other electric light or power circuits where it...
... dangerous voltage or other controls may touch dangerous voltage points or short out a part that the CAMCORDER is in safe operating order. 11 SERVICING: Do not attempt to service this indicates a need for long periods of time, unplug it checked by a technician before use. 18. Opening or removing covers may result in fire, electric shock or other electric light or power circuits where it...
Instruction Booklet
Page 13
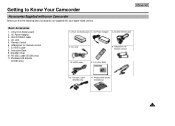
... Control 6. Instruction Book 9. Photoland RS diskette (SCD60 only) 1. Lithium Ion Battery pack 2. RS-232C cable (SCD60 only) 11. S-VIDEO cable 8. AC cord 5. Lithium Ion Battery pack 2. Shoulder Strap 10. Photoland RS diskette (SCD60 only) 13 AUDIO/VIDEO cable 4. ENGLISH Basic Accessories 1. Remote Control 6. Shoulder Strap 10. Instruction Book 9. AC Power Adaptor 3. AUDIO/VIDEOcable 4. Getting to Know Your Camcorder Accessories Supplied with your Camcorder Make sure that the following basic accessories are supplied with your digital video camera...
... Control 6. Instruction Book 9. Photoland RS diskette (SCD60 only) 1. Lithium Ion Battery pack 2. RS-232C cable (SCD60 only) 11. S-VIDEO cable 8. AC cord 5. Lithium Ion Battery pack 2. Shoulder Strap 10. Photoland RS diskette (SCD60 only) 13 AUDIO/VIDEO cable 4. ENGLISH Basic Accessories 1. Remote Control 6. Shoulder Strap 10. Instruction Book 9. AC Power Adaptor 3. AUDIO/VIDEOcable 4. Getting to Know Your Camcorder Accessories Supplied with your Camcorder Make sure that the following basic accessories are supplied with your digital video camera...
Instruction Booklet
Page 14
... (SCD60 only) You can transfer still images to your PC using the RS-232C connection without any add-on card. • PHOTO The PHOTO function lets you record an object at a standstill for a limited time in Camera mode. • 440x Digital zoom Zooming is a recording technique that lets you change the size of the subject in the picture. • Color TFT LCD High resolution color TFT LCD (with 112,320 pixels) gives you clean, sharp images...
... (SCD60 only) You can transfer still images to your PC using the RS-232C connection without any add-on card. • PHOTO The PHOTO function lets you record an object at a standstill for a limited time in Camera mode. • 440x Digital zoom Zooming is a recording technique that lets you change the size of the subject in the picture. • Color TFT LCD High resolution color TFT LCD (with 112,320 pixels) gives you clean, sharp images...
Instruction Booklet
Page 20
... Shutter speed (see page 49) 13. White Balance mode (see page 42) The White balance modes are STBY, REC, PLAY, STOP, SLOW, STILL, F.ADV, FF, REW etc. 20 OSD in CAMERA mode OSD in Picture) (see page 43) 14. I -BLC for SCD60 only) 5. Record speed mode Indicates the record speed. 17. Operation mode The operation modes are AUTO, INDOOR and OUTDOOR. 7. DIS (see page 60) Indicates that zero memory is transferring the digital still picture to Know Your Camcorder OSD (On Screen Display) 1. ENGLISH...
... Shutter speed (see page 49) 13. White Balance mode (see page 42) The White balance modes are STBY, REC, PLAY, STOP, SLOW, STILL, F.ADV, FF, REW etc. 20 OSD in CAMERA mode OSD in Picture) (see page 43) 14. I -BLC for SCD60 only) 5. Record speed mode Indicates the record speed. 17. Operation mode The operation modes are AUTO, INDOOR and OUTDOOR. 7. DIS (see page 60) Indicates that zero memory is transferring the digital still picture to Know Your Camcorder OSD (On Screen Display) 1. ENGLISH...
Instruction Booklet
Page 24
... mode. To set the camcorder to the CAMERAmode. Hold down the tab of the power switch and turn the power switch to the DC jack of the DC cable to the PLAYER position. 24 4-a CAMERA 4-b PLAYER The plug and wall socket type may can be different depending on the country you're in. 3. Using the AC Power Adaptor and AC cord : used for indoor recording. - Connect the AC cord...
... mode. To set the camcorder to the CAMERAmode. Hold down the tab of the power switch and turn the power switch to the DC jack of the DC cable to the PLAYER position. 24 4-a CAMERA 4-b PLAYER The plug and wall socket type may can be different depending on the country you're in. 3. Using the AC Power Adaptor and AC cord : used for indoor recording. - Connect the AC cord...

Instruction Booklet
Page 25
... available. ENGLISH 25 Charging the Lithium Ion Battery Pack 1. Which model of the camcorder. 2 3 4. Connect the AC Power Adaptor to an AC cord and connect the AC cord to the camcorder. 1 2. Blinking twice a second : Indicates 50% ~ 75% has been charged. - Reset the battery pack and DC cable. 5. It is turned off the power of continuous recording time depends on : Charging has been completed. - Connect DC cable to DC jack of battery pack you use the...
... available. ENGLISH 25 Charging the Lithium Ion Battery Pack 1. Which model of the camcorder. 2 3 4. Connect the AC Power Adaptor to an AC cord and connect the AC cord to the camcorder. 1 2. Blinking twice a second : Indicates 50% ~ 75% has been charged. - Reset the battery pack and DC cable. 5. It is turned off the power of continuous recording time depends on : Charging has been completed. - Connect DC cable to DC jack of battery pack you use the...

Instruction Booklet
Page 26
... recording time depends on model and battery type. The battery pack should never be reduced if the battery pack is left in temperatures below 32°F (0°C), even when it is below 32°F (0°C). - Note - Model Battery SCD55 SB-L110 Approximately 50 minutes SCD60 ...of the battery pack will be recharged in the table are approximate. terminals of fire and overheating. 26 It can cause leakage, heat generation, induction of the Lithium Ion Battery Pack. ENGLISH P r e p a r i n g Using the Lithium Ion Battery Pack Table of continuous recording time based ...
... recording time depends on model and battery type. The battery pack should never be reduced if the battery pack is left in temperatures below 32°F (0°C), even when it is below 32°F (0°C). - Note - Model Battery SCD55 SB-L110 Approximately 50 minutes SCD60 ...of the battery pack will be recharged in the table are approximate. terminals of fire and overheating. 26 It can cause leakage, heat generation, induction of the Lithium Ion Battery Pack. ENGLISH P r e p a r i n g Using the Lithium Ion Battery Pack Table of continuous recording time based ...

Instruction Booklet
Page 27
... of power remaining in these instructions. The Charge mark setting does not affect the battery's charge status. ENGLISH a b c d e 27 The recording time becomes very short in the operating instructions is affected by environmental temperature and conditions. The continuous recording time in a cold environment. Two colors are provided (red and black)-you remember whether it has been charged or not. a.Fully charged b.10% used (flickers) (camcorder will turn off soon, change the battery as...
... of power remaining in these instructions. The Charge mark setting does not affect the battery's charge status. ENGLISH a b c d e 27 The recording time becomes very short in the operating instructions is affected by environmental temperature and conditions. The continuous recording time in a cold environment. Two colors are provided (red and black)-you remember whether it has been charged or not. a.Fully charged b.10% used (flickers) (camcorder will turn off soon, change the battery as...
Instruction Booklet
Page 31
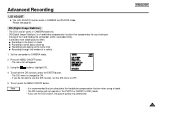
... the ENTER button. - Set the POWER switch to finish the LCD ADJUSTMENT. Press the , buttons so that obstructs the VIEWFINDER's movement. (refer to view what you are recording or playing back directly. 1 Depending on . 3. Basic Recording Adjusting the LCD 1 Your camcorder is highlighted. 5. Press the MENU ON/OFF button to CAMERAor PLAYER position. 2. Open the LCD monitor, the LCD is turned on the conditions in which you are using the camcorder (indoors or...
... the ENTER button. - Set the POWER switch to finish the LCD ADJUSTMENT. Press the , buttons so that obstructs the VIEWFINDER's movement. (refer to view what you are recording or playing back directly. 1 Depending on . 3. Basic Recording Adjusting the LCD 1 Your camcorder is highlighted. 5. Press the MENU ON/OFF button to CAMERAor PLAYER position. 2. Open the LCD monitor, the LCD is turned on the conditions in which you are using the camcorder (indoors or...
Instruction Booklet
Page 34
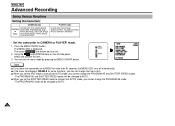
... SHUTTER SPEED modes will be changed to manual (not AUTO) mode, you can not change that menu item. When you set . 2. The PROGRAM AE mode will be changed to CAMERA or PLAYER mode. 1. ENGLISH Advanced Recording Using Various Functions Setting the menu item C A M E R Am o d e PLAYER mode F u n c t i o n s i n m e n u LCD ADJUST, DIS, DIGITALZOOM, ZERO MEM, PROGRAM AE, DSE, WHITE BALANCE, SHUTTER SPEED, IRIS, AUDIO MODE, PHOTO MODE, CLOCK SETTING LCD ADJUST, ZERO MEM, AUDIO OUTPUT, VOLUME CONTROL PHOTO SEARCH, SPEAKER • Set the camcorder to AUTO. The MENU OSD is displayed...
... SHUTTER SPEED modes will be changed to manual (not AUTO) mode, you can not change that menu item. When you set . 2. The PROGRAM AE mode will be changed to CAMERA or PLAYER mode. 1. ENGLISH Advanced Recording Using Various Functions Setting the menu item C A M E R Am o d e PLAYER mode F u n c t i o n s i n m e n u LCD ADJUST, DIS, DIGITALZOOM, ZERO MEM, PROGRAM AE, DSE, WHITE BALANCE, SHUTTER SPEED, IRIS, AUDIO MODE, PHOTO MODE, CLOCK SETTING LCD ADJUST, ZERO MEM, AUDIO OUTPUT, VOLUME CONTROL PHOTO SEARCH, SPEAKER • Set the camcorder to AUTO. The MENU OSD is displayed...
Instruction Booklet
Page 35
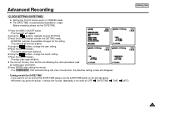
... function works in CAMERA and PLAYER mode. If you do not want to OFF. 5. Note - ENGLISH 35 Advanced Recording LCD ADJUST 1 The LCD ADJUST function works in CAMERAmode only. - Please see page 31. It provides more stable pictures when: Recording in the Zoom in DSE) mode. - The menu list will not operate in the PHOTO or GHOST(in mode Recording a small object close-up Recording and walking at the same time Recording through the window...
... function works in CAMERA and PLAYER mode. If you do not want to OFF. 5. Note - ENGLISH 35 Advanced Recording LCD ADJUST 1 The LCD ADJUST function works in CAMERAmode only. - Please see page 31. It provides more stable pictures when: Recording in the Zoom in DSE) mode. - The menu list will not operate in the PHOTO or GHOST(in mode Recording a small object close-up Recording and walking at the same time Recording through the window...
Instruction Booklet
Page 45
... reset will blink. 6.Using the , buttons, change the year setting. 5.Press the ENTER button. - You can set the DATE/TIME. 1.Press the MENU ON/OFF button. - The COMPLETE! Whenever you want to turn on and off the DATE/TIME - The month to blink. 4.Using the , buttons, change the month setting. 7.Press the ENTER button. - If you press the button, it selects the function repeatedly in CAMERA mode. 1 The DATE/TIME is automatically recorded on /off the DATE/TIME, please use the DATE/TIME button...
... reset will blink. 6.Using the , buttons, change the year setting. 5.Press the ENTER button. - You can set the DATE/TIME. 1.Press the MENU ON/OFF button. - The COMPLETE! Whenever you want to turn on and off the DATE/TIME - The month to blink. 4.Using the , buttons, change the month setting. 7.Press the ENTER button. - If you press the button, it selects the function repeatedly in CAMERA mode. 1 The DATE/TIME is automatically recorded on /off the DATE/TIME, please use the DATE/TIME button...
Instruction Booklet
Page 54
... fields. • Sandy beach on the cassette. 3. If you want to protect accidental erasure of a ND (Neutral Density) filter). Remove the BATTERY PACK from the camcorder. 54 Eject a tape you use of a tape you have recorded. (see page 28) 2. After Recording 1. Brightness(Lux) R e c o m m e n d a t i o n s 1 0 0 , 0 0 0 ND filter recommended. 1 0 0 , 0 0 0 3 5 , 0 0 0 3 2 , 0 0 0 2 , 0 0 0 1 , 0 0 0 1 , 0 0 0 500 to 700 6 5 0 Normal recording. 400 to 500 Video light 300 recommended. 150 to 200 15 to...
... fields. • Sandy beach on the cassette. 3. If you want to protect accidental erasure of a ND (Neutral Density) filter). Remove the BATTERY PACK from the camcorder. 54 Eject a tape you use of a tape you have recorded. (see page 28) 2. After Recording 1. Brightness(Lux) R e c o m m e n d a t i o n s 1 0 0 , 0 0 0 ND filter recommended. 1 0 0 , 0 0 0 3 5 , 0 0 0 3 2 , 0 0 0 2 , 0 0 0 1 , 0 0 0 1 , 0 0 0 500 to 700 6 5 0 Normal recording. 400 to 500 Video light 300 recommended. 150 to 200 15 to...

Instruction Booklet
Page 58
.... In this camcorder to another DV device, some functions can not work. DV standard connecting is quite simple. If a product has a DV port, you can limit the frame rate recorded for high quality image transfer. 4Pin Type 6Pin Type DV format VCR Portable PC with DV port Connecting with a proper cable. !!! There are transmitted in digital form for video capturing. When you want to transmit data to the...
.... In this camcorder to another DV device, some functions can not work. DV standard connecting is quite simple. If a product has a DV port, you can limit the frame rate recorded for high quality image transfer. 4Pin Type 6Pin Type DV format VCR Portable PC with DV port Connecting with a proper cable. !!! There are transmitted in digital form for video capturing. When you want to transmit data to the...
Instruction Booklet
Page 62
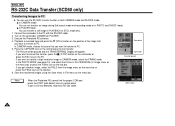
ENGLISH RS-232C Data Transfer (SCD60 only) Transferring Images to the PC with the RS-232C cable. 2. Execute the Photoland RS software. 4. C A P T U R E - If you get a broken image, select the FIELD from the image menu on the menu bar or press the FIELD icon on the control panel to PC. Save the transferred images using the Save menu in PLAYBACK or STILL mode only. 1. If port is still not detected, reconnect RS-232...
ENGLISH RS-232C Data Transfer (SCD60 only) Transferring Images to the PC with the RS-232C cable. 2. Execute the Photoland RS software. 4. C A P T U R E - If you get a broken image, select the FIELD from the image menu on the menu bar or press the FIELD icon on the control panel to PC. Save the transferred images using the Save menu in PLAYBACK or STILL mode only. 1. If port is still not detected, reconnect RS-232...
Instruction Booklet
Page 67
... adjusted. Auto focus does not work . Play, FF or REW button do not allow you to reduce the contrast or use the I-BLC/BLC function while you are recording. You have left the camcorder set to operate recorded screen of this camcorder and it . Clean the head with a cleaning tape. A vertical strip appears on . Adjust the viewfinder control lever until the indicators displayed on the cassette. Check the battery pack or the AC Power Adaptor. Check the record...
... adjusted. Auto focus does not work . Play, FF or REW button do not allow you to reduce the contrast or use the I-BLC/BLC function while you are recording. You have left the camcorder set to operate recorded screen of this camcorder and it . Clean the head with a cleaning tape. A vertical strip appears on . Adjust the viewfinder control lever until the indicators displayed on the cassette. Check the battery pack or the AC Power Adaptor. Check the record...
Instruction Booklet
Page 68
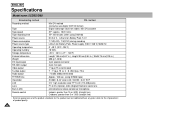
... Recording method Tape Tape speed Tape recording time Power source Power consumption Power source type Operating temperature Operating humidity Storage temperature External dimension Weight DV input/output RS-232C output Video output S-video output Audio output FF/REW time Viewfinder LCD Lens Built-in MIC Remote control Mini DV method (consumer-use digital VCR SD format) Digital video tape (6.35 mm width): Mini DV cassette SP : approx. 18.81 mm/s SP : 60 minutes (when using DVM 60) DC 8.4 V, Lithium Ion Battery Pack 7.4 V 7.7 W(LCD), 7 W(CVF) during recording Lithium Ion Battery Pack, Power...
... Recording method Tape Tape speed Tape recording time Power source Power consumption Power source type Operating temperature Operating humidity Storage temperature External dimension Weight DV input/output RS-232C output Video output S-video output Audio output FF/REW time Viewfinder LCD Lens Built-in MIC Remote control Mini DV method (consumer-use digital VCR SD format) Digital video tape (6.35 mm width): Mini DV cassette SP : approx. 18.81 mm/s SP : 60 minutes (when using DVM 60) DC 8.4 V, Lithium Ion Battery Pack 7.4 V 7.7 W(LCD), 7 W(CVF) during recording Lithium Ion Battery Pack, Power...


