User Manual (ENGLISH)
Page 14
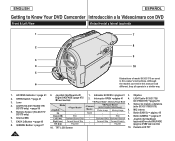
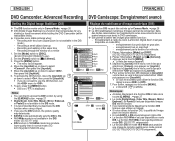
... 47 2. Q.MENU Button page 27 OK () Play/Still - 10. Although 6 the models covered in this manual look different, they all operate in this owner's instructions. LIGHT (SC-DC173U/DC175/ DC575 only) page 50 5. Joystick (Up/Down/Left/ 1. Internal MIC Left () Backward Search/ Skip - Lens 4. Interruptor OPEN página 41 4. : Memory Player Mode Mode Joystick (SC-DC173(U)/DC175/DC575 only) Photo image Moving image 5. 6. Stop 8. OPEN Switch ...
... 47 2. Q.MENU Button page 27 OK () Play/Still - 10. Although 6 the models covered in this manual look different, they all operate in this owner's instructions. LIGHT (SC-DC173U/DC175/ DC575 only) page 50 5. Joystick (Up/Down/Left/ 1. Internal MIC Left () Backward Search/ Skip - Lens 4. Interruptor OPEN página 41 4. : Memory Player Mode Mode Joystick (SC-DC173(U)/DC175/DC575 only) Photo image Moving image 5. 6. Stop 8. OPEN Switch ...

User Manual (ENGLISH)
Page 30
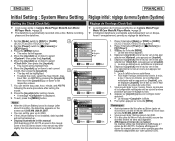
... Language ►English Demonstration ►On Move OK Select MENU Exit Camera Mode ►System Clock Set Beep Sound Language Demonstration JAN 01 2007 12 : 00 AM Adjust OK Select MENU Exit (sólo SC-DC173(U)/DC175/DC575) 2. Mueva el [Joystick] hacia arriba o hacia abajo para seleccionar y presione el botón [Joystick]. 5. To exit, press the [MENU] button. Coloque el interruptor [Mode] en [DISC] o [CARD]. 1. Coloque el interruptor [Power...
... Language ►English Demonstration ►On Move OK Select MENU Exit Camera Mode ►System Clock Set Beep Sound Language Demonstration JAN 01 2007 12 : 00 AM Adjust OK Select MENU Exit (sólo SC-DC173(U)/DC175/DC575) 2. Mueva el [Joystick] hacia arriba o hacia abajo para seleccionar y presione el botón [Joystick]. 5. To exit, press the [MENU] button. Coloque el interruptor [Mode] en [DISC] o [CARD]. 1. Coloque el interruptor [Power...
User Manual (ENGLISH)
Page 14
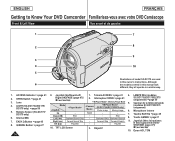
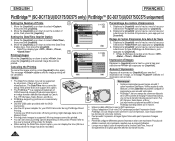
... votre DVD Caméscope Front & Left View Vue avant et de gauche PHOTO 1 7 2 8 9 3 4 10 5 Illustrations of model SC-DC175 are used in this manual look different, they all operate in this owner's instructions. OPEN Switch page 41 3. LIGHT (SC-DC173U/DC175/ DC575 only) page 50 5. Joystick (Up/Down/Left/ Right/OK)/FADE (page 47 Mode Joystick 1. Témoin ACCESS page 41 2. TFT LCD Screen 3. LAMPE...
... votre DVD Caméscope Front & Left View Vue avant et de gauche PHOTO 1 7 2 8 9 3 4 10 5 Illustrations of model SC-DC175 are used in this manual look different, they all operate in this owner's instructions. OPEN Switch page 41 3. LIGHT (SC-DC173U/DC175/ DC575 only) page 50 5. Joystick (Up/Down/Left/ Right/OK)/FADE (page 47 Mode Joystick 1. Témoin ACCESS page 41 2. TFT LCD Screen 3. LAMPE...
User Manual (ENGLISH)
Page 30
...;s-midi en suivant la même ) Setting the Clock (Clock Set) Clock setup works in this manual. Réglage de l'horloge (Clock Set) La configuration de l'horloge est effective en Camera Mode/Player Mode/ M.Cam Mode/M.Player Mode. page 26 L'indication date/heure s'enregistre automatiquement sur un disque. Set the [Power] switch to [DISC] or [CARD]. 4 (SC-DC173(U)/DC175/DC575 only) 2. Appuyez sur la...
...;s-midi en suivant la même ) Setting the Clock (Clock Set) Clock setup works in this manual. Réglage de l'horloge (Clock Set) La configuration de l'horloge est effective en Camera Mode/Player Mode/ M.Cam Mode/M.Player Mode. page 26 L'indication date/heure s'enregistre automatiquement sur un disque. Set the [Power] switch to [DISC] or [CARD]. 4 (SC-DC173(U)/DC175/DC575 only) 2. Appuyez sur la...
User Manual (ENGLISH)
Page 61
... pas disponible en mode DIS. (SC-DC171 uniquement) La fonction DIS en mode 16:9 Wide peut produire une image de moindre qualité qu'en mode normal (SC-DC173(U)/DC175/ DC575 uniquement). 61 Recording with the zoom (Digital Zoom is displayed. Recording through the window of a vehicle Set the [Mode] switch to [DISC]. (SC-DC173(U)/DC175/DC575 only) Set the [Power] switch to . 7. enregistrement tout en marchant ; - Press the [MENU] button. Move the [Joystick...
... pas disponible en mode DIS. (SC-DC171 uniquement) La fonction DIS en mode 16:9 Wide peut produire une image de moindre qualité qu'en mode normal (SC-DC173(U)/DC175/ DC575 uniquement). 61 Recording with the zoom (Digital Zoom is displayed. Recording through the window of a vehicle Set the [Mode] switch to [DISC]. (SC-DC173(U)/DC175/DC575 only) Set the [Power] switch to . 7. enregistrement tout en marchant ; - Press the [MENU] button. Move the [Joystick...
User Manual (ENGLISH)
Page 106
.... Notes M.Player Mode ►Pict Bridge Print Copies Date/Time 5/10 001 M.Player Mode ►Pict Bridge Print Copies Date/Time 5/10 Off Date Time Date&Time Paramétrage du nombre d'impressions 1. ENGLISH FRANÇAIS PictBridge™ (SC-DC173(U)/DC175/DC575 only) PictBridge™ (SC-DC173(U)/DC175/DC575 uniquement) Setting the Number of the printer for your DVD Camcorder off during PictBridge Direct Printing. Setting the Date/Time Imprint Option 3. Dé...
.... Notes M.Player Mode ►Pict Bridge Print Copies Date/Time 5/10 001 M.Player Mode ►Pict Bridge Print Copies Date/Time 5/10 Off Date Time Date&Time Paramétrage du nombre d'impressions 1. ENGLISH FRANÇAIS PictBridge™ (SC-DC173(U)/DC175/DC575 only) PictBridge™ (SC-DC173(U)/DC175/DC575 uniquement) Setting the Number of the printer for your DVD Camcorder off during PictBridge Direct Printing. Setting the Date/Time Imprint Option 3. Dé...
User Manual (ENGLISH)
Page 2
... (Remote) (SC-DC175/DC575 only 31 Setting the Beep Sound (Beep Sound 32 Setting the Shutter Sound (Shutter Sound) (SC-DC173(U)/DC175/DC575 only 33 Selecting the OSD Language (Language 34 Viewing the Demonstration (Demonstration 35 Initial Setting : Display Menu Setting 36 Adjusting the LCD Screen (LCD Bright/LCD Color 36 Displaying the Date/Time (Date/Time 37 Setting the TV Display (TV Display 38 DVD Camcorder: Before Recording 39 Using the Viewfinder 39 Using the LCD ENHANCER 39 Various Recording Techniques 40 Inserting and Removing a Disc 41 Selecting the Record Mode (Rec...
... (Remote) (SC-DC175/DC575 only 31 Setting the Beep Sound (Beep Sound 32 Setting the Shutter Sound (Shutter Sound) (SC-DC173(U)/DC175/DC575 only 33 Selecting the OSD Language (Language 34 Viewing the Demonstration (Demonstration 35 Initial Setting : Display Menu Setting 36 Adjusting the LCD Screen (LCD Bright/LCD Color 36 Displaying the Date/Time (Date/Time 37 Setting the TV Display (TV Display 38 DVD Camcorder: Before Recording 39 Using the Viewfinder 39 Using the LCD ENHANCER 39 Various Recording Techniques 40 Inserting and Removing a Disc 41 Selecting the Record Mode (Rec...
User Manual (ENGLISH)
Page 6
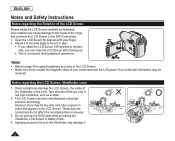
... illustrated. Open the LCD Screen 90 degrees with it . 6 PHOTO PHOTO Notes Refer to page 36 to adjust brightness and color of your finger. 2. The LCD Screen has been manufactured using high precision technology. Your credit card information may damage it facing out. This is convenient during playback operations. These dots are normal and do not affect the recorded picture in any...
... illustrated. Open the LCD Screen 90 degrees with it . 6 PHOTO PHOTO Notes Refer to page 36 to adjust brightness and color of your finger. 2. The LCD Screen has been manufactured using high precision technology. Your credit card information may damage it facing out. This is convenient during playback operations. These dots are normal and do not affect the recorded picture in any...
User Manual (ENGLISH)
Page 22
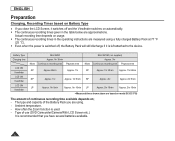
... Zoom function is switched off, the Battery Pack will still discharge if it switches off and the Viewfinder switches on model SC-DC173U The amount of use (DVD Camcorder/Camera/With LCD Screen etc.). Type of continuous recording time available depends on; - Actual recording time depends on usage. The continuous recording times in the table below are approximations. ENGLISH Preparation Charging, Recording Times based on Battery Type If you have several batteries available. 22 The type...
... Zoom function is switched off, the Battery Pack will still discharge if it switches off and the Viewfinder switches on model SC-DC173U The amount of use (DVD Camcorder/Camera/With LCD Screen etc.). Type of continuous recording time available depends on; - Actual recording time depends on usage. The continuous recording times in the table below are approximations. ENGLISH Preparation Charging, Recording Times based on Battery Type If you have several batteries available. 22 The type...
User Manual (ENGLISH)
Page 24
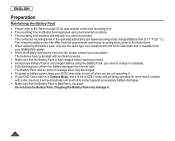
... contact your DVD Camcorder is in Camera Mode, and it is left in the instructions. When replacing the battery pack, only use the same type as chemical waste. Make sure that the Battery Pack is fitted firmly into place. The batteries have to be prone to leakage when fully discharged. To preserve battery power, keep your DVD Camcorder turned off to...
... contact your DVD Camcorder is in Camera Mode, and it is left in the instructions. When replacing the battery pack, only use the same type as chemical waste. Make sure that the Battery Pack is fitted firmly into place. The batteries have to be prone to leakage when fully discharged. To preserve battery power, keep your DVD Camcorder turned off to...

User Manual (ENGLISH)
Page 30
... Setting : System Menu Setting Setting the Clock (Clock Set) Clock setup works in Camera Mode/Player Mode/M.Cam Mode/M.Player Mode. page 26 The date/time is displayed. 9. Set the [Power] switch to select , then press the [Joystick]. 5. Move the [Joystick] up or down to [DISC] or [CARD]. (SC-DC173(U)/DC175/DC575 only) 4 2. Some of model SC-DC173U are used in this manual. Press the [MENU] button. The menu list will not be highlighted. To adjust...
... Setting : System Menu Setting Setting the Clock (Clock Set) Clock setup works in Camera Mode/Player Mode/M.Cam Mode/M.Player Mode. page 26 The date/time is displayed. 9. Set the [Power] switch to select , then press the [Joystick]. 5. Move the [Joystick] up or down to [DISC] or [CARD]. (SC-DC173(U)/DC175/DC575 only) 4 2. Some of model SC-DC173U are used in this manual. Press the [MENU] button. The menu list will not be highlighted. To adjust...

User Manual (ENGLISH)
Page 42
... Mode) : You can edit the disc on a DVD Camcorder, but playback is inserted. Note The Finalize/Format functions are prompted with the message. ENGLISH DVD Camcorder: Before Recording When using a New Disc: Formatting a new Disc Formatting may be able to play the disc on most DVD Players/Recorders/Drives. Recognition of the disc spindle, pick up the disc by hand. 3. For a DVD-RW disc: You are not available when the battery level is between Video and VR mode Video (Video Mode) : If the disc...
... Mode) : You can edit the disc on a DVD Camcorder, but playback is inserted. Note The Finalize/Format functions are prompted with the message. ENGLISH DVD Camcorder: Before Recording When using a New Disc: Formatting a new Disc Formatting may be able to play the disc on most DVD Players/Recorders/Drives. Recognition of the disc spindle, pick up the disc by hand. 3. For a DVD-RW disc: You are not available when the battery level is between Video and VR mode Video (Video Mode) : If the disc...

User Manual (ENGLISH)
Page 44
...created on DVD-R/+RW/+R DL/-RW(Video Mode)discs, and up to 999 on the LCD Screen. 5. Use either button for your First Recording 1. Remove the Lens Cover. 3. ENGLISH PHOTO DVD Camcorder: Basic Recording Making your expected recording time. 4. Open the LCD Screen Set the [Mode] switch to [DISC]. (SC-DC173(U)/DC175/DC575 only) Set the [Power] switch to the DVD Camcorder. pages 21, 25 (A Battery Pack or a AC Power adapter) 1 Insert a disc. page 41 2. The record mode, recording time, the disc type, the format mode, and...
...created on DVD-R/+RW/+R DL/-RW(Video Mode)discs, and up to 999 on the LCD Screen. 5. Use either button for your First Recording 1. Remove the Lens Cover. 3. ENGLISH PHOTO DVD Camcorder: Basic Recording Making your expected recording time. 4. Open the LCD Screen Set the [Mode] switch to [DISC]. (SC-DC173(U)/DC175/DC575 only) Set the [Power] switch to the DVD Camcorder. pages 21, 25 (A Battery Pack or a AC Power adapter) 1 Insert a disc. page 41 2. The record mode, recording time, the disc type, the format mode, and...
User Manual (ENGLISH)
Page 52
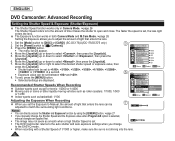
... light enters the lens. The Exposure function works in Camera Mode. page 26 The Shutter Speed refers to to the amount of a second. 5 Exposure value can directly access the Shutter and Exposure function by using the [Q.MENU] button. page 27 If you manually change the Shutter Speed and the Exposure value when Program AE option is selected, manual changes are displayed. ENGLISH DVD Camcorder: Advanced Recording Setting the Shutter Speed & Exposure (Shutter/Exposure) The Shutter Speed function works...
... light enters the lens. The Exposure function works in Camera Mode. page 26 The Shutter Speed refers to to the amount of a second. 5 Exposure value can directly access the Shutter and Exposure function by using the [Q.MENU] button. page 27 If you manually change the Shutter Speed and the Exposure value when Program AE option is selected, manual changes are displayed. ENGLISH DVD Camcorder: Advanced Recording Setting the Shutter Speed & Exposure (Shutter/Exposure) The Shutter Speed function works...
User Manual (ENGLISH)
Page 57
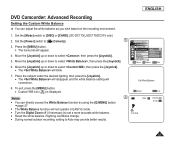
...white balance setting will not operate in EASY.Q mode. Turn the Digital Zoom off (if necessary) to set a more accurate white balance. Reset the white balance if lighting conditions change. During normal outdoor recording, setting to select , then press the [Joystick]. 5. Move the [Joystick] up or down to [ (Camera)]. 6 3. Set White Balance 8. Press the [MENU] button. The menu list will blink. ENGLISH DVD Camcorder: Advanced Recording Setting the Custom White Balance You can directly access the White Balance function by using the [Q.MENU...
...white balance setting will not operate in EASY.Q mode. Turn the Digital Zoom off (if necessary) to set a more accurate white balance. Reset the white balance if lighting conditions change. During normal outdoor recording, setting to select , then press the [Joystick]. 5. Move the [Joystick] up or down to [ (Camera)]. 6 3. Set White Balance 8. Press the [MENU] button. The menu list will blink. ENGLISH DVD Camcorder: Advanced Recording Setting the Custom White Balance You can directly access the White Balance function by using the [Q.MENU...
User Manual (ENGLISH)
Page 100
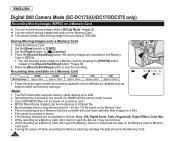
... following functions are not available in M.Cam Mode: DIS, Digital Zoom, Fade, Program AE, Digital Effect, Color Nite. While recording on a Memory Card, don't insert or eject the disc as subject matter and memory card type. Press the [Record Start/Stop] button, the moving images are recorded on the Memory Card in *.avi (avi 1.0) file format on the Memory Card. The moving image to [CARD]. 3. Set the [Power] switch to stop the recording. Saving Moving Images onto a Memory Card 1. Set the [Mode] switch to be recorded is used...
... following functions are not available in M.Cam Mode: DIS, Digital Zoom, Fade, Program AE, Digital Effect, Color Nite. While recording on a Memory Card, don't insert or eject the disc as subject matter and memory card type. Press the [Record Start/Stop] button, the moving images are recorded on the Memory Card in *.avi (avi 1.0) file format on the Memory Card. The moving image to [CARD]. 3. Set the [Power] switch to stop the recording. Saving Moving Images onto a Memory Card 1. Set the [Mode] switch to be recorded is used...

User Manual (ENGLISH)
Page 110
... Camera/USB Streaming driver(Capture Driver) 2. If the is not installed, it is required to "D:Drive". DirectX9.0 - Video Codec - Click on on the Setup screen. Driver software is inserted. Video Codec Click on on your PC. ENGLISH USB Interface (SC-DC173(U)/DC175/DC575 only) Installing DV Media PRO Program When you install the DV Media PRO software on your Windows computer, you can enjoy the following operations by this DVD Camcorder on a PC. 110 DirectX9.0 - Photo...
... Camera/USB Streaming driver(Capture Driver) 2. If the is not installed, it is required to "D:Drive". DirectX9.0 - Video Codec - Click on on the Setup screen. Driver software is inserted. Video Codec Click on on your PC. ENGLISH USB Interface (SC-DC173(U)/DC175/DC575 only) Installing DV Media PRO Program When you install the DV Media PRO software on your Windows computer, you can enjoy the following operations by this DVD Camcorder on a PC. 110 DirectX9.0 - Photo...
User Manual (ENGLISH)
Page 113
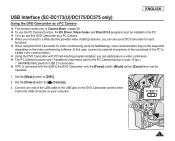
... [Power] switch, [Mode] switch, [Zoom] lever can be supported depending on the video conferencing software. Set the [Mode] switch to [ (Camera)]. 3. In this case, connect an external microphone to the soundcard of the USB cable to the USB jack on the DVD Camcorder and the other end to a Web site that provides video chatting functions, you can use your computer. 2 113 ENGLISH USB Interface (SC-DC173(U)/DC175/DC575 only) Using the DVD Camcorder as a PC Camera This function works only in Camera Mode. ...
... [Power] switch, [Mode] switch, [Zoom] lever can be supported depending on the video conferencing software. Set the [Mode] switch to [ (Camera)]. 3. In this case, connect an external microphone to the soundcard of the USB cable to the USB jack on the DVD Camcorder and the other end to a Web site that provides video chatting functions, you can use your computer. 2 113 ENGLISH USB Interface (SC-DC173(U)/DC175/DC575 only) Using the DVD Camcorder as a PC Camera This function works only in Camera Mode. ...
User Manual (ENGLISH)
Page 114
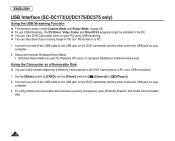
... the removable disk. 114 Set the [Mode] switch to [CARD], set the [Power] switch to a PC via a USB connection. 1. Connect one end of the USB cable to the USB jack on the DVD Camcorder and the other end to the USB jack on a PC. 1. Setup and execute Windows Movie Maker. Windows Movie Maker is used for Windows XP users. (C:\program files\Movie maker\moviemk.exe) Using the Camcorder as a moving image in the DVD Camcorder to [ (Camera)] or [ (Player)]. 2. ENGLISH USB Interface (SC-DC173(U)/DC175...
... the removable disk. 114 Set the [Mode] switch to [CARD], set the [Power] switch to a PC via a USB connection. 1. Connect one end of the USB cable to the USB jack on the DVD Camcorder and the other end to the USB jack on a PC. 1. Setup and execute Windows Movie Maker. Windows Movie Maker is used for Windows XP users. (C:\program files\Movie maker\moviemk.exe) Using the Camcorder as a moving image in the DVD Camcorder to [ (Camera)] or [ (Player)]. 2. ENGLISH USB Interface (SC-DC173(U)/DC175...
User Manual (ENGLISH)
Page 122
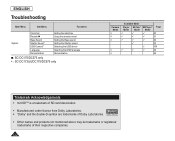
ENGLISH Troubleshooting Main Menu Sub Menu Functions System Clock Set Remote Beep Sound Shutter Sound* USB Connect* Language Demonstration Setting the date/time Using the remote control Setting the Beep sound Setting the Shutter sound Selecting the USB device Selecting the OSD language Demonstration : SC-DC175/DC575 only * : SC-DC173(U)/DC175/DC575 only Camera Mode Available Mode Player M.Cam* Mode Mode M.Player* Page Mode ...
ENGLISH Troubleshooting Main Menu Sub Menu Functions System Clock Set Remote Beep Sound Shutter Sound* USB Connect* Language Demonstration Setting the date/time Using the remote control Setting the Beep sound Setting the Shutter sound Selecting the USB device Selecting the OSD language Demonstration : SC-DC175/DC575 only * : SC-DC173(U)/DC175/DC575 only Camera Mode Available Mode Player M.Cam* Mode Mode M.Player* Page Mode ...


