Quick Guide (easy Manual) (ver.1.0) (English)
Page 4
... 7. AC Power Adapter (AA-E8 TYPE) 3. Getting to Know Your Camcorder Front & Left View 1. Lens 2. Hand Strap Hook 5. Internal MIC 6. AV/S-Video Jack 11. Lens 2. USB Jack 10. AV/S-Video Jack 11. Lithium Ion Battery Pack 2. Software CD 4. Multi-AV Cable (Audio/Video/S-Video Cable) 8. Remote Control 12. Memory Stick Basic Accessories 1. Lithium Ion Battery Pack...
... 7. AC Power Adapter (AA-E8 TYPE) 3. Getting to Know Your Camcorder Front & Left View 1. Lens 2. Hand Strap Hook 5. Internal MIC 6. AV/S-Video Jack 11. Lens 2. USB Jack 10. AV/S-Video Jack 11. Lithium Ion Battery Pack 2. Software CD 4. Multi-AV Cable (Audio/Video/S-Video Cable) 8. Remote Control 12. Memory Stick Basic Accessories 1. Lithium Ion Battery Pack...
Quick Guide (easy Manual) (ver.1.0) (English)
Page 7
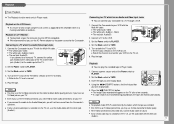
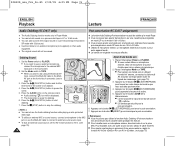
... play back. 4. If you connect the cable to the viewfinder when in Player mode. 3. S-Video input TV Video input-Yellow Audio input (left )-White VCR Audio input(right)-Red DV Camcorder USB AV/ S TV Audio/Video/ S-Video 3. Connect the Camcorder to a TV which has no Audio and Video ...10020; You can connect your VCR on the VCR to TAPE. 4. Set the Mode switch to Line. Notes s You may use the Audio cable with the Multi-AV cable. s The images you will appear on a TV Monitor ✤ To play the recorded tape in a moving automobile or outdoors. s If...
... play back. 4. If you connect the cable to the viewfinder when in Player mode. 3. S-Video input TV Video input-Yellow Audio input (left )-White VCR Audio input(right)-Red DV Camcorder USB AV/ S TV Audio/Video/ S-Video 3. Connect the Camcorder to a TV which has no Audio and Video ...10020; You can connect your VCR on the VCR to TAPE. 4. Set the Mode switch to Line. Notes s You may use the Audio cable with the Multi-AV cable. s The images you will appear on a TV Monitor ✤ To play the recorded tape in a moving automobile or outdoors. s If...

User Manual (user Manual) (ver.1.0) (English, French)
Page 69
... 3. Set the Mode switch to lower the volume or mute the sound while playing a tape on the Camcorder. Use the Menu selector to the Camcorder, you will not hear sound from the speaker. [ Notes ] I The sound will return when you...le volume ne peut pas être réglé. Set the Power switch to play the tape. 4. I When the AV cable is connected to adjust the volume. I If you close the LCD screen while playing, you will appear on 00. 4 I...mode. ✤ When you use the LCD screen for playback, you remove the connected AV cable from the jack of your Camcorder. 1.
... 3. Set the Mode switch to lower the volume or mute the sound while playing a tape on the Camcorder. Use the Menu selector to the Camcorder, you will not hear sound from the speaker. [ Notes ] I The sound will return when you...le volume ne peut pas être réglé. Set the Power switch to play the tape. 4. I When the AV cable is connected to adjust the volume. I If you close the LCD screen while playing, you will appear on 00. 4 I...mode. ✤ When you use the LCD screen for playback, you remove the connected AV cable from the jack of your Camcorder. 1.
User Manual (user Manual) (ver.1.0) (English, French)
Page 75
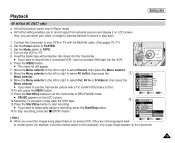
...05 PM Page 75 ENGLISH Playback Lecture FRANÇAIS AV In/Out (SC-D457 only) Entrée/Sortie AV (SC-D457 uniquement) ✤ AV In/Out function works only in Player mode. ✤ AV In/Out setting enables you to REC 9 PAUSE mode. Connect the Camcorder to temporarily pause a recording, press the Start/Stop ... du caméscope si celles-ci ne sont pas lues en vitesse normale (par exemple en accéléré ou au ralenti). 75 cable. (See pages 70~71) 2. Appuyez sur le bouton Start/Stop pour commencer l'enregistrement. Turn on , vous pouvez rediriger une vidéo ou...
...05 PM Page 75 ENGLISH Playback Lecture FRANÇAIS AV In/Out (SC-D457 only) Entrée/Sortie AV (SC-D457 uniquement) ✤ AV In/Out function works only in Player mode. ✤ AV In/Out setting enables you to REC 9 PAUSE mode. Connect the Camcorder to temporarily pause a recording, press the Start/Stop ... du caméscope si celles-ci ne sont pas lues en vitesse normale (par exemple en accéléré ou au ralenti). 75 cable. (See pages 70~71) 2. Appuyez sur le bouton Start/Stop pour commencer l'enregistrement. Turn on , vous pouvez rediriger une vidéo ou...
User Manual (user Manual) (ver.1.0) (English, French)
Page 76
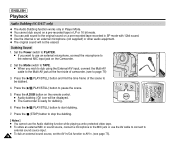
... lors de la lecture d'une cassette vidéo protégée en écriture. Press the (PLAY/STILL) button and find the time frame of camcorder. (see page 75). 76 √ 5 6. Appuyez sur le bouton A.DUB de la télécommande. I Le caméscope est prê...utilize an external MIC or sound source, connect a microphone to the MIC jack or use the Multi-AV cable to connect to start dubbing. 7. Appuyez sur le bouton (LECTURE/PAUSE) pour suspendre la lecture de la scène. 5. Dubbing Sound 1. Press the (PLAY/STILL) button to pause the scene. 5. ...
... lors de la lecture d'une cassette vidéo protégée en écriture. Press the (PLAY/STILL) button and find the time frame of camcorder. (see page 75). 76 √ 5 6. Appuyez sur le bouton A.DUB de la télécommande. I Le caméscope est prê...utilize an external MIC or sound source, connect a microphone to the MIC jack or use the Multi-AV cable to connect to start dubbing. 7. Appuyez sur le bouton (LECTURE/PAUSE) pour suspendre la lecture de la scène. 5. Dubbing Sound 1. Press the (PLAY/STILL) button to pause the scene. 5. ...
User Manual (user Manual) (ver.1.0) (English)
Page 16
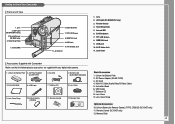
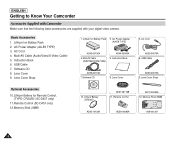
... (SC-D457 only) 12.Memory Stick (8MB) 10. USB Cable AD39-00073A 9. Multi-AV Cable (Audio/Video/S-Video Cable) AD44-00090A 5. Multi-AV Cable (Audio/Video/S-Video Cable) 5. Lens Cover Strap 1. Lithium Battery (CR2025) AD97-09716B 11. AC Power Adapter (AA-E8 TYPE) 3. Lens Cover 3. Remote Control AD72-00049A 12. ENGLISH Getting to Know Your Camcorder Accessories Supplied with Camcorder...
... (SC-D457 only) 12.Memory Stick (8MB) 10. USB Cable AD39-00073A 9. Multi-AV Cable (Audio/Video/S-Video Cable) AD44-00090A 5. Multi-AV Cable (Audio/Video/S-Video Cable) 5. Lens Cover Strap 1. Lithium Battery (CR2025) AD97-09716B 11. AC Power Adapter (AA-E8 TYPE) 3. Lens Cover 3. Remote Control AD72-00049A 12. ENGLISH Getting to Know Your Camcorder Accessories Supplied with Camcorder...

User Manual (user Manual) (ver.1.0) (English)
Page 73
...the volume. Use the Menu selector to TAPE. 3. You will not hear any sound when 4 the volume is connected to the Camcorder, you remove the connected AV cable from the speaker. [ Notes ] I A volume level display will appear on 00. Playback Controlling Sound from the Speaker ✤... The Speaker works only in Speaker. - I The sound will not hear sound from the jack of your Camcorder. √ SP 0:46:00:11 60min [05...
...the volume. Use the Menu selector to TAPE. 3. You will not hear any sound when 4 the volume is connected to the Camcorder, you remove the connected AV cable from the speaker. [ Notes ] I A volume level display will appear on 00. Playback Controlling Sound from the Speaker ✤... The Speaker works only in Speaker. - I The sound will not hear sound from the jack of your Camcorder. √ SP 0:46:00:11 60min [05...
User Manual (user Manual) (ver.1.0) (English)
Page 74
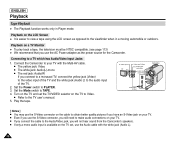
...Video input TV Video input-Yellow Audio input (left)-White Audio input (right)-Red DV USB AV/ S Audio/Video/ S-Video Camcorder [ Notes ] I The red jack: Audio(R) If you use the S-Video connector on the cable to the audio input of the TV and the white jack (Audio L) to obtain better quality... jack (Video) to the video input of the TV. 2. I Even if you use the Audio cable with the Multi-AV cable. Play the tape. Set the Power switch to view a tape using the LCD screen as the power source for the Camcorder. I If only a mono audio input is easier to PLAYER. 3.
...Video input TV Video input-Yellow Audio input (left)-White Audio input (right)-Red DV USB AV/ S Audio/Video/ S-Video Camcorder [ Notes ] I The red jack: Audio(R) If you use the S-Video connector on the cable to the audio input of the TV and the white jack (Audio L) to obtain better quality... jack (Video) to the video input of the TV. 2. I Even if you use the Audio cable with the Multi-AV cable. Play the tape. Set the Power switch to view a tape using the LCD screen as the power source for the Camcorder. I If only a mono audio input is easier to PLAYER. 3.
User Manual (user Manual) (ver.1.0) (English)
Page 75
... PLAYER. 4. Set the Mode switch to the VCR. 3. Insert the tape you wish to play back. 4. Press the (PLAY/STILL) button. Connect Audio cables for better quality. Connect a TV to TAPE. 3. I The yellow jack: Video I The red jack: Audio(R) 2. I If a tape reaches its end... jack (Audio L). 71 Playback Connecting to a TV which the tape was recorded. Connect the Camcorder to PLAYER. 2. Play the tape. I The images you may use the audio cable with the Multi-AV cable. I The S-Video Connector transmits video only. I If the VCR has an S-Video input terminal...
... PLAYER. 4. Set the Mode switch to the VCR. 3. Insert the tape you wish to play back. 4. Press the (PLAY/STILL) button. Connect Audio cables for better quality. Connect a TV to TAPE. 3. I The yellow jack: Video I The red jack: Audio(R) 2. I If a tape reaches its end... jack (Audio L). 71 Playback Connecting to a TV which the tape was recorded. Connect the Camcorder to PLAYER. 2. Play the tape. I The images you may use the audio cable with the Multi-AV cable. I The S-Video Connector transmits video only. I If the VCR has an S-Video input terminal...
User Manual (user Manual) (ver.1.0) (English)
Page 79
.... Move the Menu selector to the left or right to select Record, then press the Menu selector. 8. Also, you want to see the Camcorder picture with the Multi-AV cable. (See pages 70~71) 2. Move the Menu selector to the left or right to PLAYER. 1 3. Move the Menu selector to the left... sources and display it on the LCD screen. 12.Select the TV program or play back. 1. Playback ENGLISH AV In/Out (SC-D457 only) ✤ AV In/Out function works only in Player mode. ✤ AV In/Out setting enables you to record signal from a connected VCR, insert a recorded VHS tape into the...
.... Move the Menu selector to the left or right to select Record, then press the Menu selector. 8. Also, you want to see the Camcorder picture with the Multi-AV cable. (See pages 70~71) 2. Move the Menu selector to the left or right to PLAYER. 1 3. Move the Menu selector to the left... sources and display it on the LCD screen. 12.Select the TV program or play back. 1. Playback ENGLISH AV In/Out (SC-D457 only) ✤ AV In/Out function works only in Player mode. ✤ AV In/Out setting enables you to record signal from a connected VCR, insert a recorded VHS tape into the...
User Manual (user Manual) (ver.1.0) (English)
Page 80
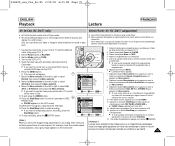
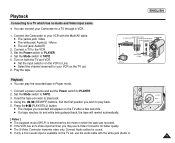
... Audio dubbing ( ) icon will not be erased. I If you wish to dub using the External A/V input, connect the Multi-AV cable to 1 the external MIC input jack on the Camcorder. 2. Dubbing Sound 1. I To utilize an external MIC or sound source, connect a microphone to the MIC jack or use an external...Camcorder is ready for dubbing. 6. Press the (PLAY/STILL) button to be dubbed. 34 5 4. Press the A.DUB button on a pre-recorded tape recorded in LP or 16 bit mode. ✤ You can add sound to TAPE. Press the (PLAY/STILL) button to PLAYER. ENGLISH Playback Audio Dubbing (SC-...
... Audio dubbing ( ) icon will not be erased. I If you wish to dub using the External A/V input, connect the Multi-AV cable to 1 the external MIC input jack on the Camcorder. 2. Dubbing Sound 1. I To utilize an external MIC or sound source, connect a microphone to the MIC jack or use an external...Camcorder is ready for dubbing. 6. Press the (PLAY/STILL) button to be dubbed. 34 5 4. Press the A.DUB button on a pre-recorded tape recorded in LP or 16 bit mode. ✤ You can add sound to TAPE. Press the (PLAY/STILL) button to PLAYER. ENGLISH Playback Audio Dubbing (SC-...

User Manual (user Manual) (ver.1.0) (English)
Page 83
...for all the recommended computer environments mentioned above. 79 Press the Start/Stop button to TAPE. 3. Connect the DV cable (not supplied) from the DV jack of the Camcorder to the DV jack of the other DV device while you want to pause recording momentarily, press the Start/Stop ...button again. 7. ENGLISH DV USB AV/ S [ Notes ] I Operation is displayed on the LCD screen. 5. IEEE 1394 Data Transfer System Requirements I PAUSE...
...for all the recommended computer environments mentioned above. 79 Press the Start/Stop button to TAPE. 3. Connect the DV cable (not supplied) from the DV jack of the Camcorder to the DV jack of the other DV device while you want to pause recording momentarily, press the Start/Stop ...button again. 7. ENGLISH DV USB AV/ S [ Notes ] I Operation is displayed on the LCD screen. 5. IEEE 1394 Data Transfer System Requirements I PAUSE...
User Manual (user Manual) (ver.1.0) (English)
Page 89
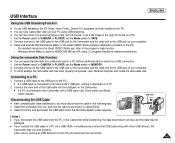
...Connect the other end to the USB jack on the Camcorder. Select [Confirm] and disconnect the USB cable when the Windows Splash screen appears. USB Cable DV USB AV/ S [ Notes ] I If you disconnect the USB cable from the PC or the Camcorder while transferring, the data transmission will stop and the ...devices from a Memory card to a PC without additional add-on cards via a USB HUB or simultaneously connect the USB cable along with a USB cable only, Zoom switch and Mode switch operate. Setup and execute Windows Movie Maker or the Ulead VIDEO Studio Software application provided on the PC...
...Connect the other end to the USB jack on the Camcorder. Select [Confirm] and disconnect the USB cable when the Windows Splash screen appears. USB Cable DV USB AV/ S [ Notes ] I If you disconnect the USB cable from the PC or the Camcorder while transferring, the data transmission will stop and the ...devices from a Memory card to a PC without additional add-on cards via a USB HUB or simultaneously connect the USB cable along with a USB cable only, Zoom switch and Mode switch operate. Setup and execute Windows Movie Maker or the Ulead VIDEO Studio Software application provided on the PC...


