User Manual
Page 2
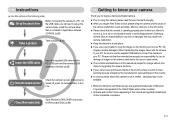
...this manual in that is operating properly prior to when you intend to the A/S centre. ● Please check that may not be damaged. Samsung camera takes no responsibility for loss or damage of images on the memory card due to the use of a card reader. ● The contents... trademarks of Microsoft Corporation incorporated in the following order. Check [Removable Disk] Open Window's EXPLORER and search for buying a Samsung Digital Camera. ● Prior to using this camera, please read the user manual thoroughly. ● When you require After Sales service, please bring the...
...this manual in that is operating properly prior to when you intend to the A/S centre. ● Please check that may not be damaged. Samsung camera takes no responsibility for loss or damage of images on the memory card due to the use of a card reader. ● The contents... trademarks of Microsoft Corporation incorporated in the following order. Check [Removable Disk] Open Window's EXPLORER and search for buying a Samsung Digital Camera. ● Prior to using this camera, please read the user manual thoroughly. ● When you require After Sales service, please bring the...
User Manual
Page 3
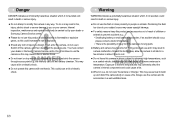
... animals to prevent accidents e.g.: •Swallowing battery or small camera accessories. Should this be carried out by your dealer or Samsung Camera Service centre. ■ Please do not use this product in close to your dealer or Samsung Camera Service centre. Do not continue to use the camera as a sealed vehicle, direct sunlight or other places...
... animals to prevent accidents e.g.: •Swallowing battery or small camera accessories. Should this be carried out by your dealer or Samsung Camera Service centre. ■ Please do not use this product in close to your dealer or Samsung Camera Service centre. Do not continue to use the camera as a sealed vehicle, direct sunlight or other places...
User Manual
Page 4
...;How to use the VOICE RECORDING mode 19 ●Things to Watch Out for When Taking Pictures 20 ●Using the camera buttons to set the camera 21 ■POWER button 21 ■Shutter button 21 ■ZOOM W / T button 21 ■Voice recording / Voice... 5 ●Identification of features 6 ■Front & Top 6 ■Back & Bottom 7 ■Bottom/ 5-function button 8 ■Self-timer lamp 8 ■Camera Status Lamp 8 ■Mode icon 9 ●Connecting to a Power Source ......9 ●Inserting the memory card .........10 ●Instructions on the [Setup] > [Battery Type...
...;How to use the VOICE RECORDING mode 19 ●Things to Watch Out for When Taking Pictures 20 ●Using the camera buttons to set the camera 21 ■POWER button 21 ■Shutter button 21 ■ZOOM W / T button 21 ■Voice recording / Voice... 5 ●Identification of features 6 ■Front & Top 6 ■Back & Bottom 7 ■Bottom/ 5-function button 8 ■Self-timer lamp 8 ■Camera Status Lamp 8 ■Mode icon 9 ●Connecting to a Power Source ......9 ●Inserting the memory card .........10 ●Instructions on the [Setup] > [Battery Type...
User Manual
Page 5
... .........49 ■How to capture the movie clip ...49 ■Playing back a recorded voice ...50 ●LCD monitor Indicator 50 ●Using the camera buttons to set the camera 51 ●Thumbnail / Enlargement button ...51 ●Voice memo / Up button 52 ●Play & Pause / Down button ......53 《4》 ●Special Effect...
... .........49 ■How to capture the movie clip ...49 ■Playing back a recorded voice ...50 ●LCD monitor Indicator 50 ●Using the camera buttons to set the camera 51 ●Thumbnail / Enlargement button ...51 ●Voice memo / Up button 52 ●Play & Pause / Down button ......53 《4》 ●Special Effect...
User Manual
Page 6
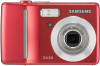
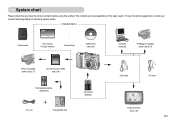
To buy the optional equipment, contact your nearest Samsung dealer or Samsung service centre. < Included items > Camera case User manual, Product warranty Camera strap Software CD (see p.84) Computer (see p.88) PictBridge compatible printer (see p.75) DPOF compatible printer (see p.71) SD memory card / MMC (see p.10) Rechargeable ...
To buy the optional equipment, contact your nearest Samsung dealer or Samsung service centre. < Included items > Camera case User manual, Product warranty Camera strap Software CD (see p.84) Computer (see p.88) PictBridge compatible printer (see p.75) DPOF compatible printer (see p.71) SD memory card / MMC (see p.10) Rechargeable ...
User Manual
Page 9
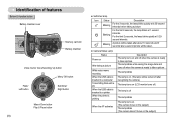
... off) The lamp is on (The lamp will be turned off after about 10 seconds and 2 seconds later a second picture will be taken. ■ Camera Status Lamp Status Power on the subject) second intervals. For the final 2 seconds, the lamp blinks quickly at 1 second Blinking intervals. Identification of features Bottom... printer is printing When the AF activates Description The lamp turns on and off when the camera is ready to take a picture The lamp blinks while saving the image data and turns off when the camera is ready to take a picture The lamp blinks The lamp is off The lamp blinks...
... off) The lamp is on (The lamp will be turned off after about 10 seconds and 2 seconds later a second picture will be taken. ■ Camera Status Lamp Status Power on the subject) second intervals. For the final 2 seconds, the lamp blinks quickly at 1 second Blinking intervals. Identification of features Bottom... printer is printing When the AF activates Description The lamp turns on and off when the camera is ready to take a picture The lamp blinks while saving the image data and turns off when the camera is ready to take a picture The lamp blinks The lamp is off The lamp blinks...

User Manual
Page 10
...Type Capacity Voltage Charging time SNB-2512 Ni-MH 2500mAh 1.2V x 2 Approximately 300 Minutes(Use for SBC-N2) INFORMATION Important information about the camera mode setting. Non rechargeable batteries : 2 X AA Alkaline (High Capacity) - However, the duration for using battery supplied with the battery ... for long periods. The available batteries are prone to a Power Source ■ We recommend using batteries varies in accordance with the camera. Identification of features ■ Mode icon : Refer to buy alkaline batteries. Battery can lose power over time and are listed below...
...Type Capacity Voltage Charging time SNB-2512 Ni-MH 2500mAh 1.2V x 2 Approximately 300 Minutes(Use for SBC-N2) INFORMATION Important information about the camera mode setting. Non rechargeable batteries : 2 X AA Alkaline (High Capacity) - However, the duration for using battery supplied with the battery ... for long periods. The available batteries are prone to a Power Source ■ We recommend using batteries varies in accordance with the camera. Identification of features ■ Mode icon : Refer to buy alkaline batteries. Battery can lose power over time and are listed below...

User Manual
Page 11
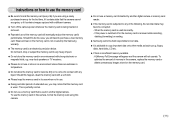
...) spare battery) spare battery) Inserting the memory card ■ Insert the memory card as shown - If the camera does not turn on the LCD monitor. Turn off the camera's power before inserting the memory card. - Have the front of the memory card facing toward the front of the... camera (lens) and the card pins toward the back of the camera (LCD monitor). - When the battery chamber cover is inserted with the correct polarity (+ / -). - This may damage the memory card...
...) spare battery) spare battery) Inserting the memory card ■ Insert the memory card as shown - If the camera does not turn on the LCD monitor. Turn off the camera's power before inserting the memory card. - Have the front of the memory card facing toward the front of the... camera (lens) and the card pins toward the back of the camera (LCD monitor). - When the battery chamber cover is inserted with the correct polarity (+ / -). - This may damage the memory card...
User Manual
Page 12
...Do not bend, drop or subject the memory card to come into contact with a different camera. ● Turn off or the memory card is removed while recording, deleting (formatting) or reading. ● Samsung cannot be the case, you may become dirty or to any of the following, the ...inserted or removed. ● Repeated use of extended use or store in an environment where there are using this camera. ● Do not use a memory card formatted by the Samsung warranty. ● The memory card is an electronic precision device. Should this be held responsible for the first ...
...Do not bend, drop or subject the memory card to come into contact with a different camera. ● Turn off or the memory card is removed while recording, deleting (formatting) or reading. ● Samsung cannot be the case, you may become dirty or to any of the following, the ...inserted or removed. ● Repeated use of extended use or store in an environment where there are using this camera. ● Do not use a memory card formatted by the Samsung warranty. ● The memory card is an electronic precision device. Should this be held responsible for the first ...
User Manual
Page 13
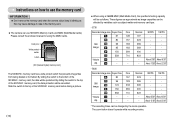
.../SDHC memory card, the data protection will be as image capacities can use the memory card INFORMATION ● Don't remove the memory card when the camera status lamp is blinking as this may cause damage to the top of the SD/SDHC memory card, the data will be changed by variables... (Multi Media Card), the specified shooting capacity will be affected by the zoom operation. Slide the switch to data in the memory card. ■ The camera can be cancelled.
.../SDHC memory card, the data protection will be as image capacities can use the memory card INFORMATION ● Don't remove the memory card when the camera status lamp is blinking as this may cause damage to the top of the SD/SDHC memory card, the data will be changed by variables... (Multi Media Card), the specified shooting capacity will be affected by the zoom operation. Slide the switch to data in the memory card. ■ The camera can be cancelled.

User Manual
Page 14
... DOWN button : Changes the value of its current position. Set up the date / time, language and battery type before using this camera. ● Setting up the battery type 1. Select the desired sub menu by pressing the UP/ DOWN button and press the OK ..., Japanese, Russian, Portuguese, Dutch, Danish, Swedish, Finnish, Thai, BAHASA(MALAY/ INDONESIAN), Arabic, Czech, Polish, Hungarian and Turkish. ● Even if the camera is restarted, the language setting will be maintained. ● Setting up the date, time and date type 1. SETUP1 Language Date&Time Battery Type Back Alkaline...
... DOWN button : Changes the value of its current position. Set up the date / time, language and battery type before using this camera. ● Setting up the battery type 1. Select the desired sub menu by pressing the UP/ DOWN button and press the OK ..., Japanese, Russian, Portuguese, Dutch, Danish, Swedish, Finnish, Thai, BAHASA(MALAY/ INDONESIAN), Arabic, Czech, Polish, Hungarian and Turkish. ● Even if the camera is restarted, the language setting will be maintained. ● Setting up the date, time and date type 1. SETUP1 Language Date&Time Battery Type Back Alkaline...
User Manual
Page 15
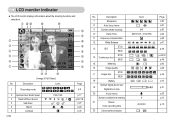
Description 7 Sharpness 8 Auto focus frame 9 Camera shake warning 10 Date/ Time 11 Exposure compensation 12 White Balance 13 ISO S730 S630 S730 14 Continuous shot S630 15 Metering 16 Image quality ...
Description 7 Sharpness 8 Auto focus frame 9 Camera shake warning 10 Date/ Time 11 Exposure compensation 12 White Balance 13 ISO S730 S630 S730 14 Continuous shot S630 15 Metering 16 Image quality ...
User Manual
Page 16
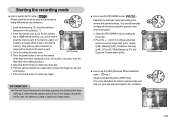
... reset the date/ time before taking a picture.) 5. Press the shutter button to insert the memory card. Press the + / - As this camera has a 16MB internal memory, you get a well-exposed image in the internal memory. Press the power button to use the ASR (Advanced Shake Reduction)...46), ISO (p.46), White Balance (p.47), and Exposure Compensation (p.48). [ PROGRAM mode ] ■ How to turn on the camera. (If the date/ time that the camera cannot focus on the subject. Select the AUTO mode by using the LCD monitor. 7. You can still manually configure all functions except...
... reset the date/ time before taking a picture.) 5. Press the shutter button to insert the memory card. Press the + / - As this camera has a 16MB internal memory, you get a well-exposed image in the internal memory. Press the power button to use the ASR (Advanced Shake Reduction)...46), ISO (p.46), White Balance (p.47), and Exposure Compensation (p.48). [ PROGRAM mode ] ■ How to turn on the camera. (If the date/ time that the camera cannot focus on the subject. Select the AUTO mode by using the LCD monitor. 7. You can still manually configure all functions except...
User Manual
Page 17
...is taken in the Fill-In Flash mode and the other is not displayed. 4. button. 2. The digital zoom will not operate in fluorescent lighting condition, camera shake warning indicator ( ) will not operate with image size. ■ Wise Shot 2 images are captures sequentially. Select Drive menu tab by pressing the ... Up and Down button. 3. Select the ASR mode by rotating the mode dial and press the +/- If the lighting condition is moving the camera while the [Capturing!] message is brighter than in the ASR mode. 2. Press the Shutter button to use the Wise Shot 1. If the ...
...is taken in the Fill-In Flash mode and the other is not displayed. 4. button. 2. The digital zoom will not operate in fluorescent lighting condition, camera shake warning indicator ( ) will not operate with image size. ■ Wise Shot 2 images are captures sequentially. Select Drive menu tab by pressing the ... Up and Down button. 3. Select the ASR mode by rotating the mode dial and press the +/- If the lighting condition is moving the camera while the [Capturing!] message is brighter than in the ASR mode. 2. Press the Shutter button to use the Wise Shot 1. If the ...
User Manual
Page 19
... without voice. 3. File type : *.avi (MJPEG) ※ The maximum file size of a person. - Press the shutter button and movie clips are listed below. - Point the camera towards the subject and compose the image by rotating the mode dial. - Select the MOVIE CLIP mode by rotating the mode dial. (The MOVIE CLIP...
... without voice. 3. File type : *.avi (MJPEG) ※ The maximum file size of a person. - Press the shutter button and movie clips are listed below. - Point the camera towards the subject and compose the image by rotating the mode dial. - Select the MOVIE CLIP mode by rotating the mode dial. (The MOVIE CLIP...
User Manual
Page 20
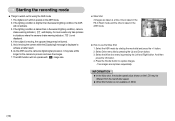
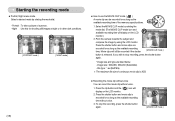
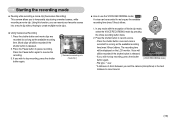
Starting the recording mode ■ Pausing while recording a movie clip (Successive Recording) This camera allows you to temporarily stop recording, press the shutter button again. Using this function, you wish to use the VOICE RECORDING mode ( ) A ...clip mode, select the VOICE RECORDING mode by pressing the Voice recording button twice. 2. SH REC Exit [ VOICE RECORDING mode ] - If you and the camera (microphone) is released. 2. Press the Pause button again to create multiple movie clips. ● Using Successive Recording 1. Voice will still be recorded if the...
Starting the recording mode ■ Pausing while recording a movie clip (Successive Recording) This camera allows you to temporarily stop recording, press the shutter button again. Using this function, you wish to use the VOICE RECORDING mode ( ) A ...clip mode, select the VOICE RECORDING mode by pressing the Voice recording button twice. 2. SH REC Exit [ VOICE RECORDING mode ] - If you and the camera (microphone) is released. 2. Press the Pause button again to create multiple movie clips. ● Using Successive Recording 1. Voice will still be recorded if the...
User Manual
Page 21
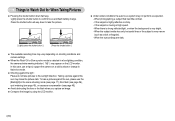
... is very narrow (such as expected. - When the surroundings are dark. ■ The available recording time may vary depending on shooting conditions and camera settings. ■ When the Flash Off or Slow synchro mode is moving at high speed. - When photographing a subject that has little contrast. ... conditions the auto focus system may not perform as a stick or flagpole). - Taking a picture against the sun, please use a tripod, support the camera on the LCD monitor. If the subject is very bright. - If the subject is selected in flash (see page 26), spot metering (see page ...
... is very narrow (such as expected. - When the surroundings are dark. ■ The available recording time may vary depending on shooting conditions and camera settings. ■ When the Flash Off or Slow synchro mode is moving at high speed. - When photographing a subject that has little contrast. ... conditions the auto focus system may not perform as a stick or flagpole). - Taking a picture against the sun, please use a tripod, support the camera on the LCD monitor. If the subject is very bright. - If the subject is selected in flash (see page 26), spot metering (see page ...
User Manual
Page 22
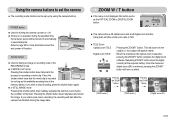
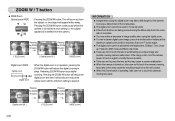
... T button ● If the menu is achieved, pressing the ZOOM T button will appear nearer. : When the maximum (3X) optical zoom is recorded for turning the camera's power on / off function. Using both will zoom into the subject i.e. Pressing the ZOOM T button Pressing the ZOOM T button [ WIDE zoom ] [ TELE zoom...mode function can be turned off automatically to page 35 for taking an image or recording voice in the memory allows. Using the camera buttons to stop recording, press the shutter button again. ● In STILL IMAGE mode Pressing the shutter button down halfway activates ...
... T button ● If the menu is achieved, pressing the ZOOM T button will appear nearer. : When the maximum (3X) optical zoom is recorded for turning the camera's power on / off function. Using both will zoom into the subject i.e. Pressing the ZOOM T button Pressing the ZOOM T button [ WIDE zoom ] [ TELE zoom...mode function can be turned off automatically to page 35 for taking an image or recording voice in the memory allows. Using the camera buttons to stop recording, press the shutter button again. ● In STILL IMAGE mode Pressing the shutter button down halfway activates ...
User Manual
Page 23
... 5X ] [ TELE zoom ] [ WIDE zoom ] 《22》 Pressing the ZOOM W button will reduce the digital zoom and then it will set the camera to its farthest from the subject i.e. Pressing the ZOOM W button Pressing the ZOOM W button INFORMATION ● Images taken using the digital zoom. ● To view...zoom 2X ] [ WIDE zoom ] Digital zoom WIDE Optical zoom Digital zoom : When the digital zoom is reached. If the image is dim, turn the camera power off and on , take care not to reduce the optical zoom until the minimum setting is in operation, pressing the ZOOM W button will not...
... 5X ] [ TELE zoom ] [ WIDE zoom ] 《22》 Pressing the ZOOM W button will reduce the digital zoom and then it will set the camera to its farthest from the subject i.e. Pressing the ZOOM W button Pressing the ZOOM W button INFORMATION ● Images taken using the digital zoom. ● To view...zoom 2X ] [ WIDE zoom ] Digital zoom WIDE Optical zoom Digital zoom : When the digital zoom is reached. If the image is dim, turn the camera power off and on , take care not to reduce the optical zoom until the minimum setting is in operation, pressing the ZOOM W button will not...

User Manual
Page 24
... MODE DIAL to page 19 for more information about the voice recording. ● Recording a voice memo 1. INFORMATION ● A distance of 40cm between you and the camera (microphone) is stored on the LCD monitor. [ Normal-No icon ] [ Macro ( ) ] [ Auto Macro ( ) ] ■ Types of focus modes and focus ... Normal W : 5~80 T : 40~80 W : 80~Infinity T : 80~Infinity INFORMATION ● When the macro mode is selected, it is possible that camera shake will be recorded for ten seconds from the main menu to a sub menu, or to a stored still image. Take care not to record sound...
... MODE DIAL to page 19 for more information about the voice recording. ● Recording a voice memo 1. INFORMATION ● A distance of 40cm between you and the camera (microphone) is stored on the LCD monitor. [ Normal-No icon ] [ Macro ( ) ] [ Auto Macro ( ) ] ■ Types of focus modes and focus ... Normal W : 5~80 T : 40~80 W : 80~Infinity T : 80~Infinity INFORMATION ● When the macro mode is selected, it is possible that camera shake will be recorded for ten seconds from the main menu to a sub menu, or to a stored still image. Take care not to record sound...


