
User Manual
Page 3
... active cells, there may be some cells that do not install and operate there. ◆ Warranty - Checking Parts PPM42S3Q & PPM50H3Q Owner's Instructions Remote Control/ AAA Batteries Power Cord Speaker Wires (2EA) Stand-Base (2EA) 2 Install CD - Pivot software Speaker Wire (2EA) PC Cable MDC ...Cable (RS232C) Screws (4EA) ➢ The PPM42S3Q model uses the same MDC program CD used for PPM50H3/63H3 models. 3 It might abnormally function at a place over 2000m in height. MDC Software (RS232C) Ferrite Cores for PPM42S3 model. Burn-...
... active cells, there may be some cells that do not install and operate there. ◆ Warranty - Checking Parts PPM42S3Q & PPM50H3Q Owner's Instructions Remote Control/ AAA Batteries Power Cord Speaker Wires (2EA) Stand-Base (2EA) 2 Install CD - Pivot software Speaker Wire (2EA) PC Cable MDC ...Cable (RS232C) Screws (4EA) ➢ The PPM42S3Q model uses the same MDC program CD used for PPM50H3/63H3 models. 3 It might abnormally function at a place over 2000m in height. MDC Software (RS232C) Ferrite Cores for PPM42S3 model. Burn-...
User Manual
Page 4
... Viewing 2 ■ User Instructions 3 ◆ CONNECTING AND PREPARING YOUR DISPLAY ■ Your New Plasma Display Panel 6 ■ Becoming Familiar with the Remote Control 8 ■ Inserting the Batteries in the Remote Control 9 ■ Assembling the Stand-Base 9 ■ Installing the Display on the Wall Attachment Panel 10 ■ Installing the Display Vertically 12...
... Viewing 2 ■ User Instructions 3 ◆ CONNECTING AND PREPARING YOUR DISPLAY ■ Your New Plasma Display Panel 6 ■ Becoming Familiar with the Remote Control 8 ■ Inserting the Batteries in the Remote Control 9 ■ Assembling the Stand-Base 9 ■ Installing the Display on the Wall Attachment Panel 10 ■ Installing the Display Vertically 12...
User Manual
Page 6
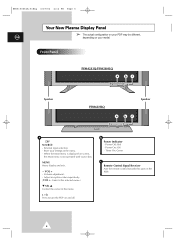
...; VOL + - b Power Indicator - Power On; I / Press to the selected menu.) ▼ SEL ▲ Control the cursor in the menu. - Power Off; Green c Remote Control Signal Receiver Aim the remote control towards this spot on your model. Store your settings in the menu. MENU Menu display and exit. - Volume adjustment. - Off - BN68-00654A...
...; VOL + - b Power Indicator - Power On; I / Press to the selected menu.) ▼ SEL ▲ Control the cursor in the menu. - Power Off; Green c Remote Control Signal Receiver Aim the remote control towards this spot on your model. Store your settings in the menu. MENU Menu display and exit. - Volume adjustment. - Off - BN68-00654A...
User Manual
Page 8
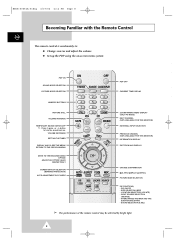
...(SOURCE) - INTERCHANGE THE MAIN AND THE SUB PICTURE (SWAP) - BN68-00654A-01Eng 4/19/04 4:12 PM Page 8 Becoming Familiar with the Remote Control ENG The remote control is used mainly to: ◆ Change sources and adjust the volume ◆ Set up the PDP using the on-screen menu system PDP...again , or - /+ button to turn the sound back on. SIZE SELECTION (SIZE) - PIP ON/OFF - SOUND SELECTION (S.SEL) ➢ The performance of the remote control may be affected by bright light. 8 VOLUME DECREASE SETTING THE TIMER DISPLAY AND CLOSE THE MENU/ RETURN TO THE PREVIOUS MENU MOVE TO THE...
...(SOURCE) - INTERCHANGE THE MAIN AND THE SUB PICTURE (SWAP) - BN68-00654A-01Eng 4/19/04 4:12 PM Page 8 Becoming Familiar with the Remote Control ENG The remote control is used mainly to: ◆ Change sources and adjust the volume ◆ Set up the PDP using the on-screen menu system PDP...again , or - /+ button to turn the sound back on. SIZE SELECTION (SIZE) - PIP ON/OFF - SOUND SELECTION (S.SEL) ➢ The performance of the remote control may be affected by bright light. 8 VOLUME DECREASE SETTING THE TIMER DISPLAY AND CLOSE THE MENU/ RETURN TO THE PREVIOUS MENU MOVE TO THE...
User Manual
Page 9
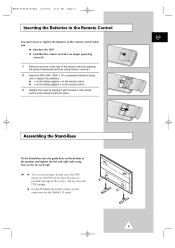
...Fit the Stand-Base into place. Never lay the PDP on the rear of the remote control by aligning it with the base of the remote control and pressing it back into the guide hole on the remote control 3 Replace the cover by pressing the symbol downwards and then pulling firmly to remove...PDP. BN68-00654A-01Eng 4/19/04 4:12 PM Page 9 Inserting the Batteries in the Remote Control ENG You must insert or replace the batteries in the remote control when you: ◆ Purchase the PDP ◆ Find that the remote control is no longer operating correctly 1 Remove the cover on the floor because of...
...Fit the Stand-Base into place. Never lay the PDP on the rear of the remote control by aligning it with the base of the remote control and pressing it back into the guide hole on the remote control 3 Replace the cover by pressing the symbol downwards and then pulling firmly to remove...PDP. BN68-00654A-01Eng 4/19/04 4:12 PM Page 9 Inserting the Batteries in the Remote Control ENG You must insert or replace the batteries in the remote control when you: ◆ Purchase the PDP ◆ Find that the remote control is no longer operating correctly 1 Remove the cover on the floor because of...
User Manual
Page 12
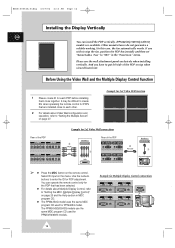
...the PDP vertically. (PPM42S3Q/50H3Q/63H3Q models are installed close together. Example for 2x2 Video Wall function Rear of the PDP Example for PPM50H3/63H3 models. The PPM50H3Q/63H3Q models use the wall attachment panel exclusively when installing vertically. Select ID input on page 25 and the Help... the numeric buttons to "Setting the MDC (Multiple Display Control)" on the menu. It may be difficult to create IDs when operating the remote control for PDPs that has been selected. ◆ For details about Multiple Display Control, refer to enter the ID for each PDP before ...
...the PDP vertically. (PPM42S3Q/50H3Q/63H3Q models are installed close together. Example for 2x2 Video Wall function Rear of the PDP Example for PPM50H3/63H3 models. The PPM50H3Q/63H3Q models use the wall attachment panel exclusively when installing vertically. Select ID input on page 25 and the Help... the numeric buttons to "Setting the MDC (Multiple Display Control)" on the menu. It may be difficult to create IDs when operating the remote control for PDPs that has been selected. ◆ For details about Multiple Display Control, refer to enter the ID for each PDP before ...
User Manual
Page 15
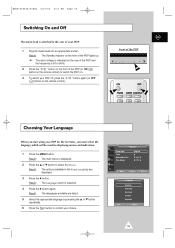
... mains lead is attached to the rear of your PDP off, press the " I / " button on the front of the PDP (or ON ( ) button on the remote control) to select Function. Result: The languages available are displayed. 3 Press the √ button. Result: The main menu is selected. 4 Press the √ button again... Italiano Español Sel. Result: The Standby indicator on the front of the PDP lights up. ➢ The main voltage is indicated on the remote control). ENG Front of the PDP and the frequency is 50 or 60Hz. 2 Press the " I / " button again (or OFF ( ) button on the rear of ...
... mains lead is attached to the rear of your PDP off, press the " I / " button on the front of the PDP (or ON ( ) button on the remote control) to select Function. Result: The languages available are displayed. 3 Press the √ button. Result: The main menu is selected. 4 Press the √ button again... Italiano Español Sel. Result: The Standby indicator on the front of the PDP lights up. ➢ The main voltage is indicated on the remote control). ENG Front of the PDP and the frequency is 50 or 60Hz. 2 Press the " I / " button again (or OFF ( ) button on the rear of ...
User Manual
Page 25
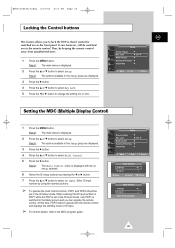
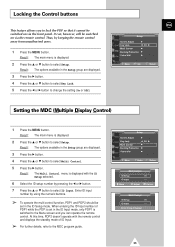
...00654A-01Eng 4/19/04 4:13 PM Page 25 Locking the Control buttons This feature allows you can , however, still be switched on via the remote control. It can operate the remote control. Return ENG Setting the MDC (Multiple Display Control) 1 Press the MENU button. Enter ID input number by keeping the... remote control away from unauthorised users. 1 Press the MENU button. Move œ √ Adjust Return Multi Control ID Setup 01 ID Input -- Result: The...
...00654A-01Eng 4/19/04 4:13 PM Page 25 Locking the Control buttons This feature allows you can , however, still be switched on via the remote control. It can operate the remote control. Return ENG Setting the MDC (Multiple Display Control) 1 Press the MENU button. Enter ID input number by keeping the... remote control away from unauthorised users. 1 Press the MENU button. Move œ √ Adjust Return Multi Control ID Setup 01 ID Input -- Result: The...

User Manual
Page 28
...; or ▼ button to select Setup. Displaying the Setting Information You can view the setting status you select by pressing the "INFO" button on the remote control. Mode Picture Sound Clock Video Dynamic Custom 11:45 28 Result: The options available in the Setup group are displayed. BN68-00654A-01Eng 4/19...
...; or ▼ button to select Setup. Displaying the Setting Information You can view the setting status you select by pressing the "INFO" button on the remote control. Mode Picture Sound Clock Video Dynamic Custom 11:45 28 Result: The options available in the Setup group are displayed. BN68-00654A-01Eng 4/19...
User Manual
Page 33
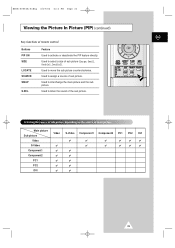
... move the sub picture counterclockwise. BN68-00654A-01Eng 4/19/04 4:13 PM Page 33 Viewing the Picture In Picture (PIP) (continued) ENG Easy functions of remote control.
... move the sub picture counterclockwise. BN68-00654A-01Eng 4/19/04 4:13 PM Page 33 Viewing the Picture In Picture (PIP) (continued) ENG Easy functions of remote control.
User Manual
Page 42
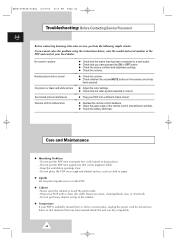
...the color settings. ◆ Check that you cannot solve the problem using the instructions below, note the model and serial number of the remote control (transmission window). ◆ Check the battery terminals. Do not place the PDP on a rough and slanted surface, such as ... fluids, wax, or chemicals. - BN68-00654A-01Eng 4/19/04 4:13 PM Page 42 Troubleshooting: Before Contacting Service Personnel ENG Before contacting Samsung after-sales service, perform the following simple checks. Care and Maintenance ◆ Identifying Problems - If you have formed inside . - Keep the ventilation...
...the color settings. ◆ Check that you cannot solve the problem using the instructions below, note the model and serial number of the remote control (transmission window). ◆ Check the battery terminals. Do not place the PDP on a rough and slanted surface, such as ... fluids, wax, or chemicals. - BN68-00654A-01Eng 4/19/04 4:13 PM Page 42 Troubleshooting: Before Contacting Service Personnel ENG Before contacting Samsung after-sales service, perform the following simple checks. Care and Maintenance ◆ Identifying Problems - If you have formed inside . - Keep the ventilation...

Owners Instructions
Page 3
... screen when displaying a still image. ◆ Cell Defect The plasma display panel consists of this PDP) on the plasma display panel for PPM50H3/PPM63H3 models. 3 Checking Parts Owner's Instructions Remote Control/ AAA Batteries Power Cord Speaker Wires (2EA) Stand-Base (2EA) 1 Install CD MDC Software (RS232C) Ferrite Cores for Speaker Wire (2EA...
... screen when displaying a still image. ◆ Cell Defect The plasma display panel consists of this PDP) on the plasma display panel for PPM50H3/PPM63H3 models. 3 Checking Parts Owner's Instructions Remote Control/ AAA Batteries Power Cord Speaker Wires (2EA) Stand-Base (2EA) 1 Install CD MDC Software (RS232C) Ferrite Cores for Speaker Wire (2EA...

Owners Instructions
Page 4
... Viewing 2 ■ User Instructions 3 ◆ CONNECTING AND PREPARING YOUR DISPLAY ■ Your New Plasma Display Panel 6 ■ Becoming Familiar with the Remote Control 8 ■ Inserting the Batteries in the Remote Control 9 ■ Assembling the Stand-Base 9 ■ Installing the Display on the Wall Attachment Panel 10 ■ Before Using the Video Wall...
... Viewing 2 ■ User Instructions 3 ◆ CONNECTING AND PREPARING YOUR DISPLAY ■ Your New Plasma Display Panel 6 ■ Becoming Familiar with the Remote Control 8 ■ Inserting the Batteries in the Remote Control 9 ■ Assembling the Stand-Base 9 ■ Installing the Display on the Wall Attachment Panel 10 ■ Before Using the Video Wall...

Owners Instructions
Page 6
... cursor in the menu. - Power On; Adjust an option value respectively. (VOL + : Enter to turn the PDP on and off. Red - Green c Remote Control Signal Receiver Aim the remote control towards this spot on screen, the Main menu is displayed on the PDP. 6 Your New Plasma Display Panel ENG Front Panel a bc...
... cursor in the menu. - Power On; Adjust an option value respectively. (VOL + : Enter to turn the PDP on and off. Red - Green c Remote Control Signal Receiver Aim the remote control towards this spot on screen, the Main menu is displayed on the PDP. 6 Your New Plasma Display Panel ENG Front Panel a bc...

Owners Instructions
Page 8
... THE SUB PICTURE (SWAP) - SIZE SELECTION (SIZE) - LOCATION SELECTION (LOCATE) - SOUND SELECTION (S.SEL) ➢ The performance of the remote control may be affected by bright light. 8 Becoming Familiar with the Remote Control ENG The remote control is used mainly to: ◆ Change sources and adjust the volume ◆ Set up the PDP using...
... THE SUB PICTURE (SWAP) - SIZE SELECTION (SIZE) - LOCATION SELECTION (LOCATE) - SOUND SELECTION (S.SEL) ➢ The performance of the remote control may be affected by bright light. 8 Becoming Familiar with the Remote Control ENG The remote control is used mainly to: ◆ Change sources and adjust the volume ◆ Set up the PDP using...

Owners Instructions
Page 9
...longer operating correctly 1 Remove the cover on the rear of possible damage to the screen. Never lay the PDP on the floor because of the remote control by aligning it with the base of the monitor and tighten the left and right sides using four screws for each side. ➢ ...Two or more people should carry the PDP. Always store the PDP upright. 9 on the remote control ◆ + on the bottom of the remote control and pressing it . 2 Insert two R03, UM4, "AAA" 1.5V or equivalent batteries taking care to respect the polarities: ◆ -...
...longer operating correctly 1 Remove the cover on the rear of possible damage to the screen. Never lay the PDP on the floor because of the remote control by aligning it with the base of the monitor and tighten the left and right sides using four screws for each side. ➢ ...Two or more people should carry the PDP. Always store the PDP upright. 9 on the remote control ◆ + on the bottom of the remote control and pressing it . 2 Insert two R03, UM4, "AAA" 1.5V or equivalent batteries taking care to respect the polarities: ◆ -...

Owners Instructions
Page 12
... Display Control)" on page 25 and the Help section in MDC program CD. ◆ The PPM42H3 model uses the same MDC program CD used for PPM50H3/PPM63H3 models. ➢ Do not install the PDP vertically. Example for 2x2 Video Wall function ➢ ◆ For details about Video Wall configuration...9670; For details about Multiple Display Control, refer to enter the ID for PDP adjustment. It may be difficult to create IDs when operating the remote control for PDPs that has been selected. Before Using the Video Wall and the Multiple Display Contol function ENG 1 Please create ID for each ...
... Display Control)" on page 25 and the Help section in MDC program CD. ◆ The PPM42H3 model uses the same MDC program CD used for PPM50H3/PPM63H3 models. ➢ Do not install the PDP vertically. Example for 2x2 Video Wall function ➢ ◆ For details about Video Wall configuration...9670; For details about Multiple Display Control, refer to enter the ID for PDP adjustment. It may be difficult to create IDs when operating the remote control for PDPs that has been selected. Before Using the Video Wall and the Multiple Display Contol function ENG 1 Please create ID for each ...

Owners Instructions
Page 15
... Off The mains lead is attached to the rear of the PDP (or ON ( ) button on the remote control) to switch the PDP on. 3 To switch your PDP off, press the " I / " button on the remote control). Result: The Standby indicator on the front of the PDP lights up. ➢ The main voltage...
... Off The mains lead is attached to the rear of the PDP (or ON ( ) button on the remote control) to switch the PDP on. 3 To switch your PDP off, press the " I / " button on the remote control). Result: The Standby indicator on the front of the PDP lights up. ➢ The main voltage...
Owners Instructions
Page 25
...pressing the œ or √ button. 7 Press the ▲ or ▼ button to lock the PDP so that it cannot be switched on via the remote control. Enter ID input number by using the numeric buttons. ➢ To operate the multi control function, PDP1 and PDP2 should be set in the... the ▲ or ▼ button to the MDC program guide. When entering the ID Input number of PDP1 while the PDP is displayed with the remote control and displays the standby mode of ID Input. ➢ For further details, refer to select Multi Control. 5 Press the √ button. Move œ √...
...pressing the œ or √ button. 7 Press the ▲ or ▼ button to lock the PDP so that it cannot be switched on via the remote control. Enter ID input number by using the numeric buttons. ➢ To operate the multi control function, PDP1 and PDP2 should be set in the... the ▲ or ▼ button to the MDC program guide. When entering the ID Input number of PDP1 while the PDP is displayed with the remote control and displays the standby mode of ID Input. ➢ For further details, refer to select Multi Control. 5 Press the √ button. Move œ √...

Owners Instructions
Page 28
Displaying the Setting Information You can view the setting status you select by pressing the "INFO" button on the remote control. Result: The resolution, vertical frequency and horizontal frequency are displayed. 3 Press the √ button. 4 Press the ▲ or ▼ button to select Setup. Mode ...
Displaying the Setting Information You can view the setting status you select by pressing the "INFO" button on the remote control. Result: The resolution, vertical frequency and horizontal frequency are displayed. 3 Press the √ button. 4 Press the ▲ or ▼ button to select Setup. Mode ...


