
User Manual
Page 3
... PDP) on the plasma display panel for more than 2 hours as "screen burn". Pivot software Speaker Wire (2EA) PC Cable MDC Cable (RS232C) Screws (4EA) ➢ The PPM42S3Q model uses the same MDC program CD used for PPM50H3/63H3 models. 3 The PPM50H3Q/63H3Q models use the same MDC program CD used for -
... PDP) on the plasma display panel for more than 2 hours as "screen burn". Pivot software Speaker Wire (2EA) PC Cable MDC Cable (RS232C) Screws (4EA) ➢ The PPM42S3Q model uses the same MDC program CD used for PPM50H3/63H3 models. 3 The PPM50H3Q/63H3Q models use the same MDC program CD used for -
User Manual
Page 9
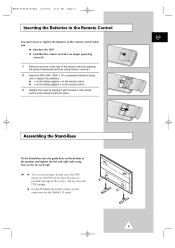
... pulling firmly to remove it back into the guide hole on the bottom of the monitor and tighten the left and right sides using four screws for the SMM6330 stand. 9
... pulling firmly to remove it back into the guide hole on the bottom of the monitor and tighten the left and right sides using four screws for the SMM6330 stand. 9
User Manual
Page 10
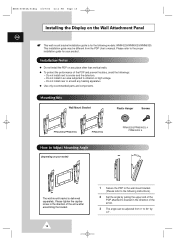
This installation guide may be adjusted from the PDP User's manual. Please refer to smoke and fire detectors. - Please tighten the captive screw in the direction of the arrow after assembling the bracket. 10 1 Secure the PDP to the wall mount bracket. (Please refer to ...the Display on your model) PPM42S3Q/PPM50H3Q: 4 PPM63H3Q: 6 The wall mount bracket is for your product. Mounting Kits Wall Mount Bracket Plastic Hanger Screws PPM42S3Q/PPM50H3Q PPM63H3Q How to vibration or high voltage. - Installation Notes ◆ Do not install the PDP on any heating apparatus. ◆ Use...
This installation guide may be adjusted from the PDP User's manual. Please refer to smoke and fire detectors. - Please tighten the captive screw in the direction of the arrow after assembling the bracket. 10 1 Secure the PDP to the wall mount bracket. (Please refer to ...the Display on your model) PPM42S3Q/PPM50H3Q: 4 PPM63H3Q: 6 The wall mount bracket is for your product. Mounting Kits Wall Mount Bracket Plastic Hanger Screws PPM42S3Q/PPM50H3Q PPM63H3Q How to vibration or high voltage. - Installation Notes ◆ Do not install the PDP on any heating apparatus. ◆ Use...

User Manual
Page 11
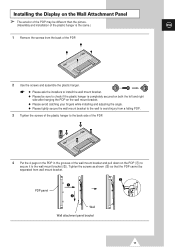
... shown (#) so that the PDP cannot be separated from a falling PDP. 3 Tighten the screws of the plastic hanger to the back side of the PDP. PPM42S3Q PPM50H3Q PPM63H3Q 2 Use the screws and assemble the plastic hanger. ☛ ◆ Please ask the installers to install the wall mount bracket. ◆ Please be ...sure to check if the plastic hanger is the same.) ENG 1 Remove the screws from the back of the PDP. PDP panel Wall Wall attachment panel bracket 11 BN68-00654A-01Eng 4/19/04 4:13 PM Page 11 Installing the...
... shown (#) so that the PDP cannot be separated from a falling PDP. 3 Tighten the screws of the plastic hanger to the back side of the PDP. PPM42S3Q PPM50H3Q PPM63H3Q 2 Use the screws and assemble the plastic hanger. ☛ ◆ Please ask the installers to install the wall mount bracket. ◆ Please be ...sure to check if the plastic hanger is the same.) ENG 1 Remove the screws from the back of the PDP. PDP panel Wall Wall attachment panel bracket 11 BN68-00654A-01Eng 4/19/04 4:13 PM Page 11 Installing the...
User Manual
Page 13
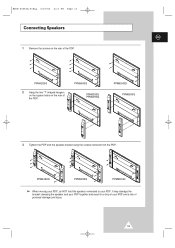
BN68-00654A-01Eng 4/19/04 4:13 PM Page 13 Connecting Speakers ENG 1 Remove the screws on the rear of the PDP. It may damage the bracket clamping the speaker and your PDP together and result in a drop of your PDP. PPM42S3Q 2 Hang the two "T" shaped hangers on the square holes on the rear of personal damage and injury. 13 PPM42S3Q PPM50H3Q PPM63H3Q ➢ When moving your PDP, do NOT hold the speaker connected to your PDP and a risk of the PDP. PPM50H3Q PPM42S3Q PPM50H3Q PPM63H3Q PPM63H3Q 3 Tighten the PDP and the speaker bracket using the screws removed from the PDP.
BN68-00654A-01Eng 4/19/04 4:13 PM Page 13 Connecting Speakers ENG 1 Remove the screws on the rear of the PDP. It may damage the bracket clamping the speaker and your PDP together and result in a drop of your PDP. PPM42S3Q 2 Hang the two "T" shaped hangers on the square holes on the rear of personal damage and injury. 13 PPM42S3Q PPM50H3Q PPM63H3Q ➢ When moving your PDP, do NOT hold the speaker connected to your PDP and a risk of the PDP. PPM50H3Q PPM42S3Q PPM50H3Q PPM63H3Q PPM63H3Q 3 Tighten the PDP and the speaker bracket using the screws removed from the PDP.

Owners Instructions
Page 3
...to this screen when displaying a still image. ◆ Cell Defect The plasma display panel consists of this PDP) on the plasma display panel for PPM50H3/PPM63H3 models. 3 This image retention is not covered by image retention. - Checking Parts Owner's Instructions Remote Control/ AAA Batteries Power Cord Speaker ... (2EA) Stand-Base (2EA) 1 Install CD MDC Software (RS232C) Ferrite Cores for Speaker Wire (2EA) PC Cable MDC Cable (RS232C) Screws (4EA) ➢ The PPM42H3 model uses the same MDC program CD used for more than 2 hours as it can normally operate only under ...
...to this screen when displaying a still image. ◆ Cell Defect The plasma display panel consists of this PDP) on the plasma display panel for PPM50H3/PPM63H3 models. 3 This image retention is not covered by image retention. - Checking Parts Owner's Instructions Remote Control/ AAA Batteries Power Cord Speaker ... (2EA) Stand-Base (2EA) 1 Install CD MDC Software (RS232C) Ferrite Cores for Speaker Wire (2EA) PC Cable MDC Cable (RS232C) Screws (4EA) ➢ The PPM42H3 model uses the same MDC program CD used for more than 2 hours as it can normally operate only under ...

Owners Instructions
Page 9
... on the rear of the remote control by aligning it with the base of the monitor and tighten the left and right sides using four screws for each side. ➢ Two or more people should carry the PDP. on the floor because of possible damage to remove it back into the...
... on the rear of the remote control by aligning it with the base of the monitor and tighten the left and right sides using four screws for each side. ➢ Two or more people should carry the PDP. on the floor because of possible damage to remove it back into the...

Owners Instructions
Page 10
... the Wall Attachment Panel ENG ☛ This wall mount bracket installation guide is delivered separately. Mounting Kits Wall Mount Bracket Plastic Hanger x 4 Screws x 4 How to bracket in the direction of the PDP and prevent troubles, avoid the followings: - Do not install near or around any...refer to vibration or high voltage. - Do not install next to the proper installation guide for the WMN4230 model. Please tighten the captive screw in an area subjected to the following instructions.) 2 Set the angle by ±2°. This installation guide may be adjusted from the ...
... the Wall Attachment Panel ENG ☛ This wall mount bracket installation guide is delivered separately. Mounting Kits Wall Mount Bracket Plastic Hanger x 4 Screws x 4 How to bracket in the direction of the PDP and prevent troubles, avoid the followings: - Do not install near or around any...refer to vibration or high voltage. - Do not install next to the proper installation guide for the WMN4230 model. Please tighten the captive screw in an area subjected to the following instructions.) 2 Set the angle by ±2°. This installation guide may be adjusted from the ...
Owners Instructions
Page 11
Installing the Display on the PDP (!) to secure it to install the wall mount bracket. ◆ Please be separated from wall mount bracket. Tighten the screws as shown (#) so that the PDP cannot be sure to check if the plastic hanger is completely secured on both the left and right side ... while installing and adjusting the angle. ◆ Please tightly secure the wall mount bracket to the wall to avoid injury from a falling PDP. 3 Tighten the screws of the plastic hanger to the back side of the PDP. 4 Put the 4 pegs on the PDP in the grooves of the wall mount bracket...
Installing the Display on the PDP (!) to secure it to install the wall mount bracket. ◆ Please be separated from wall mount bracket. Tighten the screws as shown (#) so that the PDP cannot be sure to check if the plastic hanger is completely secured on both the left and right side ... while installing and adjusting the angle. ◆ Please tightly secure the wall mount bracket to the wall to avoid injury from a falling PDP. 3 Tighten the screws of the plastic hanger to the back side of the PDP. 4 Put the 4 pegs on the PDP in the grooves of the wall mount bracket...

Owners Instructions
Page 13
Connecting Speakers ENG 1 Remove the screws on the rear of the PDP. 2 Hang the two "T" shaped hangers on the square holes on the rear of personal damage and injury. 13 It may damage the bracket clamping the speaker and your PDP together and result in a drop of your PDP and a risk of the PDP. 3 Tighten the PDP and the speaker bracket using the screws removed from the PDP. ➢ When moving your PDP, do NOT hold the speaker connected to your PDP.
Connecting Speakers ENG 1 Remove the screws on the rear of the PDP. 2 Hang the two "T" shaped hangers on the square holes on the rear of personal damage and injury. 13 It may damage the bracket clamping the speaker and your PDP together and result in a drop of your PDP and a risk of the PDP. 3 Tighten the PDP and the speaker bracket using the screws removed from the PDP. ➢ When moving your PDP, do NOT hold the speaker connected to your PDP.


