User Manual (ENGLISH)
Page 1
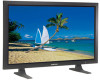
Intended for future reference. PDP-MONITOR (PLASMA DISPLAY PANEL) PPM42M5S PPM42M5H PPM50M5H PPM63M5H Owner's Instructions Before operating the unit, please read this manual thoroughly, and retain it for Commercial Use and Operation ON-SCREEN MENUS Picture In Picture (PIP) VIDEO WALL MDC (Multiple Display Control) Screen Burn Protection Digital Natural Image engine This device is a Class A digital apparatus. Register your product at www.samsung.com/global/register
Intended for future reference. PDP-MONITOR (PLASMA DISPLAY PANEL) PPM42M5S PPM42M5H PPM50M5H PPM63M5H Owner's Instructions Before operating the unit, please read this manual thoroughly, and retain it for Commercial Use and Operation ON-SCREEN MENUS Picture In Picture (PIP) VIDEO WALL MDC (Multiple Display Control) Screen Burn Protection Digital Natural Image engine This device is a Class A digital apparatus. Register your product at www.samsung.com/global/register
User Manual (ENGLISH)
Page 2
... 2 hours as it can normally operate only under 2000m in height so do so may cause a serious damage to the PDP Monitor Panel Watching the PDP Monitor in a location with heavy dust, high or low temperatures, high humidity, chemical substance and where it operates for more than a...Be sure to a change of surrounding environment such as temperature or humidity. Installing the product in an airtight place may cause permanent damage to your monitor in 4:3 format for a long time. ◆ Warranty - Damage caused by the above effect are not covered by image retention. - Warranty does...
... 2 hours as it can normally operate only under 2000m in height so do so may cause a serious damage to the PDP Monitor Panel Watching the PDP Monitor in a location with heavy dust, high or low temperatures, high humidity, chemical substance and where it operates for more than a...Be sure to a change of surrounding environment such as temperature or humidity. Installing the product in an airtight place may cause permanent damage to your monitor in 4:3 format for a long time. ◆ Warranty - Damage caused by the above effect are not covered by image retention. - Warranty does...
User Manual (ENGLISH)
Page 4
... the Display Vertically 12 ■ Before Using the Video Wall and the Multiple Display Control function ........ 12 ■ Connecting Speakers 13 ■ Switching Your PDP Monitor On and Off 15 ■ Choosing Your Language 15 ◆ USING YOUR DISPLAY ■ Changing the Picture Standard 16 ■ Customizing the Picture Settings 17...
... the Display Vertically 12 ■ Before Using the Video Wall and the Multiple Display Control function ........ 12 ■ Connecting Speakers 13 ■ Switching Your PDP Monitor On and Off 15 ■ Choosing Your Language 15 ◆ USING YOUR DISPLAY ■ Changing the Picture Standard 16 ■ Customizing the Picture Settings 17...

User Manual (ENGLISH)
Page 5
... 32 ■ Setting the Multiple Screen 33 ■ Displaying the Setting Information 34 ■ Setting and Displaying the Current Time 34 ■ Switching the PDP Monitor On and Off Automatically 35 ■ Selecting the Fan 37 ■ Setting the Film Mode 38 ■ Viewing the Picture in Picture (PIP 39 ■...
... 32 ■ Setting the Multiple Screen 33 ■ Displaying the Setting Information 34 ■ Setting and Displaying the Current Time 34 ■ Switching the PDP Monitor On and Off Automatically 35 ■ Selecting the Fan 37 ■ Setting the Film Mode 38 ■ Viewing the Picture in Picture (PIP 39 ■...
User Manual (ENGLISH)
Page 6
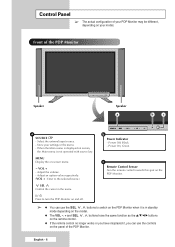
... remote control no longer works or you have misplaced it, you can use the controls on the panel of the PDP Monitor. When the Main menu is displayed on the PDP Monitor when it is not operated with source key. b Power Indicator - English - 6 Store your model. Power On; Power Off;... Adjust the volume. - Green c Remote Control Sensor Aim the remote control towards this spot on the PDP Monitor. ➢ ◆ You can use the SEL , buttons to switch on screen, the Main menu is in the menu. - MENU Display the on and off...
... remote control no longer works or you have misplaced it, you can use the controls on the panel of the PDP Monitor. When the Main menu is displayed on the PDP Monitor when it is not operated with source key. b Power Indicator - English - 6 Store your model. Power On; Power Off;... Adjust the volume. - Green c Remote Control Sensor Aim the remote control towards this spot on the PDP Monitor. ➢ ◆ You can use the SEL , buttons to switch on screen, the Main menu is in the menu. - MENU Display the on and off...
User Manual (ENGLISH)
Page 7
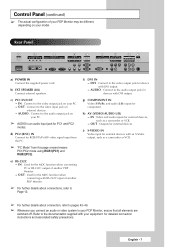
... with an S-Video output, such as a camcorder or VCR. - Control Panel (continued) ➢ The actual configuration of another PDP Monitor. ➢ For further details about connection, refer to pages 43~46. ➢ Whenever you connect an audio or video system to your PDP...PC2 mode using RGB1(PC1) and RGB2(PC2). c) PC1 IN/OUT - DVI : Connect to the documentation supplied with RS-232C input of another PDP Monitor. - OUT : Outputs for detailed connection instructions and associated safety precautions. English - 7 Refer to the video output jack for component. AUDIO : Connect...
... with an S-Video output, such as a camcorder or VCR. - Control Panel (continued) ➢ The actual configuration of another PDP Monitor. ➢ For further details about connection, refer to pages 43~46. ➢ Whenever you connect an audio or video system to your PDP...PC2 mode using RGB1(PC1) and RGB2(PC2). c) PC1 IN/OUT - DVI : Connect to the documentation supplied with RS-232C input of another PDP Monitor. - OUT : Outputs for detailed connection instructions and associated safety precautions. English - 7 Refer to the video output jack for component. AUDIO : Connect...
User Manual (ENGLISH)
Page 8
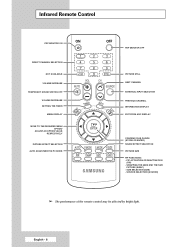
... The performance of the remote control may be affected by bright light. PIP ACTIVATION OR DEACTIVATION (PIP) - Infrared Remote Control PDP MONITOR ON DIRECT CHANNEL SELECTION NOT AVAILABLE VOLUME INCREASE TEMPORARY SOUND SWITCH-OFF VOLUME DECREASE SETTING THE TIMER MENU DISPLAY MOVE TO THE REQUIRED MENU... OPTION/ ADJUST AN OPTION VALUE RESPECTIVELY PICTURE EFFECT SELECTION AUTO ADJUSTMENT IN PC MODE PDP MONITOR OFF PICTURE STILL NEXT CHANNEL EXTERNAL INPUT SELECTION PREVIOUS CHANNEL INFORMATION DISPLAY EXIT FROM ANY DISPLAY CONFIRM YOUR CHOICE (STORE OR...
... The performance of the remote control may be affected by bright light. PIP ACTIVATION OR DEACTIVATION (PIP) - Infrared Remote Control PDP MONITOR ON DIRECT CHANNEL SELECTION NOT AVAILABLE VOLUME INCREASE TEMPORARY SOUND SWITCH-OFF VOLUME DECREASE SETTING THE TIMER MENU DISPLAY MOVE TO THE REQUIRED MENU... OPTION/ ADJUST AN OPTION VALUE RESPECTIVELY PICTURE EFFECT SELECTION AUTO ADJUSTMENT IN PC MODE PDP MONITOR OFF PICTURE STILL NEXT CHANNEL EXTERNAL INPUT SELECTION PREVIOUS CHANNEL INFORMATION DISPLAY EXIT FROM ANY DISPLAY CONFIRM YOUR CHOICE (STORE OR...

User Manual (ENGLISH)
Page 9
Inserting the Batteries in the Remote Control You must insert or replace the batteries in the remote control when you: ◆ Purchase the PDP Monitor ◆ Find that the remote control is no longer operating correctly 1 Remove the cover on the rear of possible damage to the screen...Replace the cover by pressing the symbol ( ) downwards and then pulling firmly to respect the polarities: ◆ - Assembling the Stand-Base 1 Assemble the PDP Monitor with the base of the remote control and pressing it . 2 Insert two R03, UM4, "AAA" 1.5V or equivalent batteries taking care to remove it ...
Inserting the Batteries in the Remote Control You must insert or replace the batteries in the remote control when you: ◆ Purchase the PDP Monitor ◆ Find that the remote control is no longer operating correctly 1 Remove the cover on the rear of possible damage to the screen...Replace the cover by pressing the symbol ( ) downwards and then pulling firmly to respect the polarities: ◆ - Assembling the Stand-Base 1 Assemble the PDP Monitor with the base of the remote control and pressing it . 2 Insert two R03, UM4, "AAA" 1.5V or equivalent batteries taking care to remove it ...
User Manual (ENGLISH)
Page 11
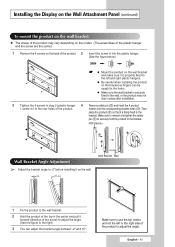
... the right) 3 You can be caught in the holes. ◆ Make sure the wall bracket is firmly fixed to adjust the angle. English - 11 PDP Monitor Wall Bracket Angle Adjustment ➢ Adjust the bracket angle to the bracket. Then place the product (@) so that it is securely fixed to the wall...
... the right) 3 You can be caught in the holes. ◆ Make sure the wall bracket is firmly fixed to adjust the angle. English - 11 PDP Monitor Wall Bracket Angle Adjustment ➢ Adjust the bracket angle to the bracket. Then place the product (@) so that it is securely fixed to the wall...
User Manual (ENGLISH)
Page 12
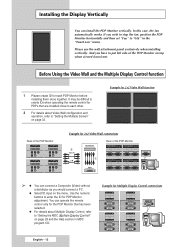
... when viewed from front. It may be difficult to create IDs when operating the remote control for 2x2 Video Wall connections Rear of the PDP Monitor ② ① ➢ ◆ You can connect a Composite (Video) without a distributor as you have to "Setting the MDC (Multiple Display Control)" on ... Help section in the "Function" menu. In this case, the fan automatically works. If you wish to stop the fan, position the PDP Monitor horizontally and then set "Fan" to enter the ID for Multiple Display Control connections English - 12 Use the numeric buttons to "Off" in ...
... when viewed from front. It may be difficult to create IDs when operating the remote control for 2x2 Video Wall connections Rear of the PDP Monitor ② ① ➢ ◆ You can connect a Composite (Video) without a distributor as you have to "Setting the MDC (Multiple Display Control)" on ... Help section in the "Function" menu. In this case, the fan automatically works. If you wish to stop the fan, position the PDP Monitor horizontally and then set "Fan" to enter the ID for Multiple Display Control connections English - 12 Use the numeric buttons to "Off" in ...
User Manual (ENGLISH)
Page 13
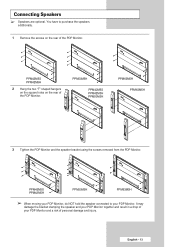
...bracket using the screws removed from the PDP Monitor. English - 13 PPM42M5S PPM42M5H PPM50M5H PPM63M5H ➢ When moving your PDP Monitor, do NOT hold the speaker connected to purchase the speakers additionally. 1 Remove the screws on the rear of the PDP Monitor. PPM42M5S PPM42M5H 2 Hang the two "T" shaped ...hangers on the square holes on the rear of the PDP Monitor. It may damage the bracket clamping the speaker and your PDP Monitor together and result in a drop of personal damage and...
...bracket using the screws removed from the PDP Monitor. English - 13 PPM42M5S PPM42M5H PPM50M5H PPM63M5H ➢ When moving your PDP Monitor, do NOT hold the speaker connected to purchase the speakers additionally. 1 Remove the screws on the rear of the PDP Monitor. PPM42M5S PPM42M5H 2 Hang the two "T" shaped ...hangers on the square holes on the rear of the PDP Monitor. It may damage the bracket clamping the speaker and your PDP Monitor together and result in a drop of personal damage and...

User Manual (ENGLISH)
Page 14
... Speakers (continued) Connect the speaker audio cable to the external speaker output jack on the rear of the PDP Monitor matching the "+" and "-" ends of the cable with the diagram on the PDP Monitor. ➢ ◆ The speakers MUST have a power handling capability of these ferrite cores to the cable near the...
... Speakers (continued) Connect the speaker audio cable to the external speaker output jack on the rear of the PDP Monitor matching the "+" and "-" ends of the cable with the diagram on the PDP Monitor. ➢ ◆ The speakers MUST have a power handling capability of these ferrite cores to the cable near the...
User Manual (ENGLISH)
Page 15
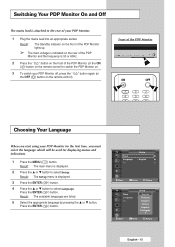
...Press the ... Result: The Setup menu is displayed. 2 Press the ... Result: The Standby indicator on the front of the PDP Monitor lights up. ➢ The main voltage is indicated on the rear of the PDP Monitor and the frequency is 50 or 60Hz. 2 Press the " " button on the front of the PDP... Monitor (or the ON ( ) button on the remote control) to switch the PDP Monitor on the remote control). TV Setup Time √ Language : English √ PC √ Move Enter Return TV Setup Time Language PC ...
...Press the ... Result: The Setup menu is displayed. 2 Press the ... Result: The Standby indicator on the front of the PDP Monitor lights up. ➢ The main voltage is indicated on the rear of the PDP Monitor and the frequency is 50 or 60Hz. 2 Press the " " button on the front of the PDP... Monitor (or the ON ( ) button on the remote control) to switch the PDP Monitor on the remote control). TV Setup Time √ Language : English √ PC √ Move Enter Return TV Setup Time Language PC ...

User Manual (ENGLISH)
Page 17
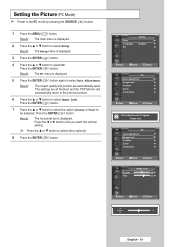
... œ or √ button until you to select Color Tone. Normal - Result: The following options are available. ◆ Cool2 - Customizing the Picture Settings Your PDP Monitor has several setting options that allow you reach the optimal setting. ➢ ◆ Press the ... Result: The Picture menu is selected. 4 Press the ... Cool -
... œ or √ button until you to select Color Tone. Normal - Result: The following options are available. ◆ Cool2 - Customizing the Picture Settings Your PDP Monitor has several setting options that allow you reach the optimal setting. ➢ ◆ Press the ... Result: The Picture menu is selected. 4 Press the ... Cool -
User Manual (ENGLISH)
Page 19
... MENU ( ) button. or † button to the previous picture. 6 Press the ... Please wait. Result: The screen quality and position are all finished, and the PDP Monitor will automatically return to select PC. The settings are automatically reset. Press the ENTER ( ) button. Press the ENTER ( ) button. Result: The main menu is displayed...
... MENU ( ) button. or † button to the previous picture. 6 Press the ... Please wait. Result: The screen quality and position are all finished, and the PDP Monitor will automatically return to select PC. The settings are automatically reset. Press the ENTER ( ) button. Press the ENTER ( ) button. Result: The main menu is displayed...
User Manual (ENGLISH)
Page 26
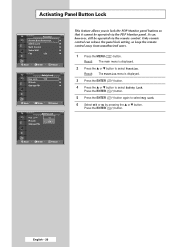
... TV Safety Lock Key Lock IR Lock Change PIN : Off Off On This feature allows you to lock the PDP Monitor panel buttons so that it cannot be operated via the PDP Monitor panel. Move Enter Return English - 26 Press the ENTER ( ) button. Only remote control can , however, still be operated via...
... TV Safety Lock Key Lock IR Lock Change PIN : Off Off On This feature allows you to lock the PDP Monitor panel buttons so that it cannot be operated via the PDP Monitor panel. Move Enter Return English - 26 Press the ENTER ( ) button. Only remote control can , however, still be operated via...

User Manual (ENGLISH)
Page 27
... ENTER ( ) button. ➢ When IR Lock is set to On, you to lock the remote control so that it cannot be operated via the PDP Monitor Panel buttons. 1 Press the MENU ( ) button. TV Function Screen Burn Protection √ Safety Lock √ Multi Control √ Video Wall √ Fan : Off √ Move...
... ENTER ( ) button. ➢ When IR Lock is set to On, you to lock the remote control so that it cannot be operated via the PDP Monitor Panel buttons. 1 Press the MENU ( ) button. TV Function Screen Burn Protection √ Safety Lock √ Multi Control √ Video Wall √ Fan : Off √ Move...
User Manual (ENGLISH)
Page 28
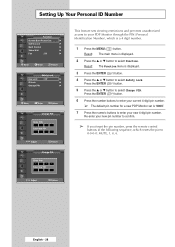
Press the ENTER ( ) button. 6 Press the number buttons to enter your current 4-digit pin number. ➢ The default pin number for a new PDP Monitor set is displayed. 3 Press the ENTER ( ) button. 4 Press the ▲ or ▼ button to select Safety Lock. Press the ENTER ( ) button. 5 ...Return TV Change PIN Enter PIN ** ** Enter New PIN Adjust Return This feature sets viewing restrictions and prevents unauthorized access to your PDP Monitor through the PIN (Personal Identification Number), which resets the pin to select Change PIN. Re-enter your new pin number to confirm. &#...
Press the ENTER ( ) button. 6 Press the number buttons to enter your current 4-digit pin number. ➢ The default pin number for a new PDP Monitor set is displayed. 3 Press the ENTER ( ) button. 4 Press the ▲ or ▼ button to select Safety Lock. Press the ENTER ( ) button. 5 ...Return TV Change PIN Enter PIN ** ** Enter New PIN Adjust Return This feature sets viewing restrictions and prevents unauthorized access to your PDP Monitor through the PIN (Personal Identification Number), which resets the pin to select Change PIN. Re-enter your new pin number to confirm. &#...
User Manual (ENGLISH)
Page 29
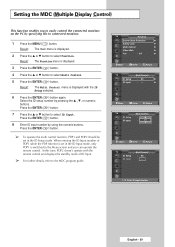
... the remote control and displays the standby mode of PDP1 while the PDP Monitor is set in the ID Input mode, only PDP1 is displayed. 2 Press the ▲ or ▼... button to connected monitors. 1 Press the MENU ( ) button. Result: The Multi Control menu is displayed. 3 Press the ENTER ( ... Input. ➢ For further details, refer to the Menu screen and you to easily control the connected monitors on the PC by specifying IDs to select Function. Result: The main menu is switched to the MDC ...
... the remote control and displays the standby mode of PDP1 while the PDP Monitor is set in the ID Input mode, only PDP1 is displayed. 2 Press the ▲ or ▼... button to connected monitors. 1 Press the MENU ( ) button. Result: The Multi Control menu is displayed. 3 Press the ENTER ( ... Input. ➢ For further details, refer to the Menu screen and you to easily control the connected monitors on the PC by specifying IDs to select Function. Result: The main menu is switched to the MDC ...
User Manual (ENGLISH)
Page 33
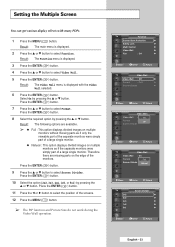
...; Natural : This option displays divided images on the edge of the monitors. Therefore there are available. ➢ ◆ Full : This option displays divided images on multiple monitors without missing parts as if the separate monitors were simply part of the screens. 12 Press the MENU ( ) button... the ENTER ( ) button. Press the ENTER ( ) button. 7 Press the ▲ or ▼ button to select the position of a large single monitor. Press the ENTER ( ) button. 9 Press the ▲ or ▼ button to select Function. Setting the Multiple Screen You can get various display effects...
...; Natural : This option displays divided images on the edge of the monitors. Therefore there are available. ➢ ◆ Full : This option displays divided images on multiple monitors without missing parts as if the separate monitors were simply part of the screens. 12 Press the MENU ( ) button... the ENTER ( ) button. Press the ENTER ( ) button. 7 Press the ▲ or ▼ button to select the position of a large single monitor. Press the ENTER ( ) button. 9 Press the ▲ or ▼ button to select Function. Setting the Multiple Screen You can get various display effects...


