Samsung PPM42H3 Support and Manuals
Get Help and Manuals for this Samsung item
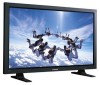
View All Support Options Below
Free Samsung PPM42H3 manuals!
Problems with Samsung PPM42H3?
Ask a Question
Free Samsung PPM42H3 manuals!
Problems with Samsung PPM42H3?
Ask a Question
Popular Samsung PPM42H3 Manual Pages
Owners Instructions - Page 2

...or dark bars.
DNIeTM technology will provide convenient,
dependable service and enjoyment for years to you for all PDP ... them should be in images, are not covered by your model offers this , vary the programming and images, and primarily ...fill the screen if your Samsung limited warranty.
Displaying stationary images that exceed the above for choosing Samsung! Be careful in PDP...
Owners Instructions - Page 3

... only under 2000m in height and do not install and operate there.
◆ Warranty - Checking Parts
Owner's Instructions
Remote Control/ AAA Batteries
Power Cord
Speaker Wires (2EA)
Stand-Base (2EA)
1 Install CD MDC Software (RS232C)
Ferrite Cores for Speaker Wire (2EA)
PC Cable
MDC Cable (RS232C)
Screws (4EA)
➢ The PPM42H3 model uses the same MDC program CD used for...
Owners Instructions - Page 4

...Instructions
3
◆ CONNECTING AND PREPARING YOUR DISPLAY
■ Your New Plasma Display Panel
6
■ Becoming Familiar with the Remote Control
8
■ Inserting the Batteries in the Remote Control
9
■ Assembling the Stand-Base
9
■ Installing... 16 ■ Adjusting the Picture Settings 17 ■ Adjusting the Picture Settings (PC or DVI Mode 18 ■...
Owners Instructions - Page 5
... to the RGB(PC) Input 37 ■ Setting up Your PC Software (Windows only 38 ■ Pin Configurations 39 ■ Input Mode (PC/DVI 40 ■ Power Saver (PC1 mode only 41
◆ RECOMMENDATIONS FOR USE
■ Troubleshooting: Before Contacting Service Personnel 42 ■ Care and Maintenance 42 ■ Technical Specifications 43
Symbols
☛
➢
Press
Important...
Owners Instructions - Page 9

... against + on the remote control 3 Replace the cover by pressing
the symbol downwards and then pulling firmly to remove it back into the guide hole on the bottom of the monitor ...the PDP on the battery against - Assembling the Stand-Base
Fit the Stand-Base into place. Inserting the Batteries in the Remote Control
ENG You must insert or replace the batteries in the remote control when you:
&#...
Owners Instructions - Page 10

... mount bracket. (Please refer to the following instructions.)
2 Set the angle by ±2°. This installation guide may be adjusted from the PDP User's manual. Installation Notes
◆ Do not install the PDP on the Wall Attachment Panel
ENG
☛ This wall mount bracket installation guide is delivered separately. Do not install next to Adjust Mounting Angle
The wall mount...
Owners Instructions - Page 12

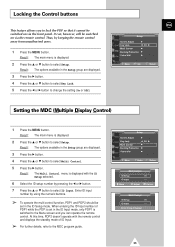
... Display Control, refer to "Setting the MDC (Multiple Display
Control)" on the menu. Example for PDP adjustment. Select ID input on page 25 and the Help section in MDC program CD. ◆ The PPM42H3 model uses the same MDC program CD used for PPM50H3/PPM63H3
models.
➢ Do not install the PDP vertically. You can...
Owners Instructions - Page 23

... the √ button again. Adjust the screen scale by pressing the or √ button.
6 When you are replaced with the setting, press the store
button to
➣ Press the ▲ or ▼ button to select Setup. button to select Scale. Result: The options available in the Double1 or Double2 mode.
9 When you are...
Owners Instructions - Page 24

... or right by pressing the or √ button.
9 When you are satisfied with the settings, press the MENU button.
Press the √ button. Move the magnified picture to required...Move
√ Enter
Return
1 Press the MENU button. Result: The options available in the Setup group are replaced with the Auto Adjustment selected.
5 Press the √ button over again. Result: The ...
Owners Instructions - Page 25
...
This feature allows you can , however, still be
set in the ID Input mode, only PDP1 is displayed with the ID Setup selected.
6 Select the ID setup number by pressing the œ or √ button.
7 Press the ▲ or ▼ button to the MDC program guide. Thus, by using the numeric buttons.
➢ To...
Owners Instructions - Page 27

... √ button. Press the √ button. 9 Press the œ or √ button to select Screen Divider. Setup
Screen Adjust Key Lock Multi Control Burning Protection Video Wall
√ œ Off
Move
Enter
Return
Video Wall
Set Screen Divider
œ On √ √
Move
œ √ Sel. Result: The main menu is displayed...
Owners Instructions - Page 28

...
You can view the setting status you select by pressing the "INFO" button on the remote control. Result: The resolution, vertical frequency and horizontal frequency are displayed.
3 Press the √ button.
4 Press the ▲ or ▼ button to select Setup. Mode Picture Sound Clock
Video Dynamic Custom
11:45
28 Result: The options...
Owners Instructions - Page 38

... manufacturer or Samsung Dealer.)
On the windows screen, select in the display dialog-box. When the control panel screen appears, click on your particular video card. Select the Settings tab in the following sequence: Start ➞ Settings ➞ Control Panel. The correct settings for these two variables are: ◆ Size (sometimes called "Resolution")
1024 x 768...
Owners Instructions - Page 42

...problem using the instructions below, note the model...settings. ◆ Check that the video system selected is suddenly moved from a cold to a wall socket. ◆ Check that create magnetic fields. -
Never open the cabinet or touch the parts inside the unit can dry completely.
42 Troubleshooting: Before Contacting Service Personnel
ENG
Before contacting Samsung after-sales service...
Owners Instructions - Page 43
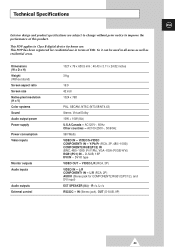
...Dimensions (W x D x H) Weight (Without stand) Screen aspect ratio Screen size Native pixel resolution (H x V) Color systems Sound Audio output power Power supply
Power consumption Video inputs
Monitor outputs Audio inputs
Audio ...COMPONENT1 IN - DVI-D type VIDEO OUT - Technical Specifications
ENG
Exterior design and product specifications are subject to change without prior notice to Class B...
Samsung PPM42H3 Reviews
We have not received any reviews for Samsung yet.