
User Manual
Page 3
... yy Sound Menu 18 Changing the Preset Sound Mode 18 Adjusting Sound Settings 18 Sound Settings 19 yy Setup Menu 20 Setting the Time 20 Using the Sleep Timer 20 Setting the On / Off Timer 20 Locking Programs 21 Other Features 22 Picture In Picture (PIP) 23 yy Support Menu 24 Advanced Features yy Network Connection 25 Connecting to a Wired Network 25 Connecting to a Wireless Network 27 yy Media Play 32 Connecting a USB Device 32 Connecting to open the relevant submenu within the OSD (on the remote control. Step...
... yy Sound Menu 18 Changing the Preset Sound Mode 18 Adjusting Sound Settings 18 Sound Settings 19 yy Setup Menu 20 Setting the Time 20 Using the Sleep Timer 20 Setting the On / Off Timer 20 Locking Programs 21 Other Features 22 Picture In Picture (PIP) 23 yy Support Menu 24 Advanced Features yy Network Connection 25 Connecting to a Wired Network 25 Connecting to a Wireless Network 27 yy Media Play 32 Connecting a USB Device 32 Connecting to open the relevant submenu within the OSD (on the remote control. Step...

User Manual
Page 4
... make sure picture and sound operate normally (p. 24). Getting Started List of the cord inserted in the AC outlet: 3/4 inch ✎✎For best cable connection to this product, be viewed without a cable box / STB (Set-Top-Box) satellite receiver. yy Remote Control (BN59-01042A) & Batteries (AAA x 2) yy Owner's Instructions yy Cleaning Cloth (BN63-01798B) yy Warranty Card / Safety Guide / Quick Setup Guide (M4 X L12) Blanking Bracket & Screw (1EA) (50 inches: BN63-06481A) (58 inches: BN63...
... make sure picture and sound operate normally (p. 24). Getting Started List of the cord inserted in the AC outlet: 3/4 inch ✎✎For best cable connection to this product, be viewed without a cable box / STB (Set-Top-Box) satellite receiver. yy Remote Control (BN59-01042A) & Batteries (AAA x 2) yy Owner's Instructions yy Cleaning Cloth (BN63-01798B) yy Warranty Card / Safety Guide / Quick Setup Guide (M4 X L12) Blanking Bracket & Screw (1EA) (50 inches: BN63-06481A) (58 inches: BN63...

User Manual
Page 7
....CH P.SIZE CC Turns the remote control light on the TV screen. Exits the menu. MTS: Press to directly access channels. Avoid use when nearby fluorescent lights or neon signs. Adjusts the volume. Displays information on or off. Press to select channel "54-3", press "54", then press "-" and "3". Changes channels. MEDIA.P: Displays Media Play (p. 32). FAV.CH: Displays Favorite Channel Lists on the Power, Channel and Volume buttons. Brings up the OSD. Cuts off . Installing batteries (Battery size: AAA...
....CH P.SIZE CC Turns the remote control light on the TV screen. Exits the menu. MTS: Press to directly access channels. Avoid use when nearby fluorescent lights or neon signs. Adjusts the volume. Displays information on or off. Press to select channel "54-3", press "54", then press "-" and "3". Changes channels. MEDIA.P: Displays Media Play (p. 32). FAV.CH: Displays Favorite Channel Lists on the Power, Channel and Volume buttons. Brings up the OSD. Cuts off . Installing batteries (Battery size: AAA...

User Manual
Page 8
Press the POWERP button. Select Air, Cable or Auto. 4 Selecting a channel 5 Setting the Clock Mode 6 Viewing the HD Connection Guide. 7 Enjoy your TV. If You Want to interrupt the memorization process. When you to memorize. POWER P 3 Selecting an antenna Press the ▲ or ▼ button, then press the ENTERE button. Press the ENTERE button. VHF/UHF Antenna Antenna Cable (Not Supplied) or Power Input Cable ANT OUT Plug & Play (Initial Setup) When the TV is...
Press the POWERP button. Select Air, Cable or Auto. 4 Selecting a channel 5 Setting the Clock Mode 6 Viewing the HD Connection Guide. 7 Enjoy your TV. If You Want to interrupt the memorization process. When you to memorize. POWER P 3 Selecting an antenna Press the ▲ or ▼ button, then press the ENTERE button. Press the ENTERE button. VHF/UHF Antenna Antenna Cable (Not Supplied) or Power Input Cable ANT OUT Plug & Play (Initial Setup) When the TV is...

User Manual
Page 9
...no screen display / no sound after connecting an HDMI cable, check the HDMI version of the external device. 02 Connections Connections Connecting to an AV Device Using an HDMI or HDMI/DVI cable: HD connection (up to 1080p) or Audio/Video (480i only) Cable Available devices: DVD, Blu-ray player, cable box, STB satellite receiver, VCR Video Cable (Not Supplied) Y W R R W R B G R W Red White R B G Red Blue Green W R Y Red White Yellow Device Audio Cable (Not Supplied) W W R R Y VIDEO OUT AUDIO OUT AUDIO OUT Component Cable (Not Supplied) G B R COMPONENT...
...no screen display / no sound after connecting an HDMI cable, check the HDMI version of the external device. 02 Connections Connections Connecting to an AV Device Using an HDMI or HDMI/DVI cable: HD connection (up to 1080p) or Audio/Video (480i only) Cable Available devices: DVD, Blu-ray player, cable box, STB satellite receiver, VCR Video Cable (Not Supplied) Y W R R W R B G R W Red White R B G Red Blue Green W R Y Red White Yellow Device Audio Cable (Not Supplied) W W R R Y VIDEO OUT AUDIO OUT AUDIO OUT Component Cable (Not Supplied) G B R COMPONENT...

User Manual
Page 15
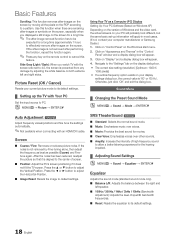
... is turned off , but the sound remains on again, a distorted picture will be displayed for picture quality control. ✎✎NOTE xx When you adjusts the Cell Light, the Eco Sensor will be used to reduce power consumption. the picture settings will automatically adapt to the light in a dark room. ¦¦ Adjusting Picture Settings OO MENUm → Picture → ENTERE Cell Light / Contrast / Brightness / Sharpness / Color / Tint (G/R) Your television has several setting...
... is turned off , but the sound remains on again, a distorted picture will be displayed for picture quality control. ✎✎NOTE xx When you adjusts the Cell Light, the Eco Sensor will be used to reduce power consumption. the picture settings will automatically adapt to the light in a dark room. ¦¦ Adjusting Picture Settings OO MENUm → Picture → ENTERE Cell Light / Contrast / Brightness / Sharpness / Color / Tint (G/R) Your television has several setting...

User Manual
Page 16
... Mode (Off / Red / Green / Blue): Displays the Red, Green and Blue color for making fine adjustments to the hue and saturation. ■■ Color Space (Auto / Native / Custom): Adjust the range of colors available to create the image.To adjust Color, Red, Green, Blue and Reset, set Color Space to Custom. ■■ White Balance: Adjust the color temperature for a more natural picture. P.SIZE 16:9: Sets the picture to an input on the TV. ■■ Size: Your cable box/satellite receiver may cause image retention (screen burn...
... Mode (Off / Red / Green / Blue): Displays the Red, Green and Blue color for making fine adjustments to the hue and saturation. ■■ Color Space (Auto / Native / Custom): Adjust the range of colors available to create the image.To adjust Color, Red, Green, Blue and Reset, set Color Space to Custom. ■■ White Balance: Adjust the color temperature for a more natural picture. P.SIZE 16:9: Sets the picture to an input on the TV. ■■ Size: Your cable box/satellite receiver may cause image retention (screen burn...
User Manual
Page 18
... HDMI/DVI cable. OO MENUm → Picture → ENTERE ¦¦ Changing the Preset Sound Mode OO MENUm → Sound → Mode → ENTERE Auto Adjustment t Adjust frequency values/positions and fine tune the settings automatically. ✎✎Not available when connecting with Your PC Set the input source to effectively remove after-images on both extreme left speaker. ■■ 100Hz / 300Hz / 1kHz / 3kHz / 10kHz (Bandwidth Adjustment): Adjusts the level of screen...
... HDMI/DVI cable. OO MENUm → Picture → ENTERE ¦¦ Changing the Preset Sound Mode OO MENUm → Sound → Mode → ENTERE Auto Adjustment t Adjust frequency values/positions and fine tune the settings automatically. ✎✎Not available when connecting with Your PC Set the input source to effectively remove after-images on both extreme left speaker. ■■ 100Hz / 300Hz / 1kHz / 3kHz / 10kHz (Bandwidth Adjustment): Adjusts the level of screen...

User Manual
Page 23
... watch the TV tuner and one external video source simultaneously. To disconnect the game console and connect another external device, set to each device's manual. 23 English Picture mode is set to Standard and Sound mode is On: -- Wireless Remote Control (Off / On) Turn on or off while watching in Game Mode, the screen shakes slightly. xx PIP Settings Main picture Component, HDMI1/DVI, HDMI2, HDMI3, HDMI4, PC Sub picture TV ■■ PIP (Off / On): Activate...
... watch the TV tuner and one external video source simultaneously. To disconnect the game console and connect another external device, set to each device's manual. 23 English Picture mode is set to Standard and Sound mode is On: -- Wireless Remote Control (Off / On) Turn on or off while watching in Game Mode, the screen shakes slightly. xx PIP Settings Main picture Component, HDMI1/DVI, HDMI2, HDMI3, HDMI4, PC Sub picture TV ■■ PIP (Off / On): Activate...
User Manual
Page 24
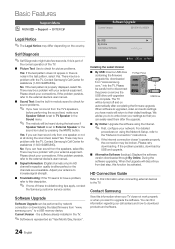
... external device's user manual. ■■ Signal Information: (Digital channels only) An HD channel's reception quality is either perfect or the channels are complete. By USB ► By Online Alternative Software U Move E Enter R Return Installing the Latest Version ■■ By USB: Insert a USB drive containing the firmware TV Rear Panel upgrade file, downloaded from "www. When software is upgraded, video and audio settings you can easily reset them after completing the firmware upgrade. Basic Features Support Menu...
... external device's user manual. ■■ Signal Information: (Digital channels only) An HD channel's reception quality is either perfect or the channels are complete. By USB ► By Online Alternative Software U Move E Enter R Return Installing the Latest Version ■■ By USB: Insert a USB drive containing the firmware TV Rear Panel upgrade file, downloaded from "www. When software is upgraded, video and audio settings you can easily reset them after completing the firmware upgrade. Basic Features Support Menu...

User Manual
Page 33
... while playing a video over -power warning message is not played, connect the USB device to the PC, format the device and check the connection. xx Do not disconnect the USB device while it takes to display on the screen. xx The maximum supported JPEG resolution is loading. xx The � (REW) or µ (FF) button while a movie is not supported. xx If you use Media Play mode through a network: xx...
... while playing a video over -power warning message is not played, connect the USB device to the PC, format the device and check the connection. xx Do not disconnect the USB device while it takes to display on the screen. xx The maximum supported JPEG resolution is loading. xx The � (REW) or µ (FF) button while a movie is not supported. xx If you use Media Play mode through a network: xx...

User Manual
Page 38
... can adjust the picture size to display the help pop-up message for continuous movie playback. ■■ Get DivX® VOD registration code: Shows the registration code authorized for the TV. The function is only enabled when stream-type files which support multiple audio formats are the same file name as required. You can play the VOD registration using Media Play, the...
... can adjust the picture size to display the help pop-up message for continuous movie playback. ■■ Get DivX® VOD registration code: Shows the registration code authorized for the TV. The function is only enabled when stream-type files which support multiple audio formats are the same file name as required. You can play the VOD registration using Media Play, the...
User Manual
Page 39
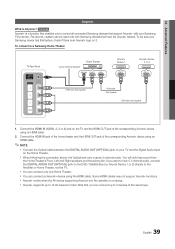
... hear 5.1 channel audio, connect the DIGITAL AUDIO OUT (OPTICAL) jack on the DVD / Satellite Box (i.e. To connect to the Amplifier or Home Theater, not the TV. Connect the HDMI IN (1(DVI), 2, 3 or 4) jack on the Home Theater. Anynet Device 1 or 2) directly to a Samsung Home Theater TV Rear Panel Optical Cable (Not Supplied) Home Theater Anynet+ Device 1 Anynet+ Device 2, 3, 4 HDMI cable (Not Supplied) HDMI cable (Not Supplied) HDMI cable (Not Supplied) 1. xx Anynet+ works when the AV device supporting Anynet...
... hear 5.1 channel audio, connect the DIGITAL AUDIO OUT (OPTICAL) jack on the DVD / Satellite Box (i.e. To connect to the Amplifier or Home Theater, not the TV. Connect the HDMI IN (1(DVI), 2, 3 or 4) jack on the Home Theater. Anynet Device 1 or 2) directly to a Samsung Home Theater TV Rear Panel Optical Cable (Not Supplied) Home Theater Anynet+ Device 1 Anynet+ Device 2, 3, 4 HDMI cable (Not Supplied) HDMI cable (Not Supplied) HDMI cable (Not Supplied) 1. xx Anynet+ works when the AV device supporting Anynet...

User Manual
Page 41
... or turn your receiver supports audio only, it may not appear in the device list. ✎✎ The receiver will send out 5.1 channel sound to the receiver. The Anynet+ device does not play. • You cannot use the remote control when you are configuring Anynet+ or switching to a view mode. • Use the remote control when the Anynet+ setting or switching to display the Anynet+ menu and select a menu you can hear sound output from the receiver...
... or turn your receiver supports audio only, it may not appear in the device list. ✎✎ The receiver will send out 5.1 channel sound to the receiver. The Anynet+ device does not play. • You cannot use the remote control when you are configuring Anynet+ or switching to a view mode. • Use the remote control when the Anynet+ setting or switching to display the Anynet+ menu and select a menu you can hear sound output from the receiver...
User Manual
Page 43
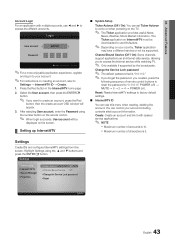
... supported. After selecting User account, enter the Password using the ▲ and ▼ buttons and press the ENTERE button. Channel Bound Service (Off / On): Some channels support applications as an Internet data service, allowing you created, press the following sequence of remote control buttons to reset the password to create an account, press the Red button; Press the Red button in to access the different accounts. You can use this screen. Highlight Settings using the number button...
... supported. After selecting User account, enter the Password using the ▲ and ▼ buttons and press the ENTERE button. Channel Bound Service (Off / On): Some channels support applications as an Internet data service, allowing you created, press the following sequence of remote control buttons to reset the password to create an account, press the Red button; Press the Red button in to access the different accounts. You can use this screen. Highlight Settings using the number button...
User Manual
Page 47
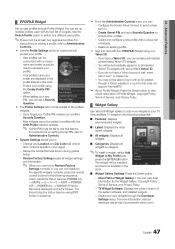
... . -- Change your Location and Zip Code (US only) to tailor contents specific to log in with an ID created through a Yahoo website in the following sequence, which resets the Yahoo Service: POWER (on) → MUTE → 9 → 4 → 8 → EXIT → POWER (off) → POWER (on) → YAHOO! (If Yahoo Service is displayed on the TV Screen, You should stop the Yahoo Service using...
... . -- Change your Location and Zip Code (US only) to tailor contents specific to log in with an ID created through a Yahoo website in the following sequence, which resets the Yahoo Service: POWER (on) → MUTE → 9 → 4 → 8 → EXIT → POWER (off) → POWER (on) → YAHOO! (If Yahoo Service is displayed on the TV Screen, You should stop the Yahoo Service using...

User Manual
Page 54
... the screen. Support - HD Box Use HDMI or Component cables to deliver HD (high definition) picture quality. • Cable/Satellite subscribers: Try HD stations from SD(Standard Definition) contents. • Adjust the Cable/Sat box video output resolution to MENU - Color is distorted or delayed. Incorrect or loose connections may cause sound distortion. • Perform the Sound Test as explained above. 54 English Eco Solution - Picture - The picture is black and white. •...
... the screen. Support - HD Box Use HDMI or Component cables to deliver HD (high definition) picture quality. • Cable/Satellite subscribers: Try HD stations from SD(Standard Definition) contents. • Adjust the Cable/Sat box video output resolution to MENU - Color is distorted or delayed. Incorrect or loose connections may cause sound distortion. • Perform the Sound Test as explained above. 54 English Eco Solution - Picture - The picture is black and white. •...

User Manual
Page 55
.... Software Upgrade over the network fails. • Try network test in Setup menu (p. 23). • If you are using an HDMI connection, check the audio output setting on the remote control. • Reboot the connected device by the TV (p. 11). 05 Other Information Issues Solutions and Explanations No Picture, No Video The TV won 't display in full screen. • HD channels will have black bars on either side of the screen when displaying...
.... Software Upgrade over the network fails. • Try network test in Setup menu (p. 23). • If you are using an HDMI connection, check the audio output setting on the remote control. • Reboot the connected device by the TV (p. 11). 05 Other Information Issues Solutions and Explanations No Picture, No Video The TV won 't display in full screen. • HD channels will have black bars on either side of the screen when displaying...
User Manual
Page 56
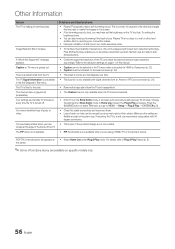
... a wall, we recommend using a HDMI, PC or Component source. Change the settings from Store Demo mode to the side. Make sure the cables are using cables with screen burn reduction technology. The TV Signal Information is not available. This is a plastic smell from the TV and reassemble it. • The Channel menu is only available when the TV source is selected. • If the TV is part of audio or video. Image...
... a wall, we recommend using a HDMI, PC or Component source. Change the settings from Store Demo mode to the side. Make sure the cables are using cables with screen burn reduction technology. The TV Signal Information is not available. This is a plastic smell from the TV and reassemble it. • The Channel menu is only available when the TV source is selected. • If the TV is part of audio or video. Image...

User Manual
Page 59
... button Optimal resolution P Password Photos Picture Size PIP (Picture in Picture) Plug & Play Power Indicator 7, 13 13 17 15 16 11 9, 39 10, 39 52 42 22 57 32 23 23 19 36 12 25 26 7 11 43 37 16, 38 23 8 6 R Receiver Recording Repeat Mode RGB Only Mode Rotate S Self Diagnosis Sharpness Signal Information Sleep Timer Slide Show Software Upgrade Source List Speaker Select Specifications Standby mode Symbol T Timer Title Tools Troubleshooting TV Speaker U USB Drive V Video Formats Videos Volume W Wall Mount Warm White...
... button Optimal resolution P Password Photos Picture Size PIP (Picture in Picture) Plug & Play Power Indicator 7, 13 13 17 15 16 11 9, 39 10, 39 52 42 22 57 32 23 23 19 36 12 25 26 7 11 43 37 16, 38 23 8 6 R Receiver Recording Repeat Mode RGB Only Mode Rotate S Self Diagnosis Sharpness Signal Information Sleep Timer Slide Show Software Upgrade Source List Speaker Select Specifications Standby mode Symbol T Timer Title Tools Troubleshooting TV Speaker U USB Drive V Video Formats Videos Volume W Wall Mount Warm White...


