User Manual (user Manual) (ver.1.0) (English)
Page 3
... yy Sound Menu 21 Changing the Preset Sound Mode 21 Adjusting Sound Settings 21 Sound Settings 21 yy Setup Menu 22 Setting the Time 22 Using the Sleep Timer 22 Setting the On / Off Timer 22 Locking Programs 23 Other Features 24 Picture In Picture (PIP) 26 yy Support Menu 26 Advanced Features yy Network Connection 28 Connecting to a Wired Network 28 Connecting to a Wireless Network 30 yy Media Play 34 Connecting a USB Device 34 Connecting to open the relevant submenu within the OSD (on the remote control. Note...
... yy Sound Menu 21 Changing the Preset Sound Mode 21 Adjusting Sound Settings 21 Sound Settings 21 yy Setup Menu 22 Setting the Time 22 Using the Sleep Timer 22 Setting the On / Off Timer 22 Locking Programs 23 Other Features 24 Picture In Picture (PIP) 26 yy Support Menu 26 Advanced Features yy Network Connection 28 Connecting to a Wired Network 28 Connecting to a Wireless Network 30 yy Media Play 34 Connecting a USB Device 34 Connecting to open the relevant submenu within the OSD (on the remote control. Note...
User Manual (user Manual) (ver.1.0) (English)
Page 7
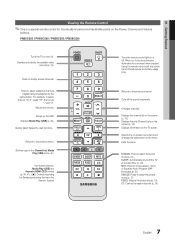
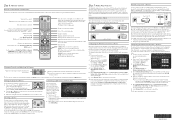
... available video sources (p. 14). Displays Media Play (USB) (p. 34). Changes channels. Selects the on-screen menu items and changes the values seen on the Power, Channel and Volume buttons. P.MODE: Press to select additional channels (digital) being broadcasted by the same station. Press to select the picture mode (p. 17). Buttons used functions. Exits the menu. SLEEP: Automatically shuts off the sound temporarily. P.SIZE: Selects the picture size (p. 19). 01 Getting Started Viewing the Remote Control ✎✎This is a special remote control...
... available video sources (p. 14). Displays Media Play (USB) (p. 34). Changes channels. Selects the on-screen menu items and changes the values seen on the Power, Channel and Volume buttons. P.MODE: Press to select additional channels (digital) being broadcasted by the same station. Press to select the picture mode (p. 17). Buttons used functions. Exits the menu. SLEEP: Automatically shuts off the sound temporarily. P.SIZE: Selects the picture size (p. 19). 01 Getting Started Viewing the Remote Control ✎✎This is a special remote control...
User Manual (user Manual) (ver.1.0) (English)
Page 10
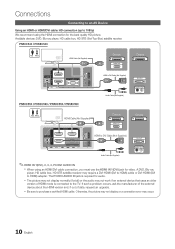
... a connection error may require a DVI-HDMI (DVI to HDMI) cable or DVI-HDMI (DVI to HDMI) adapter. The PC/DVI AUDIO IN jack is connected to the TV. xx The picture may not display normally (if at all) or the audio may not work if an external device that uses an older version of date, request an upgrade. A DVD, Blu-ray player, HD cable box, HD STB satellite receiver may occur. 10 English PN50C540 / PN58C540 R W Red White HDMI Cable (Not Supplied) Device HDMI...
... a connection error may require a DVI-HDMI (DVI to HDMI) cable or DVI-HDMI (DVI to HDMI) adapter. The PC/DVI AUDIO IN jack is connected to the TV. xx The picture may not display normally (if at all) or the audio may not work if an external device that uses an older version of date, request an upgrade. A DVD, Blu-ray player, HD cable box, HD STB satellite receiver may occur. 10 English PN50C540 / PN58C540 R W Red White HDMI Cable (Not Supplied) Device HDMI...
User Manual (user Manual) (ver.1.0) (English)
Page 14
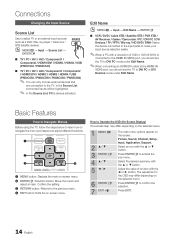
... TV or an external input sources such as a DVD / Blu-ray player / cable box / STB satellite receiver. Select an icon with the ▲ or ▼ button. The adjustment in the OSD may differ depending on the selected menu. 1 MENU m 2 ▲/▼ 3 ENTER E 4 ▲/▼ 5 ◄/► 6 ENTER E 7 EXIT e The main menu options appear on the screen: Picture, Sound, Channel, Setup, Input, Application, Support. Press EXIT. 14 English Connections Changing the Input Source Source List Use to confirm...
... TV or an external input sources such as a DVD / Blu-ray player / cable box / STB satellite receiver. Select an icon with the ▲ or ▼ button. The adjustment in the OSD may differ depending on the selected menu. 1 MENU m 2 ▲/▼ 3 ENTER E 4 ▲/▼ 5 ◄/► 6 ENTER E 7 EXIT e The main menu options appear on the screen: Picture, Sound, Channel, Setup, Input, Application, Support. Press EXIT. 14 English Connections Changing the Input Source Source List Use to confirm...
User Manual (user Manual) (ver.1.0) (English)
Page 17
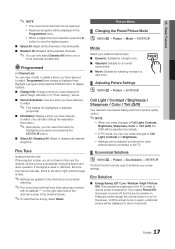
.... Picture Menu ¦¦ Changing the Preset Picture Mode OO MENUm → Picture → Mode → ENTERE Mode Select your power savings. xx When a digital channel is turned off, but the sound remains on the screen. xx In PC mode, you have reserved to Cell Light, Contrast, Brightness, Sharpness, Color or Tint (G/R) the OSD will be displayed in the channel list. ■■ Deselect All: Deselect all the channels in the Programmed menu...
.... Picture Menu ¦¦ Changing the Preset Picture Mode OO MENUm → Picture → Mode → ENTERE Mode Select your power savings. xx When a digital channel is turned off, but the sound remains on the screen. xx In PC mode, you have reserved to Cell Light, Contrast, Brightness, Sharpness, Color or Tint (G/R) the OSD will be displayed in the channel list. ■■ Deselect All: Deselect all the channels in the Programmed menu...
User Manual (user Manual) (ver.1.0) (English)
Page 18
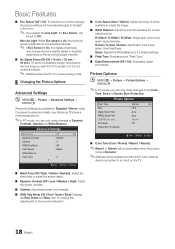
... picture. Reset: Resets the White Balance to it 's not receiving a signal. ✎✎ Disabled when the PC is On, the display brightness may change (become slightly darker or brighter) depending on the surrounding light intensity. ■■ No Signal Power Off (Off / 15 min. / 30 min. / 60 min.): To avoid unnecessary energy consumption, set to the Color Tone, Size and Screen Burn Protection. R-Offset / G-Offset / B-Offset: Adjust each color's (red, green, blue...
... picture. Reset: Resets the White Balance to it 's not receiving a signal. ✎✎ Disabled when the PC is On, the display brightness may change (become slightly darker or brighter) depending on the surrounding light intensity. ■■ No Signal Power Off (Off / 15 min. / 30 min. / 60 min.): To avoid unnecessary energy consumption, set to the Color Tone, Size and Screen Burn Protection. R-Offset / G-Offset / B-Offset: Adjust each color's (red, green, blue...
User Manual (user Manual) (ver.1.0) (English)
Page 20
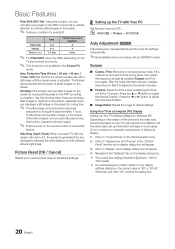
... available in the "Control Panel" window and a display dialog-box will probably look different, but the same basic set-up the TV with an HDMI/DVI cable. Side Gray (Light / Dark): When you watch TV with a still image until the screen saver is not removed by Fine-tuning alone, then adjust the frequency as best as a Computer (PC) Display Setting Up Your PC Software (Based on Windows XP...
... available in the "Control Panel" window and a display dialog-box will probably look different, but the same basic set-up the TV with an HDMI/DVI cable. Side Gray (Light / Dark): When you watch TV with a still image until the screen saver is not removed by Fine-tuning alone, then adjust the frequency as best as a Computer (PC) Display Setting Up Your PC Software (Based on Windows XP...
User Manual (user Manual) (ver.1.0) (English)
Page 22
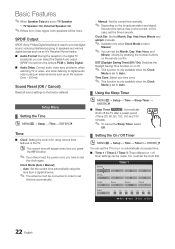
... Clock Mode is set to the factory defaults. On Time ▲ Inactivate ▼ Off Time Inactivate Volume 20 Repeat Once Timer 1 00 00 am 00 Source TV 00 Antenna Cable am /pm manually. ✎✎ Available only when Clock Mode is set to Manual. ✎✎ You can select the Digital Audio output (SPDIF) format from a digital channel. ✎✎ The antenna must set the clock first. Sound Reset (OK / Cancel) Reset all sound settings to Auto. Clock Set: Set the...
... Clock Mode is set to the factory defaults. On Time ▲ Inactivate ▼ Off Time Inactivate Volume 20 Repeat Once Timer 1 00 00 am 00 Source TV 00 Antenna Cable am /pm manually. ✎✎ Available only when Clock Mode is set to Manual. ✎✎ You can select the Digital Audio output (SPDIF) format from a digital channel. ✎✎ The antenna must set the clock first. Sound Reset (OK / Cancel) Reset all sound settings to Auto. Clock Set: Set the...
User Manual (user Manual) (ver.1.0) (English)
Page 25
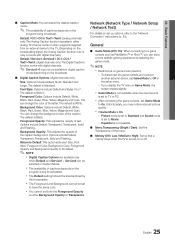
... analog TV channel mode or when a signal is turned on the broadcast. ■■ Digital Caption Options: (digital channels only) Size: Options include Default, Small, Standard and Large. Picture mode is set to Movie. -- 03 Basic Features ■■ Caption Mode: You can change the color of the letter. The default is White. Foreground Color: Options include Default, White, Black, Red, Green, Blue, Yellow, Magenta and Cyan. The default is Standard. The default is set to Off in digital caption mode depending...
... analog TV channel mode or when a signal is turned on the broadcast. ■■ Digital Caption Options: (digital channels only) Size: Options include Default, Small, Standard and Large. Picture mode is set to Movie. -- 03 Basic Features ■■ Caption Mode: You can change the color of the letter. The default is White. Foreground Color: Options include Default, White, Black, Red, Green, Blue, Yellow, Magenta and Cyan. The default is Standard. The default is set to Off in digital caption mode depending...
User Manual (user Manual) (ver.1.0) (English)
Page 26
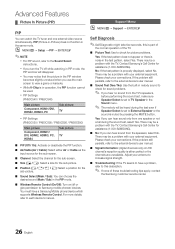
... or Cable as the input source for the sub-screen. ■■ Channel: Select the channel for the sub-screen. ■■ Size (Õ / Ã): Select a size for the sub-picture. ■■ Position Select a position for sound problems. ✎✎ If you can choose the desired sound (Main / Sub) in the PIP mode. ■■ Wireless Remote Control (On/Off): Turn on/off while watching in the Sound menu. ✎...
... or Cable as the input source for the sub-screen. ■■ Channel: Select the channel for the sub-screen. ■■ Size (Õ / Ã): Select a size for the sub-picture. ■■ Position Select a position for sound problems. ✎✎ If you can choose the desired sound (Main / Sub) in the PIP mode. ■■ Wireless Remote Control (On/Off): Turn on/off while watching in the Sound menu. ✎...
User Manual (user Manual) (ver.1.0) (English)
Page 34
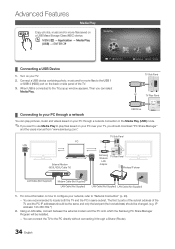
... Panel PC LAN or External Modem (ADSL/VDSL/Cable TV) Samsung TV Rear Panel Wireless LAN Adapter Wireless IP sharer LAN Cable (Not Supplied) Modem Cable (Not Supplied) LAN Cable (Not Supplied) LAN Cable (Not Supplied) LAN Cable (Not Supplied) 1. O MENUm → Application → Media Play (USB) → ENTERE MediaPlay Videos SUM Change Device ¦ Connecting a USB Device 1. View Devices E Enter R Return TV Side Panel or TV Rear Panel ¦ Connecting to your PC through a network connection in same subnet. Using a LAN cable, connect between the external...
... Panel PC LAN or External Modem (ADSL/VDSL/Cable TV) Samsung TV Rear Panel Wireless LAN Adapter Wireless IP sharer LAN Cable (Not Supplied) Modem Cable (Not Supplied) LAN Cable (Not Supplied) LAN Cable (Not Supplied) LAN Cable (Not Supplied) 1. O MENUm → Application → Media Play (USB) → ENTERE MediaPlay Videos SUM Change Device ¦ Connecting a USB Device 1. View Devices E Enter R Return TV Side Panel or TV Rear Panel ¦ Connecting to your PC through a network connection in same subnet. Using a LAN cable, connect between the external...
User Manual (user Manual) (ver.1.0) (English)
Page 35
... list of MSC are Thumb drives, Flash Card Readers and USB HDD (USB HUB are connected, you can be displayed in the list is playing. ✎✎The Divx DRM, Multi-audio, embedded captions are not supported when connecting to a PC through a network: xx The Background Music and Background Music Setting functions. xx If the TV has been no input during time set in the Photos, Music, and Videos...
... list of MSC are Thumb drives, Flash Card Readers and USB HDD (USB HUB are connected, you can be displayed in the list is playing. ✎✎The Divx DRM, Multi-audio, embedded captions are not supported when connecting to a PC through a network: xx The Background Music and Background Music Setting functions. xx If the TV has been no input during time set in the Photos, Music, and Videos...

User Manual (user Manual) (ver.1.0) (English)
Page 40
Advanced Features Videos/Music/Photos Play Option menu During file playback, press the TOOLS button. You can play the video with Subtitles. Videos > > > > > > Music > > Photos > > > > > > > > > > Settings Using the Setup Menu ■■ Continuous Movie Play Help (Resume Play) (On / Off): Select to view information about the played file. If you can download the VOD registration file. You can adjust the picture setting. (p. 17, 18, 19, 20) You can adjust the sound setting. (p. 21...
Advanced Features Videos/Music/Photos Play Option menu During file playback, press the TOOLS button. You can play the video with Subtitles. Videos > > > > > > Music > > Photos > > > > > > > > > > Settings Using the Setup Menu ■■ Continuous Movie Play Help (Resume Play) (On / Off): Select to view information about the played file. If you can download the VOD registration file. You can adjust the picture setting. (p. 17, 18, 19, 20) You can adjust the sound setting. (p. 21...
User Manual (user Manual) (ver.1.0) (English)
Page 44
... output through the receiver. • Check whether or not the device supports Anynet+ functions. • Check whether or not the HDMI cable is properly connected. • Check whether Anynet+ (HDMI-CEC) is set to On in the Anynet+ Setup menu. • Press the TOOLS button to display the Anynet+ menu and select a menu you are configuring Anynet+ or switching to a view mode. • Use the remote control when the Anynet+ setting...
... output through the receiver. • Check whether or not the device supports Anynet+ functions. • Check whether or not the HDMI cable is properly connected. • Check whether Anynet+ (HDMI-CEC) is set to On in the Anynet+ Setup menu. • Press the TOOLS button to display the Anynet+ menu and select a menu you are configuring Anynet+ or switching to a view mode. • Use the remote control when the Anynet+ setting...
User Manual (user Manual) (ver.1.0) (English)
Page 50
...'s power cable. There is properly displayed, the poor picture may cause color problems or a blank screen. Eco Solution Energy Saving) (p. 17) • Try resetting the picture to view the default picture settings. (go to MENU - The picture is black and white. • If you are using a DVI to HDMI cable, a separate audio cable is required. • If your TV audio is properly displaying the test image. (go to MENU - Sound Problem First of the device (Cable/Sat Box, DVD, Blu-ray etc) connected...
...'s power cable. There is properly displayed, the poor picture may cause color problems or a blank screen. Eco Solution Energy Saving) (p. 17) • Try resetting the picture to view the default picture settings. (go to MENU - The picture is black and white. • If you are using a DVI to HDMI cable, a separate audio cable is required. • If your TV audio is properly displaying the test image. (go to MENU - Sound Problem First of the device (Cable/Sat Box, DVD, Blu-ray etc) connected...
User Manual (user Manual) (ver.1.0) (English)
Page 51
... Box, DVD, Blu-ray etc) video outputs to match the connections to (p. 25). • Some channels may cause picture distortion, especially with Component cable connection. • Remove the left and right audio connections from the set -top-box has a grounding issue. Network Connection Wireless network connection failure. • The Samsung Wireless USB dongle is required to use a wireless network. • Make sure Network Connection is connected securely. • Please try Auto Program to add available channels to MENU - The picture won't display in full screen...
... Box, DVD, Blu-ray etc) video outputs to match the connections to (p. 25). • Some channels may cause picture distortion, especially with Component cable connection. • Remove the left and right audio connections from the set -top-box has a grounding issue. Network Connection Wireless network connection failure. • The Samsung Wireless USB dongle is required to use a wireless network. • Make sure Network Connection is connected securely. • Please try Auto Program to add available channels to MENU - The picture won't display in full screen...
User Manual (user Manual) (ver.1.0) (English)
Page 52
... time. POP (TV's internal banner ad) appears on the TV too high. A "Mode Not Supported" message appears. • Check the supported resolution of screen burn, this manual. Refer to MENU → Setup → Plug & Play → ENTERE (p. 9). You have loud humming if the back of your connection cables. • Improper installation of the product's design and is too close to a wall, we recommend using a HDMI, PC or Component source. The PIP menu...
... time. POP (TV's internal banner ad) appears on the TV too high. A "Mode Not Supported" message appears. • Check the supported resolution of screen burn, this manual. Refer to MENU → Setup → Plug & Play → ENTERE (p. 9). You have loud humming if the back of your connection cables. • Improper installation of the product's design and is too close to a wall, we recommend using a HDMI, PC or Component source. The PIP menu...

User Manual (user Manual) (ver.1.0) (English)
Page 55
... Network Connection Network Setup O ON/OFF button Optimal resolution P Photos Picture Size PIP Plug & Play Power Indicator 7, 8, 15 15 19 17 18 13 R Receiver Recording Remote Control Repeat Mode RGB Only Mode Rotate 10, 41 11, 41 48 24 53 S Select All Self Diagnosis Sharpness Signal Information Sleep Timer Slide Show Software Upgrade Source List Speaker Select Specifications Standby mode Symbol 34 T 25 25 Timer 21 Title 38 Tools Troubleshooting TV Speaker 14 U 28 29 USB Drive V 7 Video Formats 13 Videos Virtual Surround Volume 38...
... Network Connection Network Setup O ON/OFF button Optimal resolution P Photos Picture Size PIP Plug & Play Power Indicator 7, 8, 15 15 19 17 18 13 R Receiver Recording Remote Control Repeat Mode RGB Only Mode Rotate 10, 41 11, 41 48 24 53 S Select All Self Diagnosis Sharpness Signal Information Sleep Timer Slide Show Software Upgrade Source List Speaker Select Specifications Standby mode Symbol 34 T 25 25 Timer 21 Title 38 Tools Troubleshooting TV Speaker 14 U 28 29 USB Drive V 7 Video Formats 13 Videos Virtual Surround Volume 38...
Quick Guide (easy Manual) (ver.1.0) (English)
Page 1
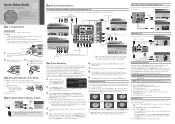
...: 1. Video Cable (Not Supplied) Audio Cable (Not Supplied) Lowest Quality Connection Audio/Video connection (480i only) Using a Component Cable AUDIO OUT DVD, Blu-ray player, cable box, STB satellite receiver, VCR VIDEO OUT Device ✎✎When connecting to same type as a Monitor. screen appears. The first time you fasten the screws with the with factory adjusted settings, each time you press the P.MODE button, you must select Channel Source to AV IN 1 on your remote. The Tools menu appears. 2. Step 1: Install the Stand 50 inches model only...
...: 1. Video Cable (Not Supplied) Audio Cable (Not Supplied) Lowest Quality Connection Audio/Video connection (480i only) Using a Component Cable AUDIO OUT DVD, Blu-ray player, cable box, STB satellite receiver, VCR VIDEO OUT Device ✎✎When connecting to same type as a Monitor. screen appears. The first time you fasten the screws with the with factory adjusted settings, each time you press the P.MODE button, you must select Channel Source to AV IN 1 on your remote. The Tools menu appears. 2. Step 1: Install the Stand 50 inches model only...
Quick Guide (easy Manual) (ver.1.0) (English)
Page 2
Step 6: Remote Control Remote Control Buttons and Functions ✎✎This is a device, such as a Blu-ray/DVD player, a cable/satellite box, antenna or a cable TV SOURCE input. Quickly select frequently used functions. Use these buttons in Media Play (USB) and Anynet+ (HDMI-CEC) modes. (�: Controls recording on your network. Displays information on the Wall Wireless IP sharer TV Side Panel Samsung Wireless LAN Adapter LAN Cable (Not Supplied) or TV Rear Panel Samsung's Wireless LAN adapter supports the IEEE 802.11A, IEEE 802.11B, IEEE 802.11G...
Step 6: Remote Control Remote Control Buttons and Functions ✎✎This is a device, such as a Blu-ray/DVD player, a cable/satellite box, antenna or a cable TV SOURCE input. Quickly select frequently used functions. Use these buttons in Media Play (USB) and Anynet+ (HDMI-CEC) modes. (�: Controls recording on your network. Displays information on the Wall Wireless IP sharer TV Side Panel Samsung Wireless LAN Adapter LAN Cable (Not Supplied) or TV Rear Panel Samsung's Wireless LAN adapter supports the IEEE 802.11A, IEEE 802.11B, IEEE 802.11G...


