User Guide
Page 3
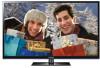
❑❑ Using the Channel Menu Press the CONTENT button to select Watch TV, and then select the desired menu item. Watch TV Schedule Manager Channel List Channel Manager ▶ My Contents Source ●● The displayed image may differ depending on the model. Choose from Schedule Manager, Channel List, and Channel Manager. English
❑❑ Using the Channel Menu Press the CONTENT button to select Watch TV, and then select the desired menu item. Watch TV Schedule Manager Channel List Channel Manager ▶ My Contents Source ●● The displayed image may differ depending on the model. Choose from Schedule Manager, Channel List, and Channel Manager. English

User Guide
Page 7
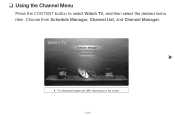
... { Program View L CH Mode E Watch k Page ●● The displayed image may differ depending on your TV displays (Added Channels) when you press the Channel button on the model. OO When you press the CH LIST button on the Channel List remote control, the Channel List screen is Added... Channels 6-1 TV#6 displayed at once. 7 a3 TV#7 Air 23 TV#6 ●● Added Channels: Shows all favorite channels, ...
... { Program View L CH Mode E Watch k Page ●● The displayed image may differ depending on your TV displays (Added Channels) when you press the Channel button on the model. OO When you press the CH LIST button on the Channel List remote control, the Channel List screen is Added... Channels 6-1 TV#6 displayed at once. 7 a3 TV#7 Air 23 TV#6 ●● Added Channels: Shows all favorite channels, ...
User Guide
Page 11
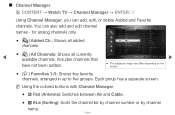
■ Channel Manager O CONTENT → Watch TV → Channel Manager → ENTERE Using Channel Manager, you can also add and edit channel names - for analog channels only. Selected items : 4 1/1 page Channel...; ( ) All Channels: Shows all currently available channels. Air a Antenna } Sorting k Page E Select T Tools R Return ▶ ● The displayed image may differ depending on the model. ● ( ) Favorites 1-5: Shows five favorite channels, arranged in up to five groups. Channel Manager Added Ch. N Using the colored buttons with Channel Manager. ● a Red...
■ Channel Manager O CONTENT → Watch TV → Channel Manager → ENTERE Using Channel Manager, you can also add and edit channel names - for analog channels only. Selected items : 4 1/1 page Channel...; ( ) All Channels: Shows all currently available channels. Air a Antenna } Sorting k Page E Select T Tools R Return ▶ ● The displayed image may differ depending on the model. ● ( ) Favorites 1-5: Shows five favorite channels, arranged in up to five groups. Channel Manager Added Ch. N Using the colored buttons with Channel Manager. ● a Red...
User Guide
Page 36
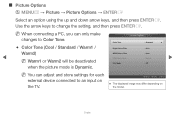
Use the arrow keys to an input on the model. ▶ English Picture Options Color Tone Digital Noise Filter MPEG Noise Filter HDMI Black Level Film Mode : Standard : Auto : Auto : Normal : Off ► ▶ NN ... Warm1 or Warm2 will be deactivated when the picture mode is Dynamic. U Move E Enter R Return ●● The displayed image may differ depending on the TV. NN When connecting a PC, you can adjust and store settings for each external device connected to change the setting, and then press ENTERE. ■■...
Use the arrow keys to an input on the model. ▶ English Picture Options Color Tone Digital Noise Filter MPEG Noise Filter HDMI Black Level Film Mode : Standard : Auto : Auto : Normal : Off ► ▶ NN ... Warm1 or Warm2 will be deactivated when the picture mode is Dynamic. U Move E Enter R Return ●● The displayed image may differ depending on the TV. NN When connecting a PC, you can adjust and store settings for each external device connected to change the setting, and then press ENTERE. ■■...
User Guide
Page 58
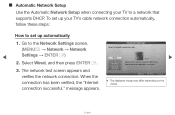
To set up your TV to a network that the LAN cable is connected. message appears. Network Settings Select a network connection type. Please make sure that supports DHCP. U Move E Enter R Return ▶ ●● The displayed image may differ depending on the model. ▶ English The network test screen appears and verifies the network...
To set up your TV to a network that the LAN cable is connected. message appears. Network Settings Select a network connection type. Please make sure that supports DHCP. U Move E Enter R Return ▶ ●● The displayed image may differ depending on the model. ▶ English The network test screen appears and verifies the network...
User Guide
Page 61
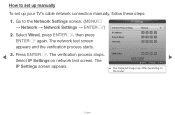
Go to set up manually To set up your TV's cable network connection manually, follow these steps: 1. OK U Move E Enter R Return ▶ ●● The displayed image may differ depending on network test ... stops. The IP Settings screen appears. IP Settings Internet Protocol Setup IP Address Subnet Mask Gateway : Manual ► . . . . . . . . . Select IP Settings on the model. ▶ English Press ENTERE. DNS : Manual DNS Server . . . The network test screen appears and the verification process starts. 3. Select Wired, press ENTERE, then press ENTERE...
Go to set up manually To set up your TV's cable network connection manually, follow these steps: 1. OK U Move E Enter R Return ▶ ●● The displayed image may differ depending on network test ... stops. The IP Settings screen appears. IP Settings Internet Protocol Setup IP Address Subnet Mask Gateway : Manual ► . . . . . . . . . Select IP Settings on the model. ▶ English Press ENTERE. DNS : Manual DNS Server . . . The network test screen appears and the verification process starts. 3. Select Wired, press ENTERE, then press ENTERE...
User Guide
Page 69
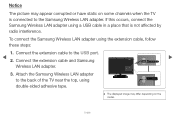
...a place that is connected to the Samsung Wireless LAN adapter. Connect the extension cable to the back of the TV near the top, using double-sided adhesive tape. ●● The displayed image may appear corrupted or have static on the model. ▶ English Connect the extension ...cable and Samsung ▶ Wireless LAN adapter. 3. Attach the Samsung Wireless LAN adapter to the USB...
...a place that is connected to the Samsung Wireless LAN adapter. Connect the extension cable to the back of the TV near the top, using double-sided adhesive tape. ●● The displayed image may appear corrupted or have static on the model. ▶ English Connect the extension ...cable and Samsung ▶ Wireless LAN adapter. 3. Attach the Samsung Wireless LAN adapter to the USB...
User Guide
Page 79
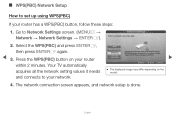
Go to the Access Point easily by pressing the WPS(PBC) button. Press the WPS(PBC) button on the model. 4. Select the WPS(PBC) and press ENTERE, then press ENTERE again. 3. ■■ WPS(PBC) Network Setup How to set up using WPS(PBC)... If your router within 2 minutes. Network Settings Select a network connection type. 2. Your TV automatically acquires all the network setting values it needs and connects to your Access Point supports Push Button Configuration(PBC) U Move E Enter R Return ▶ ●...
Go to the Access Point easily by pressing the WPS(PBC) button. Press the WPS(PBC) button on the model. 4. Select the WPS(PBC) and press ENTERE, then press ENTERE again. 3. ■■ WPS(PBC) Network Setup How to set up using WPS(PBC)... If your router within 2 minutes. Network Settings Select a network connection type. 2. Your TV automatically acquires all the network setting values it needs and connects to your Access Point supports Push Button Configuration(PBC) U Move E Enter R Return ▶ ●...

User Guide
Page 83
... than 9 3/4 inches from the Samsung Wireless ▶ ●● The displayed image may differ depending on the router and TV. 2. Select this connection type after placing the Access Point within 10 inches (25cm) of wireless router and TV. 1. LAN Adapter. ▶...and press ENTERE, then press ENTERE again. Wired Wireless(General) WPS(PBC) One Foot Connection Connect to the wireless network automatically if your TV. Turn on the model. Go to Network Settings screen. (MENUm → Network Settings Select a network connection type. Network → Network Settings → ...
... than 9 3/4 inches from the Samsung Wireless ▶ ●● The displayed image may differ depending on the router and TV. 2. Select this connection type after placing the Access Point within 10 inches (25cm) of wireless router and TV. 1. LAN Adapter. ▶...and press ENTERE, then press ENTERE again. Wired Wireless(General) WPS(PBC) One Foot Connection Connect to the wireless network automatically if your TV. Turn on the model. Go to Network Settings screen. (MENUm → Network Settings Select a network connection type. Network → Network Settings → ...

User Guide
Page 93
... L Move U Adjust E Enter R Return ▶ use On Timer. ●● The displayed image may differ depending on Setup: Select Off, Once, Everyday, Mon~Fri, the model. Setting the On / Off Timer OO MENUm → System → Time → ENTERE ●● Set On Timer so that your... TV turns on On Timer 1 automatically at a time and on a day of your TV. Mon~Sat, Sat~Sun or Manual. If you select Manual, you can choose the days you want On Timer...
... L Move U Adjust E Enter R Return ▶ use On Timer. ●● The displayed image may differ depending on Setup: Select Off, Once, Everyday, Mon~Fri, the model. Setting the On / Off Timer OO MENUm → System → Time → ENTERE ●● Set On Timer so that your... TV turns on On Timer 1 automatically at a time and on a day of your TV. Mon~Sat, Sat~Sun or Manual. If you select Manual, you can choose the days you want On Timer...
User Guide
Page 96
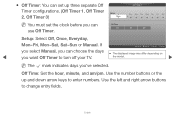
L Move U Adjust E Enter R Return ●● The displayed image may differ depending on the model. ▶ NN The c mark indicates days you want Off Timer to turn off your TV. Use the number buttons or the up three separate Off Timer configurations. (Off Timer 1, Off Timer 2, Off Timer 3) Setup Once Off Timer 1 Sun...
L Move U Adjust E Enter R Return ●● The displayed image may differ depending on the model. ▶ NN The c mark indicates days you want Off Timer to turn off your TV. Use the number buttons or the up three separate Off Timer configurations. (Off Timer 1, Off Timer 2, Off Timer 3) Setup Once Off Timer 1 Sun...
User Guide
Page 132
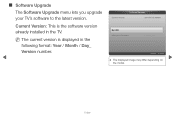
NN The current version is the software version already installed in the following format: Year / Month / Day_ Version number. Current Version Software Upgrade 2011/01/18_000001 By USB Alternative Software E Enter R Return ●● The displayed image may differ depending on ▶ the model. ▶ English Current Version: This is displayed in the TV. ■■ Software Upgrade The Software Upgrade menu lets you upgrade your TV's software to the latest version.
NN The current version is the software version already installed in the following format: Year / Month / Day_ Version number. Current Version Software Upgrade 2011/01/18_000001 By USB Alternative Software E Enter R Return ●● The displayed image may differ depending on ▶ the model. ▶ English Current Version: This is displayed in the TV. ■■ Software Upgrade The Software Upgrade menu lets you upgrade your TV's software to the latest version.
User Guide
Page 134
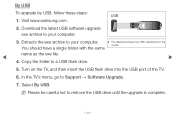
Copy the folder to Support → Software Upgrade. 7. In the TV's menu, go to a USB flash drive. 5. NN Please be careful not to your computer. 3. Visit www.samsung.com. 2. Turn on the model. Select By USB. Download the latest USB software upgrade exe archive to your computer.... ●● The displayed image may differ depending on the TV, and then insert the USB flash drive into ...
Copy the folder to Support → Software Upgrade. 7. In the TV's menu, go to a USB flash drive. 5. NN Please be careful not to your computer. 3. Visit www.samsung.com. 2. Turn on the model. Select By USB. Download the latest USB software upgrade exe archive to your computer.... ●● The displayed image may differ depending on the TV, and then insert the USB flash drive into ...
User Guide
Page 169
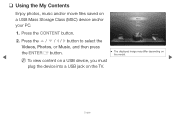
Press the u / d / l / r button to select the Videos, Photos, or Music, and then press the ENTERE button. ● The displayed image may differ depending on the TV. ▶ English Source Watch TV 2. Music 1. N To view content on a USB device, you must ▶ plug the device into a USB jack on the model. Press the CONTENT button. ❑ Using the My Contents Enjoy photos, music and/or movie files saved on My Contents a USB Mass Storage Class (MSC) device and/or Videos Photos your PC.
Press the u / d / l / r button to select the Videos, Photos, or Music, and then press the ENTERE button. ● The displayed image may differ depending on the TV. ▶ English Source Watch TV 2. Music 1. N To view content on a USB device, you must ▶ plug the device into a USB jack on the model. Press the CONTENT button. ❑ Using the My Contents Enjoy photos, music and/or movie files saved on My Contents a USB Mass Storage Class (MSC) device and/or Videos Photos your PC.
User Guide
Page 170
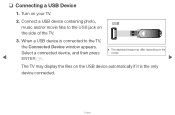
Turn on the side of the TV. 3. When a USB device is the only device connected. ▶ English Connect a USB device containing photo, USB music and/or movie files to the TV, the Connected Device window appears. ❑❑ Connecting a USB Device 1. Select a connected device, and then press ENTERE. ●● The displayed image may differ depending on the model. ▶ The TV may display the files on the USB device automatically if it is connected to the USB jack on your TV. 2.
Turn on the side of the TV. 3. When a USB device is the only device connected. ▶ English Connect a USB device containing photo, USB music and/or movie files to the TV, the Connected Device window appears. ❑❑ Connecting a USB Device 1. Select a connected device, and then press ENTERE. ●● The displayed image may differ depending on the model. ▶ The TV may display the files on the USB device automatically if it is connected to the USB jack on your TV. 2.
User Guide
Page 209
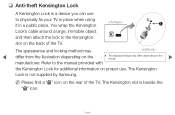
... ●● The displayed image may differ depending on the rear of the TV. The Kensington Lock is beside the "K" icon. ▶ English NN Please find a "K" icon on the model. ▶ manufacturer. The Kensington slot is not supplied by Samsung. You wrap the Kensington 1 Lock's cable around a large, immobile object and then attach...
... ●● The displayed image may differ depending on the rear of the TV. The Kensington Lock is beside the "K" icon. ▶ English NN Please find a "K" icon on the model. ▶ manufacturer. The Kensington slot is not supplied by Samsung. You wrap the Kensington 1 Lock's cable around a large, immobile object and then attach...
User Guide
Page 210
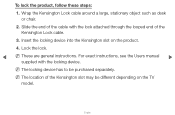
... of the cable with the locking device. ▶ To lock the product, follow these steps: 1. Insert the locking device into the Kensington slot on the TV model. English For exact instructions, see the Users manual ▶ supplied with the lock attached through the looped end of the Kensington Lock cable. 3. Slide the...
... of the cable with the locking device. ▶ To lock the product, follow these steps: 1. Insert the locking device into the Kensington slot on the TV model. English For exact instructions, see the Users manual ▶ supplied with the lock attached through the looped end of the Kensington Lock cable. 3. Slide the...


