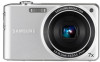
PL200 Digital Camera - Samsung
PL200 Digital Camera
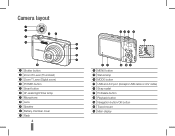
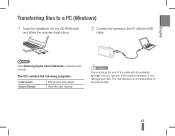
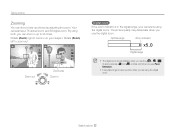
Related Manual Pages


Related Videos

Samsung PL200 Digital Camera
Duration: 2:58
Total Views: 18,817
Duration: 2:58
Total Views: 18,817
PL200 New Samsung Digital Camera
Duration: 3:39
Total Views: 2,745
Duration: 3:39
Total Views: 2,745
PL200 New Samsung Digital Camera
Duration: 3:39
Total Views: 547
Duration: 3:39
Total Views: 547
PL200 New Samsung Digital Camera
Duration: 3:39
Total Views: 4,956
Duration: 3:39
Total Views: 4,956
Similar Questions

How Do I Charge A Samsung 33x Optical Zoom Digital 1200x L
(Posted by regturbo 10 years ago)
I Am Unable To 'power On' My Samsung Pl 90 Digital Camera.
I am unable to 'power on my Samsung PL 90 digital camera. When i press the button for power on, it d...
I am unable to 'power on my Samsung PL 90 digital camera. When i press the button for power on, it d...
(Posted by kayessen 10 years ago)

How To Download Videos From My L700 Digital Camera To My Macbook
How to download videos from my L700 digital camera to my macbook?
How to download videos from my L700 digital camera to my macbook?
(Posted by gargeebardoloi 11 years ago)

Samsung Bl 103 Digital Camera Problem
Dear Technician, i am a samsung bl 103 digital camera user from Asian country Nepal. so i recently h...
Dear Technician, i am a samsung bl 103 digital camera user from Asian country Nepal. so i recently h...
(Posted by sahazb 13 years ago)
Related Terms
The following terms were also used when searching for PL200 Digital Camera - Samsung:- samsung pl200
- pl200 camera
- samsung pl200 camera
- pl200 review
- samsung pl200 digital camera
- pl200 digital camera
- samsung pl200 review
- pl200 camera review
- pl200 ec pl200zbpbus
- samsung pl200 ec pl200zbpbus
- samsung pl200 camera review
- pl200 a v cable
- pl200 camera reviews
- pl200 case
- pl200 forum
- pl200 samsung review
- pl200 14 megapixel 7x optical zoom digital camera
- pl200 best buy
- l200 camera
- pl 200 review
- pl200
- pl200 14.2-megapixel digital camera
- pl200 accessories
- pl200 battery
- pl200 battery charger
- pl200 black
- pl200 cable
- pl200 camera battery
- pl200 camera burst setting
- pl200 camera charger
- pl200 camera charger cable
- pl200 camera manual
- pl200 charger
- pl200 charging cable
- pl200 dcf full error
- pl200 digital camera battery charger
- pl200 digital camera battery life
- pl200 driver
- pl200 driver download
- pl200 drivers
- pl200 ec-pl200zbpbus digital camera
- pl200 instruction manual
- pl200 instructions
- pl200 labeler
- pl200 lens stuck
- pl200 manual
- pl200 manual pdf
- pl200 memory card
- pl200 orange light
- pl200 owners manual
- pl200 parts
- pl200 photos
- pl200 power cord
- pl200 price
- pl200 review samsung
- pl200 reviews
- pl200 samsung
- pl200 samsung camera
- pl200 samsung manual
- pl200 sd card
- pl200 software
- pl200 software download
- pl200 specs
- pl200 troubleshooting
- pl200 usb cable
- pl200 usb/charger
- pl200 user manual
- pl200 vluu pl200
- pl200 wall charger
- pl200 wont turn on
- pl200 zoom stuck
- pl200/vluu pl200
- pl200zbpbus
- samsung l200 camera
- samsung pl 200 review
- samsung pl 2000
- samsung pl200 14 megapixel 7x optical zoom digital camera
- samsung pl200 14.2-megapixel digital camera
- samsung pl200 7x
- samsung pl200 a v cable
- samsung pl200 accessories
- samsung pl200 battery
- samsung pl200 battery charger
- samsung pl200 best buy
- samsung pl200 cable
- samsung pl200 camera battery
- samsung pl200 camera burst setting
- samsung pl200 camera charger
- samsung pl200 camera charger cable
- samsung pl200 camera manual
- samsung pl200 camera reviews
- samsung pl200 case
- samsung pl200 charger
- samsung pl200 charging cable
- samsung pl200 dcf full error
- samsung pl200 digital camera battery charger
- samsung pl200 digital camera battery life
- samsung pl200 driver
- samsung pl200 driver download
- samsung pl200 drivers
- samsung pl200 ec-pl200zbpbus digital camera
- samsung pl200 forum
- samsung pl200 instruction manual
- samsung pl200 instructions
- samsung pl200 lens stuck
- samsung pl200 manual
- samsung pl200 manual pdf
- samsung pl200 memory card
- samsung pl200 orange light
- samsung pl200 owners manual
- samsung pl200 parts
- samsung pl200 photos
- samsung pl200 power cord
- samsung pl200 price
- samsung pl200 reviews
- samsung pl200 sd card
- samsung pl200 software
- samsung pl200 software download
- samsung pl200 specs
- samsung pl200 troubleshooting
- samsung pl200 usb cable
- samsung pl200 usb/charger
- samsung pl200 user manual
- samsung pl200 vluu pl200
- samsung pl200 wall charger
- samsung pl200 wont turn on
- samsung pl200 zoom stuck
- samsung pl200/vluu pl200
- samsung pl200zbpbus