
Quick Guide (easy Manual) (ver.1.0) (English, Turkish)
Page 3
... your camera from the camera flash. shooting at night. • Turn on the flash. • Select Night in the mode. • Set ISO speed options. • Use a tripod to Red-eye or Red-eye Fix. • If the photo has already been taken, select Red-eye Fix in the edit menu. Photos are blurred. blurred when This can easily solve most problems by taking photos in low light conditions or holding the camera incorrectly. • Press [Shutter] halfway...
... your camera from the camera flash. shooting at night. • Turn on the flash. • Select Night in the mode. • Set ISO speed options. • Use a tripod to Red-eye or Red-eye Fix. • If the photo has already been taken, select Red-eye Fix in the edit menu. Photos are blurred. blurred when This can easily solve most problems by taking photos in low light conditions or holding the camera incorrectly. • Press [Shutter] halfway...

User Manual (user Manual) (ver.1.0) (English)
Page 10
... Preventing red-eye 39 Using the flash 39 Adjusting the ISO speed 40 Changing the camera's focus 41 Using macro 41 Using auto focus 41 Using tracking auto focus 42 Adjusting the focus area 43 Using face detection 44 Detecting faces 44 Taking a self-portrait shot 45 Taking a smile shot 45 Detecting eye blinking 46 Adjusting brightness and color 47 Adjusting the exposure manually (EV 47 Compensating for backlighting (ACB 47 Changing the metering option 48 Selecting a light source (White balance 48 Using burst modes 50 Improving your photos 51...
... Preventing red-eye 39 Using the flash 39 Adjusting the ISO speed 40 Changing the camera's focus 41 Using macro 41 Using auto focus 41 Using tracking auto focus 42 Adjusting the focus area 43 Using face detection 44 Detecting faces 44 Taking a self-portrait shot 45 Taking a smile shot 45 Detecting eye blinking 46 Adjusting brightness and color 47 Adjusting the exposure manually (EV 47 Compensating for backlighting (ACB 47 Changing the metering option 48 Selecting a light source (White balance 48 Using burst modes 50 Improving your photos 51...

User Manual (user Manual) (ver.1.0) (English)
Page 11
... 66 Transferring files to your Windows computer 67 Transferring files using Intelli-studio 69 Transferring files by connecting the camera as a removable disk ... 71 Disconnecting the camera (for Windows XP 72 Transferring files to your Mac computer 73 Printing photos with a PictBridge photo printer 74 Appendixes 75 Camera settings menu 76 Accessing the settings menu 76 Sound 77 Display 77 Settings 78 Error messages 81 Camera maintenance 82 Cleaning your camera 82 About memory cards 83 About the battery 84 Before contacting a service center 87 Camera specifications 90 FCC...
... 66 Transferring files to your Windows computer 67 Transferring files using Intelli-studio 69 Transferring files by connecting the camera as a removable disk ... 71 Disconnecting the camera (for Windows XP 72 Transferring files to your Mac computer 73 Printing photos with a PictBridge photo printer 74 Appendixes 75 Camera settings menu 76 Accessing the settings menu 76 Sound 77 Display 77 Settings 78 Error messages 81 Camera maintenance 82 Cleaning your camera 82 About memory cards 83 About the battery 84 Before contacting a service center 87 Camera specifications 90 FCC...

User Manual (user Manual) (ver.1.0) (English)
Page 12
Basic functions Learn about your camera 16 Learning icons 17 Selecting options 18 Setting the display and sound 20 Changing the display type 20 Setting the sound 20 Taking photos 21 Zooming 22 Reducing camera shake (OIS 23 Tips for shooting. Unpacking 12 Camera layout 13 Inserting the battery and memory card ... ... 15 Charging the battery and turning your camera on ...... 16 Charging the battery 16 Turning on your camera's layout, icons, and basic functions for getting a clearer photo 24
Basic functions Learn about your camera 16 Learning icons 17 Selecting options 18 Setting the display and sound 20 Changing the display type 20 Setting the sound 20 Taking photos 21 Zooming 22 Reducing camera shake (OIS 23 Tips for shooting. Unpacking 12 Camera layout 13 Inserting the battery and memory card ... ... 15 Charging the battery and turning your camera on ...... 16 Charging the battery 16 Turning on your camera's layout, icons, and basic functions for getting a clearer photo 24

User Manual (user Manual) (ver.1.0) (English)
Page 25
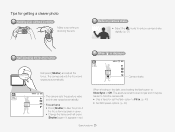
... Optical Image Stabilization option to reduce camera shake optically. (p. 23) • Select the mode to Slow Sync or Off. When shooting in . (p. 39) • Set ISO speed options. (p. 40) Basic functions 24 The aperture remains open longer and it appears in red. Tips for getting a clearer photo Holding your camera correctly Make sure nothing is displayed Half-press [Shutter] and adjust the focus. Focus frame • Press [Shutter] to take the photo...
... Optical Image Stabilization option to reduce camera shake optically. (p. 23) • Select the mode to Slow Sync or Off. When shooting in . (p. 39) • Set ISO speed options. (p. 40) Basic functions 24 The aperture remains open longer and it appears in red. Tips for getting a clearer photo Holding your camera correctly Make sure nothing is displayed Half-press [Shutter] and adjust the focus. Focus frame • Press [Shutter] to take the photo...

User Manual (user Manual) (ver.1.0) (English)
Page 33
... activated the Optical Image Stabilization, the camera may not support high definition recording. Shooting modes Using the Program mode In the Program mode, you set various options except the shutter speed and aperture value, which the camera sets automatically. 1 In Shooting mode, press [ ]. 2 Select Program. 3 Set options. (For a list of options, refer to "Shooting options.") 4 Align your video with the sounds the OIS makes when operating. 1 In Shooting mode, press [ ]. 2 Select Movie. 3 Press [ ]. 4 Select Movie → Frame...
... activated the Optical Image Stabilization, the camera may not support high definition recording. Shooting modes Using the Program mode In the Program mode, you set various options except the shutter speed and aperture value, which the camera sets automatically. 1 In Shooting mode, press [ ]. 2 Select Program. 3 Set options. (For a list of options, refer to "Shooting options.") 4 Align your video with the sounds the OIS makes when operating. 1 In Shooting mode, press [ ]. 2 Select Movie. 3 Press [ ]. 4 Select Movie → Frame...

User Manual (user Manual) (ver.1.0) (English)
Page 36
... 36 Selecting image quality 36 Using the timer 37 Shooting in shooting mode. Shooting options Learn about the options you can set in the dark 39 Preventing red-eye 39 Using the flash 39 Adjusting the ISO speed 40 Changing the camera's focus 41 Using macro 41 Using auto focus 41 Using tracking auto focus 42 Adjusting the focus area 43 Using face detection 44 Detecting faces 44 Taking a self-portrait shot 45 Taking a smile shot 45 Detecting eye blinking 46 Adjusting brightness and color 47 Adjusting the exposure manually (EV...
... 36 Selecting image quality 36 Using the timer 37 Shooting in shooting mode. Shooting options Learn about the options you can set in the dark 39 Preventing red-eye 39 Using the flash 39 Adjusting the ISO speed 40 Changing the camera's focus 41 Using macro 41 Using auto focus 41 Using tracking auto focus 42 Adjusting the focus area 43 Using face detection 44 Detecting faces 44 Taking a self-portrait shot 45 Taking a smile shot 45 Detecting eye blinking 46 Adjusting brightness and color 47 Adjusting the exposure manually (EV...

User Manual (user Manual) (ver.1.0) (English)
Page 41
... advanced software analysis. Slow Sync: • The flash fires and the shutter stays open longer. • Select this when you select Motion Capture, the camera sets the ISO speed to light as defined by the International Organization for Standardization (ISO). Red-eye*: • The flash fires when the subject or background is dark. Adjusting the ISO speed The ISO speed is the measure of a film's sensitivity to Auto. With a higher ISO speed...
... advanced software analysis. Slow Sync: • The flash fires and the shutter stays open longer. • Select this when you select Motion Capture, the camera sets the ISO speed to light as defined by the International Organization for Standardization (ISO). Red-eye*: • The flash fires when the subject or background is dark. Adjusting the ISO speed The ISO speed is the measure of a film's sensitivity to Auto. With a higher ISO speed...

User Manual (user Manual) (ver.1.0) (English)
Page 67
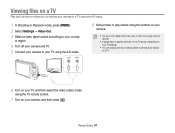
Viewing files on a TV Play back photos or videos by connecting your camera to a TV using the A/V cable. 1 In Shooting or Playback mode, press [ ]. 2 Select Settings → Video Out. 3 Select a video signal output according to your country or region. 4 Turn off your camera and TV. 5 Connect your camera to a TV. 6 Turn on your TV, and then select the video output mode using the TV remote control. 7 Turn on your camera, and then press [ ]. 8 View photos or play videos using the A/V cable. Playback/Editing 66 Video Audio...
Viewing files on a TV Play back photos or videos by connecting your camera to a TV using the A/V cable. 1 In Shooting or Playback mode, press [ ]. 2 Select Settings → Video Out. 3 Select a video signal output according to your country or region. 4 Turn off your camera and TV. 5 Connect your camera to a TV. 6 Turn on your TV, and then select the video output mode using the TV remote control. 7 Turn on your camera, and then press [ ]. 8 View photos or play videos using the A/V cable. Playback/Editing 66 Video Audio...

User Manual (user Manual) (ver.1.0) (English)
Page 80
Set the camera to turn off automatically when you change after replacing the battery. • The camera will not change the names of files intentionally, the camera may not print the date and time. Appendixes 79 If you are not using it is 9999. • The camera defines file names according to the Digital rule for Camera File system (DCF) standard. Item Imprint Auto Power Off AF Lamp Video Out * Default Description Select whether...
Set the camera to turn off automatically when you change after replacing the battery. • The camera will not change the names of files intentionally, the camera may not print the date and time. Appendixes 79 If you are not using it is 9999. • The camera defines file names according to the Digital rule for Camera File system (DCF) standard. Item Imprint Auto Power Off AF Lamp Video Out * Default Description Select whether...

User Manual (user Manual) (ver.1.0) (English)
Page 5
... respective owners. • Camera specifications or contents of this manual may be changed without prior notice due to upgrade of the user manual Basic functions 11 Learn about the options you can set in the provided CD-ROM. Extended functions 27 Learn how to take a photo by selecting a mode and how to your camera to record a video or voice memo. You will also learn how to connect your photo printer...
... respective owners. • Camera specifications or contents of this manual may be changed without prior notice due to upgrade of the user manual Basic functions 11 Learn about the options you can set in the provided CD-ROM. Extended functions 27 Learn how to take a photo by selecting a mode and how to your camera to record a video or voice memo. You will also learn how to connect your photo printer...
User Manual (user Manual) (ver.1.0) (English)
Page 6
...For example: Select Shooting → White Balance represents select Shooting, and then select White Balance. * Annotation Shooting mode icons These icons indicate that a function is available in this manual Abbreviation Definition ACB Auto Contrast Balance AEB Auto Exposure Bracket AF Auto Focus DIS Digital Image Stabilization DPOF Digital Print Order Format EV Exposure Value ISO International Organization for Standardization WB White Balance 5 The mode may not support functions for example: [Shutter] represents the shutter button. ( ) Page number of related...
...For example: Select Shooting → White Balance represents select Shooting, and then select White Balance. * Annotation Shooting mode icons These icons indicate that a function is available in this manual Abbreviation Definition ACB Auto Contrast Balance AEB Auto Exposure Bracket AF Auto Focus DIS Digital Image Stabilization DPOF Digital Print Order Format EV Exposure Value ISO International Organization for Standardization WB White Balance 5 The mode may not support functions for example: [Shutter] represents the shutter button. ( ) Page number of related...
User Manual (user Manual) (ver.1.0) (English)
Page 10
... Charging the battery 16 Turning on your camera 16 Performing the initial setup 17 Learning icons 18 Selecting options 19 Setting the display and sound 21 Changing the display type 21 Setting the sound 21 Taking photos 22 Zooming 23 Tips for getting a clearer photo 25 Extended functions 27 Shooting modes 28 Using the Smart Auto mode 28 Using the Photo Help Guide mode 29 Using the Scene mode 30 Using the Beauty Shot mode 30 Using the DIS mode 31 Using the Program mode 32 Recording a video 32 Recording...
... Charging the battery 16 Turning on your camera 16 Performing the initial setup 17 Learning icons 18 Selecting options 19 Setting the display and sound 21 Changing the display type 21 Setting the sound 21 Taking photos 22 Zooming 23 Tips for getting a clearer photo 25 Extended functions 27 Shooting modes 28 Using the Smart Auto mode 28 Using the Photo Help Guide mode 29 Using the Scene mode 30 Using the Beauty Shot mode 30 Using the DIS mode 31 Using the Program mode 32 Recording a video 32 Recording...
User Manual (user Manual) (ver.1.0) (English)
Page 12
Basic functions Learn about your camera 16 Performing the initial setup 17 Learning icons 18 Selecting options 19 Setting the display and sound 21 Changing the display type 21 Setting the sound 21 Taking photos 22 Zooming 23 Tips for shooting. Unpacking 12 Camera layout 13 Inserting the battery and memory card ... ... 15 Charging the battery and turning your camera on 16 Charging the battery 16 Turning on your camera's layout, icons, and basic functions for getting a clearer photo 25
Basic functions Learn about your camera 16 Performing the initial setup 17 Learning icons 18 Selecting options 19 Setting the display and sound 21 Changing the display type 21 Setting the sound 21 Taking photos 22 Zooming 23 Tips for shooting. Unpacking 12 Camera layout 13 Inserting the battery and memory card ... ... 15 Charging the battery and turning your camera on 16 Charging the battery 16 Turning on your camera's layout, icons, and basic functions for getting a clearer photo 25
User Manual (user Manual) (ver.1.0) (English)
Page 19
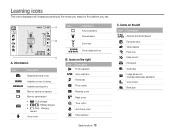
... Flash option Timer option Auto focus option Face detection Basic functions 18 C. Information Icon Description Selected shooting mode Available number of photos Available recording time Memory card is not inserted Memory card inserted • : Fully charged • : Partially charged • (Red) : Charging needed Voice memo Icon Description Auto focus frame Camera shake Zoom ratio Current date and time B. Icons on the left Icon Description Aperture and shutter speed Exposure value White balance Face tone Face retouch ISO speed Smart filter Image adjustment...
... Flash option Timer option Auto focus option Face detection Basic functions 18 C. Information Icon Description Selected shooting mode Available number of photos Available recording time Memory card is not inserted Memory card inserted • : Fully charged • : Partially charged • (Red) : Charging needed Voice memo Icon Description Auto focus frame Camera shake Zoom ratio Current date and time B. Icons on the left Icon Description Aperture and shutter speed Exposure value White balance Face tone Face retouch ISO speed Smart filter Image adjustment...
User Manual (user Manual) (ver.1.0) (English)
Page 26
... [Shutter] to take the photo if the focus frame appears in green. • Change the frame and half-press [Shutter] again if it may be harder to hold the camera still. • Use a tripod or set the flash option to Fill in red. The camera adjusts the focus and exposure automatically. The aperture remains open longer and it appears in . (p. 40) • Set ISO speed options. (p. 40) Basic functions 25 When shooting in...
... [Shutter] to take the photo if the focus frame appears in green. • Change the frame and half-press [Shutter] again if it may be harder to hold the camera still. • Use a tripod or set the flash option to Fill in red. The camera adjusts the focus and exposure automatically. The aperture remains open longer and it appears in . (p. 40) • Set ISO speed options. (p. 40) Basic functions 25 When shooting in...

User Manual (user Manual) (ver.1.0) (English)
Page 36
... a resolution 36 Selecting image quality 36 Using the timer 37 Shooting in shooting mode. Shooting options Learn about the options you can set in the dark 39 Preventing red-eye 39 Using the flash 39 Adjusting the ISO speed 40 Changing the camera's focus 41 Using macro 41 Using auto focus 41 Adjusting the focus area 42 Using face detection 43 Detecting faces 43 Taking a self-portrait shot 44 Taking a smile shot 44 Detecting eye blinking 45 Adjusting brightness and color 46 Adjusting the exposure manually (EV 46...
... a resolution 36 Selecting image quality 36 Using the timer 37 Shooting in shooting mode. Shooting options Learn about the options you can set in the dark 39 Preventing red-eye 39 Using the flash 39 Adjusting the ISO speed 40 Changing the camera's focus 41 Using macro 41 Using auto focus 41 Adjusting the focus area 42 Using face detection 43 Detecting faces 43 Taking a self-portrait shot 44 Taking a smile shot 44 Detecting eye blinking 45 Adjusting brightness and color 46 Adjusting the exposure manually (EV 46...
User Manual (user Manual) (ver.1.0) (English)
Page 65
... A/V cable. Video Audio 8 View photos or play videos using the buttons on your camera. • On some TVs, digital noise may occur or part of an image may not appear. • Images may not appear centered on the TV screen depending on your TV settings. • You can capture photos or videos while the camera is connected to a TV. 6 Turn on your TV, and then select the video output mode using the TV remote control. 7 Turn...
... A/V cable. Video Audio 8 View photos or play videos using the buttons on your camera. • On some TVs, digital noise may occur or part of an image may not appear. • Images may not appear centered on the TV screen depending on your TV settings. • You can capture photos or videos while the camera is connected to a TV. 6 Turn on your TV, and then select the video output mode using the TV remote control. 7 Turn...
User Manual (user Manual) (ver.1.0) (English)
Page 78
... Auto Power Off AF Lamp Video Out * Default Description • Select whether to display the date and time on an assistant light to help you change after replacing the battery. • The camera will not change the names of files intentionally, the camera may not play back the files. Camera settings menu Item File No. * Default Description Specify how to name files. • Reset: Set the file number to start from 0001 when inserting a new memory card, formatting a memory card, or deleting all files. • Series*: Set the file number...
... Auto Power Off AF Lamp Video Out * Default Description • Select whether to display the date and time on an assistant light to help you change after replacing the battery. • The camera will not change the names of files intentionally, the camera may not play back the files. Camera settings menu Item File No. * Default Description Specify how to name files. • Reset: Set the file number to start from 0001 when inserting a new memory card, formatting a memory card, or deleting all files. • Series*: Set the file number...
User Manual (user Manual) (ver.1.0) (English)
Page 104
... ISO speed 40 L Light source (White balance) 47 M Macro 41 Maintenance 81 Memory card Capacity 84 MENU button 14 Metering Center-weighted 47 Multi 47 Spot 47 MJPEG (Motion JPEG) 94 Motion Timer 38 Movie mode 32 Muting Camera 16 Video 33 N Navigation button 14 P Photo quality 36 Photo styles in Playback mode 61 in Shooting mode 50 Playback button 16 Playback mode 53 Printing photos 72 Print order 63 Program mode 32 Protecting files 55 Q Quick View 75 R Recording Video 32 Voice memo 34 Red-eye in Playback mode...
... ISO speed 40 L Light source (White balance) 47 M Macro 41 Maintenance 81 Memory card Capacity 84 MENU button 14 Metering Center-weighted 47 Multi 47 Spot 47 MJPEG (Motion JPEG) 94 Motion Timer 38 Movie mode 32 Muting Camera 16 Video 33 N Navigation button 14 P Photo quality 36 Photo styles in Playback mode 61 in Shooting mode 50 Playback button 16 Playback mode 53 Printing photos 72 Print order 63 Program mode 32 Protecting files 55 Q Quick View 75 R Recording Video 32 Voice memo 34 Red-eye in Playback mode...


