
User Manual
Page 1
SyncMaster NC220 LED Monitor User Manual The color and the appearance may differ depending on the product, and the specifications are subject to change without prior notice to improve the performance.
SyncMaster NC220 LED Monitor User Manual The color and the appearance may differ depending on the product, and the specifications are subject to change without prior notice to improve the performance.

User Manual
Page 2
...2-1 Installing the Stand 2-2 Adjusting the Product Tilt and Height 2-3 Rotating the Monitor Screen 2-4 Installing a Wall-mount Kit or Desktop Stand 2-5 Connecting to your Network 2-6 Connecting the Power 2-7 Connecting to another Monitor 2-8 Connecting a SERIAL Cable 2-9 Connecting with a PC 2-10 Connecting a Stereo... Adjustment Menu (OSD: On Screen Display) . . . . 3-8 INSTALLING THE SOFTWARE PCoIP 4-1 Natural Color 4-2 MultiScreen 4-3 TROUBLESHOOTING Monitor Self-Diagnosis 5-1 Before Requesting Service 5-2 FAQ 5-3 MORE INFORMATION Specifications 6-1 Power Saving Function 6-2
...2-1 Installing the Stand 2-2 Adjusting the Product Tilt and Height 2-3 Rotating the Monitor Screen 2-4 Installing a Wall-mount Kit or Desktop Stand 2-5 Connecting to your Network 2-6 Connecting the Power 2-7 Connecting to another Monitor 2-8 Connecting a SERIAL Cable 2-9 Connecting with a PC 2-10 Connecting a Stereo... Adjustment Menu (OSD: On Screen Display) . . . . 3-8 INSTALLING THE SOFTWARE PCoIP 4-1 Natural Color 4-2 MultiScreen 4-3 TROUBLESHOOTING Monitor Self-Diagnosis 5-1 Before Requesting Service 5-2 FAQ 5-3 MORE INFORMATION Specifications 6-1 Power Saving Function 6-2

User Manual
Page 6
...solvents, or that is surface active. Wipe the monitor using a soft cloth dampened with wet hands. 3. Otherwise, the liquid may come off the monitor and PC. 2. Clean the exterior of the monitor. Clean the monitor according to the monitor after you contact the nearest service center (paid service...sure you have finished cleaning. 6. Major Safety Precautions 1-3 Otherwise, the exterior may discolor or crack or the panel coating may sink into the monitor and cause a fire, electric shock, or failure. 4. Connect the power cable to the following steps. 1. To avoid electric shock, be...
...solvents, or that is surface active. Wipe the monitor using a soft cloth dampened with wet hands. 3. Otherwise, the liquid may come off the monitor and PC. 2. Clean the exterior of the monitor. Clean the monitor according to the monitor after you contact the nearest service center (paid service...sure you have finished cleaning. 6. Major Safety Precautions 1-3 Otherwise, the exterior may discolor or crack or the panel coating may sink into the monitor and cause a fire, electric shock, or failure. 4. Connect the power cable to the following steps. 1. To avoid electric shock, be...

User Manual
Page 12
... need to move the product at a later stage. • If any items are missing, contact your dealer. • Contact a local dealer to purchase optional items. Monitor CONTENTS Quick Setup Guide Warranty Card (Not available in all locations) User Manual Power cable Stand base OPTIONAL PARTS DC power adapter LAN Cable DVI...
... need to move the product at a later stage. • If any items are missing, contact your dealer. • Contact a local dealer to purchase optional items. Monitor CONTENTS Quick Setup Guide Warranty Card (Not available in all locations) User Manual Power cable Stand base OPTIONAL PARTS DC power adapter LAN Cable DVI...

User Manual
Page 14
2-3 Adjusting the Product Tilt and Height The color and shape of the product and adjust the height carefully. Specifications are subject to change without notice to improve quality. • To adjust the height, remove the fixing pin. • The monitor tilt and height can be adjusted. • Hold the top center of parts may differ from what is shown. Installing the Product 2-3
2-3 Adjusting the Product Tilt and Height The color and shape of the product and adjust the height carefully. Specifications are subject to change without notice to improve quality. • To adjust the height, remove the fixing pin. • The monitor tilt and height can be adjusted. • Hold the top center of parts may differ from what is shown. Installing the Product 2-3

User Manual
Page 15
The monitor may hit the floor and get damaged. 2-4 Installing the Product 2-4 Rotating the Monitor Screen You can rotate your monitor as shown below. • Be sure to fully extend the stand before rotating the monitor. • If you rotate the monitor without fully extending the stand, the corner of the monitor may get damaged. • Do not rotate the monitor counterclockwise.
The monitor may hit the floor and get damaged. 2-4 Installing the Product 2-4 Rotating the Monitor Screen You can rotate your monitor as shown below. • Be sure to fully extend the stand before rotating the monitor. • If you rotate the monitor without fully extending the stand, the corner of the monitor may get damaged. • Do not rotate the monitor counterclockwise.
User Manual
Page 18
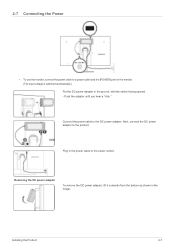
Push the adapter until you hear a "click." Next, connect the DC power adapter to a power outlet and the [POWER] port on the monitor. (The input voltage is switched automatically.) Put the DC power adapter in the groove, with the switch facing upward. - Installing the Product 2-7 Plug in the ... adapter, lift it outwards from the bottom as shown in the power cable to the DC power adapter. 2-7 Connecting the Power • To use the monitor, connect the power cable to the product. Connect the power cable to the power socket.
Push the adapter until you hear a "click." Next, connect the DC power adapter to a power outlet and the [POWER] port on the monitor. (The input voltage is switched automatically.) Put the DC power adapter in the groove, with the switch facing upward. - Installing the Product 2-7 Plug in the ... adapter, lift it outwards from the bottom as shown in the power cable to the DC power adapter. 2-7 Connecting the Power • To use the monitor, connect the power cable to the product. Connect the power cable to the power socket.

User Manual
Page 19
You can connect more monitors via [DVI OUT]. (For presentation purposes). 2-8 Installing the Product 2-8 Connecting to another Monitor The connecting part may differ depending on the product model. • Connect between the [DVI OUT] port on the product and the DVI port on your monitor using a DVI cable.
You can connect more monitors via [DVI OUT]. (For presentation purposes). 2-8 Installing the Product 2-8 Connecting to another Monitor The connecting part may differ depending on the product model. • Connect between the [DVI OUT] port on the product and the DVI port on your monitor using a DVI cable.

User Manual
Page 21
2-10 Connecting with a PC The connecting part may differ depending on the product model. • Connect the [RGB IN] port of the product to a PC. 2-10 Installing the Product Use the [RGB IN] port to directly connect the monitor to the D-Sub port of your PC with a D-Sub cable.
2-10 Connecting with a PC The connecting part may differ depending on the product model. • Connect the [RGB IN] port of the product to a PC. 2-10 Installing the Product Use the [RGB IN] port to directly connect the monitor to the D-Sub port of your PC with a D-Sub cable.

User Manual
Page 22
2-11 Connecting a Stereo Cable The connecting part may differ depending on the product model. • Connect the [AUDIO IN] port on the rear side of the monitor to the sound card of the PC. Installing the Product 2-11
2-11 Connecting a Stereo Cable The connecting part may differ depending on the product model. • Connect the [AUDIO IN] port on the rear side of the monitor to the sound card of the PC. Installing the Product 2-11

User Manual
Page 23
2-12 Connecting Headphones The connecting part may connect your headphones to the monitor. 2-12 Installing the Product You may differ depending on the product model. • Connect your headphones to the Headphone connection terminal.
2-12 Connecting Headphones The connecting part may connect your headphones to the monitor. 2-12 Installing the Product You may differ depending on the product model. • Connect your headphones to the Headphone connection terminal.

User Manual
Page 24
You may differ depending on the monitor. Installing the Product 2-13 2-13 Connecting MIC The connecting part may connect your microphone to the MIC port on the product model. • Connect the microphone cable to the monitor.
You may differ depending on the monitor. Installing the Product 2-13 2-13 Connecting MIC The connecting part may connect your microphone to the MIC port on the product model. • Connect the microphone cable to the monitor.

User Manual
Page 26
... and co-working by displaying the network display screen on another display device by connecting it is a PC over IP? • This monitor can decode and display the screen of 1920*1080 pixels for various fields such as DSC, MP3, external storage device etc. Using the ...Using the product 3-1 What is used by connecting the device through the network (LAN) as well as display the computer screen like a conventional monitor. This monitor shows a far more improved performance than a normal RDP and has been designed to support a resolution of the server PC encoded and transmitted through...
... and co-working by displaying the network display screen on another display device by connecting it is a PC over IP? • This monitor can decode and display the screen of 1920*1080 pixels for various fields such as DSC, MP3, external storage device etc. Using the ...Using the product 3-1 What is used by connecting the device through the network (LAN) as well as display the computer screen like a conventional monitor. This monitor shows a far more improved performance than a normal RDP and has been designed to support a resolution of the server PC encoded and transmitted through...

User Manual
Page 27
...USB port to the USB ports. 3-2 Connect to the host PC using a LAN cable Host PC Hub LAN Cable Monitor Connect the power cord to the power terminal at the back of the host PC. Connect the mouse and the keyboard...an external storage device (DSC, MP3, external storage, etc.). Connect the hub and the LAN port of the monitor. Connect the LAN port on the monitor. The host PC must have an IP address. Connecting one Host PC to many client device is possible only when...connecting the LAN and setting the IP address, you can view the host PC screen on the back of the monitor and the hub.
...USB port to the USB ports. 3-2 Connect to the host PC using a LAN cable Host PC Hub LAN Cable Monitor Connect the power cord to the power terminal at the back of the host PC. Connect the mouse and the keyboard...an external storage device (DSC, MP3, external storage, etc.). Connect the hub and the LAN port of the monitor. Connect the LAN port on the monitor. The host PC must have an IP address. Connecting one Host PC to many client device is possible only when...connecting the LAN and setting the IP address, you can view the host PC screen on the back of the monitor and the hub.

User Manual
Page 28
... conditions. • Connect USB devices such as a mouse, keyboard, Memory Stick, or external hard disk drive by connecting them to the USB port of the monitor without connecting them to USB 2.0. Using the product 3-2 You can be connected and used in this port in Client mode only. 3-2-1 Connecting USB • The...
... conditions. • Connect USB devices such as a mouse, keyboard, Memory Stick, or external hard disk drive by connecting them to the USB port of the monitor without connecting them to USB 2.0. Using the product 3-2 You can be connected and used in this port in Client mode only. 3-2-1 Connecting USB • The...

User Manual
Page 30
... is set for the panel size. Using the product 3-4 Therefore, configure it as follows, referring to the optimal resolution of the panel, unlike for a CDT monitor. 3-4 Standard Signal Mode Table The monitor has one optimal resolution for the best visual quality depending on .
... is set for the panel size. Using the product 3-4 Therefore, configure it as follows, referring to the optimal resolution of the panel, unlike for a CDT monitor. 3-4 Standard Signal Mode Table The monitor has one optimal resolution for the best visual quality depending on .

User Manual
Page 35
OSD Guide will appear on the screen. • If you press a button on the front of the monitor, an OSD Guide will display showing the function of the button before the menu for the pressed button appears. • To go to the menu, press the button on the monitor. Please refer to functions and models. E.g.) LF22NEBHBNMEN • Press one of the buttons on the front of the model code is M, the model has internal speakers. Icon Speaker OSD Guide Description If the 11th digit of the monitor again. • OSD Guide may vary according to actual product. 3-7 Using the product
OSD Guide will appear on the screen. • If you press a button on the front of the monitor, an OSD Guide will display showing the function of the button before the menu for the pressed button appears. • To go to the menu, press the button on the monitor. Please refer to functions and models. E.g.) LF22NEBHBNMEN • Press one of the buttons on the front of the model code is M, the model has internal speakers. Icon Speaker OSD Guide Description If the 11th digit of the monitor again. • OSD Guide may vary according to actual product. 3-7 Using the product

User Manual
Page 36
...; This menu is unavailable when < • This menu is unavailable when < Bright> is set to mode. Bright Coarse Blue Color Tone Menu V-Position Menu Transparency Monitor functions may vary according to actual product.
...; This menu is unavailable when < • This menu is unavailable when < Bright> is set to mode. Bright Coarse Blue Color Tone Menu V-Position Menu Transparency Monitor functions may vary according to actual product.

User Manual
Page 58
... it from the colors of the printed pictures. This software works with using a PC is a color management system developed by Samsung Electronics to the online help of the problems with Samsung products only and enables you see on the screen to adjust the displayed colors on the screen are different from the...
... it from the colors of the printed pictures. This software works with using a PC is a color management system developed by Samsung Electronics to the online help of the problems with Samsung products only and enables you see on the screen to adjust the displayed colors on the screen are different from the...

User Manual
Page 59
... restart the computer after the installation. Insert the installation CD into the CD-ROM drive. 2. Complete the remaining software installation steps according to use the monitor by the graphics card, motherboard and the networking environment.
... restart the computer after the installation. Insert the installation CD into the CD-ROM drive. 2. Complete the remaining software installation steps according to use the monitor by the graphics card, motherboard and the networking environment.


