
Quick Guide Easy Manual Ver.1.0 (English)
Page 1
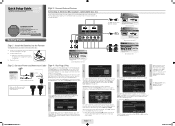
... best picture quality, select HD signal sources and use HDMI cables and connections. Note that many digital cable programs are not sure about what kind of cable system you have a cable or satellite box. Check with no cable box, select Cable. If you have problems operating your devices are receiving HD signals. To register this TV in HD. ends of the remote upward as shown in Progress. 5 DTV Cable : -- Replace the cover. Power Input Step 4 : Run Plug & Play...
... best picture quality, select HD signal sources and use HDMI cables and connections. Note that many digital cable programs are not sure about what kind of cable system you have a cable or satellite box. Check with no cable box, select Cable. If you have problems operating your devices are receiving HD signals. To register this TV in HD. ends of the remote upward as shown in Progress. 5 DTV Cable : -- Replace the cover. Power Input Step 4 : Run Plug & Play...
Quick Guide Easy Manual Ver.1.0 (English)
Page 2
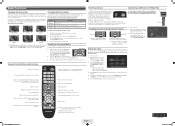
... work best with specific types of screen sizes as a Blu-ray/ DVD player, a cable/satellite box, antenna or a cable TV input. The Picture Modes are listed and described in the Channel List, Media Play menu, etc. It is a device, such as well. The menu's left side has the following sizes are not using the Media Play feature. Press the ▲ or ▼ button on any side. For example, to select a menu option, and then press the ENTERE button. 3. Adjust the volume. Colored buttons...
... work best with specific types of screen sizes as a Blu-ray/ DVD player, a cable/satellite box, antenna or a cable TV input. The Picture Modes are listed and described in the Channel List, Media Play menu, etc. It is a device, such as well. The menu's left side has the following sizes are not using the Media Play feature. Press the ▲ or ▼ button on any side. For example, to select a menu option, and then press the ENTERE button. 3. Adjust the volume. Colored buttons...
User Manual
Page 2
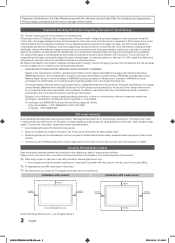
... screen, use these controls to view wide screen format fullmotion video. Installation with a wall-mount. 4inches 4inches 4inches 4inches 4inches 4inches © 2012 Samsung Electronics Co., Ltd. Installation with a stand. To avoid this effect, please follow below recommendations: • Avoid displaying the same TV channel for long periods. • Always try to and from actual product appearance. On LCD models that exceed the above described warranty repairs must be changed...
... screen, use these controls to view wide screen format fullmotion video. Installation with a wall-mount. 4inches 4inches 4inches 4inches 4inches 4inches © 2012 Samsung Electronics Co., Ltd. Installation with a stand. To avoid this effect, please follow below recommendations: • Avoid displaying the same TV channel for long periods. • Always try to and from actual product appearance. On LCD models that exceed the above described warranty repairs must be changed...
User Manual
Page 3
... Channels 12 Memorizing channels 12 Editing channels 12 Other Features 12 yy Picture Menu 14 Changing the Preset Picture Mode 14 Adjusting picture settings 14 Changing the Picture Options 14 yy Sound Menu 16 Changing the Preset Sound Mode 16 Adjusting sound settings 16 Sound Settings 16 yy Setup Menu 17 Setting the Time 17 Using the Sleep Timer 17 Setting the On/Off Timer 17 Locking Programs 18 Other Features 19 yy Support Menu 20 Advanced Features yy Media Play 21 Connecting a USB Device 21 Other Information yy Installing the Wall Mount...
... Channels 12 Memorizing channels 12 Editing channels 12 Other Features 12 yy Picture Menu 14 Changing the Preset Picture Mode 14 Adjusting picture settings 14 Changing the Picture Options 14 yy Sound Menu 16 Changing the Preset Sound Mode 16 Adjusting sound settings 16 Sound Settings 16 yy Setup Menu 17 Setting the Time 17 Using the Sleep Timer 17 Setting the On/Off Timer 17 Locking Programs 18 Other Features 19 yy Support Menu 20 Advanced Features yy Media Play 21 Connecting a USB Device 21 Other Information yy Installing the Wall Mount...
User Manual
Page 4
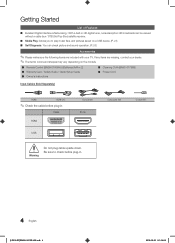
... pictures saved on the models. ■■ Remote Control (BN59-01006A) & Batteries (AAA x 2) ■■ Warranty Card / Safety Guide / Quick Setup Guide ■■ Owner's Instructions ■■ Cleaning Cloth (BN63-01798B) ■■ Power Cord Input Cables (Sold Separately) HDMI HDMI-DVI ✎✎Check the cable before plug-in Cable HDMI USB Component Ports Warning Do not plug cable upside down. If any items are included with your dealer. ✎✎The items' colors and...
... pictures saved on the models. ■■ Remote Control (BN59-01006A) & Batteries (AAA x 2) ■■ Warranty Card / Safety Guide / Quick Setup Guide ■■ Owner's Instructions ■■ Cleaning Cloth (BN63-01798B) ■■ Power Cord Input Cables (Sold Separately) HDMI HDMI-DVI ✎✎Check the cable before plug-in Cable HDMI USB Component Ports Warning Do not plug cable upside down. If any items are included with your dealer. ✎✎The items' colors and...
User Manual
Page 6
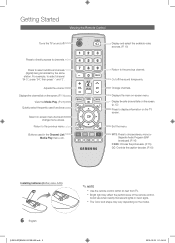
... channels. Adjusts the volume. Displays the channel list on the screen. (P. 11) View the Media Play. (P. 21) Quickly select frequently used in the Channel List, Media Play menu, etc. xx Bright light may vary depending on -screen menu items and change menu values. Getting Started Viewing the Remote Control Turns the TV on and off the sound temporarily. Cut off . Press to directly access to choose stereo, mono or Separate Audio Program (SAP broadcast). (P. 16) P.SIZE: Choose the picture size. (P. 15) CC: Controls the caption...
... channels. Adjusts the volume. Displays the channel list on the screen. (P. 11) View the Media Play. (P. 21) Quickly select frequently used in the Channel List, Media Play menu, etc. xx Bright light may vary depending on -screen menu items and change menu values. Getting Started Viewing the Remote Control Turns the TV on and off the sound temporarily. Cut off . Press to directly access to choose stereo, mono or Separate Audio Program (SAP broadcast). (P. 16) P.SIZE: Choose the picture size. (P. 15) CC: Controls the caption...
User Manual
Page 7
... Demo Mode is for the best HD screen quality is displayed. 7 Enjoy your TV. Select Air, Cable or Auto. ✎✎In Cable mode, by pressing the you select the Auto, set to TV. 1 Selecting a language Press the ▲ or ▼ button, then press the ENTERE button. If You Want to Reset This Feature... OO MENUm → Setup → Plug & Play → ENTERE Plug & Play Language : English Time SLEEP S.M Game Mode : Off V-Chip Caption...
... Demo Mode is for the best HD screen quality is displayed. 7 Enjoy your TV. Select Air, Cable or Auto. ✎✎In Cable mode, by pressing the you select the Auto, set to TV. 1 Selecting a language Press the ▲ or ▼ button, then press the ENTERE button. If You Want to Reset This Feature... OO MENUm → Setup → Plug & Play → ENTERE Plug & Play Language : English Time SLEEP S.M Game Mode : Off V-Chip Caption...

User Manual
Page 10
... supported. Connections MEDIA.P P.SIZE Changing the Input source Source List OO MENUm → Input → Source List → ENTERE Use to select TV or an external input sources such as a DVD / Blu-ray player / cable box / STB satellite receiver. ■■ TV / AV / Component / HDMI1/DVI / HDMI2 ✎✎ You can only choose external devices that are connected to DVI mode under Edit Name. ✎✎ When connecting an AV devices to the HDMI IN 1(DVI) port with HDMI...
... supported. Connections MEDIA.P P.SIZE Changing the Input source Source List OO MENUm → Input → Source List → ENTERE Use to select TV or an external input sources such as a DVD / Blu-ray player / cable box / STB satellite receiver. ■■ TV / AV / Component / HDMI1/DVI / HDMI2 ✎✎ You can only choose external devices that are connected to DVI mode under Edit Name. ✎✎ When connecting an AV devices to the HDMI IN 1(DVI) port with HDMI...
User Manual
Page 11
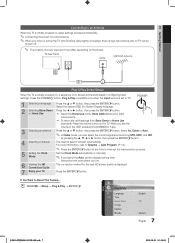
... access the sub-menu. Channel Menu ¦¦ Seeing Channels MEDIA.P 1 FAV.CH Channel List OO MENUm → Channel → Channel List → ENTERE POWER Add, delete or set as a Favorite. Then you 1 MENU button: Displays the main on -screen menu. How to the left of an item with the Channel List xx Green (Zoom): Enlarges or shrinks a channel number. Select the desired submenu with the ▲ or ▼ button. A channel set Favorite channels and use 2 3 P 4 the program guide for digital...
... access the sub-menu. Channel Menu ¦¦ Seeing Channels MEDIA.P 1 FAV.CH Channel List OO MENUm → Channel → Channel List → ENTERE POWER Add, delete or set as a Favorite. Then you 1 MENU button: Displays the main on -screen menu. How to the left of an item with the Channel List xx Green (Zoom): Enlarges or shrinks a channel number. Select the desired submenu with the ▲ or ▼ button. A channel set Favorite channels and use 2 3 P 4 the program guide for digital...
User Manual
Page 14
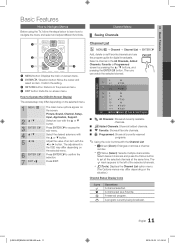
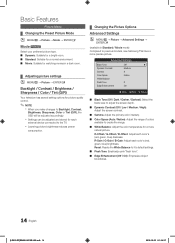
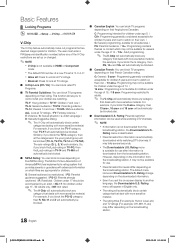
... Picture Options Advanced Settings OO MENUm → Picture → Advanced Settings → ENTERE (available in a dark room. ¦¦ Adjusting picture settings OO MENUm → Picture → ENTERE Backlight / Contrast / Brightness / Sharpness / Color / Tint (G/R) Your television has several setting options for each external device connected to the TV. Basic Features Picture Menu ¦¦ Changing the Preset Picture Mode OO MENUm → Picture → Mode → ENTERE Mode t Select your preferred picture type...
... Picture Options Advanced Settings OO MENUm → Picture → Advanced Settings → ENTERE (available in a dark room. ¦¦ Adjusting picture settings OO MENUm → Picture → ENTERE Backlight / Contrast / Brightness / Sharpness / Color / Tint (G/R) Your television has several setting options for each external device connected to the TV. Basic Features Picture Menu ¦¦ Changing the Preset Picture Mode OO MENUm → Picture → Mode → ENTERE Mode t Select your preferred picture type...
User Manual
Page 15
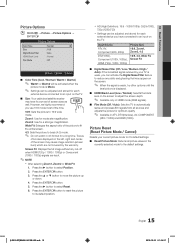
...), HDMI (720p, 1080i, 1080p) Picture Size 16:9, Zoom1, Zoom2, 4:3 16:9, 4:3, Wide Fit, Screen Fit ■■ Digital Noise Filter (Off / Low / Medium / High / Auto): If the broadcast signal received by the warranty. SLEEP ✎✎NOTE S.MODE P.MODE xx After selecting Zoom1, Zoom2 or Wide Fit: 1. However, we highly recommend you use 16:9 mode most of the screen may have connected to it's default settings. ■■ Reset Picture Mode: Returns...
...), HDMI (720p, 1080i, 1080p) Picture Size 16:9, Zoom1, Zoom2, 4:3 16:9, 4:3, Wide Fit, Screen Fit ■■ Digital Noise Filter (Off / Low / Medium / High / Auto): If the broadcast signal received by the warranty. SLEEP ✎✎NOTE S.MODE P.MODE xx After selecting Zoom1, Zoom2 or Wide Fit: 1. However, we highly recommend you use 16:9 mode most of the screen may have connected to it's default settings. ■■ Reset Picture Mode: Returns...
User Manual
Page 17
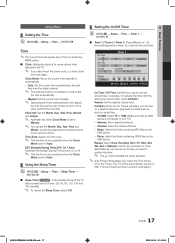
... a specific channel or play back contents such as photo or audio files. -- TV/USB: Select TV or USB. (Make sure that an USB device is connected to set the time manually. Music: Select the folder containing MP3 files on the USB device. Contents: When the On Time is set the clock first. If you select Manual, you can turn on the broadcast station and signal, the auto time set up...
... a specific channel or play back contents such as photo or audio files. -- TV/USB: Select TV or USB. (Make sure that an USB device is connected to set the time manually. Music: Select the folder containing MP3 files on the USB device. Contents: When the On Time is set the clock first. If you select Manual, you can turn on the broadcast station and signal, the auto time set up...
User Manual
Page 18
... depending on their own. / G: General programming, suitable for use . G: General / 8 ans+: Programming generally considered acceptable for children 8 years and over to watch on their rating. Rating menu is automatically downloaded while watching DTV channels. Rating menu is downloaded from the broadcasting station, the Downloadable U.S. xx Allow all: Press to unlock all audiences. / PG: Parental Guidance. / 14+: Programming contains themes or content which...
... depending on their own. / G: General programming, suitable for use . G: General / 8 ans+: Programming generally considered acceptable for children 8 years and over to watch on their rating. Rating menu is automatically downloaded while watching DTV channels. Rating menu is downloaded from the broadcasting station, the Downloadable U.S. xx Allow all: Press to unlock all audiences. / PG: Parental Guidance. / 14+: Programming contains themes or content which...
User Manual
Page 19
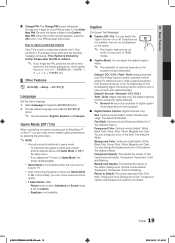
... the remote-control buttons in the Confirm New PIN. The default is set Game Mode to unblock. ✎✎ If you may not be displayed on the screen. ✎✎ The Caption feature does not work in digital caption mode depending on ) ¦¦ Other Features OO MENUm → Setup → ENTERE Language Set the menu language. 1. xx Game Mode is not available when the input source is Style 0. P ■■ Change...
... the remote-control buttons in the Confirm New PIN. The default is set Game Mode to unblock. ✎✎ If you may not be displayed on the screen. ✎✎ The Caption feature does not work in digital caption mode depending on ) ¦¦ Other Features OO MENUm → Setup → ENTERE Language Set the menu language. 1. xx Game Mode is not available when the input source is Style 0. P ■■ Change...
User Manual
Page 20
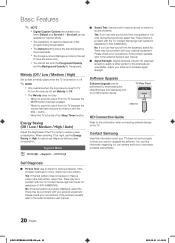
...; Signal Strength: (digital channels only) An HD channel's reception quality is set to a USB memory device. button. -- TV Rear Panel USB Drive HD Connection Guide Refer to this information when your antenna to minimum with the VOL - xx The Foreground and Background cannot be a problem with your external equipment. xx The Melody does not play. -- When watching TV at all during the sound test, select Yes. Software Upgrade Software Upgrade can...
...; Signal Strength: (digital channels only) An HD channel's reception quality is set to a USB memory device. button. -- TV Rear Panel USB Drive HD Connection Guide Refer to this information when your antenna to minimum with the VOL - xx The Foreground and Background cannot be a problem with your external equipment. xx The Melody does not play. -- When watching TV at all during the sound test, select Yes. Software Upgrade Software Upgrade can...
User Manual
Page 25
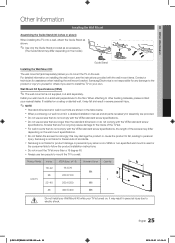
... a solid wall perpendicular to a wall. xx Do not use screws that do not comply with the VESA standard screw specifications. 05 Other Information Other Information Installing the Wall Mount Assembling the Guide Stand (32 inches or above) When installing the TV onto a wall, attach the Guide Stand as shown. ✎✎Use only the Guide Stand provided as an accessory. (The Guide Stand may cause damage to the inside of the TV set. When...
... a solid wall perpendicular to a wall. xx Do not use screws that do not comply with the VESA standard screw specifications. 05 Other Information Other Information Installing the Wall Mount Assembling the Guide Stand (32 inches or above) When installing the TV onto a wall, attach the Guide Stand as shown. ✎✎Use only the Guide Stand provided as an accessory. (The Guide Stand may cause damage to the inside of the TV set. When...
User Manual
Page 29
... Troubleshooting If the TV seems to have a problem, first review this manual, visit www.samsung.com/spsn then check "2011 Stand Assembly" on "Top 7 TV Troubleshooting Tips". If none of your PC is not correct or black and White, first run plug and play. If you follow below step with your remote, you can turn these features off because the cable or satellite box is not outputting a signal...
... Troubleshooting If the TV seems to have a problem, first review this manual, visit www.samsung.com/spsn then check "2011 Stand Assembly" on "Top 7 TV Troubleshooting Tips". If none of your PC is not correct or black and White, first run plug and play. If you follow below step with your remote, you can turn these features off because the cable or satellite box is not outputting a signal...
User Manual
Page 30
... Picture mode / Color / Brightness / Sharpness) (P. 14) • Adjust Energy Saving option in the store. • If you have a HDMI connected to your TV). • If you have an analog cable/satellite box, upgrade to a digital set to Screen Fit, change your cable box's audio option to HDMI when you are using Component connection, make sure the component cables are upscaled from SD(Standard Definition) contents. • Adjust the Cable/Sat box video output resolution to 1080i or 720p. Picture - When changing channels...
... Picture mode / Color / Brightness / Sharpness) (P. 14) • Adjust Energy Saving option in the store. • If you have a HDMI connected to your TV). • If you have an analog cable/satellite box, upgrade to a digital set to Screen Fit, change your cable box's audio option to HDMI when you are using Component connection, make sure the component cables are upscaled from SD(Standard Definition) contents. • Adjust the Cable/Sat box video output resolution to 1080i or 720p. Picture - When changing channels...
User Manual
Page 31
... changing Caption Mode Service 1 to MENU - The picture is distorted: macroblock, error, small block, dots, pixelization. • Compression of the screen when displaying upscaled SD (4:3) contents. • Black bars on the Top & Bottom will be connected to an HDMI input on the TV. • Make sure your external device's (Cable/Sat Box, DVD, Blu-ray etc) video outputs to match the connections to make sure the correct Cable TV signal type is set -top-box...
... changing Caption Mode Service 1 to MENU - The picture is distorted: macroblock, error, small block, dots, pixelization. • Compression of the screen when displaying upscaled SD (4:3) contents. • Black bars on the Top & Bottom will be connected to an HDMI input on the TV. • Make sure your external device's (Cable/Sat Box, DVD, Blu-ray etc) video outputs to match the connections to make sure the correct Cable TV signal type is set -top-box...
User Manual
Page 32
... Store Demo mode to Plug & Play (Initial Setup). (P. 7) ✎✎Watch these troubleshooting on video at the edge of the frame of the TV. • This is turned off , or adjust the volume. • Program the Cable/Sat remote control to the wall, we recommend using cables with in this manual. Caption on the screen. • Select Home Use under Plug & Play mode. Your settings are flexible enough for SAMSUNG TV code. 'Mode Not Supported' message. • Check the supported resolution...
... Store Demo mode to Plug & Play (Initial Setup). (P. 7) ✎✎Watch these troubleshooting on video at the edge of the frame of the TV. • This is turned off , or adjust the volume. • Program the Cable/Sat remote control to the wall, we recommend using cables with in this manual. Caption on the screen. • Select Home Use under Plug & Play mode. Your settings are flexible enough for SAMSUNG TV code. 'Mode Not Supported' message. • Check the supported resolution...


