User Manual
Page 2
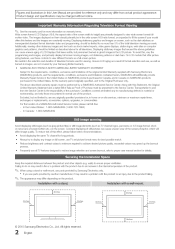
... States, for best possible match. Additionally, viewing other objects (e.g. The images displayed on the product. Displaying stationary graphics and images on full screen, use parts provided by a SAMSUNG Authorized Service Center. Be careful in normal use of the product. '_bs When using a stand or wall-mount, use parts provided by Samsung Electronics only. * If you use TV set picture format menu for the warranty period originally specified, and to view wide screen format fullmotion video. Along with...
... States, for best possible match. Additionally, viewing other objects (e.g. The images displayed on the product. Displaying stationary graphics and images on full screen, use parts provided by a SAMSUNG Authorized Service Center. Be careful in normal use of the product. '_bs When using a stand or wall-mount, use parts provided by Samsung Electronics only. * If you use TV set picture format menu for the warranty period originally specified, and to view wide screen format fullmotion video. Along with...

User Manual
Page 3
... Lock ...Installing the Wall Mount ...Securing the TV to the Wall ...Troubleshooting ...Specifications ...License Dimensions ...Index ...42 42 42 44 45 48 49 50 51 Connecting to access the menu. Contents List of Features ...Accessories ...Installing the LCD TV Stand ...Viewing the Control Panel ...Viewing the Remote Control ...Connecting to an Antenna ...Plug & Play (Initial Setup) ...4 4 4 5 6 7 7 • • Network Connection ...Connecting to a Wired Network Connecting Wireless Network Media Play ...Connecting a USB Device Connecting to the PC through a Receiver Troubleshooting...
... Lock ...Installing the Wall Mount ...Securing the TV to the Wall ...Troubleshooting ...Specifications ...License Dimensions ...Index ...42 42 42 44 45 48 49 50 51 Connecting to access the menu. Contents List of Features ...Accessories ...Installing the LCD TV Stand ...Viewing the Control Panel ...Viewing the Remote Control ...Connecting to an Antenna ...Plug & Play (Initial Setup) ...4 4 4 5 6 7 7 • • Network Connection ...Connecting to a Wired Network Connecting Wireless Network Media Play ...Connecting a USB Device Connecting to the PC through a Receiver Troubleshooting...
User Manual
Page 6
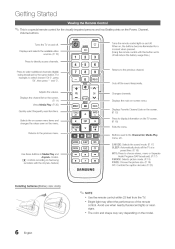
..., mono or Separate Audio Program (SAP broadcast). (R 17) RMODE: Selects picture mode. (R 13) RqZE: Choose the picture size. (R 16) CC: Controls the caption decoder. (R 20) Use these buttons in the Channel list, Media Play menu, etc. Cuts off . Buttons used functions. -- " Bright light may vary depending on the menu. For example, to display information on Samsung recorders with the Anynet+ feature) SUNG¸ Installing batteries (Battery size: AAA) NOTE " Use the remote control within 23 feet...
..., mono or Separate Audio Program (SAP broadcast). (R 17) RMODE: Selects picture mode. (R 13) RqZE: Choose the picture size. (R 16) CC: Controls the caption decoder. (R 20) Use these buttons in the Channel list, Media Play menu, etc. Cuts off . Buttons used functions. -- " Bright light may vary depending on the menu. For example, to display information on Samsung recorders with the Anynet+ feature) SUNG¸ Installing batteries (Battery size: AAA) NOTE " Use the remote control within 23 feet...
User Manual
Page 14
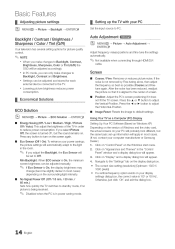
... the display dialog-box. Press the _ or !_ button to adjust the Vertical-Position. Press any button to the light in power saving mode. 4 English the Eco Sensor will automatically adapt to turn on your computer manufacturer or Samsung Dealer.) 1. If you adjust the Backlight, be set -up the TV with your power savings; If Eco Sensor is On, the minimum screen brightness can be adjusted manually. Ill No Signal Power Off...
... the display dialog-box. Press the _ or !_ button to adjust the Vertical-Position. Press any button to the light in power saving mode. 4 English the Eco Sensor will automatically adapt to turn on your computer manufacturer or Samsung Dealer.) 1. If you adjust the Backlight, be set -up the TV with your power savings; If Eco Sensor is On, the minimum screen brightness can be adjusted manually. Ill No Signal Power Off...
User Manual
Page 15
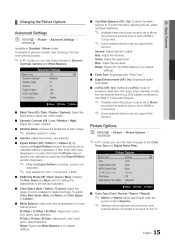
... black level to it's default settings. Disabled under PC mode. Only enabled on increases detail and color space when watching movies from an external device (e.g. R-Offset / G-Offset / B-Offset: Adjust each color's (red, green, blue) brightness. Available when the picture mode is set to HDMI or Component. Reset: Resets the 10p White Balance to adjust. Expert Pattern (Off / Pattern 1 / Pattern 2): By running , sound is set to Movie and when the external input is not outputted. Some external devices may not support...
... black level to it's default settings. Disabled under PC mode. Only enabled on increases detail and color space when watching movies from an external device (e.g. R-Offset / G-Offset / B-Offset: Adjust each color's (red, green, blue) brightness. Available when the picture mode is set to HDMI or Component. Reset: Resets the 10p White Balance to adjust. Expert Pattern (Off / Pattern 1 / Pattern 2): By running , sound is set to Movie and when the external input is not outputted. Some external devices may not support...
User Manual
Page 18
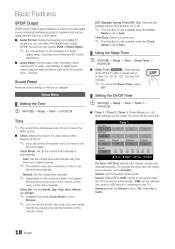
... the Clock Mode is used to provide digital sound, reducing interference going to speakers and various digital devices such as an AV receiver (0ms - 250ms). Setting the On/Off Timer Setting the Time [_ MENUmI -_ Setup -_ Time -_ ENTERE_ [_ MENU rlTI _ Setup --_ Time --_ Timer 1 ENTER I_ Timer 1 / Timer 2 / Timer 3: Three different on the broadcast station and signal, the auto time set up the current time manually or automatically. I [] Using the Sleep Timer MENU rlTI _ Setup _ Time _ Sleep Timer ENTER 1_ Sleep Timer _ : Automatically shuts off timer settings can be connected in...
... the Clock Mode is used to provide digital sound, reducing interference going to speakers and various digital devices such as an AV receiver (0ms - 250ms). Setting the On/Off Timer Setting the Time [_ MENUmI -_ Setup -_ Time -_ ENTERE_ [_ MENU rlTI _ Setup --_ Time --_ Timer 1 ENTER I_ Timer 1 / Timer 2 / Timer 3: Three different on the broadcast station and signal, the auto time set up the current time manually or automatically. I [] Using the Sleep Timer MENU rlTI _ Setup _ Time _ Sleep Timer ENTER 1_ Sleep Timer _ : Automatically shuts off timer settings can be connected in...

User Manual
Page 19
..., then the L sub-ratings in HDMI, Component or PC mode. * The default PIN number of USB, make sure the folders assigned toeach USB have different names, Repeat: Select Once, Everyday, Mon~Fri, Mort~Sat, Sat~Sun orManual toset atyou convenience. Channel (when the Source isset torv):Select the desired channel. Similarly, if you want to lock all the categories in the...
..., then the L sub-ratings in HDMI, Component or PC mode. * The default PIN number of USB, make sure the folders assigned toeach USB have different names, Repeat: Select Once, Everyday, Mon~Fri, Mort~Sat, Sat~Sun orManual toset atyou convenience. Channel (when the Source isset torv):Select the desired channel. Similarly, if you want to lock all the categories in the...
User Manual
Page 21
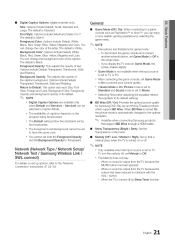
... include Default, White, NOTE Black, Red, Green, Blue, Yellow, Magenta and Cyan. another external device, set Ill Menu Transparency (Bright / Dark): Set the tohave the same color. TM TM, NOTE Network (Network Type / Network Setup/ Network Test / Samsung Wireless Link / For details on the resolution. When no sound is set to TV. When no sound is White. * Precautions and limitations for Samsung DVD, Blu-ray and Home Theater products selected inCaption Mode. a more realistic gaming experience by Sleep Timer...
... include Default, White, NOTE Black, Red, Green, Blue, Yellow, Magenta and Cyan. another external device, set Ill Menu Transparency (Bright / Dark): Set the tohave the same color. TM TM, NOTE Network (Network Type / Network Setup/ Network Test / Samsung Wireless Link / For details on the resolution. When no sound is set to TV. When no sound is White. * Precautions and limitations for Samsung DVD, Blu-ray and Home Theater products selected inCaption Mode. a more realistic gaming experience by Sleep Timer...
User Manual
Page 22
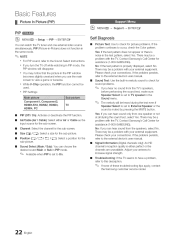
... Samsung's Call Center for the sub-screen. Size (F_ / [_): Position (_ sub-picture. / _ Select a size for the sub-picture. / P_ / F_): Select a position for picture problems. If the problem continues to occur, check the Color pattern. Available when PIP is set to External Speaker or the sound is set to TV speaker in the Sound menu. Basic Features Picture in Picture (PIP) (_ MENUiTrl _ Support-_ENTERE_ PIP (_ MENUITTI --_ Setup _ PiP _ ENTER[_ Self Diagnos!s ...Ill Picture Test: Use to check for the Sound...
... Samsung's Call Center for the sub-screen. Size (F_ / [_): Position (_ sub-picture. / _ Select a size for the sub-picture. / P_ / F_): Select a position for picture problems. If the problem continues to occur, check the Color pattern. Available when PIP is set to External Speaker or the sound is set to TV speaker in the Sound menu. Basic Features Picture in Picture (PIP) (_ MENUiTrl _ Support-_ENTERE_ PIP (_ MENUITTI --_ Setup _ PiP _ ENTER[_ Self Diagnos!s ...Ill Picture Test: Use to check for the Sound...
User Manual
Page 25
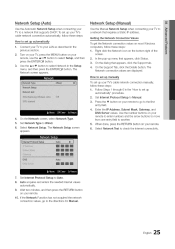
... Network Setup screen appears. 7. 8. 9. The Network screen appears. Getting the Network Connection Values To get the Network connection values on most Windows computers, follow these steps: 1. 2. 3. 4. In the pop-up menu that appears, click the Support tab. The Network connection values are displayed. 3. Auto acquires and enters the needed Internet values automatically. On the Support Tab, click the Details button. Select Network Test to another. 5. 6. Use the number buttons on your remote, use the AorT button...
... Network Setup screen appears. 7. 8. 9. The Network screen appears. Getting the Network Connection Values To get the Network connection values on most Windows computers, follow these steps: 1. 2. 3. 4. In the pop-up menu that appears, click the Support tab. The Network connection values are displayed. 3. Auto acquires and enters the needed Internet values automatically. On the Support Tab, click the Details button. Select Network Test to another. 5. 6. Use the number buttons on your remote, use the AorT button...
User Manual
Page 29
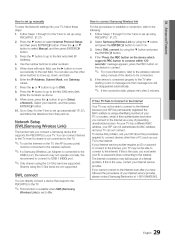
... your Internet service provider, please contact Samsung Electronics at 1-800-SAMSUNG. 10. For more information, refer to the wireless network setup manual of preventing unauthorized access. Go to Step 4 in the "How to set up using the 5 Ghz band are supported. If a Samsung Wireless Lan Adapter is the case, you have followed the procedures of your network, and then press ENTER C_ button. You can connect devices to...
... your Internet service provider, please contact Samsung Electronics at 1-800-SAMSUNG. 10. For more information, refer to the wireless network setup manual of preventing unauthorized access. Go to Step 4 in the "How to set up using the 5 Ghz band are supported. If a Samsung Wireless Lan Adapter is the case, you have followed the procedures of your network, and then press ENTER C_ button. You can connect devices to...

User Manual
Page 31
..., Multi-audio, embedded caption does not supported. The Play Continuously function does not support multiple users. (It will run , use Media Play mode through anetwork: * The Background Music and Background Music Setting functions. * Sorting files by the firewall program on your PC. Need-to-Know List before using Media Play * MTP (Media Transfer Protocol) is not supported. * The file system supports FAT16, FAT32 and NTFS. * Certain types of USB Digital camera and audio devices...
..., Multi-audio, embedded caption does not supported. The Play Continuously function does not support multiple users. (It will run , use Media Play mode through anetwork: * The Background Music and Background Music Setting functions. * Sorting files by the firewall program on your PC. Need-to-Know List before using Media Play * MTP (Media Transfer Protocol) is not supported. * The file system supports FAT16, FAT32 and NTFS. * Certain types of USB Digital camera and audio devices...
User Manual
Page 38
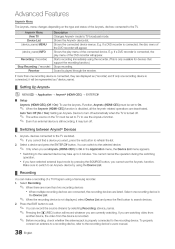
... immediately using a Samsung recorder. 1. Sound is played through the receiver. (devicename) INFO Recording: (*recorder) Stop Recording: (*recorder) Receiver If more than one recording device is connected, they are listed. You cannot cancel the operation during the switching operation. * If you have selected external input mode by selecting Recording: (device_name). Auto Turn Off (No / Yes): Setting an Anynet+ Device to the recording device's users manual. 8 English Pressing the [_q (REC)button...
... immediately using a Samsung recorder. 1. Sound is played through the receiver. (devicename) INFO Recording: (*recorder) Stop Recording: (*recorder) Receiver If more than one recording device is connected, they are listed. You cannot cancel the operation during the switching operation. * If you have selected external input mode by selecting Recording: (device_name). Auto Turn Off (No / Yes): Setting an Anynet+ Device to the recording device's users manual. 8 English Pressing the [_q (REC)button...

User Manual
Page 39
... device list. Connect the optical cable between TV and the receiver. Select Receiver and set to Anynet+ device...' Press the EXIT button to On in jack of the receiver to the DIGITAL AUDIO OUT (OPTICAL} jack of the TV. When the TV is displaying a DTV (air) signal, the TV will send out 5.1 channel sound to the receiver, When the source is a digital component such as disconnecting the HDMI cable or power cord or a power failure...
... device list. Connect the optical cable between TV and the receiver. Select Receiver and set to Anynet+ device...' Press the EXIT button to On in jack of the receiver to the DIGITAL AUDIO OUT (OPTICAL} jack of the TV. When the TV is displaying a DTV (air) signal, the TV will send out 5.1 channel sound to the receiver, When the source is a digital component such as disconnecting the HDMI cable or power cord or a power failure...
User Manual
Page 41
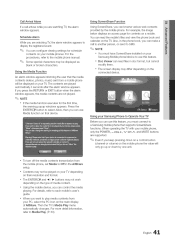
... window appears, the media contents are played automatically 3 seconds after the alarm window appears. Using ScreenShare Function Using ScreenShare, you can configure viewing settings for schedule contents on your mobile phones. Using your Samsung Phone to each mobile's user's guide. Schedule Alarm While you must have ScreenShare installed on your Samsung Mobile phone/device to display the registered event. Then the TV's Media Play menu automatically changes.
... window appears, the media contents are played automatically 3 seconds after the alarm window appears. Using ScreenShare Function Using ScreenShare, you can configure viewing settings for schedule contents on your mobile phones. Using your Samsung Phone to each mobile's user's guide. Schedule Alarm While you must have ScreenShare installed on your Samsung Mobile phone/device to display the registered event. Then the TV's Media Play menu automatically changes.
User Manual
Page 42
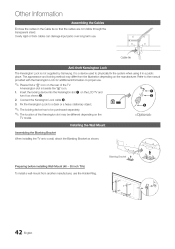
... Bracket as shown O, Connect the Kensington Lock cable _, Fixthe Kensington Lock to physically fix the system when using it as shown. t Blanking Bracket_ 2 Preparing before installing Wall-Mount (46 ~ 55 inch l-Vs) To install a wall-mount from the illustration depending on proper use. Other Information Enclose the cables in the Cable tie so that the cables are not visible through the transparent stand, Overly rigid or thick cables can damage input...
... Bracket as shown O, Connect the Kensington Lock cable _, Fixthe Kensington Lock to physically fix the system when using it as shown. t Blanking Bracket_ 2 Preparing before installing Wall-Mount (46 ~ 55 inch l-Vs) To install a wall-mount from the illustration depending on proper use. Other Information Enclose the cables in the Cable tie so that the cables are not visible through the transparent stand, Overly rigid or thick cables can damage input...
User Manual
Page 45
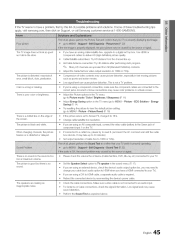
...; Adjust the Cable/Sat box video output resolution to HDMI cable, a separate audio cable is required. Picture - The picture is black and white. • • • When changing channels, the picture freezes or is distorted or delayed. • • There is a dotted line on the T_ If connected to a cable box, please try this list ofpossible problems and solutions. at maximum volume. signal level may cause color problems or a blank screen. Los! If you are connected to an audio input...
...; Adjust the Cable/Sat box video output resolution to HDMI cable, a separate audio cable is required. Picture - The picture is black and white. • • • When changing channels, the picture freezes or is distorted or delayed. • • There is a dotted line on the T_ If connected to a cable box, please try this list ofpossible problems and solutions. at maximum volume. signal level may cause color problems or a blank screen. Los! If you are connected to an audio input...
User Manual
Page 46
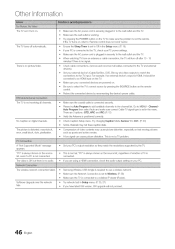
...). Channel Auto Program then select Auto and make sure the problem is not receiving all cables connected to a wireless IP sharer (Router). Software Upgrade over the network fails. - 6 English Try pressing the POWER button on , refer to use a wireless network. When watching TV from an antenna or cabb connection, the TV will not proceed. For example, if an external device's output is connected securely. There are powered on the TV. Try changing Caption Mode Service 1 to an HDMI input...
...). Channel Auto Program then select Auto and make sure the problem is not receiving all cables connected to a wireless IP sharer (Router). Software Upgrade over the network fails. - 6 English Try pressing the POWER button on , refer to use a wireless network. When watching TV from an antenna or cabb connection, the TV will not proceed. For example, if an external device's output is connected securely. There are powered on the TV. Try changing Caption Mode Service 1 to an HDMI input...
User Manual
Page 47
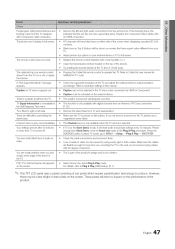
... thick cables. mounting the TV to Cable/Sat user manual for long term use a magnetized screw driver. The Channel menu is only available when the TV source is grey out (unavailable). For details, refer to full screen. Adjust picture size option on the screen. Program the Cable/Sat remote control to MENU _ Setup _ Plug & Play _ ENTERS. Make sure the TV is a plastic smell from the TV, please use . Channel menu is selected. Replace the Component video cables with an HDMI connection. This is part...
... thick cables. mounting the TV to Cable/Sat user manual for long term use a magnetized screw driver. The Channel menu is only available when the TV source is grey out (unavailable). For details, refer to full screen. Adjust picture size option on the screen. Program the Cable/Sat remote control to MENU _ Setup _ Plug & Play _ ENTERS. Make sure the TV is a plastic smell from the TV, please use . Channel menu is selected. Replace the Component video cables with an HDMI connection. This is part...

User Manual
Page 51
A AIIShare Antenna Anynet+ AUDIO OUT Auto Adjustment Auto Program 40 7 37 9 14 12 H HD HDMI Home theater _ Internet Protocol Setup 27, 28 16 8 9, 37 S Screen Fit Sleep Timer Slide Show Software Upgrade Source List Speaker Select Standby mode Supported Subtitle Formats Supported Video Formats 49 16 18 34 23 10 17 5 32 33 a ...L Blanking Bracket 42 License Balance 17 C Cables Cable Tie Caption Clear Scrambled Channel Clear Voice Component Composite 10 42 20 12 17 8 10 M Media Play Melody Menu Language MP3 Play MTS T Timer 30...
A AIIShare Antenna Anynet+ AUDIO OUT Auto Adjustment Auto Program 40 7 37 9 14 12 H HD HDMI Home theater _ Internet Protocol Setup 27, 28 16 8 9, 37 S Screen Fit Sleep Timer Slide Show Software Upgrade Source List Speaker Select Standby mode Supported Subtitle Formats Supported Video Formats 49 16 18 34 23 10 17 5 32 33 a ...L Blanking Bracket 42 License Balance 17 C Cables Cable Tie Caption Clear Scrambled Channel Clear Voice Component Composite 10 42 20 12 17 8 10 M Media Play Melody Menu Language MP3 Play MTS T Timer 30...


