User Manual (ENGLISH)
Page 3
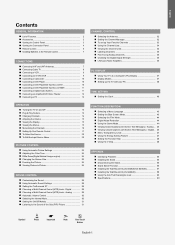
...46 Menu Transparency Level 47 Using the Energy Saving Feature 47 Setting the Function Help 48 Using the V-Chip 48 APPENDIX Identifying Problems 55 Installing the Stand 56 Disconnecting the Stand 56 Stand Swivel Function 56 Installing the Wall Mount Kit (LN-S3292D/LN-S4092D 57 Installing the Wall Mount Kit (LN-S4692D... Connection Panel 4 Remote Control 6 Installing Batteries in the Remote Control 7 CONNECTIONS Connecting VHF and UHF Antennas 7 Connecting Cable TV 8 Connecting a VCR 9 Connecting an S-VHS VCR 9 Connecting a Camcorder 10 Connecting a DVD Player 10 Connecting a DVD...
...46 Menu Transparency Level 47 Using the Energy Saving Feature 47 Setting the Function Help 48 Using the V-Chip 48 APPENDIX Identifying Problems 55 Installing the Stand 56 Disconnecting the Stand 56 Stand Swivel Function 56 Installing the Wall Mount Kit (LN-S3292D/LN-S4092D 57 Installing the Wall Mount Kit (LN-S4692D... Connection Panel 4 Remote Control 6 Installing Batteries in the Remote Control 7 CONNECTIONS Connecting VHF and UHF Antennas 7 Connecting Cable TV 8 Connecting a VCR 9 Connecting an S-VHS VCR 9 Connecting a Camcorder 10 Connecting a DVD Player 10 Connecting a DVD...
User Manual (ENGLISH)
Page 59
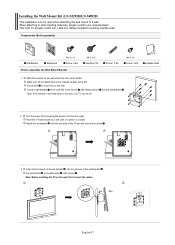
... wood screws after fitting anchors into the grooves of the set -bracket and wall-bracket with screws . When attaching to a wall. Installing the Wall Mount Kit (LN-S3292D/LN-S4092D) This installation is not firmly fixed to the wall, LCD TV can fall off and unplug the power cord from the outlet. Fix anchors on each hole on the...
... wood screws after fitting anchors into the grooves of the set -bracket and wall-bracket with screws . When attaching to a wall. Installing the Wall Mount Kit (LN-S3292D/LN-S4092D) This installation is not firmly fixed to the wall, LCD TV can fall off and unplug the power cord from the outlet. Fix anchors on each hole on the...
User Manual (ENGLISH)
Page 60
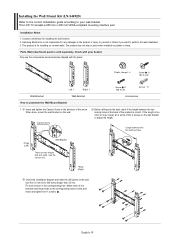
...wall. This LCD TV accepts a 600 mm x 400 mm VESA-compliant mounting interface pad. This product is for installing the wall bracket. 2. When done, mount the wall bracket on the wall. Length between the two locking holes at the back of the product is sold separately. Installing the Wall Mount Kit (LN-S4692D... anchor holes and insert and tighten the 11 screws . Check with your wall bracket. Match each anchor in place when installed on the wall bracket to perform the wall installation. 3. Samsung Electronics is too short or long, loosen all or some of the brackets...
...wall. This LCD TV accepts a 600 mm x 400 mm VESA-compliant mounting interface pad. This product is for installing the wall bracket. 2. When done, mount the wall bracket on the wall. Length between the two locking holes at the back of the product is sold separately. Installing the Wall Mount Kit (LN-S4692D... anchor holes and insert and tighten the 11 screws . Check with your wall bracket. Match each anchor in place when installed on the wall bracket to perform the wall installation. 3. Samsung Electronics is too short or long, loosen all or some of the brackets...

User Manual (ENGLISH)
Page 61
...or the right side of the arrow) to adjust the angle. (See the figure to adjust the angle. Installing the Wall Mount Kit (LN-S4692D) Fixing the TV panel to the wall attachment panel bracket The shape of the product may not stay in place after installation. Insert the screw into the corresponding ...• Make sure the wall bracket is firmly fixed to the wall, or the product may vary depending on the model. (The assemblies of the plastic hanger and the screw are the same) 2 Remove the 4 screws on the back of the product. LCD TV How to Adjust Mounting Angle Adjust the bracket angle...
...or the right side of the arrow) to adjust the angle. (See the figure to adjust the angle. Installing the Wall Mount Kit (LN-S4692D) Fixing the TV panel to the wall attachment panel bracket The shape of the product may not stay in place after installation. Insert the screw into the corresponding ...• Make sure the wall bracket is firmly fixed to the wall, or the product may vary depending on the model. (The assemblies of the plastic hanger and the screw are the same) 2 Remove the 4 screws on the back of the product. LCD TV How to Adjust Mounting Angle Adjust the bracket angle...


