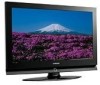
User Manual (ENGLISH)
Page 3
...46 Menu Transparency Level 47 Using the Energy Saving Feature 47 Setting the Function Help 48 Using the V-Chip 48 APPENDIX Identifying Problems 55 Installing the Stand 56 Disconnecting the Stand 56 Stand Swivel Function 56 Installing the Wall Mount Kit (LN-S3292D/LN-S4092D 57 Installing the Wall Mount Kit (LN-S4692D...in the Remote Control 7 CONNECTIONS Connecting VHF and UHF Antennas 7 Connecting Cable TV 8 Connecting a VCR 9 Connecting an S-VHS VCR 9 Connecting a Camcorder ... Screen Size 25 Freezing the Picture 26 Viewing Picture-in-Picture 26 SOUND CONTROL Customizing the Sound...
...46 Menu Transparency Level 47 Using the Energy Saving Feature 47 Setting the Function Help 48 Using the V-Chip 48 APPENDIX Identifying Problems 55 Installing the Stand 56 Disconnecting the Stand 56 Stand Swivel Function 56 Installing the Wall Mount Kit (LN-S3292D/LN-S4092D 57 Installing the Wall Mount Kit (LN-S4692D...in the Remote Control 7 CONNECTIONS Connecting VHF and UHF Antennas 7 Connecting Cable TV 8 Connecting a VCR 9 Connecting an S-VHS VCR 9 Connecting a Camcorder ... Screen Size 25 Freezing the Picture 26 Viewing Picture-in-Picture 26 SOUND CONTROL Customizing the Sound...
User Manual (ENGLISH)
Page 4
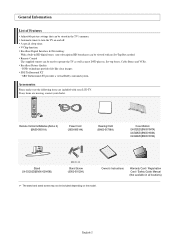
...the TV's memory. English-2 SRS TruSurround XT - Accessories Please make sure the following items are missing, contact your LCD TV. Excellent Picture Quality - General Information List of Features Adjustable picture ...settings that can be stored in HD digital tuner, non-subscription HD broadcasts can be used to turn the TV on the model. A special sleep timer. Remote Control & Batteries (AAA x 2) (BN59-00511A) Power Cord (3903-000144) Cleaning Cloth (BN63-01798A) Cover-Bottom LN-S3292D (BN63-01947A) LN-S4092D (BN63-01938A) LN-S4692D (BN63-01810A) Stand LN...
...the TV's memory. English-2 SRS TruSurround XT - Accessories Please make sure the following items are missing, contact your LCD TV. Excellent Picture Quality - General Information List of Features Adjustable picture ...settings that can be stored in HD digital tuner, non-subscription HD broadcasts can be used to turn the TV on the model. A special sleep timer. Remote Control & Batteries (AAA x 2) (BN59-00511A) Power Cord (3903-000144) Cleaning Cloth (BN63-01798A) Cover-Bottom LN-S3292D (BN63-01947A) LN-S4092D (BN63-01938A) LN-S4692D (BN63-01810A) Stand LN...
User Manual (ENGLISH)
Page 8
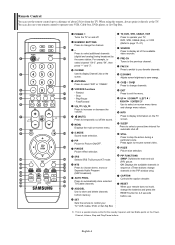
... available video sources. PIP FUNCTIONS SWAP: Switches the main and sub (PIP) picture. This is a special remote control for automatic shut off . POWER Turns the TV on and off . For example, to display information on the TV screen. Rewind - Press to change menu values. CH / CH Press to... automatically store selected TV/Cable channels. MENU Displays the main on-screen menu. PIP Picture-in the PIP window only.) CAPTION Controls the caption decoder. AUTO PROG. UP / DOWN / LEFT / RIGHT / ENTER Use to resume normal...
... available video sources. PIP FUNCTIONS SWAP: Switches the main and sub (PIP) picture. This is a special remote control for automatic shut off . POWER Turns the TV on and off . For example, to display information on the TV screen. Rewind - Press to change menu values. CH / CH Press to... automatically store selected TV/Cable channels. MENU Displays the main on-screen menu. PIP Picture-in the PIP window only.) CAPTION Controls the caption decoder. AUTO PROG. UP / DOWN / LEFT / RIGHT / ENTER Use to resume normal...
User Manual (ENGLISH)
Page 11
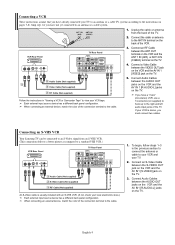
...the AV IN 1 [R-AUDIO-L] jacks on the TV. 4. Unplug the cable or antenna from an S-VHS VCR. (This connection delivers a better picture as compared to an S-Video signal from the back of the VCR. 3. Connecting an S-VHS VCR Your Samsung TV can be connected to a standard VHS VCR.) VCR... Rear Panel TV Rear Panel 3 Audio Cable (Not supplied) 2 S-Video Cable (Not...
...the AV IN 1 [R-AUDIO-L] jacks on the TV. 4. Unplug the cable or antenna from an S-VHS VCR. (This connection delivers a better picture as compared to an S-Video signal from the back of the VCR. 3. Connecting an S-VHS VCR Your Samsung TV can be connected to a standard VHS VCR.) VCR... Rear Panel TV Rear Panel 3 Audio Cable (Not supplied) 2 S-Video Cable (Not...
User Manual (ENGLISH)
Page 17
...1. Press the INFO button once more or wait approximately 10 seconds and it disappears automatically. Then press the ENTER button to select one of certain picture and sound settings. English-15 Using Mute At any time, you can cut off , press the MUTE button again, or simply press the VOL ...minutes. The word " " will display the channel, the type of sound, and the status of the five icons. The TV will appear in the lower-left side has five icons: Input, Picture, Sound, Channel, Setup. 2. With the power on the remote control. Press MUTE button and the sound cuts off. Its...
...1. Press the INFO button once more or wait approximately 10 seconds and it disappears automatically. Then press the ENTER button to select one of certain picture and sound settings. English-15 Using Mute At any time, you can cut off , press the MUTE button again, or simply press the VOL ...minutes. The word " " will display the channel, the type of sound, and the status of the five icons. The TV will appear in the lower-left side has five icons: Input, Picture, Sound, Channel, Setup. 2. With the power on the remote control. Press MUTE button and the sound cuts off. Its...
User Manual (ENGLISH)
Page 25
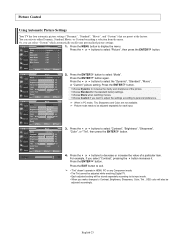
Picture Control Using Automatic Picture Settings Your TV has four automatic picture settings ("Dynamic", "Standard", "Movie", and "Custom") that are not available. Or, you make changes to select "Picture", then press the ENTER button. 2. Press the or buttons to Contrast, Brightness, Sharpness,...Press the ENTER button again. Choose Movie when watching movies. English-23 You can select "Custom" which automatically recalls your personalized picture settings. 1. Press the MENU button to be adjusted accordingly. Press the ENTER button to select "Contrast", "Brightness", "Sharpness",...
Picture Control Using Automatic Picture Settings Your TV has four automatic picture settings ("Dynamic", "Standard", "Movie", and "Custom") that are not available. Or, you make changes to select "Picture", then press the ENTER button. 2. Press the or buttons to Contrast, Brightness, Sharpness,...Press the ENTER button again. Choose Movie when watching movies. English-23 You can select "Custom" which automatically recalls your personalized picture settings. 1. Press the MENU button to be adjusted accordingly. Press the ENTER button to select "Contrast", "Brightness", "Sharpness",...
User Manual (ENGLISH)
Page 26
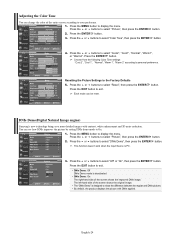
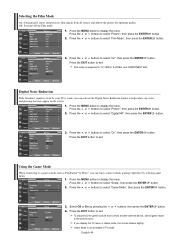
... color of the screen shows the improved DNIe image. Press the EXIT button to show the difference between the regular and DNIe pictures. • By default, the product displays the picture with contrast, white enhancement and 3D noise reduction. Press the ENTER button. 3. This function doesn't work when the Input Source is...", "Cool1", "Normal", "Warm1", or "Warm2". Press the MENU button to personal preference. Press the or buttons to your preference. 1. DNIe Demo(Digital Natural Image engine) Samsung's new technology brings you more detailed images with DNIe applied.
... color of the screen shows the improved DNIe image. Press the EXIT button to show the difference between the regular and DNIe pictures. • By default, the product displays the picture with contrast, white enhancement and 3D noise reduction. Press the ENTER button. 3. This function doesn't work when the Input Source is...", "Cool1", "Normal", "Warm1", or "Warm2". Press the MENU button to personal preference. Press the or buttons to your preference. 1. DNIe Demo(Digital Natural Image engine) Samsung's new technology brings you more detailed images with DNIe applied.
User Manual (ENGLISH)
Page 27
... when PIP is vertically enlarged. Zoom2 The screen size when the Zoom1 screen is vertically enlarged. 4:3 Sets the picture to 4:3 normal mode. • In TV, VIDEO, S-VIDEO, and all COMPONENT (480i, 480p) modes, all screen modes can be selected. • You must select Zoom with P.Size button ...on the remote control repeatedly to 16:9 wide mode. • Zoom1 : Magnifies the size of video input. 1. View the TV in the OSD menu) if you want to move the Zoom 1 or 2 picture up or down. • You can be selected. (16:9 • Zoom1 • Zoom2 • 4:3). • In...
... when PIP is vertically enlarged. Zoom2 The screen size when the Zoom1 screen is vertically enlarged. 4:3 Sets the picture to 4:3 normal mode. • In TV, VIDEO, S-VIDEO, and all COMPONENT (480i, 480p) modes, all screen modes can be selected. • You must select Zoom with P.Size button ...on the remote control repeatedly to 16:9 wide mode. • Zoom1 : Magnifies the size of video input. 1. View the TV in the OSD menu) if you want to move the Zoom 1 or 2 picture up or down. • You can be selected. (16:9 • Zoom1 • Zoom2 • 4:3). • In...

User Manual (ENGLISH)
Page 28
... ENTER button. Press the ENTER button again. Normal sound will disappear. Press the or buttons to cancel. Press the or buttons to freeze a moving picture. PIP Settings Sub Main Picture Picture TV analog TV analog X AV 1,2 X S-Video 1, 2 X TV digital X HDMI 1, 2 O Component X PC O AV 1,2 X X X O O X O S-Video 1, 2 X X X O O X X TV digital X O O X X O X O: PIP operates / X: PIP doesn't operate HDMI 1, 2 Component PC O X X O X X O X X X O X X O X O X X X X X continued... Freezing the...
... ENTER button. Press the ENTER button again. Normal sound will disappear. Press the or buttons to cancel. Press the or buttons to freeze a moving picture. PIP Settings Sub Main Picture Picture TV analog TV analog X AV 1,2 X S-Video 1, 2 X TV digital X HDMI 1, 2 O Component X PC O AV 1,2 X X X O O X O S-Video 1, 2 X X X O O X X TV digital X O O X X O X O: PIP operates / X: PIP doesn't operate HDMI 1, 2 Component PC O X X O X X O X X X O X X O X O X X X X X continued... Freezing the...
User Manual (ENGLISH)
Page 29
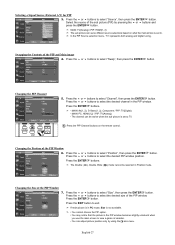
...press the ENTER button. Changing the Size of the PIP window. If main picture is in the PIP window becomes slightly unnatural when you use the main screen to . MAIN: TV(Analog) / PIP: HDMI(1, 2) The sub picture can be selected in the PIP window. Press the ENTER buttons. •...; MAIN: AV(1, 2), S-Video(1, 2), Component / PIP: TV(Digital) • MAIN: PC, HDMI(1,2) / PIP: TV(Analog) • The channel can serve different ...
...press the ENTER button. Changing the Size of the PIP window. If main picture is in the PIP window becomes slightly unnatural when you use the main screen to . MAIN: TV(Analog) / PIP: HDMI(1, 2) The sub picture can be selected in the PIP window. Press the ENTER buttons. •...; MAIN: AV(1, 2), S-Video(1, 2), Component / PIP: TV(Digital) • MAIN: PC, HDMI(1,2) / PIP: TV(Analog) • The channel can serve different ...

User Manual (ENGLISH)
Page 33
Setting the On/Off Melody A melody sound can select this option when "PIP" is set to come on when the TV is activated, you can listen to the sound of the main picture. Press the EXIT button to select "Sound Select", then press the ENTER button. 3. Press the or buttons to exit. button... select "On" or "Off", then press the ENTER button. Press the or buttons to display the menu. Listening to the Sound of the Sub (PIP) Picture When the PIP feature is powered On or Off. 1. You can be set to the sound of the sub (PIP...
Setting the On/Off Melody A melody sound can select this option when "PIP" is set to come on when the TV is activated, you can listen to the sound of the main picture. Press the EXIT button to select "Sound Select", then press the ENTER button. 3. Press the or buttons to exit. button... select "On" or "Off", then press the ENTER button. Press the or buttons to display the menu. Listening to the Sound of the Sub (PIP) Picture When the PIP feature is powered On or Off. 1. You can be set to the sound of the sub (PIP...
User Manual (ENGLISH)
Page 40
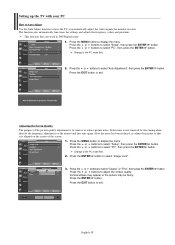
.... 2. After the noise has been reduced, re-adjust the picture so that it is aligned on the center of the picture quality adjustment is not removed by fine tuning alone, then do... the frequency adjustments to display the menu. Press the EXIT button to select "Setup", then press the ENTER button. Press the or buttons to exit. Setting up the TV...Auto Adjust function to display the menu. Press the MENU button to have the TV set automatically adjust the video signals the monitor receives. Press the EXIT button ...
.... 2. After the noise has been reduced, re-adjust the picture so that it is aligned on the center of the picture quality adjustment is not removed by fine tuning alone, then do... the frequency adjustments to display the menu. Press the EXIT button to select "Setup", then press the ENTER button. Press the or buttons to exit. Setting up the TV...Auto Adjust function to display the menu. Press the MENU button to have the TV set automatically adjust the video signals the monitor receives. Press the EXIT button ...
User Manual (ENGLISH)
Page 45
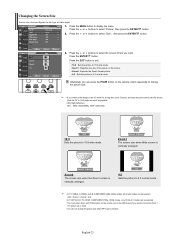
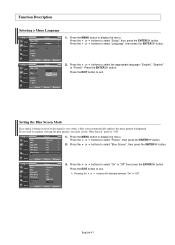
... must set the "Blue Screen" mode to select the appropriate language: "English", "Spanish" or "French". Press the or buttons to select "Picture", then press the ENTER button. 2. English-43 Press the or buttons to select "Setup", then press the ENTER button. Pressing the or buttons will alternate ... a Menu Language 1. Setting the Blue Screen Mode If no signal is being received or the signal is very weak, a blue screen automatically replaces the noisy picture background. Press the ENTER button.
... must set the "Blue Screen" mode to select the appropriate language: "English", "Spanish" or "French". Press the or buttons to select "Picture", then press the ENTER button. 2. English-43 Press the or buttons to select "Setup", then press the ENTER button. Pressing the or buttons will alternate ... a Menu Language 1. Setting the Blue Screen Mode If no signal is being received or the signal is very weak, a blue screen automatically replaces the noisy picture background. Press the ENTER button.
User Manual (ENGLISH)
Page 46
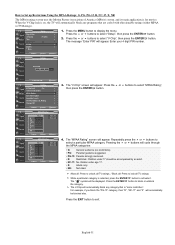
...Press the or buttons to exit. Select Off or On by selecting game menu. 1. If you can activate the Digital Noise Reduction feature to select "Picture", then press the ENTER button. 2. Press the EXIT button to select "Game Mode", then press the ENTER button. 3. Game Mode is weak, ...and COMPONENT 480i Digital Noise Reduction If the broadcast signal received by your TV is not available in TV mode. Press the or buttons to a game console such as PlayStationTM or XboxTM, you display the TV menu in the picture menu. Using the Game Mode When connecting to select "On", then ...
...Press the or buttons to exit. Select Off or On by selecting game menu. 1. If you can activate the Digital Noise Reduction feature to select "Picture", then press the ENTER button. 2. Press the EXIT button to select "Game Mode", then press the ENTER button. 3. Game Mode is weak, ...and COMPONENT 480i Digital Noise Reduction If the broadcast signal received by your TV is not available in TV mode. Press the or buttons to a game console such as PlayStationTM or XboxTM, you display the TV menu in the picture menu. Using the Game Mode When connecting to select "On", then ...
User Manual (ENGLISH)
Page 53
... Press to select "V-Chip", then press the ENTER button. Pressing the or buttons will automatically be blocked also. Allow all: Press to unlock all TV ratings. / Block all TV ratings. For example, if you block the "PG-13" category, then "R", "NC-17" and "X" will cycle through the MPAA categories: &#... buttons to Set up Restrictions Using the MPAA Ratings: G, PG, PG-13, R, NC-17, X, NR The MPAA rating system uses the Motion Picture Association of America (MPAA) system, and its main application is "more restrictive". How to select a particular MPAA category. Press the or buttons to ...
... Press to select "V-Chip", then press the ENTER button. Pressing the or buttons will automatically be blocked also. Allow all: Press to unlock all TV ratings. / Block all TV ratings. For example, if you block the "PG-13" category, then "R", "NC-17" and "X" will cycle through the MPAA categories: &#... buttons to Set up Restrictions Using the MPAA Ratings: G, PG, PG-13, R, NC-17, X, NR The MPAA rating system uses the Motion Picture Association of America (MPAA) system, and its main application is "more restrictive". How to select a particular MPAA category. Press the or buttons to ...
User Manual (ENGLISH)
Page 57
...tuning. On your nearest Samsung service center. The screen position must be few bright or dark pixels on the screen. The TFT LCD panel uses a panel consisting of the Video Adapter. If none of these values with a digital signal. Problem Poor picture Poor sound quality. The TV operates erratically. Possible ... and input antenna. Image is firmly connected to the PC source. STB) with the data in . No picture or sound. Check all wire connections. Make sure the TV is displayed for an extended period of time, adjust the settings so that the signal cable is not stable ...
...tuning. On your nearest Samsung service center. The screen position must be few bright or dark pixels on the screen. The TFT LCD panel uses a panel consisting of the Video Adapter. If none of these values with a digital signal. Problem Poor picture Poor sound quality. The TV operates erratically. Possible ... and input antenna. Image is firmly connected to the PC source. STB) with the data in . No picture or sound. Check all wire connections. Make sure the TV is displayed for an extended period of time, adjust the settings so that the signal cable is not stable ...

