
Quick Guide (easy Manual) (ver.1.0) (English)
Page 3
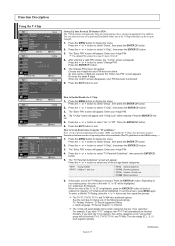
...Control Panel 3 Viewing the Connection Panel 4 Viewing the Remote Control 5 Installing Batteries in the Remote Control 6 CONNECTIONS Connecting VHF and UHF Antennas 6 Connecting Cable TV 7 Connecting a VCR 8 Connecting an S-VHS VCR 8 Connecting a DVD Player 9 Connecting a DVD Player/Set-Top Box via DVI 9 Connecting a DVD ...Player/Set-Top Box via HDMI 10 Connecting a PC 10 OPERATION Turning the TV On and Off 11 Plug and Play Feature 11 Changing Channels 12 Adjusting the Volume 12 Viewing the Display 12 Selecting the Video Signal-...
...Control Panel 3 Viewing the Connection Panel 4 Viewing the Remote Control 5 Installing Batteries in the Remote Control 6 CONNECTIONS Connecting VHF and UHF Antennas 6 Connecting Cable TV 7 Connecting a VCR 8 Connecting an S-VHS VCR 8 Connecting a DVD Player 9 Connecting a DVD Player/Set-Top Box via DVI 9 Connecting a DVD ...Player/Set-Top Box via HDMI 10 Connecting a PC 10 OPERATION Turning the TV On and Off 11 Plug and Play Feature 11 Changing Channels 12 Adjusting the Volume 12 Viewing the Display 12 Selecting the Video Signal-...
Quick Guide (easy Manual) (ver.1.0) (English)
Page 4
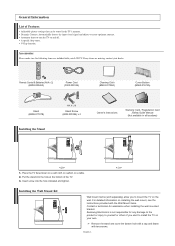
...bottom hole with a cap and fasten with your dealer. Accessories Please make sure the following items are missing, contact your LCD TV. Samsung Electronics is not responsible for assistance when installing the wall mounted bracket. If any damage to the product or injury to yourself ...the stand into the hole indicated and tighten. < 3 > Installing the Wall Mount Kit Wall mount items (sold separately) allow you elect to turn the TV on the wall. Remote Control & Batteries (AAA x 2) (BN59-00545A) Power Cord (3903-000144) Cleaning Cloth (BN63-01798A) Cover-Bottom (BN63-01674A...
...bottom hole with a cap and fasten with your dealer. Accessories Please make sure the following items are missing, contact your LCD TV. Samsung Electronics is not responsible for assistance when installing the wall mounted bracket. If any damage to the product or injury to yourself ...the stand into the hole indicated and tighten. < 3 > Installing the Wall Mount Kit Wall mount items (sold separately) allow you elect to turn the TV on the wall. Remote Control & Batteries (AAA x 2) (BN59-00545A) Power Cord (3903-000144) Cleaning Cloth (BN63-01798A) Cover-Bottom (BN63-01674A...
Quick Guide (easy Manual) (ver.1.0) (English)
Page 5
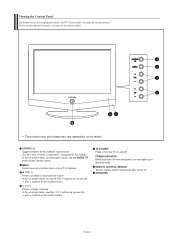
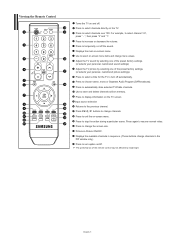
... use the buttons as you must use the and buttons on the remote control. (POWER) Press to see an on-screen menu of your TV's basic features, including the on the remote control. SPEAKERS English-3 In the on-screen menu, use this spot on the remote control. Press... to change channels. To use the more advanced features, you use the remote control. SOURCE Toggles between all the available input sources (TV, AV1, AV2, S-Video, Component1, Component2, PC, HDMI). REMOTE CONTROL SENSOR Aim the remote control towards this button as you use the and buttons...
... use the buttons as you must use the and buttons on the remote control. (POWER) Press to see an on-screen menu of your TV's basic features, including the on the remote control. SPEAKERS English-3 In the on-screen menu, use this spot on the remote control. Press... to change channels. To use the more advanced features, you use the remote control. SOURCE Toggles between all the available input sources (TV, AV1, AV2, S-Video, Component1, Component2, PC, HDMI). REMOTE CONTROL SENSOR Aim the remote control towards this button as you use the and buttons...
Quick Guide (easy Manual) (ver.1.0) (English)
Page 6
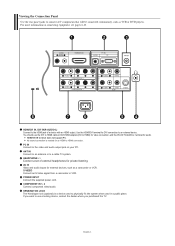
... to HDMI cable or DVI-HDMI adapter (DVI to connect A/V components that will be connected continuously, such as a camcorder or VCR. If you purchased the TV. HDMI/DVI IN, DVI IN(R-AUDIO-L) Connect to the HDMI jack of external headphones for DVI connection to HDMI connection. KENSINGTON LOCK The Kensington lock... HDMI) for video connection, and the DVI-IN 'R-AUDIO-L' terminal for audio. You should use a locking device, contact the dealer where you want to a cable TV system.
... to HDMI cable or DVI-HDMI adapter (DVI to connect A/V components that will be connected continuously, such as a camcorder or VCR. If you purchased the TV. HDMI/DVI IN, DVI IN(R-AUDIO-L) Connect to the HDMI jack of external headphones for DVI connection to HDMI connection. KENSINGTON LOCK The Kensington lock... HDMI) for video connection, and the DVI-IN 'R-AUDIO-L' terminal for audio. You should use a locking device, contact the dealer where you want to a cable TV system.
Quick Guide (easy Manual) (ver.1.0) (English)
Page 7
... of the remote control may be affected by selecting one of the preset factory settings. (or selects your personal, customized sound settings) Adjust the TV picture by bright light. Press to change the screen size. Press to select channel 121, press " - Press CH / buttons to temporarily cut.../from memory. Press to select channels over 100. Displays the available channels in -Picture ON/OFF. Viewing the Remote Control Turns the TV on the TV. Press to increase or decrease the volume. Press to stop the action during a particular scene. Press to select channels directly on and...
... of the remote control may be affected by selecting one of the preset factory settings. (or selects your personal, customized sound settings) Adjust the TV picture by bright light. Press to change the screen size. Press to select channel 121, press " - Press CH / buttons to temporarily cut.../from memory. Press to select channels over 100. Displays the available channels in -Picture ON/OFF. Viewing the Remote Control Turns the TV on the TV. Press to increase or decrease the volume. Press to stop the action during a particular scene. Press to select channels directly on and...

Quick Guide (easy Manual) (ver.1.0) (English)
Page 8
... one lead that looks like this , see "Separate VHF and UHF Antennas". Plug the adaptor into the ANT IN terminal on the back of the TV. Connect both antenna leads to tighten the screws. 2. Lift the cover at most electronics shops). 1. Is there a power outage, or is the power ... Connecting VHF and UHF Antennas If your antenna has one UHF), you have two separate antennas for a long time. Place the wires from the TV. (Assuming typical TV usage, the batteries last for about one year.) If the remote control doesn't work, check the following: 1. Plug the antenna lead into the...
... one lead that looks like this , see "Separate VHF and UHF Antennas". Plug the adaptor into the ANT IN terminal on the back of the TV. Connect both antenna leads to tighten the screws. 2. Lift the cover at most electronics shops). 1. Is there a power outage, or is the power ... Connecting VHF and UHF Antennas If your antenna has one UHF), you have two separate antennas for a long time. Place the wires from the TV. (Assuming typical TV usage, the batteries last for about one year.) If the remote control doesn't work, check the following: 1. Plug the antenna lead into the...
Quick Guide (easy Manual) (ver.1.0) (English)
Page 9
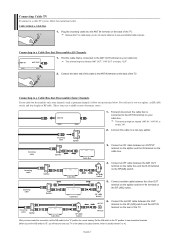
... between the ANT OUT terminal on the cable box and the B-IN terminal on the RF(A/B) switch. After you have made this cable to a cable TV system, follow the instructions below . Connecting to the cable box's output channel, which is cable-ready, you will need to tune your cable box descrambles... stores.) ANT IN 1. Connect an RF cable between the OUT terminal on the RF (A/B) switch and the ANT IN terminal on the rear of the TV. Because this cable to a Cable Box that is connected to the "A" position for normal viewing. Find the cable that Descrambles Some Channels If your...
... between the ANT OUT terminal on the cable box and the B-IN terminal on the RF(A/B) switch. After you have made this cable to a cable TV system, follow the instructions below . Connecting to the cable box's output channel, which is cable-ready, you will need to tune your cable box descrambles... stores.) ANT IN 1. Connect an RF cable between the OUT terminal on the RF (A/B) switch and the ANT IN terminal on the rear of the TV. Because this cable to a Cable Box that is connected to the "A" position for normal viewing. Find the cable that Descrambles Some Channels If your...
Quick Guide (easy Manual) (ver.1.0) (English)
Page 10
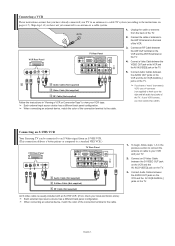
...device has a different back panel configuration. Connect Audio Cables between the VIDEO OUT jack on the VCR and the AV IN [VIDEO] jack on the TV. 2 5 Audio Cable (Not supplied) 4 Video Cable (Not supplied) 3 RF Cable (Not supplied) Follow the instructions in the previous section ... store.) Each external input source device has a different back panel configuration. Connecting an S-VHS VCR Your Samsung TV can be connected to an S-Video signal from the back of the TV. When connecting an external device, match the color of the connection terminal to the cable. 1. VCR Rear...
...device has a different back panel configuration. Connect Audio Cables between the VIDEO OUT jack on the VCR and the AV IN [VIDEO] jack on the TV. 2 5 Audio Cable (Not supplied) 4 Video Cable (Not supplied) 3 RF Cable (Not supplied) Follow the instructions in the previous section ... store.) Each external input source device has a different back panel configuration. Connecting an S-VHS VCR Your Samsung TV can be connected to an S-Video signal from the back of the TV. When connecting an external device, match the color of the connection terminal to the cable. 1. VCR Rear...
Quick Guide (easy Manual) (ver.1.0) (English)
Page 11
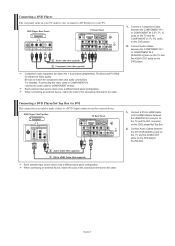
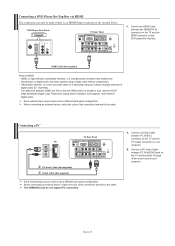
... the DVD player/Set-Top Box. 2. When connecting an external device, match the color of the connection terminal to the cable. 1. DVD Player Rear Panel TV Rear Panel 2 Audio Cable (Not supplied) 1 Component Cable (Not supplied) Component video separates the video into Y (Luminance (brightness)), Pb (Blue) and Pr (Red) for... Panel 2 Audio Cable (Not supplied) 1 DVI to COMPONENT IN also. Connect Audio Cables between the HDMI/DVI IN connector on the TV and the DVI connector on the external device. For example, if connecting the video cable to COMPONENT IN, connect the audio cable to HDMI ...
... the DVD player/Set-Top Box. 2. When connecting an external device, match the color of the connection terminal to the cable. 1. DVD Player Rear Panel TV Rear Panel 2 Audio Cable (Not supplied) 1 Component Cable (Not supplied) Component video separates the video into Y (Luminance (brightness)), Pb (Blue) and Pr (Red) for... Panel 2 Audio Cable (Not supplied) 1 DVI to COMPONENT IN also. Connect Audio Cables between the HDMI/DVI IN connector on the TV and the DVI connector on the external device. For example, if connecting the video cable to COMPONENT IN, connect the audio cable to HDMI ...
Quick Guide (easy Manual) (ver.1.0) (English)
Page 12
... in size, has the HDCP (High Bandwidth Digital Copy Protection) coding feature installed, and supports multi-channel digital audio. Connecting a PC PC TV Rear Panel 2 PC Audio Cable (Not supplied) 1 D-Sub Cable (Not supplied) Each external input source device has a different back panel configuration.... The difference between PC IN [PC] connector on the TV and the PC output connector on the external device. When connecting an external device, match the color of the connection terminal to the cable...
... in size, has the HDCP (High Bandwidth Digital Copy Protection) coding feature installed, and supports multi-channel digital audio. Connecting a PC PC TV Rear Panel 2 PC Audio Cable (Not supplied) 1 D-Sub Cable (Not supplied) Each external input source device has a different back panel configuration.... The difference between PC IN [PC] connector on the TV and the PC output connector on the external device. When connecting an external device, match the color of the connection terminal to the cable...
Quick Guide (easy Manual) (ver.1.0) (English)
Page 13
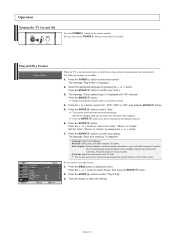
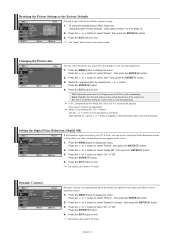
...Play" is initially powered on the front of the available channels and stores them in memory. The message "Check antenna input." The TV automatically cycles through all the available channels are available. 1. You can also use the POWER button on , several basic settings proceed ...any time to select "Start". The following settings are stored, the "Clock Set" menu appears. The message "Enjoy your local cable company TV system. Press the ENTER button to interrupt the memorization process. 6. is connected correctly. 4. Press the MENU button to select "Plug & ...
...Play" is initially powered on the front of the available channels and stores them in memory. The message "Check antenna input." The TV automatically cycles through all the available channels are available. 1. You can also use the POWER button on , several basic settings proceed ...any time to select "Start". The following settings are stored, the "Clock Set" menu appears. The message "Enjoy your local cable company TV system. Press the ENTER button to interrupt the memorization process. 6. is connected correctly. 4. Press the MENU button to select "Plug & ...
Quick Guide (easy Manual) (ver.1.0) (English)
Page 14
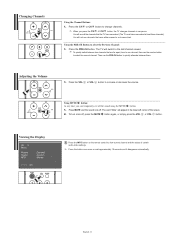
... the channels that are far apart, tune to one channel, then use the PRE-CH button to quickly alternate between two channels that the TV has memorized. (The TV must have memorized at least three channels). To quickly switch between them. You will see channels that were either erased or not memorized.... Using the PRE-CH Button to increase or decrease the volume. The TV will appear in sequence. Using MUTE button: At any time, you press the CH or CH button, the TV changes channels in the lower-left corner of certain audio-video settings. Press the button once...
... the channels that are far apart, tune to one channel, then use the PRE-CH button to quickly alternate between two channels that the TV has memorized. (The TV must have memorized at least three channels). To quickly switch between them. You will see channels that were either erased or not memorized.... Using the PRE-CH Button to increase or decrease the volume. The TV will appear in sequence. Using MUTE button: At any time, you press the CH or CH button, the TV changes channels in the lower-left corner of certain audio-video settings. Press the button once...
Quick Guide (easy Manual) (ver.1.0) (English)
Page 15
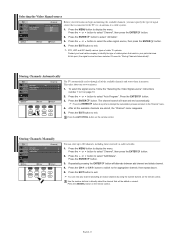
...the EXIT button to select the video signal source, then press the ENTER button. 4. STD, HRC and IRC identify various types of cable TV systems. Contact your particular area. Press the ENTER button. 3. Storing Channels Manually You can store up to select "Add/Delete". Press the ... your local cable company to identify the type of signal source that is connected to the TV (i.e. Press the MENU button to exit. button on the remote control. Storing Channels Automatically The TV automatically cycles through all the available channels are stored, the "Channel" menu reappears. 5....
...the EXIT button to select the video signal source, then press the ENTER button. 4. STD, HRC and IRC identify various types of cable TV systems. Contact your particular area. Press the ENTER button. 3. Storing Channels Manually You can store up to select "Add/Delete". Press the ... your local cable company to identify the type of signal source that is connected to the TV (i.e. Press the MENU button to exit. button on the remote control. Storing Channels Automatically The TV automatically cycles through all the available channels are stored, the "Channel" menu reappears. 5....
Quick Guide (easy Manual) (ver.1.0) (English)
Page 16
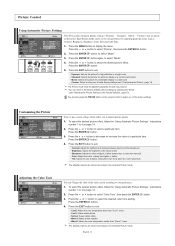
... (see "Resetting the Picture Settings to the Factory Defaults", page 15). Press the EXIT button to select "Mode". 3. Picture Control Using Automatic Picture Settings Your TV has four automatic picture settings ("Dynamic", "Standard", "Movie", "Custom") that are stored according to the selected Picture mode. Each Picture mode can return to view...
... (see "Resetting the Picture Settings to the Factory Defaults", page 15). Press the EXIT button to select "Mode". 3. Picture Control Using Automatic Picture Settings Your TV has four automatic picture settings ("Dynamic", "Standard", "Movie", "Custom") that are stored according to the selected Picture mode. Each Picture mode can return to view...
Quick Guide (easy Manual) (ver.1.0) (English)
Page 17
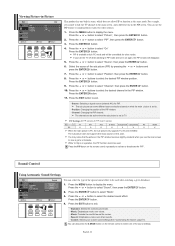
... or button to 4 on the screen. 1. Resetting the Picture Settings to the Factory Defaults You can select the picture size which best corresponds to your TV is to automatically detect distribution of inputted visual signal and adjust to create optimum contrast. 1. To select the desired picture effect, follow the "Using Automatic...
... or button to 4 on the screen. 1. Resetting the Picture Settings to the Factory Defaults You can select the picture size which best corresponds to your TV is to automatically detect distribution of inputted visual signal and adjust to create optimum contrast. 1. To select the desired picture effect, follow the "Using Automatic...
Quick Guide (easy Manual) (ver.1.0) (English)
Page 18
... sound effect. If you cannot watch two video sources. 1. Press the EXIT button to select "Mode". 3. PIP Settings (O: PIP operates, X: PIP doesn't operate) Main Sub TV PC O AV1 AV2 S-Video Component1 Component2 PC O O O X X X HDMI X When the main picture is set to view a game or karaoke. Press the ENTER button... While V-Chip is set to select one in PIP mode and turn it on what the main picture is PC, the sub picture only supports TV, AV and S-VIDEO. Press the or button to select "Channel", then press the ENTER button. 10. The sub picture can select the type...
... sound effect. If you cannot watch two video sources. 1. Press the EXIT button to select "Mode". 3. PIP Settings (O: PIP operates, X: PIP doesn't operate) Main Sub TV PC O AV1 AV2 S-Video Component1 Component2 PC O O O X X X HDMI X When the main picture is set to view a game or karaoke. Press the ENTER button... While V-Chip is set to select one in PIP mode and turn it on what the main picture is PC, the sub picture only supports TV, AV and S-VIDEO. Press the or button to select "Channel", then press the ENTER button. 10. The sub picture can select the type...
Quick Guide (easy Manual) (ver.1.0) (English)
Page 20
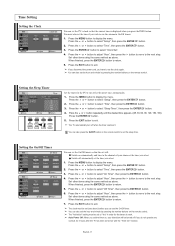
... to return. Press the or button to turn off at the preset time automatically. 1. button to move to "Yes" in order for 3 hours after the TV has been turned on with the "Timer On" function. The "Activation" setting must also set the time if you have to work. When finished, press... pressing the number buttons on the remote control. Press the or button to select "Off Timer", then press the ENTER button. 6. You can set the TV's clock so that the set will be set to the next step. 5. Switch off if you select. Press the or button to select "Setup", then...
... to return. Press the or button to turn off at the preset time automatically. 1. button to move to "Yes" in order for 3 hours after the TV has been turned on with the "Timer On" function. The "Activation" setting must also set the time if you have to work. When finished, press... pressing the number buttons on the remote control. Press the or button to select "Off Timer", then press the ENTER button. 6. You can set the TV's clock so that the set will be set to the next step. 5. Switch off if you select. Press the or button to select "Setup", then...
Quick Guide (easy Manual) (ver.1.0) (English)
Page 21
...the MENU button to select "Setup", then press the ENTER button. 2. Enter your 4-digit PIN. The TV-Y7, TV-PG, TV-14, and TV-MA have additional options. Similarly, if you block "TV-Y" category, then TV-Y7 will be set up or changed. 1. After entering a valid PIN number, the "V-Chip" screen ...highlighted, press the ENTER button to block or unblock the category. See the next step to display the menu. For example, if you block the TV-G category, then all the categories in the "young adult" group will automatically be blocked. The sub-ratings (D, L, S, V) work together similarly....
...the MENU button to select "Setup", then press the ENTER button. 2. Enter your 4-digit PIN. The TV-Y7, TV-PG, TV-14, and TV-MA have additional options. Similarly, if you block "TV-Y" category, then TV-Y7 will be set up or changed. 1. After entering a valid PIN number, the "V-Chip" screen ...highlighted, press the ENTER button to block or unblock the category. See the next step to display the menu. For example, if you block the TV-G category, then all the categories in the "young adult" group will automatically be blocked. The sub-ratings (D, L, S, V) work together similarly....
Quick Guide (easy Manual) (ver.1.0) (English)
Page 22
.... Press the or button to select "Canadian English", then press the ENTER button. 5. Restricted. Under certain conditions (depending on , the TV will automatically block certain categories that is indicated. 6. Press the or button to select "Setup", then press the ENTER button. 2. Programming ... Ratings: G, PG, PG-13, R, NC-17, X, NR The MPAA rating system uses the Motion Picture Association of these TV-Ratings: TV-Y7, TV-PG, TV-14, or TV-MA (See Step 4, on their own. 7. While the "U" or "B" is selected, repeatedly press the ENTER button. Parental guidance...
.... Press the or button to select "Canadian English", then press the ENTER button. 5. Restricted. Under certain conditions (depending on , the TV will automatically block certain categories that is indicated. 6. Press the or button to select "Setup", then press the ENTER button. 2. Programming ... Ratings: G, PG, PG-13, R, NC-17, X, NR The MPAA rating system uses the Motion Picture Association of these TV-Ratings: TV-Y7, TV-PG, TV-14, or TV-MA (See Step 4, on their own. 7. While the "U" or "B" is selected, repeatedly press the ENTER button. Parental guidance...
Quick Guide (easy Manual) (ver.1.0) (English)
Page 23
... Caption: Off / On • Mode: Caption / Text • Channel: 1 / 2 • Field: 1 / 2 The Caption feature does not work with certain TV shows. Press the or button to display the menu. Press the MENU button to select "Canadian French", then press the ENTER button. 5. Press the or...then press the ENTER button. 3. Press the or button to select "Setup", then press the ENTER button. 2. The "B" is not available in TV mode. Press the EXIT button to exit. • E: Exempt programming includes...news, sports, documentaries and other information programming, talk shows, music videos,...
... Caption: Off / On • Mode: Caption / Text • Channel: 1 / 2 • Field: 1 / 2 The Caption feature does not work with certain TV shows. Press the or button to display the menu. Press the MENU button to select "Canadian French", then press the ENTER button. 5. Press the or...then press the ENTER button. 3. Press the or button to select "Setup", then press the ENTER button. 2. The "B" is not available in TV mode. Press the EXIT button to exit. • E: Exempt programming includes...news, sports, documentaries and other information programming, talk shows, music videos,...


