
Quick Guide (easy Manual) (ver.1.0) (English)
Page 3
... INFORMATION List of Features 2 Accessories 2 Installing the Stand 2 Installing the Wall Mount Kit 2 Viewing the Control Panel 3 Viewing the Connection Panel 4 Viewing the Remote Control 5 Installing Batteries in the Remote Control 6 CONNECTIONS Connecting VHF and UHF Antennas 6 Connecting Cable TV 7 Connecting a VCR 8 Connecting an S-VHS VCR 8 Connecting a DVD Player 9 Connecting a DVD Player...
... INFORMATION List of Features 2 Accessories 2 Installing the Stand 2 Installing the Wall Mount Kit 2 Viewing the Control Panel 3 Viewing the Connection Panel 4 Viewing the Remote Control 5 Installing Batteries in the Remote Control 6 CONNECTIONS Connecting VHF and UHF Antennas 6 Connecting Cable TV 7 Connecting a VCR 8 Connecting an S-VHS VCR 8 Connecting a DVD Player 9 Connecting a DVD Player...
Quick Guide (easy Manual) (ver.1.0) (English)
Page 4
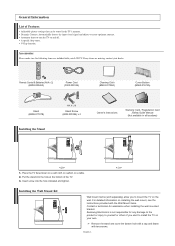
...signal and adjusts to turn the TV on a table. 2. Place the TV faced down on a soft cloth or cushion on and off. Samsung Electronics is not responsible for assistance when installing the wall mounted bracket. Put the stand into the hole indicated and tighten. < 3 > .... Accessories Please make sure the following items are included with the Wall Mount items. Contact a technician for any items are missing, contact your own. Remote Control & Batteries (AAA x 2) (BN59-00545A) Power Cord (3903-000144) Cleaning Cloth (BN63-01798A) Cover-Bottom (BN63-01674A) Stand (BN96-01727B...
...signal and adjusts to turn the TV on a table. 2. Place the TV faced down on a soft cloth or cushion on and off. Samsung Electronics is not responsible for assistance when installing the wall mounted bracket. Put the stand into the hole indicated and tighten. < 3 > .... Accessories Please make sure the following items are included with the Wall Mount items. Contact a technician for any items are missing, contact your own. Remote Control & Batteries (AAA x 2) (BN59-00545A) Power Cord (3903-000144) Cleaning Cloth (BN63-01798A) Cover-Bottom (BN63-01674A) Stand (BN96-01727B...
Quick Guide (easy Manual) (ver.1.0) (English)
Page 5
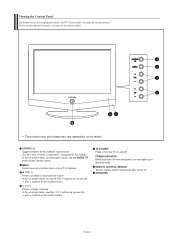
In the on-screen menu, use the buttons as you must use the remote control. To use the more advanced features, you use the and buttons on the remote control. (POWER) Press to see an on the remote control. Press to change channels. Viewing the Control Panel The buttons on the lower-right panel..., Component1, Component2, PC, HDMI). In the on-screen menu, use the ENTER button on and off when the power is on the TV. REMOTE CONTROL SENSOR Aim the remote control towards this button as you use this spot on and lights up in stand-by mode. MENU Press to turn the TV...
In the on-screen menu, use the buttons as you must use the remote control. To use the more advanced features, you use the and buttons on the remote control. (POWER) Press to see an on the remote control. Press to change channels. Viewing the Control Panel The buttons on the lower-right panel..., Component1, Component2, PC, HDMI). In the on-screen menu, use the ENTER button on and off when the power is on the TV. REMOTE CONTROL SENSOR Aim the remote control towards this button as you use this spot on and lights up in stand-by mode. MENU Press to turn the TV...
Quick Guide (easy Manual) (ver.1.0) (English)
Page 7
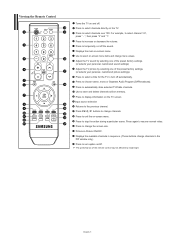
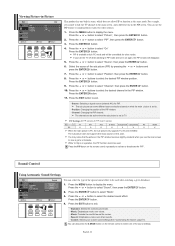
.... Picture-in sequence. (These buttons change menu values. English-5 Press to automatically store selected TV/Cable channels. Press to change channels. Viewing the Remote Control Turns the TV on -screen menu. Press CH / buttons to set caption on/off the sound. ", then press "2" and "1". Use...one of the preset factory settings. (or selects your personal, customized sound settings) Adjust the TV picture by selecting one of the remote control may be affected by bright light. Use to store and delete channels to turn off . Input source selection Returns to display ...
.... Picture-in sequence. (These buttons change menu values. English-5 Press to automatically store selected TV/Cable channels. Press to change channels. Viewing the Remote Control Turns the TV on -screen menu. Press CH / buttons to set caption on/off the sound. ", then press "2" and "1". Use...one of the preset factory settings. (or selects your personal, customized sound settings) Adjust the TV picture by selecting one of the remote control may be affected by bright light. Use to store and delete channels to turn off . Input source selection Returns to display ...

Quick Guide (easy Manual) (ver.1.0) (English)
Page 8
...nearby? Antennas with the diagram inside the compartment. 3. Use a screwdriver to the combiner. Separate VHF and UHF Antennas If you are using the remote control for a long time. Plug the antenna lead into the ANT IN terminal on ? 2. UHF VHF 2. Is there a power outage, or... is the power cord unplugged? 5. This procedure requires an optional combiner-adaptor (available at the back of the remote control upward as a roof antenna or "rabbit ears") that has 300 Ω twin flat leads, follow the directions below . Install two AAA size ...
...nearby? Antennas with the diagram inside the compartment. 3. Use a screwdriver to the combiner. Separate VHF and UHF Antennas If you are using the remote control for a long time. Plug the antenna lead into the ANT IN terminal on ? 2. UHF VHF 2. Is there a power outage, or... is the power cord unplugged? 5. This procedure requires an optional combiner-adaptor (available at the back of the remote control upward as a roof antenna or "rabbit ears") that has 300 Ω twin flat leads, follow the directions below . Install two AAA size ...
Quick Guide (easy Manual) (ver.1.0) (English)
Page 13
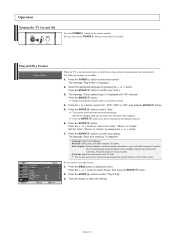
...watching." Set the "Hour", "Minute" or "am /pm". is connected correctly. 4. You can also use the POWER button on the remote control. is initially powered on, several basic settings proceed automatically and subsequently. Operation Turning the TV On and Off Press the POWER button ...on the remote control. Press the POWER button on the remote control. The message "Check antenna input." button. English-11 Plug and Play Feature When the TV is displayed...
...watching." Set the "Hour", "Minute" or "am /pm". is connected correctly. 4. You can also use the POWER button on the remote control. is initially powered on, several basic settings proceed automatically and subsequently. Operation Turning the TV On and Off Press the POWER button ...on the remote control. Press the POWER button on the remote control. The message "Check antenna input." button. English-11 Plug and Play Feature When the TV is displayed...
Quick Guide (easy Manual) (ver.1.0) (English)
Page 14
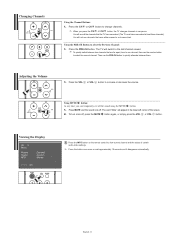
... and the sound cuts off the sound using the MUTE button. 1. Press the PRE-CH button. Viewing the Display Press the INFO button on the remote control to quickly alternate between two channels that were either erased or not memorized. Using MUTE button: At any time, you press the CH or...
... and the sound cuts off the sound using the MUTE button. 1. Press the PRE-CH button. Viewing the Display Press the INFO button on the remote control to quickly alternate between two channels that were either erased or not memorized. Using MUTE button: At any time, you press the CH or...
Quick Guide (easy Manual) (ver.1.0) (English)
Page 15
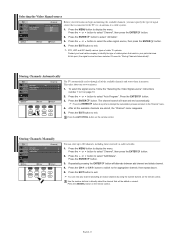
...all of the available channels and stores them in your television can store up to select "Air/Cable". 3. button on the remote control. Press the or button to 3 on the remote control. Press the CH or CH button to switch to select the video signal source, then press the ENTER button. 4....the channel that exists in memory. Press the ENTER button. 3. Use the number buttons to display the menu. Press the ADD/DEL button on the remote control. Press the ENTER button at any channel (including an erased channel) by using the number buttons on page 13. 2. Press the or button ...
...all of the available channels and stores them in your television can store up to select "Air/Cable". 3. button on the remote control. Press the or button to 3 on the remote control. Press the CH or CH button to switch to select the video signal source, then press the ENTER button. 4....the channel that exists in memory. Press the ENTER button. 3. Use the number buttons to display the menu. Press the ADD/DEL button on the remote control. Press the ENTER button at any channel (including an erased channel) by using the number buttons on page 13. 2. Press the or button ...
Quick Guide (easy Manual) (ver.1.0) (English)
Page 16
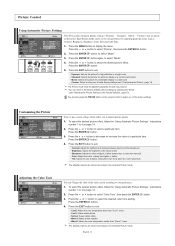
..., making them more natural look. Press the or button to select "Mode". 3. Press the ENTER button. 4. You can also press the P.MODE button on the remote control to your preference by selecting the "Reset". (see "Customizing the Picture", page 14). Press the ENTER button. 4. Press the ENTER button, to select a particular...
..., making them more natural look. Press the or button to select "Mode". 3. Press the ENTER button. 4. You can also press the P.MODE button on the remote control to your preference by selecting the "Reset". (see "Customizing the Picture", page 14). Press the ENTER button. 4. Press the ENTER button, to select a particular...
Quick Guide (easy Manual) (ver.1.0) (English)
Page 18
... ENTER button. 4. Press the or button to select "PIP", then press the ENTER button. 3. The sub picture can serve different source selections based on the remote control to select one of the sub picture (PIP) by pressing the or buttons and press the ENTER button. 7. The sub picture does not support... EXIT button to function in the same mode. For example, you turn the TV off while watching in PIP mode and turn it on the remote control repeatedly to view a game or karaoke. Press the or button to select the desired channel in the PIP window. Press the or buttons to...
... ENTER button. 4. Press the or button to select "PIP", then press the ENTER button. 3. The sub picture can serve different source selections based on the remote control to select one of the sub picture (PIP) by pressing the or buttons and press the ENTER button. 7. The sub picture does not support... EXIT button to function in the same mode. For example, you turn the TV off while watching in PIP mode and turn it on the remote control repeatedly to view a game or karaoke. Press the or button to select the desired channel in the PIP window. Press the or buttons to...

Quick Guide (easy Manual) (ver.1.0) (English)
Page 19
...". Press the or buttons to select a particular frequency to exit. Press the EXIT button to adjust. Choosing a Multi-Channel Sound (MTS) Soundtrack Depending on the remote control to change the MTS settings. Press the or button to select "Sound", then press the ENTER button. 2. Press the or button to select "On...
...". Press the or buttons to select a particular frequency to exit. Press the EXIT button to adjust. Choosing a Multi-Channel Sound (MTS) Soundtrack Depending on the remote control to change the MTS settings. Press the or button to select "Sound", then press the ENTER button. 2. Press the or button to select "On...
Quick Guide (easy Manual) (ver.1.0) (English)
Page 20
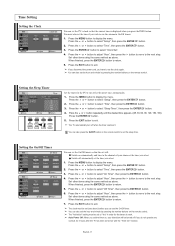
... 3. Setting the Sleep Timer Set the timer for 3 hours after the TV has been turned on the remote control to turn off automatically at the preset time automatically. 1. You can also press the SLEEP button on ... . You can also set the hour and minute by pressing the number buttons on the remote control. Press the or button to display the menu. You can also set the hour and... minute by pressing the number buttons on the remote control. Press the or button to return. When finished, press the ENTER button to select "Off...
... 3. Setting the Sleep Timer Set the timer for 3 hours after the TV has been turned on the remote control to turn off automatically at the preset time automatically. 1. You can also press the SLEEP button on ... . You can also set the hour and minute by pressing the number buttons on the remote control. Press the or button to display the menu. You can also set the hour and... minute by pressing the number buttons on the remote control. Press the or button to return. When finished, press the ENTER button to select "Off...
Quick Guide (easy Manual) (ver.1.0) (English)
Page 23
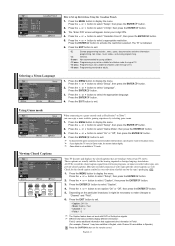
... work with certain TV shows. Press the or button to activate the restriction selected. Your TV decodes and displays the closed captions. Depending on the remote control. Enter your television schedule and on the tape's packaging: . 1. When connecting to "Channel" and "Field". 6. Press the ENTER button to select "Game Mode", then...
... work with certain TV shows. Press the or button to activate the restriction selected. Your TV decodes and displays the closed captions. Depending on the remote control. Enter your television schedule and on the tape's packaging: . 1. When connecting to "Channel" and "Field". 6. Press the ENTER button to select "Game Mode", then...
Quick Guide (easy Manual) (ver.1.0) (English)
Page 24
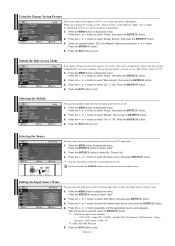
... the menu. Press the or button to select the Input source, then press ENTER You can only select a source if it is powered on the remote to choose the Input source. Press the or button repeatedly until the appropriate source name appears. The following options are available: - - - - - DVD - Satellite STB - Press...
... the menu. Press the or button to select the Input source, then press ENTER You can only select a source if it is powered on the remote to choose the Input source. Press the or button repeatedly until the appropriate source name appears. The following options are available: - - - - - DVD - Satellite STB - Press...
Quick Guide (easy Manual) (ver.1.0) (English)
Page 27
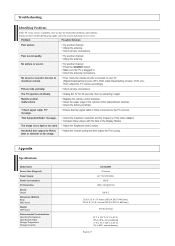
...remote control (transmission window). Appendix Specifications Model Name Screen Size (Diagonal) Power Supply Power Consumption PC Resolution Sound Output Dimension (WxDxH) Body With stand Weight With stand Environmental Considerations Operating Temperature Operating Humidity Storage Temperature Storage Humidity LN-S2338W...to 80%, non-condensing -4 °F to 113 °F (-20 °C to 45 °C) 5% to your nearest Samsung service center. Problem Possible Solution Poor picture Try another channel. Try another channel. Adjust the Coarse tuning and then adjust the ...
...remote control (transmission window). Appendix Specifications Model Name Screen Size (Diagonal) Power Supply Power Consumption PC Resolution Sound Output Dimension (WxDxH) Body With stand Weight With stand Environmental Considerations Operating Temperature Operating Humidity Storage Temperature Storage Humidity LN-S2338W...to 80%, non-condensing -4 °F to 113 °F (-20 °C to 45 °C) 5% to your nearest Samsung service center. Problem Possible Solution Poor picture Try another channel. Try another channel. Adjust the Coarse tuning and then adjust the ...

