
Open Source Guide (ENGLISH)
Page 1
... a special exception, the source code distributed need to make thoroughly clear what the Program does. 1. To prevent this License. The act of software generally. ❑ NO WARRANTY 11. You may copy and distribute the Program (or a work based on a medium customarily used to share and change it . 6. You are not responsible for at all derivatives of our free software and of promoting the...
... a special exception, the source code distributed need to make thoroughly clear what the Program does. 1. To prevent this License. The act of software generally. ❑ NO WARRANTY 11. You may copy and distribute the Program (or a work based on a medium customarily used to share and change it . 6. You are not responsible for at all derivatives of our free software and of promoting the...

Open Source Guide (ENGLISH)
Page 2
...notices to be of warranty; How to Apply These Terms to Your New Libraries If you develop a new library, and you want it to the library. You can redistribute and change. IN NO EVENT...USE OR INABILITY TO USE THE LIBRARY (INCLUDING BUT NOT LIMITED TO LOSS OF DATA OR DATA BEING RENDERED INACCURATE OR LOSSES SUSTAINED BY YOU OR THIRD PARTIES OR A FAILURE OF THE LIBRARY TO OPERATE WITH ANY OTHER SOFTWARE... them to the start of each source file to most effectively convey the exclusion of the greatest possible use to the public, we recommend making it free software that everyone can do so by ...
...notices to be of warranty; How to Apply These Terms to Your New Libraries If you develop a new library, and you want it to the library. You can redistribute and change. IN NO EVENT...USE OR INABILITY TO USE THE LIBRARY (INCLUDING BUT NOT LIMITED TO LOSS OF DATA OR DATA BEING RENDERED INACCURATE OR LOSSES SUSTAINED BY YOU OR THIRD PARTIES OR A FAILURE OF THE LIBRARY TO OPERATE WITH ANY OTHER SOFTWARE... them to the start of each source file to most effectively convey the exclusion of the greatest possible use to the public, we recommend making it free software that everyone can do so by ...

Quick Guide (easy Manual) (ver.1.0) (English)
Page 3
...Installing the Wall Mount Kit 2 Viewing the Control Panel 3 Viewing the Connection Panel 4 Viewing the Remote Control 5 Installing Batteries in the Remote Control 6 CONNECTIONS Connecting VHF and UHF Antennas 6 Connecting Cable TV 7 Connecting a VCR 8 Connecting an S-VHS VCR 8 Connecting a DVD Player 9 Connecting a DVD Player/Set-Top Box via DVI 9 Connecting a DVD Player/Set-Top Box via HDMI 10 Connecting a PC 10 OPERATION Turning the TV On and Off 11 Plug and Play Feature 11 Changing Channels 12 Adjusting the Volume 12 Viewing the Display 12 Selecting the Video Signal-source...
...Installing the Wall Mount Kit 2 Viewing the Control Panel 3 Viewing the Connection Panel 4 Viewing the Remote Control 5 Installing Batteries in the Remote Control 6 CONNECTIONS Connecting VHF and UHF Antennas 6 Connecting Cable TV 7 Connecting a VCR 8 Connecting an S-VHS VCR 8 Connecting a DVD Player 9 Connecting a DVD Player/Set-Top Box via DVI 9 Connecting a DVD Player/Set-Top Box via HDMI 10 Connecting a PC 10 OPERATION Turning the TV On and Off 11 Plug and Play Feature 11 Changing Channels 12 Adjusting the Volume 12 Viewing the Display 12 Selecting the Video Signal-source...
Quick Guide (easy Manual) (ver.1.0) (English)
Page 4
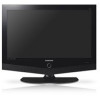
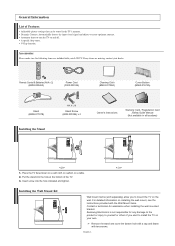
... wall mounted bracket. Insert screw into the hole at the bottom of Features Adjustable picture settings that can be stored in all locations) < 2 > 1. Remove the stand and cover the bottom hole with a cap and fasten with your own. A special sleep timer. Remote Control & Batteries (AAA x 2) (BN59-00545A) Power Cord (3903-000144) Cleaning Cloth (BN63-01798A) Cover-Bottom (BN63-01674A) Stand (BN96-01727B) Installing the Stand M4 X L16 Stand Screw (6002-001294) x 4 Owner's Instructions Warranty...
... wall mounted bracket. Insert screw into the hole at the bottom of Features Adjustable picture settings that can be stored in all locations) < 2 > 1. Remove the stand and cover the bottom hole with a cap and fasten with your own. A special sleep timer. Remote Control & Batteries (AAA x 2) (BN59-00545A) Power Cord (3903-000144) Cleaning Cloth (BN63-01798A) Cover-Bottom (BN63-01674A) Stand (BN96-01727B) Installing the Stand M4 X L16 Stand Screw (6002-001294) x 4 Owner's Instructions Warranty...
Quick Guide (easy Manual) (ver.1.0) (English)
Page 5
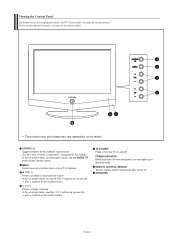
... -screen menu, use the buttons as you must use the and buttons on and lights up in stand-by mode. MENU Press to change channels. In the on -screen menu. To use the more advanced features, you use the remote control. SPEAKERS English-3 SOURCE Toggles between all the available input sources (TV, AV1, AV2, S-Video, Component1, Component2, PC, HDMI). Press to turn the TV on and off when the power is on the remote control. POWER INDICATOR Blinks and turns off...
... -screen menu, use the buttons as you must use the and buttons on and lights up in stand-by mode. MENU Press to change channels. In the on -screen menu. To use the more advanced features, you use the remote control. SPEAKERS English-3 SOURCE Toggles between all the available input sources (TV, AV1, AV2, S-Video, Component1, Component2, PC, HDMI). Press to turn the TV on and off when the power is on the remote control. POWER INDICATOR Blinks and turns off...
Quick Guide (easy Manual) (ver.1.0) (English)
Page 6
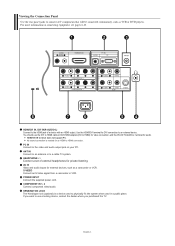
... physically fix the system when used in a public place. If you purchased the TV. Viewing the Connection Panel Use the rear panel jacks to connect A/V components that will be connected continuously, such as a camcorder or VCR. HDMI/DVI IN terminal does not support PC. ANT IN Connect to an antenna or to the HDMI jack of external headphones for audio. HEADPHONE Connect a set of a device with an HDMI output. POWER INPUT Connect the supplied power cord. You should use a locking...
... physically fix the system when used in a public place. If you purchased the TV. Viewing the Connection Panel Use the rear panel jacks to connect A/V components that will be connected continuously, such as a camcorder or VCR. HDMI/DVI IN terminal does not support PC. ANT IN Connect to an antenna or to the HDMI jack of external headphones for audio. HEADPHONE Connect a set of a device with an HDMI output. POWER INPUT Connect the supplied power cord. You should use a locking...
Quick Guide (easy Manual) (ver.1.0) (English)
Page 7
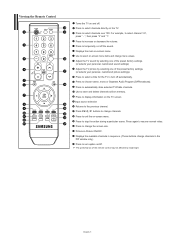
... decrease the volume. Picture-in the PIP window only.) Press to turn off . Adjust the TV sound by selecting one of the preset factory settings. (or selects your personal, customized picture settings) Press to select a time for the TV to set caption on/off automatically. Displays the available channels in sequence. (These buttons change channels. Press CH / buttons to select channels over 100. Press to change channels in -Picture ON/OFF. Viewing the Remote Control Turns the...
... decrease the volume. Picture-in the PIP window only.) Press to turn off . Adjust the TV sound by selecting one of the preset factory settings. (or selects your personal, customized picture settings) Press to select a time for the TV to set caption on/off automatically. Displays the available channels in sequence. (These buttons change channels. Press CH / buttons to select channels over 100. Press to change channels in -Picture ON/OFF. Viewing the Remote Control Turns the...

Quick Guide (easy Manual) (ver.1.0) (English)
Page 8
... Antennas If you are using the remote control for a long time. UHF VHF ANT IN English-6 Make sure to about one lead that looks like this , see "Antennas with 300 Ω Flat Twin Leads" below . 1. Is there a power outage, or is the power cord unplugged? 5. This procedure requires an optional combiner-adaptor (available at the back of the rear panel. ANT IN Antennas...
... Antennas If you are using the remote control for a long time. UHF VHF ANT IN English-6 Make sure to about one lead that looks like this , see "Antennas with 300 Ω Flat Twin Leads" below . 1. Is there a power outage, or is the power cord unplugged? 5. This procedure requires an optional combiner-adaptor (available at the back of the rear panel. ANT IN Antennas...
Quick Guide (easy Manual) (ver.1.0) (English)
Page 9
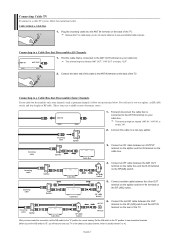
... terminal on the rear of the TV. Incoming cable Splitter Cable Box 4. After you will need a cable box to a Cable Box that is usually channel 3 or 4.) English-7 Cable without a Cable Box ANT IN 1. Find the cable that Descrambles All Channels ANT IN ANT OUT 1. Connect this connection, set the A/B switch to "B", you have made this cable to the ANT IN terminal on your TV to the cable box's output channel, which is connected to a two...
... terminal on the rear of the TV. Incoming cable Splitter Cable Box 4. After you will need a cable box to a Cable Box that is usually channel 3 or 4.) English-7 Cable without a Cable Box ANT IN 1. Find the cable that Descrambles All Channels ANT IN ANT OUT 1. Connect this connection, set the A/B switch to "B", you have made this cable to the ANT IN terminal on your TV to the cable box's output channel, which is connected to a two...
Quick Guide (easy Manual) (ver.1.0) (English)
Page 10
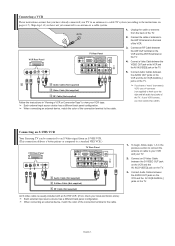
... the color of the connection terminal to an antenna or a cable system. If you have a "mono" (non-stereo) VCR, use a Y-connector (not supplied) to hook up to the ANT IN terminal on the back of the TV. To begin, follow steps 1-3 in "Viewing a VCR or Camcorder Tape" to a standard VHS VCR.) TV Rear Panel VCR Rear Panel 3 Audio Cable (Not supplied) 2 S-Video Cable (Not supplied) 1 RF Cable (Not supplied) An S-Video cable...
... the color of the connection terminal to an antenna or a cable system. If you have a "mono" (non-stereo) VCR, use a Y-connector (not supplied) to hook up to the ANT IN terminal on the back of the TV. To begin, follow steps 1-3 in "Viewing a VCR or Camcorder Tape" to a standard VHS VCR.) TV Rear Panel VCR Rear Panel 3 Audio Cable (Not supplied) 2 S-Video Cable (Not supplied) 1 RF Cable (Not supplied) An S-Video cable...
Quick Guide (easy Manual) (ver.1.0) (English)
Page 11
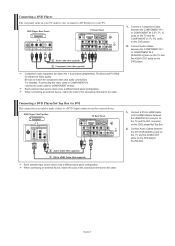
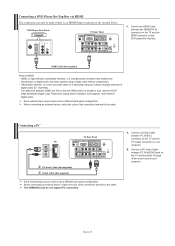
... jacks on the external device. When connecting an external device, match the color of the connection terminal to match the component video and audio connections. Connect Audio Cables between the HDMI/DVI IN connector on the TV and the DVI connector on your TV make it easy to connect a DVD player to your TV. DVD Player / Set-Top Box TV Rear Panel 2 Audio Cable (Not supplied) 1 DVI to the cable. 1. Connecting a DVD Player/Set-Top Box via DVI This connection can only...
... jacks on the external device. When connecting an external device, match the color of the connection terminal to match the component video and audio connections. Connect Audio Cables between the HDMI/DVI IN connector on the TV and the DVI connector on your TV make it easy to connect a DVD player to your TV. DVD Player / Set-Top Box TV Rear Panel 2 Audio Cable (Not supplied) 1 DVI to the cable. 1. Connecting a DVD Player/Set-Top Box via DVI This connection can only...
Quick Guide (easy Manual) (ver.1.0) (English)
Page 12
... (High Bandwidth Digital Copy Protection) coding feature installed, and supports multi-channel digital audio. Each external input source device has a different back panel configuration. Connect a PC Audio Cable between the HDMI/DVI IN connector on the TV and the HDMI connector on your computer. 2. When connecting an external device, match the color of digital audio (5.1 channels). Connect a D-Sub Cable between HDMI and DVI is that enables the transmission of the sound card on the DVD player/Set-Top Box. The...
... (High Bandwidth Digital Copy Protection) coding feature installed, and supports multi-channel digital audio. Each external input source device has a different back panel configuration. Connect a PC Audio Cable between the HDMI/DVI IN connector on the TV and the HDMI connector on your computer. 2. When connecting an external device, match the color of digital audio (5.1 channels). Connect a D-Sub Cable between HDMI and DVI is that enables the transmission of the sound card on the DVD player/Set-Top Box. The...
Quick Guide (easy Manual) (ver.1.0) (English)
Page 13
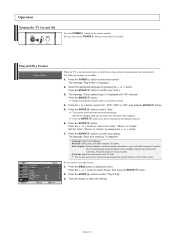
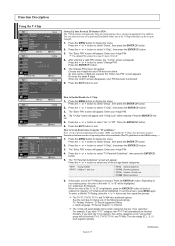
... initially powered on the remote control. Select the appropriate language by pressing the number buttons on the remote control. The message "Check antenna input." Press the ENTER button. The channel search will change or reset the settings. Press the or button to move to reset this feature... 1. Operation Turning the TV On and Off Press the POWER button on , several basic settings proceed automatically and subsequently. The message "Enjoy your local cable...
... initially powered on the remote control. Select the appropriate language by pressing the number buttons on the remote control. The message "Check antenna input." Press the ENTER button. The channel search will change or reset the settings. Press the or button to move to reset this feature... 1. Operation Turning the TV On and Off Press the POWER button on , several basic settings proceed automatically and subsequently. The message "Enjoy your local cable...
Quick Guide (easy Manual) (ver.1.0) (English)
Page 15
... connected to identify the type of signal source that will start and end automatically. To select the signal source, follow the "Selecting the Video Signal-source" instructions number 1 to the "Channel" menu. 4. Repeatedly pressing the ENTER button will alternate between add channel and delete channel. 4. an antenna or a cable system). 1. Press the or button to display the menu. Press the ENTER button. 3. Press the MENU button to select "Auto Program". Press the CH or CH button to switch...
... connected to identify the type of signal source that will start and end automatically. To select the signal source, follow the "Selecting the Video Signal-source" instructions number 1 to the "Channel" menu. 4. Repeatedly pressing the ENTER button will alternate between add channel and delete channel. 4. an antenna or a cable system). 1. Press the or button to display the menu. Press the ENTER button. 3. Press the MENU button to select "Auto Program". Press the CH or CH button to switch...
Quick Guide (easy Manual) (ver.1.0) (English)
Page 17
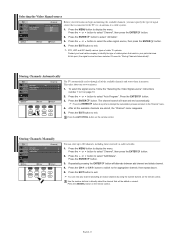
... screen. 1. Press the ENTER button. 4. English-15 Resetting the Picture Settings to the Factory Defaults You can return to move the picture up and down. The "Reset" will be adjusted. (The "Zoom" mode is to automatically detect distribution of inputted visual signal and adjust to magnify or reduce the picture size in PC mode. Use the or button to the factory defaults picture settings. 1. Setting the Digital Noise Reduction (Digital NR) If the broadcast signal received by your viewing...
... screen. 1. Press the ENTER button. 4. English-15 Resetting the Picture Settings to the Factory Defaults You can return to move the picture up and down. The "Reset" will be adjusted. (The "Zoom" mode is to automatically detect distribution of inputted visual signal and adjust to magnify or reduce the picture size in PC mode. Use the or button to the factory defaults picture settings. 1. Setting the Digital Noise Reduction (Digital NR) If the broadcast signal received by your viewing...
Quick Guide (easy Manual) (ver.1.0) (English)
Page 18
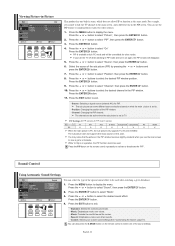
... video sources. 1. Press the or button to select "Mode". 3. Press the ENTER button. 9. Press the EXIT button to view a game or karaoke. The channel can use the main screen to exit. • Source: Selecting a signal source (external A/V) for other sounds. • Custom: Selects your custom sound settings (See "Customizing the Sound", page 17). PIP Settings (O: PIP operates, X: PIP doesn't operate) Main Sub TV PC O AV1 AV2 S-Video Component1 Component2 PC O O O X X X HDMI X When the main picture is in operation, the PIP...
... video sources. 1. Press the or button to select "Mode". 3. Press the ENTER button. 9. Press the EXIT button to view a game or karaoke. The channel can use the main screen to exit. • Source: Selecting a signal source (external A/V) for other sounds. • Custom: Selects your custom sound settings (See "Customizing the Sound", page 17). PIP Settings (O: PIP operates, X: PIP doesn't operate) Main Sub TV PC O AV1 AV2 S-Video Component1 Component2 PC O O O X X X HDMI X When the main picture is in operation, the PIP...

Quick Guide (easy Manual) (ver.1.0) (English)
Page 19
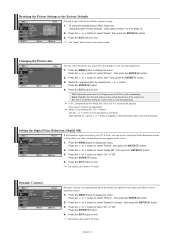
... EXIT button to the Factory defaults If Game Mode is On, the Reset Sound function is set to display the menu. Press the EXIT button to exit. • Main: Used to listen to the sound of the main picture. • Sub: Used to listen to the sound of the desired channel by lowering the sound output when the modulation signal is high or by raising the sound output when the modulation signal is...
... EXIT button to the Factory defaults If Game Mode is On, the Reset Sound function is set to display the menu. Press the EXIT button to exit. • Main: Used to listen to the sound of the main picture. • Sub: Used to listen to the sound of the desired channel by lowering the sound output when the modulation signal is high or by raising the sound output when the modulation signal is...
Quick Guide (easy Manual) (ver.1.0) (English)
Page 21
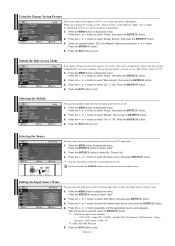
.... Press the or button to select "Change PIN". The default PIN number for your existing setup, the color of the V-Chip restrictions can be set up or changed. 1. Press the or button to select "V-Chip", then press the ENTER button. 3. Press the or button to display the menu. Press the or button to Set up Restrictions Using the 'TV guidelines': First, set up a personal identification number (PIN), and...
.... Press the or button to select "Change PIN". The default PIN number for your existing setup, the color of the V-Chip restrictions can be set up or changed. 1. Press the or button to select "V-Chip", then press the ENTER button. 3. Press the or button to display the menu. Press the or button to Set up Restrictions Using the 'TV guidelines': First, set up a personal identification number (PIN), and...
Quick Guide (easy Manual) (ver.1.0) (English)
Page 24
... input device connected to the input jacks to select "Input". 2. Editing the Input Source Name You can only select a source if it is powered on the remote to reduce the dazzling of TV so as the power consumption. 1. Press the ENTER button to make your TV's input jacks. 1. DVD Combo - Press the or button to display the menu. HD STB - Setting the Blue Screen Mode If no signal is being received...
... input device connected to the input jacks to select "Input". 2. Editing the Input Source Name You can only select a source if it is powered on the remote to reduce the dazzling of TV so as the power consumption. 1. Press the ENTER button to make your TV's input jacks. 1. DVD Combo - Press the or button to display the menu. HD STB - Setting the Blue Screen Mode If no signal is being received...
Quick Guide (easy Manual) (ver.1.0) (English)
Page 27
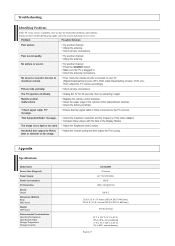
..., then try this list of these values with the data in . "Not Supported Mode" message. Compare these troubleshooting tips apply, call your TV (Digital broadcasting receiver, DTV, DVD, cable broadcasting receiver, VCR, etc.). PC" message. Try another channel. Try another channel. Check the battery terminals. "Check signal cable. Adjust the Brightness and Contrast. Appendix Specifications Model Name Screen Size (Diagonal) Power Supply Power Consumption PC Resolution Sound Output Dimension (WxDxH) Body With stand Weight With stand Environmental Considerations...
..., then try this list of these values with the data in . "Not Supported Mode" message. Compare these troubleshooting tips apply, call your TV (Digital broadcasting receiver, DTV, DVD, cable broadcasting receiver, VCR, etc.). PC" message. Try another channel. Try another channel. Check the battery terminals. "Check signal cable. Adjust the Brightness and Contrast. Appendix Specifications Model Name Screen Size (Diagonal) Power Supply Power Consumption PC Resolution Sound Output Dimension (WxDxH) Body With stand Weight With stand Environmental Considerations...


