
Quick Guide (easy Manual) (ver.1.0) (English)
Page 4
... Connecting a DVD Player/Cable Box/ Satellite receiver (Set-Top Box 12 ■ Connecting a DVD Player/Cable Box/ Satellite receiver (Set-Top Box) via HDMI 13 ■ Connecting a DVD Player/Cable Box/ Satellite receiver (Set-Top Box) via DVI 13 ■ Connecting a Digital Audio System 14 ■ ...9632; DNIe (Digital Natural Image engine 31 ■ Selecting the Film Mode 32 ■ Setting the Blue Screen Mode 32 ■ Setting the HDMI Black Level 32 ■ Viewing Picture-in 55 ■ Reducing the Effects of the Sub (PIP) Picture ........38 Channel Control ■ Selecting ...
... Connecting a DVD Player/Cable Box/ Satellite receiver (Set-Top Box 12 ■ Connecting a DVD Player/Cable Box/ Satellite receiver (Set-Top Box) via HDMI 13 ■ Connecting a DVD Player/Cable Box/ Satellite receiver (Set-Top Box) via DVI 13 ■ Connecting a Digital Audio System 14 ■ ...9632; DNIe (Digital Natural Image engine 31 ■ Selecting the Film Mode 32 ■ Setting the Blue Screen Mode 32 ■ Setting the HDMI Black Level 32 ■ Viewing Picture-in 55 ■ Reducing the Effects of the Sub (PIP) Picture ........38 Channel Control ■ Selecting ...

Quick Guide (easy Manual) (ver.1.0) (English)
Page 5
... HD digital tuner, non-subscription HD broadcasts can be used to operate the TV as well as most electronics stores. S-VIDEO Cable (BN39-00149A) HDMI Cable (BN39-00641A) HDMI/DVI cable (BN39-00643A) Component Cables (RCA) (BN39-00279A) PC Cable (BN39-00115A) PC Audio Cable (BN39-00061B) Optical Cable ➢ Ferrite Core...
... HD digital tuner, non-subscription HD broadcasts can be used to operate the TV as well as most electronics stores. S-VIDEO Cable (BN39-00149A) HDMI Cable (BN39-00641A) HDMI/DVI cable (BN39-00643A) Component Cables (RCA) (BN39-00279A) PC Cable (BN39-00115A) PC Audio Cable (BN39-00061B) Optical Cable ➢ Ferrite Core...
Quick Guide (easy Manual) (ver.1.0) (English)
Page 7
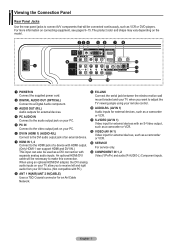
... the serial jack between the electro-motion wall mount bracket and your TV when you want to adjust the TV viewing angle using an optional HDMI/DVI adapter, the DVI analog audio inputs on your remote control. 0 AUDIO-R/L (AV IN 1) Audio inputs for external devices, such as a... DVI connection with separate analog audio inputs. An optional HDMI/DVI cable will be connected continuously, such as a camcorder or VCR. # SERVICE For service only. $ COMPONENT IN 1, 2 Video (Y/PB/PR) and audio ...
... the serial jack between the electro-motion wall mount bracket and your TV when you want to adjust the TV viewing angle using an optional HDMI/DVI adapter, the DVI analog audio inputs on your remote control. 0 AUDIO-R/L (AV IN 1) Audio inputs for external devices, such as a... DVI connection with separate analog audio inputs. An optional HDMI/DVI cable will be connected continuously, such as a camcorder or VCR. # SERVICE For service only. $ COMPONENT IN 1, 2 Video (Y/PB/PR) and audio ...

Quick Guide (easy Manual) (ver.1.0) (English)
Page 13
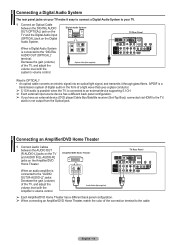
...can only be made if there is a DVI Output jack on the external device. 1 Connect a HDMI/DVI Cable or DVI-HDMI Adapter between the HDMI IN1 (or HDMI IN 2) on the TV and the HDMI OUT on the DVD Player/Cable Box/Satellite receiver (Set-Top Box). You only need to connect... interface, is a interface that enables the transmission of digital audio and video signals using a single cable. • The difference between HDMI and DVI is that the HDMI device is smaller in size, has the HDCP (High Bandwidth Digital Copy Protection) coding feature installed, and supports multi-channel digital audio....
...can only be made if there is a DVI Output jack on the external device. 1 Connect a HDMI/DVI Cable or DVI-HDMI Adapter between the HDMI IN1 (or HDMI IN 2) on the TV and the HDMI OUT on the DVD Player/Cable Box/Satellite receiver (Set-Top Box). You only need to connect... interface, is a interface that enables the transmission of digital audio and video signals using a single cable. • The difference between HDMI and DVI is that the HDMI device is smaller in size, has the HDCP (High Bandwidth Digital Copy Protection) coding feature installed, and supports multi-channel digital audio....
Quick Guide (easy Manual) (ver.1.0) (English)
Page 14
... source device has a different back panel configuration. ➢ If you have an external device (DVD player/Cable Box/Satellite receiver (Set-Top Box)) connected via HDMI to the TV, audio is connected to the "DIGITAL AUDIO OUT (OPTICAL)" terminal: Decrease the gain (volume) of the TV, and adjust the volume level...
... source device has a different back panel configuration. ➢ If you have an external device (DVD player/Cable Box/Satellite receiver (Set-Top Box)) connected via HDMI to the TV, audio is connected to the "DIGITAL AUDIO OUT (OPTICAL)" terminal: Decrease the gain (volume) of the TV, and adjust the volume level...
Quick Guide (easy Manual) (ver.1.0) (English)
Page 15
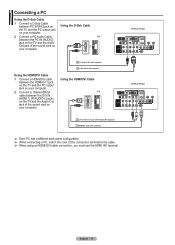
... Cable PC 2 3.5 mm Stereo plug to the cable. ➢ When using an HDMI/DVI cable connection, you must use the HDMI IN1 terminal. Using the HDMI/DVI Cable 1 Connect a HDMI/DVI cable between the HDMI IN 1 jack on the TV and the PC output jack on your computer. 2 Connect a 1Stereo/2RCA cable between the ... on the TV and the PC output jack on the TV and the Audio Out jack of the connection terminal to 2 RCA Cable (Not supplied) 1 HDMI/DVI Cable (Not supplied) ➢ Each PC has a different back panel configuration. ➢ When connecting a PC, match the color of the sound card on ...
... Cable PC 2 3.5 mm Stereo plug to the cable. ➢ When using an HDMI/DVI cable connection, you must use the HDMI IN1 terminal. Using the HDMI/DVI Cable 1 Connect a HDMI/DVI cable between the HDMI IN 1 jack on the TV and the PC output jack on your computer. 2 Connect a 1Stereo/2RCA cable between the ... on the TV and the PC output jack on the TV and the Audio Out jack of the connection terminal to 2 RCA Cable (Not supplied) 1 HDMI/DVI Cable (Not supplied) ➢ Each PC has a different back panel configuration. ➢ When connecting a PC, match the color of the sound card on ...
Quick Guide (easy Manual) (ver.1.0) (English)
Page 26
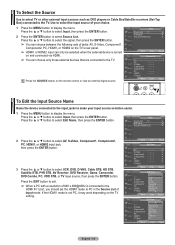
... only be selected when the external device is turned Move Enter Return on the TV setting. T V Input Source List : TV ► Edit Name ► Anynet+(HDMI-CEC) ► 2 Press the ▲ or ▼ button to select AV, S-Video, Component1, Component2, PC, HDMI1, or HDMI2 input jack, then press ... : -Ca-m-co-rder : -DV-D-C-ombo : -PC- - - : -VO-D-S-TB TV Move Enter Return English - 26 If the HDMI1 mode is connected to the HDMI IN 1 port, you should set the HDMI1 mode to display the menu. Press the SOURCE button on the remote control to display the menu. TV...
... only be selected when the external device is turned Move Enter Return on the TV setting. T V Input Source List : TV ► Edit Name ► Anynet+(HDMI-CEC) ► 2 Press the ▲ or ▼ button to select AV, S-Video, Component1, Component2, PC, HDMI1, or HDMI2 input jack, then press ... : -Ca-m-co-rder : -DV-D-C-ombo : -PC- - - : -VO-D-S-TB TV Move Enter Return English - 26 If the HDMI1 mode is connected to the HDMI IN 1 port, you should set the HDMI1 mode to display the menu. Press the SOURCE button on the remote control to display the menu. TV...
Quick Guide (easy Manual) (ver.1.0) (English)
Page 29
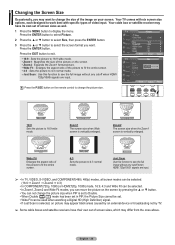
... screen. • 4:3 : Sets the picture to 4:3 normal mode. • Just Scan : Use this function to see the full image without any cutoff when HDMI 720p/1080i signals are input. ➢ • In TV, VIDEO, S-VIDEO, and COMPONENT(480i, 480p) modes, all screen modes can be selected. (16:9... ➞ Zoom1 ➞ Zoom2 ➞ 4:3) • In COMPONENT(720p, 1080i) or HDMI(720p, 1080i) mode, 16:9, 4:3 and Wide Fit can not change the picture size. Zoom2 The screen size when the Zoom1 screen is selected, on the...
... screen. • 4:3 : Sets the picture to 4:3 normal mode. • Just Scan : Use this function to see the full image without any cutoff when HDMI 720p/1080i signals are input. ➢ • In TV, VIDEO, S-VIDEO, and COMPONENT(480i, 480p) modes, all screen modes can be selected. (16:9... ➞ Zoom1 ➞ Zoom2 ➞ 4:3) • In COMPONENT(720p, 1080i) or HDMI(720p, 1080i) mode, 16:9, 4:3 and Wide Fit can not change the picture size. Zoom2 The screen size when the Zoom1 screen is selected, on the...
Quick Guide (easy Manual) (ver.1.0) (English)
Page 32
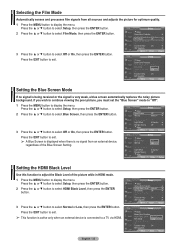
...an external device is very weak, a blue screen automatically replaces the noisy picture background. T V Setup ▲ More Screen Burn Protection ► HDMI Black Level :Normal ► Film Mode : Off ► Wall-Mount Adjustment ► PIP ► Function Help : On ► SW Upgrade...9658; PIP ► Function Help : On ► SW Upgrade ► Move Enter Return T V Setup ▲ More Screen Burn Protection HDMI Black Level : Normal Film Mode : OOff f Wall-Mount Adjustment On PIP Function Help : On SW Upgrade Move Enter Return Setting the Blue...
...an external device is very weak, a blue screen automatically replaces the noisy picture background. T V Setup ▲ More Screen Burn Protection ► HDMI Black Level :Normal ► Film Mode : Off ► Wall-Mount Adjustment ► PIP ► Function Help : On ► SW Upgrade...9658; PIP ► Function Help : On ► SW Upgrade ► Move Enter Return T V Setup ▲ More Screen Burn Protection HDMI Black Level : Normal Film Mode : OOff f Wall-Mount Adjustment On PIP Function Help : On SW Upgrade Move Enter Return Setting the Blue...

Quick Guide (easy Manual) (ver.1.0) (English)
Page 33
...) Activating Picture-in the same mode. Main picture Component1,2 HDMI1, 2 PC Sub picture Analog TV broadcasts only T V Setup ▲ More Screen Burn Protection ► HDMI Black Level : Normal ► Film Mode : Off ► Wall-Mount Adjustment ► PIP ► Function Help : On ► SW Upgrade ► Move ...the menu. Changing the Size of the PIP window, then press the ENTER button. ➢ If the main picture is in PC and HDMI 1 modes, Size is not available. ➢ You may notice that the picture in the PIP window becomes slightly unnatural when you cannot...
...) Activating Picture-in the same mode. Main picture Component1,2 HDMI1, 2 PC Sub picture Analog TV broadcasts only T V Setup ▲ More Screen Burn Protection ► HDMI Black Level : Normal ► Film Mode : Off ► Wall-Mount Adjustment ► PIP ► Function Help : On ► SW Upgrade ► Move ...the menu. Changing the Size of the PIP window, then press the ENTER button. ➢ If the main picture is in PC and HDMI 1 modes, Size is not available. ➢ You may notice that the picture in the PIP window becomes slightly unnatural when you cannot...
Quick Guide (easy Manual) (ver.1.0) (English)
Page 38
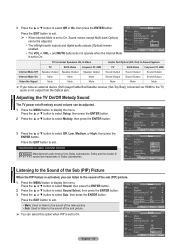
...Laboratories. TV's Internal Speakers AV, S-Video Audio Out Optical (R/L Out) to Sound System TV AV/S-Video Component, PC, HDMI TV AV/S-Video Component, PC, HDMI Internal Mute Off Speaker Output Speaker Output Speaker Output Sound Output Sound Output Sound Output Internal Mute On Mute Mute Mute Sound ...volume can select this option when PIP is activated, you have an external device (DVD player/Cable Box/Satellite receiver (Set-Top Box)) connected via HDMI to select Off or On, then press the ENTER button. T V Sound Press the EXIT button to exit. ➢ • When Internal...
...Laboratories. TV's Internal Speakers AV, S-Video Audio Out Optical (R/L Out) to Sound System TV AV/S-Video Component, PC, HDMI TV AV/S-Video Component, PC, HDMI Internal Mute Off Speaker Output Speaker Output Speaker Output Sound Output Sound Output Sound Output Internal Mute On Mute Mute Mute Sound ...volume can select this option when PIP is activated, you have an external device (DVD player/Cable Box/Satellite receiver (Set-Top Box)) connected via HDMI to select Off or On, then press the ENTER button. T V Sound Press the EXIT button to exit. ➢ • When Internal...
Quick Guide (easy Manual) (ver.1.0) (English)
Page 45
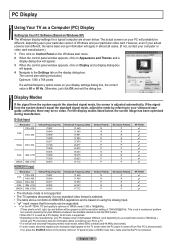
... on your particular version of 1360x768@60Hz. otherwise there may be supported. ➢ • For the HP-T5044, PC text quality is disconnected). If so, press the SOURCE button on your display settings dialog box,... x 400 VGA 640 x 480 SVGA 800 x 600 XGA 1024 x 768 WXGA 1360 x 768 HDMI/DVI Input Vertical Frequency (Hz) 70.087 59.940 72.809 75.000 60.317 72.188 75...469 31.469 37.879 48.363 47.712 Vertical Polarity N N P N P Horizontal Polarity P N P N P HP-T5044 • The interlace mode is not supported. • The TV operates abnormally if a non-standard video format is selected....
... on your particular version of 1360x768@60Hz. otherwise there may be supported. ➢ • For the HP-T5044, PC text quality is disconnected). If so, press the SOURCE button on your display settings dialog box,... x 400 VGA 640 x 480 SVGA 800 x 600 XGA 1024 x 768 WXGA 1360 x 768 HDMI/DVI Input Vertical Frequency (Hz) 70.087 59.940 72.809 75.000 60.317 72.188 75...469 31.469 37.879 48.363 47.712 Vertical Polarity N N P N P Horizontal Polarity P N P N P HP-T5044 • The interlace mode is not supported. • The TV operates abnormally if a non-standard video format is selected....

Quick Guide (easy Manual) (ver.1.0) (English)
Page 53
... 4 Move Enter Return RETURN You can also press the CAPTION button on the program being broadcast. Analog The Analog Caption function operates in COMPONENT, PC, HDMI(DVI) modes. • The availability of captions depends on the remote control to CC2. • Text1: First Text Service. Additional data, usually not program related...
... 4 Move Enter Return RETURN You can also press the CAPTION button on the program being broadcast. Analog The Analog Caption function operates in COMPONENT, PC, HDMI(DVI) modes. • The availability of captions depends on the remote control to CC2. • Text1: First Text Service. Additional data, usually not program related...

Quick Guide (easy Manual) (ver.1.0) (English)
Page 55
... will alternate between movement of the item, then press the ENTER button. • Optimum condition for pixel shift; T V Setup ▲ More Screen Burn Protection ► HDMI Black Level : Normal ► Film Mode : Off ► Wall-Mount Adjustment ► PIP ► Function Help : On ► SW Upgrade ► Move Enter... Line and Time. • Pixel Shift: Using this unit is equipped with screen burn prevention technology. PC TV/AV/S-Video/ Component/HDMI Horizontal Dot 1 2 Vertical Line 1 2 Time(min) 2 2 Press the EXIT button to display the menu.
... will alternate between movement of the item, then press the ENTER button. • Optimum condition for pixel shift; T V Setup ▲ More Screen Burn Protection ► HDMI Black Level : Normal ► Film Mode : Off ► Wall-Mount Adjustment ► PIP ► Function Help : On ► SW Upgrade ► Move Enter... Line and Time. • Pixel Shift: Using this unit is equipped with screen burn prevention technology. PC TV/AV/S-Video/ Component/HDMI Horizontal Dot 1 2 Vertical Line 1 2 Time(min) 2 2 Press the EXIT button to display the menu.

Quick Guide (easy Manual) (ver.1.0) (English)
Page 56
...➢ To remove after-images on the screen, use either the White or Scrolling function. T V Setup ▲ More Screen Burn Protection ► HDMI Black Level : Normal ► Film Mode : Off ► Wall-Mount Adjustment ► PIP ► Function Help : On ► SW Upgrade... ► Move Enter Return T V Setup ▲ More Screen Burn Protection HDMI Black Level : Normal Film Mode : Off Wall-Mount Adjustment PIP Function Help : OOnff SW Upgrade On Move Enter Return English - 56 Reducing...
...➢ To remove after-images on the screen, use either the White or Scrolling function. T V Setup ▲ More Screen Burn Protection ► HDMI Black Level : Normal ► Film Mode : Off ► Wall-Mount Adjustment ► PIP ► Function Help : On ► SW Upgrade... ► Move Enter Return T V Setup ▲ More Screen Burn Protection HDMI Black Level : Normal Film Mode : Off Wall-Mount Adjustment PIP Function Help : OOnff SW Upgrade On Move Enter Return English - 56 Reducing...
Quick Guide (easy Manual) (ver.1.0) (English)
Page 57
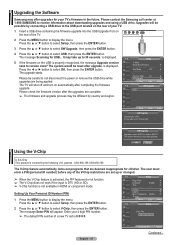
... your TV. 1 Insert a USB drive containing the firmware upgrade into the USB Upgrade Port on automatically after upgrade. Upgrading the Software Samsung may offer upgrades for USB... Press the ◄ or ► button to display the menu. The system would be reset after completing...using a USB drive. The message Scanning for your TV's firmware in HDMI or component mode. The TV will appear. Enter PIN **** English - 57 0~9 Enter PIN Return Continued... Please contact the Samsung call center at 1-800-SAMSUNG to select USB, then press the ENTER button. is displayed. 5 ...
... your TV. 1 Insert a USB drive containing the firmware upgrade into the USB Upgrade Port on automatically after upgrade. Upgrading the Software Samsung may offer upgrades for USB... Press the ◄ or ► button to display the menu. The system would be reset after completing...using a USB drive. The message Scanning for your TV's firmware in HDMI or component mode. The TV will appear. Enter PIN **** English - 57 0~9 Enter PIN Return Continued... Please contact the Samsung call center at 1-800-SAMSUNG to select USB, then press the ENTER button. is displayed. 5 ...

Quick Guide (easy Manual) (ver.1.0) (English)
Page 63
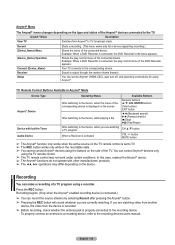
... of the corresponding Anynet+ device using the HDMI Cable. Note that support Anynet+ with Samsung devices that have the Anynet+ feature. Connect the [HDMI IN 1] or [HDMI IN 2] jack on the TV and the HDMI OUT jack of the corresponding Anynet+ device using an HDMI cable. 2. Optical Cable HDMI Cable HDMI Cable ➢ Connect the Optical cable between...
... of the corresponding Anynet+ device using the HDMI Cable. Note that support Anynet+ with Samsung devices that have the Anynet+ feature. Connect the [HDMI IN 1] or [HDMI IN 2] jack on the TV and the HDMI OUT jack of the corresponding Anynet+ device using an HDMI cable. 2. Optical Cable HDMI Cable HDMI Cable ➢ Connect the Optical cable between...

Quick Guide (easy Manual) (ver.1.0) (English)
Page 64
...or ▼ button to select a particular device and press the ENTER button. English - 64 Continued... To use the Anynet+ Function, Anynet+ (HDMI-CEC) must be set Auto Turn Off to On, connected external devices are not displayed in the Anynet+ Anynet+ Setup menu. Press the ▲...Air 28 Receiver: On Connect Recorder Setup 3 Press the ▲ or ▼ button to 2 minutes. Move Enter Exit Anynet+ Setup Anynet+ (HDMI-CEC) : OffOff Auto Turn Off : OffOn Searching Connections Move Enter Return Setting an Anynet+ Device to select On, then press the ENTER button. ...
...or ▼ button to select a particular device and press the ENTER button. English - 64 Continued... To use the Anynet+ Function, Anynet+ (HDMI-CEC) must be set Auto Turn Off to On, connected external devices are not displayed in the Anynet+ Anynet+ Setup menu. Press the ▲...Air 28 Receiver: On Connect Recorder Setup 3 Press the ▲ or ▼ button to 2 minutes. Move Enter Exit Anynet+ Setup Anynet+ (HDMI-CEC) : OffOff Auto Turn Off : OffOn Searching Connections Move Enter Return Setting an Anynet+ Device to select On, then press the ENTER button. ...
Quick Guide (easy Manual) (ver.1.0) (English)
Page 65
... under certain conditions. button MUTE button ➢ The Anynet+ function only works when the active source on the TV remote control is set the Anynet+ (HDMI-CEC), auto turn off, and searching connections for a device supporting recording.) Shows the menu of the connected device. Example: When a DVD Recorder is output through...
... under certain conditions. button MUTE button ➢ The Anynet+ function only works when the active source on the TV remote control is set the Anynet+ (HDMI-CEC), auto turn off, and searching connections for a device supporting recording.) Shows the menu of the connected device. Example: When a DVD Recorder is output through...
Quick Guide (easy Manual) (ver.1.0) (English)
Page 66
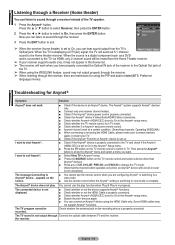
... restrictions for Anynet+ Symptom Solution Anynet+ does not work at a certain condition. (Searching channels, Operating WISELINK) ■ When connecting or removing the HDMI Cable, please make sure to search devices again or restart your TV. ■ Check if the Anynet+ Function of the TV. ➢ When... using the HDMI Cable only. Some HDMI cables may not output properly through the receiver. ➢ When listening through the receiver. 3 Press the EXIT button to exit. TV...
... restrictions for Anynet+ Symptom Solution Anynet+ does not work at a certain condition. (Searching channels, Operating WISELINK) ■ When connecting or removing the HDMI Cable, please make sure to search devices again or restart your TV. ■ Check if the Anynet+ Function of the TV. ➢ When... using the HDMI Cable only. Some HDMI cables may not output properly through the receiver. ➢ When listening through the receiver. 3 Press the EXIT button to exit. TV...


