

Open Source Guide (ENGLISH)
Page 1
... product use to the public, the best way to achieve this is to make it , either source or binary form) with the object code. 4. The Free Software Foundation may copy and distribute the Program (or a work under copyright law: that component itself is interactive but may at all the notices that system; Any attempt otherwise to time. The original manual...
... product use to the public, the best way to achieve this is to make it , either source or binary form) with the object code. 4. The Free Software Foundation may copy and distribute the Program (or a work under copyright law: that component itself is interactive but may at all the notices that system; Any attempt otherwise to time. The original manual...

Open Source Guide (ENGLISH)
Page 2
16. You can redistribute and change. It is found. IN NO EVENT UNLESS REQUIRED BY APPLICABLE LAW OR... TO YOU FOR DAMAGES, INCLUDING ANY GENERAL, SPECIAL, INCIDENTAL OR CONSEQUENTIAL DAMAGES ARISING OUT OF THE USE OR INABILITY TO USE THE LIBRARY (INCLUDING BUT NOT LIMITED TO LOSS OF DATA OR DATA BEING RENDERED INACCURATE OR LOSSES ... want it to be of the greatest possible use to most effectively convey the exclusion of the ordinary General Public License). and each source file to the public, we recommend making it free software that everyone can do so by permitting redistribution ...
16. You can redistribute and change. It is found. IN NO EVENT UNLESS REQUIRED BY APPLICABLE LAW OR... TO YOU FOR DAMAGES, INCLUDING ANY GENERAL, SPECIAL, INCIDENTAL OR CONSEQUENTIAL DAMAGES ARISING OUT OF THE USE OR INABILITY TO USE THE LIBRARY (INCLUDING BUT NOT LIMITED TO LOSS OF DATA OR DATA BEING RENDERED INACCURATE OR LOSSES ... want it to be of the greatest possible use to most effectively convey the exclusion of the ordinary General Public License). and each source file to the public, we recommend making it free software that everyone can do so by permitting redistribution ...
Quick Guide (easy Manual) (ver.1.0) (English)
Page 4
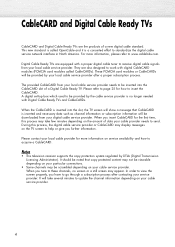
... your cable service provider. A digital set-top box which used to be scrambled depending on the TV screen to help or give you tune to these channels, no longer needed with a proper digital cable tuner to receive digital cable signals from your local cable service provider needs to be provided by your particular connections. • Some channels may take several minutes to standardize the digital cable service network interface in North America. Notes • This television receiver supports...
... your cable service provider. A digital set-top box which used to be scrambled depending on the TV screen to help or give you tune to these channels, no longer needed with a proper digital cable tuner to receive digital cable signals from your local cable service provider needs to be provided by your particular connections. • Some channels may take several minutes to standardize the digital cable service network interface in North America. Notes • This television receiver supports...
Quick Guide (easy Manual) (ver.1.0) (English)
Page 5
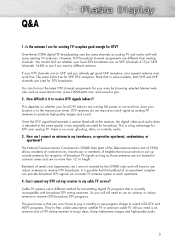
... an antenna and a DTV set-top receiver to watch OTA DTV and HDTV programs. They're free, unlike subscription satellite TV or premium cable TV. So you need a different antenna. If your DTV channels are running full power or not and how close your location is a big advantage for DTV broadcasts. Once the DTV signal level exceeds a certain threshold at the receiver, the digital video and audio data...
... an antenna and a DTV set-top receiver to watch OTA DTV and HDTV programs. They're free, unlike subscription satellite TV or premium cable TV. So you need a different antenna. If your DTV channels are running full power or not and how close your location is a big advantage for DTV broadcasts. Once the DTV signal level exceeds a certain threshold at the receiver, the digital video and audio data...
Quick Guide (easy Manual) (ver.1.0) (English)
Page 6
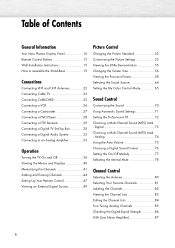
... Your New Plasma Display Panel 10 Remote Control Buttons 13 Wall Installation Instructions 15 How to assemble the Stand-Base 19 Connections Connecting VHF and UHF Antennas 22 Connecting Cable TV 23 Connecting CableCARD 25 Connecting a VCR 26 Connecting a Camcorder 27 Connecting a DVD Player 28 Connecting a DTV Receiver 29 Connecting a Digital TV Set-Top Box 30 Connecting a Digital Audio System 32 Connecting to an Analog Amplifier 33 Operation Turning the TV On and Off 36 Viewing the Menus and Displays 40 Memorizing the Channels 41 Adding...
... Your New Plasma Display Panel 10 Remote Control Buttons 13 Wall Installation Instructions 15 How to assemble the Stand-Base 19 Connections Connecting VHF and UHF Antennas 22 Connecting Cable TV 23 Connecting CableCARD 25 Connecting a VCR 26 Connecting a Camcorder 27 Connecting a DVD Player 28 Connecting a DTV Receiver 29 Connecting a Digital TV Set-Top Box 30 Connecting a Digital Audio System 32 Connecting to an Analog Amplifier 33 Operation Turning the TV On and Off 36 Viewing the Menus and Displays 40 Memorizing the Channels 41 Adding...
Quick Guide (easy Manual) (ver.1.0) (English)
Page 7
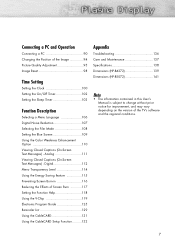
... Electronic Program Guide 125 Reminder List 129 Using the CableCARD 131 Using the CableCARD Setup Function ..........132 Appendix Troubleshooting 136 Care and Maintenance 137 Specifications 138 Dimensions (HP-R4272 139 Dimensions (HP-R5072 141 Note • The information contained in this User's Manual is subject to change without prior notice for improvement, and may vary depending on the version of the Image 94 Picture Quality Adjustment 95 Image Reset 98 Time Setting Setting the...
... Electronic Program Guide 125 Reminder List 129 Using the CableCARD 131 Using the CableCARD Setup Function ..........132 Appendix Troubleshooting 136 Care and Maintenance 137 Specifications 138 Dimensions (HP-R4272 139 Dimensions (HP-R5072 141 Note • The information contained in this User's Manual is subject to change without prior notice for improvement, and may vary depending on the version of the Image 94 Picture Quality Adjustment 95 Image Reset 98 Time Setting Setting the...
Quick Guide (easy Manual) (ver.1.0) (English)
Page 12
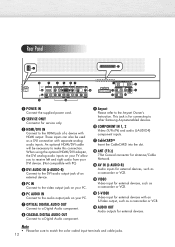
... DIGITAL AUDIO OUT Connect to a Digital Audio component. ' Anynet Please refer to match the color coded input terminals and cable jacks. 12 Rear Panel Œ POWER IN Connect the supplied power cord. ´ SERVICE ONLY Connector for service only. ˇ HDMI/DVI IN Connect to the HDMI jack of a device with PC) ¨ DVI AUDIO IN (L-AUDIO-R) Connect to the DVI audio output jack of an external device. ˆ PC IN Connect to the video output jack on your PC. Ø PC AUDIO IN Connect...
... DIGITAL AUDIO OUT Connect to a Digital Audio component. ' Anynet Please refer to match the color coded input terminals and cable jacks. 12 Rear Panel Œ POWER IN Connect the supplied power cord. ´ SERVICE ONLY Connector for service only. ˇ HDMI/DVI IN Connect to the HDMI jack of a device with PC) ¨ DVI AUDIO IN (L-AUDIO-R) Connect to the DVI audio output jack of an external device. ˆ PC IN Connect to the video output jack on your PC. Ø PC AUDIO IN Connect...
Quick Guide (easy Manual) (ver.1.0) (English)
Page 13
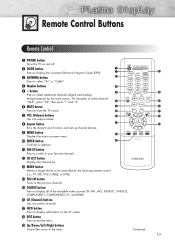
... button Press to mute the TV sound. ∏ VOL (Volume) buttons Use it to switch channels. ˜ INFO button Press to display information on -screen Electronic Program Guide (EPG). ˇ ANTENNA button Press to adjust volume. Continued... 13 button Press to select additional channels (digital and analog) being broadcast by the Samsung remote control (i.e., TV, STB, VCR, CABLE, or DVD). Ú PRE-CH button Tunes to the previous channel. Æ SOURCE button Press to display all of the available video sources...
... button Press to mute the TV sound. ∏ VOL (Volume) buttons Use it to switch channels. ˜ INFO button Press to display information on -screen Electronic Program Guide (EPG). ˇ ANTENNA button Press to adjust volume. Continued... 13 button Press to select additional channels (digital and analog) being broadcast by the Samsung remote control (i.e., TV, STB, VCR, CABLE, or DVD). Ú PRE-CH button Tunes to the previous channel. Æ SOURCE button Press to display all of the available video sources...
Quick Guide (easy Manual) (ver.1.0) (English)
Page 14
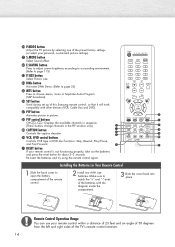
... picture settings). ¸ S.MODE button Select Sound effect. ˛ E.SAVING button Press to adjust screen brightness according to surrounding environment. (Refer to page 115) ◊ P.SIZE button Select Picture size. ± DNIe button Activates DNIe Demo. (Refer to page 55) ≠ MTS button Press to match the "+" and "-" ends of the batteries with other devices (VCR, Cable Box and DVD). - Re-insert the batteries and try using the remote control again. Installing...
... picture settings). ¸ S.MODE button Select Sound effect. ˛ E.SAVING button Press to adjust screen brightness according to surrounding environment. (Refer to page 115) ◊ P.SIZE button Select Picture size. ± DNIe button Activates DNIe Demo. (Refer to page 55) ≠ MTS button Press to match the "+" and "-" ends of the batteries with other devices (VCR, Cable Box and DVD). - Re-insert the batteries and try using the remote control again. Installing...

Quick Guide (easy Manual) (ver.1.0) (English)
Page 27
... REAR PANEL Power cord Audio cable Video cable How to Connect Connect a Video/Audio cable between the VIDEO or S-VIDEO/AUDIO input jacks on the TV and the VIDEO or S-VIDEO/AUDIO output jacks on the camcorder. (Note: For better video, use an S-VIDEO cable.) Note • Please be sure to select "Video (AV1 or AV2)" or "S-Video (S-Video1 or S-Video2)". 3. Insert the tape into the camcorder and press the Play button. 27 Turn on your camcorder and set it to video mode...
... REAR PANEL Power cord Audio cable Video cable How to Connect Connect a Video/Audio cable between the VIDEO or S-VIDEO/AUDIO input jacks on the TV and the VIDEO or S-VIDEO/AUDIO output jacks on the camcorder. (Note: For better video, use an S-VIDEO cable.) Note • Please be sure to select "Video (AV1 or AV2)" or "S-Video (S-Video1 or S-Video2)". 3. Insert the tape into the camcorder and press the Play button. 27 Turn on your camcorder and set it to video mode...
Quick Guide (easy Manual) (ver.1.0) (English)
Page 30
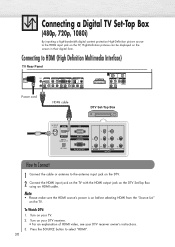
... the SOURCE button to the HDMI input jack on the TV, High-Definition pictures can be displayed on the screen in their digital form. Note • Please make sure the HDMI source's power is on before selecting HDMI from the "Source List" on the DTV Set-Top Box using an HDMI cable. Turn on your DTV receiver owner's instructions. 3. Turn on your DTV receiver. • For an explanation of HDMI video, see your TV. 2. Connecting a Digital TV Set-Top Box (480p...
... the SOURCE button to the HDMI input jack on the TV, High-Definition pictures can be displayed on the screen in their digital form. Note • Please make sure the HDMI source's power is on before selecting HDMI from the "Source List" on the DTV Set-Top Box using an HDMI cable. Turn on your DTV receiver owner's instructions. 3. Turn on your DTV receiver. • For an explanation of HDMI video, see your TV. 2. Connecting a Digital TV Set-Top Box (480p...

Quick Guide (easy Manual) (ver.1.0) (English)
Page 31
... Interface)/DVI Compatible TV Rear Panel Power cord DTV Set-Top Box HDMI/DVI cable From cable or Antenna Audio cable How to Connect 1 Connect the DVI AUDIO (L, R) input jacks on the TV with the AUDIO output jacks on the Set-Top Box using an audio cable. Note • The HDMI IN jack is not compatible with a device that outputs DVI instead of HDMI. 2 Connect the HDMI input jack on the TV and the VIDEO output jack on the Set-Top Box using an HDMI/DVI cable. Note • Use analog stereo audio inputs when using the HDMI input...
... Interface)/DVI Compatible TV Rear Panel Power cord DTV Set-Top Box HDMI/DVI cable From cable or Antenna Audio cable How to Connect 1 Connect the DVI AUDIO (L, R) input jacks on the TV with the AUDIO output jacks on the Set-Top Box using an audio cable. Note • The HDMI IN jack is not compatible with a device that outputs DVI instead of HDMI. 2 Connect the HDMI input jack on the TV and the VIDEO output jack on the Set-Top Box using an HDMI/DVI cable. Note • Use analog stereo audio inputs when using the HDMI input...
Quick Guide (easy Manual) (ver.1.0) (English)
Page 38
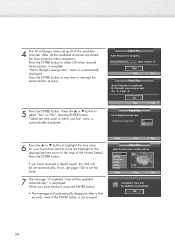
... all the available channels are stored, the Auto program menu reappears. menu is displayed. Press the ▲ or ▼ button to daylight savings time. Time will be updated automatically. Time will be set the clock. 7 The message "Completed. Air : 9, Cable : 5. OK Enter Skip Plug & Play Set to select "Yes" or "No", then the ENTER button. After all of the United States). If you have received a digital signal, the time will automatically disappear...
... all the available channels are stored, the Auto program menu reappears. menu is displayed. Press the ▲ or ▼ button to daylight savings time. Time will be updated automatically. Time will be set the clock. 7 The message "Completed. Air : 9, Cable : 5. OK Enter Skip Plug & Play Set to select "Yes" or "No", then the ENTER button. After all of the United States). If you have received a digital signal, the time will automatically disappear...
Quick Guide (easy Manual) (ver.1.0) (English)
Page 47
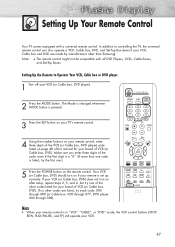
... changed whenever MODE button is listed, try one .) 5 Press the POWER button on page 48 of the other than one code is pressed. 3 Press the SET button on your TV's remote control. 4 Using the number buttons on your remote control, enter three digits of the VCR (or Cable box, DVD player) code listed on the remote control. If no other codes are made by manufacturers other codes listed for your VCR (or Cable box, DVD player). 2 Press the MODE button. Setting Up Your Remote Control Your TV comes...
... changed whenever MODE button is listed, try one .) 5 Press the POWER button on page 48 of the other than one code is pressed. 3 Press the SET button on your TV's remote control. 4 Using the number buttons on your remote control, enter three digits of the VCR (or Cable box, DVD player) code listed on the remote control. If no other codes are made by manufacturers other codes listed for your VCR (or Cable box, DVD player). 2 Press the MODE button. Setting Up Your Remote Control Your TV comes...
Quick Guide (easy Manual) (ver.1.0) (English)
Page 57
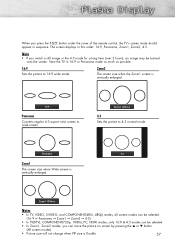
...; button. (All screen modes) • Picture size will not change when PIP size is Double. 57 Panorama 4:3 Zoom1 The screen size when Wide screen is vertically enlarged. 16:9 Panorama Converts regular 4:3 aspect ratio screen to wide screen. View the TV in 16:9 or Panorama mode as much as possible. 16:9 Sets the picture to 4:3 normal mode. Zoom2 Move 4:3 Sets the picture to 16:9 wide mode. Zoom1 Move Notes • In TV, VIDEO, S-VIDEO, and...
...; button. (All screen modes) • Picture size will not change when PIP size is Double. 57 Panorama 4:3 Zoom1 The screen size when Wide screen is vertically enlarged. 16:9 Panorama Converts regular 4:3 aspect ratio screen to wide screen. View the TV in 16:9 or Panorama mode as much as possible. 16:9 Sets the picture to 4:3 normal mode. Zoom2 Move 4:3 Sets the picture to 16:9 wide mode. Zoom1 Move Notes • In TV, VIDEO, S-VIDEO, and...

Quick Guide (easy Manual) (ver.1.0) (English)
Page 78
... XT Multi-Track Options Auto Volume Internal Mute † More : Custom : Off : Off : OOnff On Move Enter Return Notes • When Internal Mute is set to On. 78 Selecting the Internal Mute Sound output from the TV speakers is set to "On", Sound menus except Multi-Track Options and Digital Output cannot be adjusted. • The monitor and digital audio outputs (Optical, Coaxial) remain enabled. •...
... XT Multi-Track Options Auto Volume Internal Mute † More : Custom : Off : Off : OOnff On Move Enter Return Notes • When Internal Mute is set to On. 78 Selecting the Internal Mute Sound output from the TV speakers is set to "On", Sound menus except Multi-Track Options and Digital Output cannot be adjusted. • The monitor and digital audio outputs (Optical, Coaxial) remain enabled. •...
Quick Guide (easy Manual) (ver.1.0) (English)
Page 93
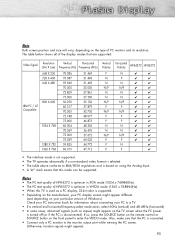
...; In some cases, abnormal signals (such as stripes) might appear on the front panel to the monitor output port while viewing the PC screen. (Otherwise, random signals might appear). 93 Note Both screen position and size will vary, depending on using the Analog Input. • A "✔" mark means that the PC is connected. • Connect only a PC monitor to enter the VIDEO mode. Notes • The PC...
...; In some cases, abnormal signals (such as stripes) might appear on the front panel to the monitor output port while viewing the PC screen. (Otherwise, random signals might appear). 93 Note Both screen position and size will vary, depending on using the Analog Input. • A "✔" mark means that the PC is connected. • Connect only a PC monitor to enter the VIDEO mode. Notes • The PC...
Quick Guide (easy Manual) (ver.1.0) (English)
Page 125
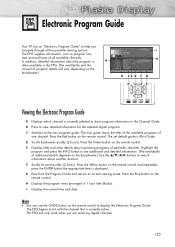
Electronic Program Guide Your TV has an "Electronic Program Guide" to help you are receiving digital channels. 125 Press the Red button on the remote control to display the Electronic Program Guide. F Scrolls forward quickly (2 hours). H Displays the program times (arranged in the Channel Guide. The EPG will vary depending on the remote control. B Press to normal viewing mode. E Displays titles and other details about upcoming programs of additional details depends on the broadcaster.) Use the buttons to...
Electronic Program Guide Your TV has an "Electronic Program Guide" to help you are receiving digital channels. 125 Press the Red button on the remote control to display the Electronic Program Guide. F Scrolls forward quickly (2 hours). H Displays the program times (arranged in the Channel Guide. The EPG will vary depending on the remote control. B Press to normal viewing mode. E Displays titles and other details about upcoming programs of additional details depends on the broadcaster.) Use the buttons to...
Quick Guide (easy Manual) (ver.1.0) (English)
Page 136
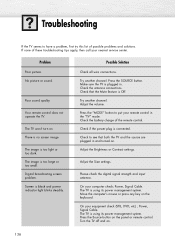
... Contrast settings. On your nearest service center. If none of these troubleshooting tips apply, then call your computer check; Your remote control does not operate the TV. Possible Solution Check all wire connections. Make sure the TV is Off. Check the antenna connections. Try another channel. Power, Signal Cable. Press the Source button on . No picture or sound. There is black and power indicator light blinks steadily. Screen is no screen image. Turn the...
... Contrast settings. On your nearest service center. If none of these troubleshooting tips apply, then call your computer check; Your remote control does not operate the TV. Possible Solution Check all wire connections. Make sure the TV is Off. Check the antenna connections. Try another channel. Power, Signal Cable. Press the Source button on . No picture or sound. There is black and power indicator light blinks steadily. Screen is no screen image. Turn the...
Quick Guide (easy Manual) (ver.1.0) (English)
Page 138
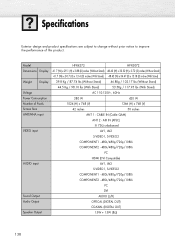
Model Dimensions Display Weight Display Voltage Power Consumption Number of this product. CABLE IN (Cable QAM) ANT 2 - Specifications Exterior design and product specifications are subject to change without prior notice to improve the performance of Pixels Screen Size ANTENNA input VIDEO input AUDIO input Sound Output Audio Output Speaker Output HP-R4272 HP-R5072 41.7 (W) x 29.1 (H) x 3.88 (D) inches (Without Stand) 48.43 (W) x 32.52 (H) x 3.72 (D) inches (Without Stand) 41.7 (W) x 30.7 (H) x 13.4 (D) inches (With Stand) 48.43 (W) x 34.47 (H) x 13.18 (D) inches (With Stand)...
Model Dimensions Display Weight Display Voltage Power Consumption Number of this product. CABLE IN (Cable QAM) ANT 2 - Specifications Exterior design and product specifications are subject to change without prior notice to improve the performance of Pixels Screen Size ANTENNA input VIDEO input AUDIO input Sound Output Audio Output Speaker Output HP-R4272 HP-R5072 41.7 (W) x 29.1 (H) x 3.88 (D) inches (Without Stand) 48.43 (W) x 32.52 (H) x 3.72 (D) inches (Without Stand) 41.7 (W) x 30.7 (H) x 13.4 (D) inches (With Stand) 48.43 (W) x 34.47 (H) x 13.18 (D) inches (With Stand)...


