User Manual (ENGLISH)
Page 7
... 44 ƃAttaching the Lens 46 ƃAdjusting the Viewfinder Dioptre 48 Basic Operations ƃBasic Shooting Operation 50 ƈHolding the Camera 50 ƈLetting the Camera Choose the Optimal Settings 51 ƈOperating the shutter release button 53 ƈHard-to-Autofocus Subjects 54 ƃOPS (Optical Picture Stabilisation 55 ƈ...
... 44 ƃAttaching the Lens 46 ƃAdjusting the Viewfinder Dioptre 48 Basic Operations ƃBasic Shooting Operation 50 ƈHolding the Camera 50 ƈLetting the Camera Choose the Optimal Settings 51 ƈOperating the shutter release button 53 ƈHard-to-Autofocus Subjects 54 ƃOPS (Optical Picture Stabilisation 55 ƈ...
User Manual (ENGLISH)
Page 8
...88 ƈSelecting the Number of Images to Display / Displaying a Folder 89 ƈSlideshow 90 ƈConnecting the Camera to AV Equipment 92 ƈDigital Filters 93 ƈEditing RAW Images 96 ƃDeleting Images 98 ƈDeleting a Single Image 98 ƈDeleting ...menu item and set 119 ƈ[CAPTURE MENU] Menu Settings 120 ƈSetting the Image Tone 121 ƈSetting the File Format / Setting the JPEG Recorded Pixels 122 ƈSetting the JPEG Quality Level 123 ƈSetting the Saturation / Sharpness / Contrast 124 ƈStoring User Settings 125 ƈSetting the Colour ...
...88 ƈSelecting the Number of Images to Display / Displaying a Folder 89 ƈSlideshow 90 ƈConnecting the Camera to AV Equipment 92 ƈDigital Filters 93 ƈEditing RAW Images 96 ƃDeleting Images 98 ƈDeleting a Single Image 98 ƈDeleting ...menu item and set 119 ƈ[CAPTURE MENU] Menu Settings 120 ƈSetting the Image Tone 121 ƈSetting the File Format / Setting the JPEG Recorded Pixels 122 ƈSetting the JPEG Quality Level 123 ƈSetting the Saturation / Sharpness / Contrast 124 ƈStoring User Settings 125 ƈSetting the Colour ...
User Manual (ENGLISH)
Page 9
... Balance with Color Temperature / Noise Reduction 137 ƈISO Warning 138 ƈISO sensitivity step / Reset Custom Function1 139 ƈ[CUSTOM2 MENU] Menu Setting Items 140 ƈAuto Bracketing order / Green Button in Manual mode 141 ƈAperture Ring Use 142 ƈe-dial functions on the P / Sv...ƈCleaning the CCD 161 ƈRemoving the dust 163 ƈReset 164 ƃ[PLAYBACK MENU] Menu Setting Items / Exposure warning 165 ƈInstant View 166 ƈDigital Preview / Digital Filter 167 ƈSlide show 168 ƃUsing the Fn Menu 169 ƈCapture Mode 169 ƈ...
... Balance with Color Temperature / Noise Reduction 137 ƈISO Warning 138 ƈISO sensitivity step / Reset Custom Function1 139 ƈ[CUSTOM2 MENU] Menu Setting Items 140 ƈAuto Bracketing order / Green Button in Manual mode 141 ƈAperture Ring Use 142 ƈe-dial functions on the P / Sv...ƈCleaning the CCD 161 ƈRemoving the dust 163 ƈReset 164 ƃ[PLAYBACK MENU] Menu Setting Items / Exposure warning 165 ƈInstant View 166 ƈDigital Preview / Digital Filter 167 ƈSlide show 168 ƃUsing the Fn Menu 169 ƈCapture Mode 169 ƈ...

User Manual (ENGLISH)
Page 10
... ƈUsing the USER Mode 187 Basic Function ƃChecking the Composition, Exposure and Focus Before Shooting 190 ƃFocusing 192 ƃSetting the Exposure 199 ƃUsing the Built-in Flash 208 ƃUsing an External Flash (Optional 212 Software information ƃSoftware Notes 218... ƃAbout the software 219 ƃSetting up the application software 220 ƃRemovable Disk 223 ƃRemoving the removable disk 225 ƃDigimax Master 227 ƃDigimax RAW Converter...
... ƈUsing the USER Mode 187 Basic Function ƃChecking the Composition, Exposure and Focus Before Shooting 190 ƃFocusing 192 ƃSetting the Exposure 199 ƃUsing the Built-in Flash 208 ƃUsing an External Flash (Optional 212 Software information ƃSoftware Notes 218... ƃAbout the software 219 ƃSetting up the application software 220 ƃRemovable Disk 223 ƃRemoving the removable disk 225 ƃDigimax Master 227 ƃDigimax RAW Converter...
User Manual (ENGLISH)
Page 20
...396;ȜȞ) Uses it to move cursor or change items in menus and Fn menu. ۀOK button Saves the setting you selected in the menu. ہFocus position dial Press to select a focus position. (p.194) ۂ...;ۀ ڻ ڿ ڼ ھ ڽ ڹExposure bracket button Sets the Exposure bracket. (p.206) ںMENU button Displays the [CAPTURE MENU], [CUSTOM1 MENU], [CUSTOM2 MENU], [SETUP MENU] and [PLAYBACK MENU]...
...396;ȜȞ) Uses it to move cursor or change items in menus and Fn menu. ۀOK button Saves the setting you selected in the menu. ہFocus position dial Press to select a focus position. (p.194) ۂ...;ۀ ڻ ڿ ڼ ھ ڽ ڹExposure bracket button Sets the Exposure bracket. (p.206) ںMENU button Displays the [CAPTURE MENU], [CUSTOM1 MENU], [CUSTOM2 MENU], [SETUP MENU] and [PLAYBACK MENU]...
User Manual (ENGLISH)
Page 21
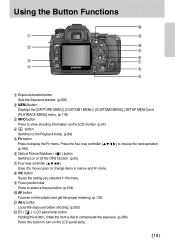
Using the Button Functions ڻ ڹMetering mode lever Changes the metering modes. (p.202) ںMode dial Changes the camera modes. (p.171) ڻRear e-dial Sets aperture ISO sensitivity values. ڼGreen button Resets exposure settings and automatically adjusts the appropriate exposure in a M (Manual) mode. ڽFront e-dial Sets shutter speed and EV compensation values. ŝ20Ş
Using the Button Functions ڻ ڹMetering mode lever Changes the metering modes. (p.202) ںMode dial Changes the camera modes. (p.171) ڻRear e-dial Sets aperture ISO sensitivity values. ڼGreen button Resets exposure settings and automatically adjusts the appropriate exposure in a M (Manual) mode. ڽFront e-dial Sets shutter speed and EV compensation values. ŝ20Ş
User Manual (ENGLISH)
Page 22
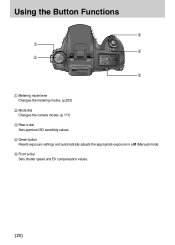
.... (p.86) Use to capture mode. ڼRear e-dial Sets the Exposure values. Use it to display the previous or next image in magnified playback (p.86) or adjust the digital filter. (p.93) ںMain switch Move to turn the camera on and off. (p.41) ڻShutter release button...
.... (p.86) Use to capture mode. ڼRear e-dial Sets the Exposure values. Use it to display the previous or next image in magnified playback (p.86) or adjust the digital filter. (p.93) ںMain switch Move to turn the camera on and off. (p.41) ڻShutter release button...

User Manual (ENGLISH)
Page 23
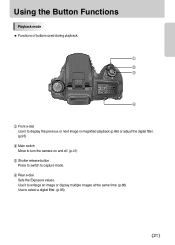
...;ƌȜȞ) Uses it to move cursor or change items in menus, Fn menu and playback screen. ڿOK button Saves the setting you selected in the menu or playback screen. ۀAE-L / button Locks the exposure of the shooting conditions. (p.205) Press to display the...
...;ƌȜȞ) Uses it to move cursor or change items in menus, Fn menu and playback screen. ڿOK button Saves the setting you selected in the menu or playback screen. ۀAE-L / button Locks the exposure of the shooting conditions. (p.205) Press to display the...
User Manual (ENGLISH)
Page 24
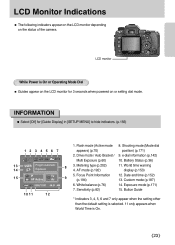
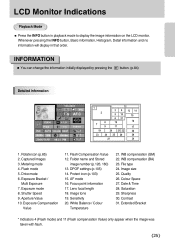
...display (p.153) 12. Flash mode (Active mode appears) (p.70) 2. INFORMATION ƃ Select [Off] for 3 seconds when powered on the status of the camera. Metering type (p.202) 4. Date and time (p.152) 13. LCD monitor While Power is On. ŝ23Ş Shooting mode (Mode dial position) ...(p.171) 9. Exposure mode (p.171) 15. Button Guide * Indicators 3, 4, 5, 6 and 7 only appear when the setting other than the default setting is selected. 11 only appears when World Time is On or Operating Mode Dial ƈ Guides appear on the LCD monitor for [Guide...
...display (p.153) 12. Flash mode (Active mode appears) (p.70) 2. INFORMATION ƃ Select [Off] for 3 seconds when powered on the status of the camera. Metering type (p.202) 4. Date and time (p.152) 13. LCD monitor While Power is On. ŝ23Ş Shooting mode (Mode dial position) ...(p.171) 9. Exposure mode (p.171) 15. Button Guide * Indicators 3, 4, 5, 6 and 7 only appear when the setting other than the default setting is selected. 11 only appears when World Time is On or Operating Mode Dial ƈ Guides appear on the LCD monitor for [Guide...

User Manual (ENGLISH)
Page 25
...) 4. Aperture Value (p.200) 8. Image tone (p.121) 13. LCD Monitor Indications Capture Mode ƈ Press the INFO button in capture mode to display the capture function settings on the LCD monitor for 15 seconds. Shooting mode (p.171) 2. Quality level (p.123) 22. White balance (p.76) 16. Sharpness (p.124) 28. Optical Picture Stabilization (OPS...
...) 4. Aperture Value (p.200) 8. Image tone (p.121) 13. LCD Monitor Indications Capture Mode ƈ Press the INFO button in capture mode to display the capture function settings on the LCD monitor for 15 seconds. Shooting mode (p.171) 2. Quality level (p.123) 22. White balance (p.76) 16. Sharpness (p.124) 28. Optical Picture Stabilization (OPS...
User Manual (ENGLISH)
Page 26
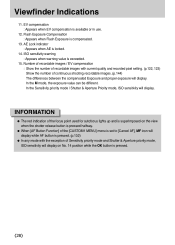
...; You can change the information initially displayed by pressing the PB button. (p.84) Detailed Information 1. Protect icon (p.103) 15. Drive mode 6. Aperture Value 10. DPOF settings (p.105) 14. Sensitivity 20. Image size 25. Quality 26. Colour Space 27. Saturation 29.
...; You can change the information initially displayed by pressing the PB button. (p.84) Detailed Information 1. Protect icon (p.103) 15. Drive mode 6. Aperture Value 10. DPOF settings (p.105) 14. Sensitivity 20. Image size 25. Quality 26. Colour Space 27. Saturation 29.
User Manual (ENGLISH)
Page 27
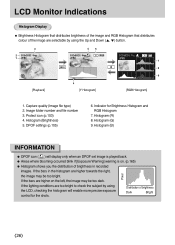
... lighting conditions are too bright to check the subject by using the LCD, checking the histogram will display only when an DPOF set image is played back. ƃ Areas where blooming occurred blink if [Exposure Warning] warning is on the left, the image...Histogram (R) 8. Distribution of brightness in the histogram are higher towards the right, Pixel the image may be too bright. Protect icon (p.103) 4. DPOF settings (p.105) 6. Histogram (Brightness) 5. Histogram (G) 9. If the bars are higher on . (p.165) ƃ Histogram shows you the distribution of brightness ...
... lighting conditions are too bright to check the subject by using the LCD, checking the histogram will display only when an DPOF set image is played back. ƃ Areas where blooming occurred blink if [Exposure Warning] warning is on the left, the image...Histogram (R) 8. Distribution of brightness in the histogram are higher towards the right, Pixel the image may be too bright. Protect icon (p.103) 4. DPOF settings (p.105) 6. Histogram (Brightness) 5. Histogram (G) 9. If the bars are higher on . (p.165) ƃ Histogram shows you the distribution of brightness ...
User Manual (ENGLISH)
Page 28
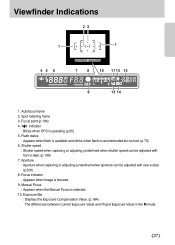
Viewfinder Indications 1. Flash status : Appears when flash is available and blinks when flash is focused. 9. Focus indicator : Appears when image is recommended but not set. (p.70) 6. Exposure Bar : Displays the Exposure Compensation Value. (p.184) The differences between Current Exposure Value and Proper Exposure Value in the M mode. ŝ27Ş ...
Viewfinder Indications 1. Flash status : Appears when flash is available and blinks when flash is focused. 9. Focus indicator : Appears when image is recommended but not set. (p.70) 6. Exposure Bar : Displays the Exposure Compensation Value. (p.184) The differences between Current Exposure Value and Proper Exposure Value in the M mode. ŝ27Ş ...
User Manual (ENGLISH)
Page 29
... and is superimposed on the view when the shutter release button is pressed halfway. ƃ When [AF Button Function] of the [CUSTOM1 MENU] menu is set to [Cancel AF], MF icon will display while AF button is pressed. (p.132) ƃ In any mode with current quality and recorded pixel... setting. (p.122, 123) Show the number of Sensitivity priority mode and Shutter & Aperture priority mode, ISO sensitivity will display on No. 14 position while the OK ...
... and is superimposed on the view when the shutter release button is pressed halfway. ƃ When [AF Button Function] of the [CUSTOM1 MENU] menu is set to [Cancel AF], MF icon will display while AF button is pressed. (p.132) ƃ In any mode with current quality and recorded pixel... setting. (p.122, 123) Show the number of Sensitivity priority mode and Shutter & Aperture priority mode, ISO sensitivity will display on No. 14 position while the OK ...

User Manual (ENGLISH)
Page 32
Attaching the Strap 32 Connecting to read it and follow the instructions. Be sure to a Power Source 33 Using the memory card 38 Turning the Camera On and Off 41 Initial Settings 42 Attaching the Lens 46 Adjusting the Viewfinder Dioptre 48 31 2 Getting Started This chapter explains your first steps from purchasing the camera to taking pictures.
Attaching the Strap 32 Connecting to read it and follow the instructions. Be sure to a Power Source 33 Using the memory card 38 Turning the Camera On and Off 41 Initial Settings 42 Attaching the Lens 46 Adjusting the Viewfinder Dioptre 48 31 2 Getting Started This chapter explains your first steps from purchasing the camera to taking pictures.

User Manual (ENGLISH)
Page 34
... will display. Problems caused by using the other battery are not covered by the Samsung warranty. ƃ Do not open the cover ()ں. ŝ33Ş The batteries may cause a camera breakdown. Rotate the Battery cover unlock lever as shown in the illustration ( ...Use the supplied rechargeable battery (SLB-1674). When the battery is used for a long time, a [Low Battery] message will not use the camera for "Setting the Date and Time". ƃ Insert batteries correctly. Wipe the electrodes of the batteries before inserting. ƃ When the battery is not ...
... will display. Problems caused by using the other battery are not covered by the Samsung warranty. ƃ Do not open the cover ()ں. ŝ33Ş The batteries may cause a camera breakdown. Rotate the Battery cover unlock lever as shown in the illustration ( ...Use the supplied rechargeable battery (SLB-1674). When the battery is used for a long time, a [Low Battery] message will not use the camera for "Setting the Date and Time". ƃ Insert batteries correctly. Wipe the electrodes of the batteries before inserting. ƃ When the battery is not ...

User Manual (ENGLISH)
Page 40
...electrical interference. (3) the card has not been used for a long time, the data on compatible Memory Cards, visit the Samsung Camera website or contact your nearest Samsung Camera customer service centre. ƃ Always format new Memory Cards. Keep it may be exposed to static electricity or electrical interference... back, or the camera is equipped with other cameras. ȵ Formatting the Memory Card (p.150) ŝ39Ş Using the memory card Precautions When Using the Memory Card ƃ The Memory Card is connected to a computer with the USB cable. Setting the switch to the...
...electrical interference. (3) the card has not been used for a long time, the data on compatible Memory Cards, visit the Samsung Camera website or contact your nearest Samsung Camera customer service centre. ƃ Always format new Memory Cards. Keep it may be exposed to static electricity or electrical interference... back, or the camera is equipped with other cameras. ȵ Formatting the Memory Card (p.150) ŝ39Ş Using the memory card Precautions When Using the Memory Card ƃ The Memory Card is connected to a computer with the USB cable. Setting the switch to the...
User Manual (ENGLISH)
Page 41
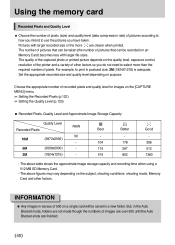
.... The above table shows the approximate image storage capacity and recording time when using a 512 MB SD Memory Card. - Set the appropriate recorded size and quality level depending on a single card will be recorded on the [CAPTURE MENU] menu. Ҹ...; Setting the Recorded Pixels (p.122) Ҹ Setting the Quality Level (p.123) ƃ Recorded Pixels, Quality Level and Approximate Image Storage Capacity Quality Level RAW Recorded Pixels Best Better ...
.... The above table shows the approximate image storage capacity and recording time when using a 512 MB SD Memory Card. - Set the appropriate recorded size and quality level depending on a single card will be recorded on the [CAPTURE MENU] menu. Ҹ...; Setting the Recorded Pixels (p.122) Ҹ Setting the Quality Level (p.123) ƃ Recorded Pixels, Quality Level and Approximate Image Storage Capacity Quality Level RAW Recorded Pixels Best Better ...
User Manual (ENGLISH)
Page 42
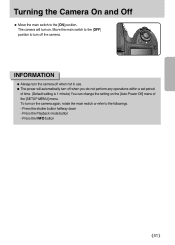
To turn off the camera. INFORMATION ƃ Always turn the camera off when not in use. ƃ The power will turn off when you do not perform any operations within a set period of time. (Default setting is 1 minute) You can change the setting on the [Auto Power Off] menu of the [SETUP MENU...] menu. Press the shutter button halfway down - Press the INFO button ŝ41Ş Press the Playback mode button - Turning the Camera On and Off ...
To turn off the camera. INFORMATION ƃ Always turn the camera off when not in use. ƃ The power will turn off when you do not perform any operations within a set period of time. (Default setting is 1 minute) You can change the setting on the [Auto Power Off] menu of the [SETUP MENU...] menu. Press the shutter button halfway down - Press the INFO button ŝ41Ş Press the Playback mode button - Turning the Camera On and Off ...
User Manual (ENGLISH)
Page 43
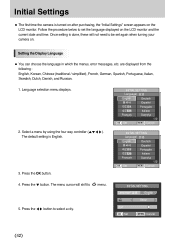
...; Press the OK button. Select a menu by using the four way controller The default setting is turned on after purchasing, the "Initial Settings" screen appears on the LCD monitor. Initial Settings ƈ The first time the camera is English. 3. Setting the Display Language ƈ You can choose the language in which the menus, error messages...
...; Press the OK button. Select a menu by using the four way controller The default setting is turned on after purchasing, the "Initial Settings" screen appears on the LCD monitor. Initial Settings ƈ The first time the camera is English. 3. Setting the Display Language ƈ You can choose the language in which the menus, error messages...


