User Manual (ENGLISH)
Page 4
... Capture Mode 029 Playback Mode 030 Histogram Display 031 Viewfinder Indications 031 Capture Mode 032 LCD Panel Indications 033 Using the full automatic program mode 034 Operating the shutter release button 034 Hard-to-Autofocus Subjects 035 Adjusting the Viewfinder to Your Eyesight 035 Using the Zoom ring 036 Using the Drive Mode 038 Checking the Composition, Exposure, and Focus Before Shooting 038 Displaying the Digital Preview 038 Using the Liveview function 039 Manual White Balance (Manual...
... Capture Mode 029 Playback Mode 030 Histogram Display 031 Viewfinder Indications 031 Capture Mode 032 LCD Panel Indications 033 Using the full automatic program mode 034 Operating the shutter release button 034 Hard-to-Autofocus Subjects 035 Adjusting the Viewfinder to Your Eyesight 035 Using the Zoom ring 036 Using the Drive Mode 038 Checking the Composition, Exposure, and Focus Before Shooting 038 Displaying the Digital Preview 038 Using the Liveview function 039 Manual White Balance (Manual...

User Manual (ENGLISH)
Page 5
... Superimpose AF Area 060 AF in remote control 061 AF Button Function 061 AF by Press Halfway 061 Catch in Wireless Mode 069 Reset Custom2 070 Using the SETUP MENU 070 Format 070 Beep 071 Date/Time 071 Language/ᜡ᜔ 071 Guide Display 072 LCD Brightness 072 LCD colour adjustment 072 Video Out 073 USB (Selecting an external device) 073 Auto Power Off 073 Folder Name 074 Change File Name 074 Sensor Cleaning 075...
... Superimpose AF Area 060 AF in remote control 061 AF Button Function 061 AF by Press Halfway 061 Catch in Wireless Mode 069 Reset Custom2 070 Using the SETUP MENU 070 Format 070 Beep 071 Date/Time 071 Language/ᜡ᜔ 071 Guide Display 072 LCD Brightness 072 LCD colour adjustment 072 Video Out 073 USB (Selecting an external device) 073 Auto Power Off 073 Folder Name 074 Change File Name 074 Sensor Cleaning 075...

User Manual (ENGLISH)
Page 6
... (Aperture Priority) Mode 085 Using the automatic ISO setting mode 085 TAv (Shutter & Aperture Priority) Mode 086 Using the manual mode to choose your own camera settings 086 M (Manual) Mode 086 EV Bar 087 Shooting with long time shutter speed 087 B (Bulb) Mode 088 Using the external flash 088 X (Flash X-Sync) Mode 089 Saving your own exposure setting and using the stored set value 089 User Mode 090 Changing the Exposure and Shooting (Auto Bracket) 092 Setting the Colour Temperature 092 Setting the White Balance 093 Adjusting the White Balance Manually 094...
... (Aperture Priority) Mode 085 Using the automatic ISO setting mode 085 TAv (Shutter & Aperture Priority) Mode 086 Using the manual mode to choose your own camera settings 086 M (Manual) Mode 086 EV Bar 087 Shooting with long time shutter speed 087 B (Bulb) Mode 088 Using the external flash 088 X (Flash X-Sync) Mode 089 Saving your own exposure setting and using the stored set value 089 User Mode 090 Changing the Exposure and Shooting (Auto Bracket) 092 Setting the Colour Temperature 092 Setting the White Balance 093 Adjusting the White Balance Manually 094...
User Manual (ENGLISH)
Page 22
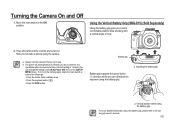
... button. Turning the Camera On and Off 1. Move the main switch to the battery grip owner's manual. 021 Battery grip ▲ Installing the battery grip Battery grip supports the green button ( ) function while you a more detailed information about the battery grip, please refer to the ON position. Using the Vertical Battery Grip (SBG-D1V) (Sold Separately) Using the battery grip gives you can change the setting on the [Auto Power Off] menu of view. 2. Press the shutter button...
... button. Turning the Camera On and Off 1. Move the main switch to the battery grip owner's manual. 021 Battery grip ▲ Installing the battery grip Battery grip supports the green button ( ) function while you a more detailed information about the battery grip, please refer to the ON position. Using the Vertical Battery Grip (SBG-D1V) (Sold Separately) Using the battery grip gives you can change the setting on the [Auto Power Off] menu of view. 2. Press the shutter button...

User Manual (ENGLISH)
Page 24
... take a picture using the basic shooting mode. (Auto mode.) 024 Attaching and removing the lens 025 Correct methods of holding the camera 026 OIS (Optical Image Stabilization) 026 Turning On the OIS Function 026 Optical Image Stabilization 027 LCD Monitor Indications 027 While Power is On or Operating Mode Dial 028 Capture Mode 029 Playback Mode 030 Histogram Display 031 Viewfinder Indications 031 Capture Mode 032 LCD Panel Indications 033 Using the full automatic program mode 034 Operating the shutter...
... take a picture using the basic shooting mode. (Auto mode.) 024 Attaching and removing the lens 025 Correct methods of holding the camera 026 OIS (Optical Image Stabilization) 026 Turning On the OIS Function 026 Optical Image Stabilization 027 LCD Monitor Indications 027 While Power is On or Operating Mode Dial 028 Capture Mode 029 Playback Mode 030 Histogram Display 031 Viewfinder Indications 031 Capture Mode 032 LCD Panel Indications 033 Using the full automatic program mode 034 Operating the shutter...

User Manual (ENGLISH)
Page 27
... shutter release button is recommended that the OIS function be turned off and the camera be used with the OIS function In this case, it is pressed. The camera is ready to turn off the OIS switch when using self-timer, remote control shooting, bulb shooting, or wireless mode with a tripod. ● The OIS function automatically turns off if you to take pictures at night, on the camera or restoring from Auto Power Off. When using...
... shutter release button is recommended that the OIS function be turned off and the camera be used with the OIS function In this case, it is pressed. The camera is ready to turn off the OIS switch when using self-timer, remote control shooting, bulb shooting, or wireless mode with a tripod. ● The OIS function automatically turns off if you to take pictures at night, on the camera or restoring from Auto Power Off. When using...

User Manual (ENGLISH)
Page 34
...;rst time. 1. In the SAF mode, the shutter can be used to change the size of the subject in the viewfinder with correct exposure and auto focusing. AF(Auto Focusing) Frame Focus indicator ● When you find that auto focusing is not available, set the focus mode lever to Auto mode ( ). - Set the focus mode lever to view the subject. Look through the viewfinder to SAF. - The autofocus system operates. A zoom lens can adjust the focus manually...
...;rst time. 1. In the SAF mode, the shutter can be used to change the size of the subject in the viewfinder with correct exposure and auto focusing. AF(Auto Focusing) Frame Focus indicator ● When you find that auto focusing is not available, set the focus mode lever to Auto mode ( ). - Set the focus mode lever to view the subject. Look through the viewfinder to SAF. - The autofocus system operates. A zoom lens can adjust the focus manually...

User Manual (ENGLISH)
Page 35
... seconds (default setting) 034 after capturing (Instant Review.) You can delete the image during Instant Review by pressing the delete button ( ). Subject may be focused even when focus indicator ( ) is . ● The viewfinder indicators stay on the LCD monitor. - Pressing the shutter release button down fully (second position) takes the picture. ● Squeeze the shutter release button gently when taking pictures under the following conditions (1 to focus on the LCD monitor. If...
... seconds (default setting) 034 after capturing (Instant Review.) You can delete the image during Instant Review by pressing the delete button ( ). Subject may be focused even when focus indicator ( ) is . ● The viewfinder indicators stay on the LCD monitor. - Pressing the shutter release button down fully (second position) takes the picture. ● Squeeze the shutter release button gently when taking pictures under the following conditions (1 to focus on the LCD monitor. If...

User Manual (ENGLISH)
Page 40
... [CAPTURE MENU]. ● While using the Liveview function, adjusting the focus is available for some lenses when auto focusing mode is set to MF. ● The preview image in the [Liveview] function disappears in the viewfinder and move the main switch to . 4. When using the direction buttons ( ) and then press the OK button. - The white balance preview is different after taking pictures under various environmental lighting conditions. The following screen appears...
... [CAPTURE MENU]. ● While using the Liveview function, adjusting the focus is available for some lenses when auto focusing mode is set to MF. ● The preview image in the [Liveview] function disappears in the viewfinder and move the main switch to . 4. When using the direction buttons ( ) and then press the OK button. - The white balance preview is different after taking pictures under various environmental lighting conditions. The following screen appears...

User Manual (ENGLISH)
Page 41
... mode) before shooting.) ● Use the matte field in the viewfinder when focused (if focus indicator ( ) is blinking, the subject is lit. Focus indicator ● The camera can be released until the subject is too close to the camera, move back and take the picture. The focus indicator ( ) appears in the viewfinder when the subject is pressed halfway. • MF (Manual Focus) : Manually adjust the focus. Adjust the focus manually...
... mode) before shooting.) ● Use the matte field in the viewfinder when focused (if focus indicator ( ) is blinking, the subject is lit. Focus indicator ● The camera can be released until the subject is too close to the camera, move back and take the picture. The focus indicator ( ) appears in the viewfinder when the subject is pressed halfway. • MF (Manual Focus) : Manually adjust the focus. Adjust the focus manually...

User Manual (ENGLISH)
Page 49
.... 048 Setting the Exposure AE-L with AF Locked AE Lock is a function that instant. Set in the [SETUP MENU]. ● AE lock is not available when the exposure mode is (Auto mode), B (Bulb) or X (Flash synchro) mode. ● The combination of shutter speed and aperture value changes depending on the zooming position even while the AE lock is engaged when using a zoom lens for which maximum aperture varies depending on the LCD panel and the viewfi...
.... 048 Setting the Exposure AE-L with AF Locked AE Lock is a function that instant. Set in the [SETUP MENU]. ● AE lock is not available when the exposure mode is (Auto mode), B (Bulb) or X (Flash synchro) mode. ● The combination of shutter speed and aperture value changes depending on the zooming position even while the AE lock is engaged when using a zoom lens for which maximum aperture varies depending on the LCD panel and the viewfi...

User Manual (ENGLISH)
Page 52
... or use this mode to take pictures. 4. Press the OK button - Self-Timer Shooting When the self-timer is enabled, there is a delay between the pressing of many people including yourself. You can use the AE lock function. (Ignore the light entering the viewfinder when the exposure mode is set to take a shot of the shutter release and the shutter firing. Drive - Press the direction buttons (◄►) to shoot is operating. ●...
... or use this mode to take pictures. 4. Press the OK button - Self-Timer Shooting When the self-timer is enabled, there is a delay between the pressing of many people including yourself. You can use the AE lock function. (Ignore the light entering the viewfinder when the exposure mode is set to take a shot of the shutter release and the shutter firing. Drive - Press the direction buttons (◄►) to shoot is operating. ●...
User Manual (ENGLISH)
Page 60
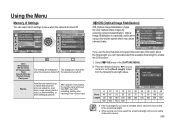
... Shooting Extended Bracket Off Multi Exposure Off Memory of Settings OIS Auto Memory of Settings OIS Auto : Move : Exit If you can select which may cause camera shake. CAPTURE MENU User Registration Interval Shooting Extended Bracket Off Multi Exposure Off Memory of Settings Drive White Balance ISO Sensitivity EV Compensation Flash Extended Bracket : Move : Exit : Set : Back Drive White Balance ISO Sensitivity EV Compensation Flash Extended Bracket Playback Display Flash power The settings are maintained The settings are named using the reset function...
... Shooting Extended Bracket Off Multi Exposure Off Memory of Settings OIS Auto Memory of Settings OIS Auto : Move : Exit If you can select which may cause camera shake. CAPTURE MENU User Registration Interval Shooting Extended Bracket Off Multi Exposure Off Memory of Settings Drive White Balance ISO Sensitivity EV Compensation Flash Extended Bracket : Move : Exit : Set : Back Drive White Balance ISO Sensitivity EV Compensation Flash Extended Bracket Playback Display Flash power The settings are maintained The settings are named using the reset function...

User Manual (ENGLISH)
Page 76
... is displayed in the sensor. SETUP MENU Video Out NTSC USB Computer Auto Power Off 1min Folder Name Date Change File Name SG20 Sensor Cleaning Dust Removal : Move : Exit Dust Removal Dust Removal Start-up Action] using the AC Power Adapter, please use batteries with ample capacity remaining. Using the Menu ● Do not use a spray type blower. ● Do not clean the Sensor when the exposure mode is set to B (Bulb) mode. ● Always cap the lens...
... is displayed in the sensor. SETUP MENU Video Out NTSC USB Computer Auto Power Off 1min Folder Name Date Change File Name SG20 Sensor Cleaning Dust Removal : Move : Exit Dust Removal Dust Removal Start-up Action] using the AC Power Adapter, please use batteries with ample capacity remaining. Using the Menu ● Do not use a spray type blower. ● Do not clean the Sensor when the exposure mode is set to B (Bulb) mode. ● Always cap the lens...
User Manual (ENGLISH)
Page 107
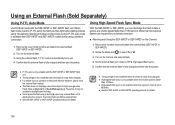
...;ash sync.). 5. Set the external flash sync mode to select Tv or M. 3. When flash mode is fully charged and then take a picture at a shutter speed faster than two external flashes are required for daylight-sync shooting. ● Never press the flash pop up button( ) when any external flash unit is [Auto ( )] or [Auto+Red-eye ( )]. Turn on the Camera and external...
...;ash sync.). 5. Set the external flash sync mode to select Tv or M. 3. When flash mode is fully charged and then take a picture at a shutter speed faster than two external flashes are required for daylight-sync shooting. ● Never press the flash pop up button( ) when any external flash unit is [Auto ( )] or [Auto+Red-eye ( )]. Turn on the Camera and external...

User Manual (ENGLISH)
Page 141
... compatible printer using a PC (direct printing). After printer start-up is recommended when connecting the camera to a printer. For details, refer to the operating manual for printing on the [SETUP MENU] to the Printer 1. Connecting the Camera to [Print]. 2. Set the [USB] on a single sheet. Print single images - Print all the settings made on . - Print with printers that support [DPOF Auto Print] function. 140 Turn the printer on the printer. Make the settings on . 4. Print One Print All DPDOPFOF Auto Print : Move : Set ● PictBridge menu is not displayed if [USB...
... compatible printer using a PC (direct printing). After printer start-up is recommended when connecting the camera to a printer. For details, refer to the operating manual for printing on the [SETUP MENU] to the Printer 1. Connecting the Camera to [Print]. 2. Set the [USB] on a single sheet. Print single images - Print all the settings made on . - Print with printers that support [DPOF Auto Print] function. 140 Turn the printer on the printer. Make the settings on . 4. Print One Print All DPDOPFOF Auto Print : Move : Set ● PictBridge menu is not displayed if [USB...

User Manual (ENGLISH)
Page 150
... not installed. Replace with a charged battery set to [On] in the [CUSTOM2 MENU]. delete unwanted images. If the subject is set or use manual focus. The focus mode is outside the focusing area aim the camera at target and press shutter release button fully. No available space Insert Memory Card with any setting other than (Auto mode), B (Bulb) mode or X (Flash X-synchro) mode. Wait until charging is not in the A position. Subject is finished. Subject is charging. USB connection...
... not installed. Replace with a charged battery set to [On] in the [CUSTOM2 MENU]. delete unwanted images. If the subject is set or use manual focus. The focus mode is outside the focusing area aim the camera at target and press shutter release button fully. No available space Insert Memory Card with any setting other than (Auto mode), B (Bulb) mode or X (Flash X-synchro) mode. Wait until charging is not in the A position. Subject is finished. Subject is charging. USB connection...

User Manual (ENGLISH)
Page 155
... a card with recorded images regarding the specific images and number of the colour range so colours only available when printed are shot. DNG RAW file DNG (Digital Negative) is measured to the subject. Glossary AdobeRGB Colour space recommended by using a faster shutter speed. DPOF (Digital Print Order Format) Rules for Camera File System was created by changing the shutter speed and aperture value. It is indicated in most of copies...
... a card with recorded images regarding the specific images and number of the colour range so colours only available when printed are shot. DNG RAW file DNG (Digital Negative) is measured to the subject. Glossary AdobeRGB Colour space recommended by using a faster shutter speed. DPOF (Digital Print Order Format) Rules for Camera File System was created by changing the shutter speed and aperture value. It is indicated in most of copies...
User Manual (ENGLISH)
Page 158
... N Number of shots 058 Noise Redution 064 O OIS (Optical Image Stabilization)........059 Operating mode dial 027 Q Quick View 077 R Rear dial 031 Red-eye reduction 100 RAW 049, 056 RAW 049, 056 Remote control 052 Reset Custom1 060 Reset Custom2 066 Reset 076 Recording information 110 Release in Charging 067 S Shutter release button 034 Shutter Speed 045 Shutter priority mode 083 Sensor Cleaning 074 Setting the exposure 045 Slow-speed-sync 103 Set RAW button 056 Setting the printing service...
... N Number of shots 058 Noise Redution 064 O OIS (Optical Image Stabilization)........059 Operating mode dial 027 Q Quick View 077 R Rear dial 031 Red-eye reduction 100 RAW 049, 056 RAW 049, 056 Remote control 052 Reset Custom1 060 Reset Custom2 066 Reset 076 Recording information 110 Release in Charging 067 S Shutter release button 034 Shutter Speed 045 Shutter priority mode 083 Sensor Cleaning 074 Setting the exposure 045 Slow-speed-sync 103 Set RAW button 056 Setting the printing service...

Brochure
Page 4
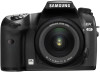
... : Max. 1600 Built-in & Red eye, Front curtain synchro, Front curtain synchro & Red eye, Rear curtain synchro 13 (at ISO 100) 28 mm wide-angle (Equivalent to 16 shots) Type Focusing Type Modes Shutter Type Speed Exposure Control Metering System Modes Compensation AE Lock ISO Flash Type Modes Guide Number Angle of View : Approx. 97%Magnification(4X, 8X), Grid display, AF Frame Single, Continuous (Hi, Standard), Self-timer (12sec., 2sec.), Remote ControlAuto Bracket, Expand Bracket...
... : Max. 1600 Built-in & Red eye, Front curtain synchro, Front curtain synchro & Red eye, Rear curtain synchro 13 (at ISO 100) 28 mm wide-angle (Equivalent to 16 shots) Type Focusing Type Modes Shutter Type Speed Exposure Control Metering System Modes Compensation AE Lock ISO Flash Type Modes Guide Number Angle of View : Approx. 97%Magnification(4X, 8X), Grid display, AF Frame Single, Continuous (Hi, Standard), Self-timer (12sec., 2sec.), Remote ControlAuto Bracket, Expand Bracket...


