
User Manual (ENGLISH)
Page 2
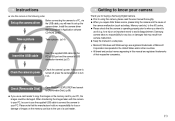
... Camera. ƃ Prior to using this camera in this manual are registered trademarks of their respective companies. Samsung camera takes no responsibility for any loss or damages that the manufacturer holds no responsibility for [Removable Disk]. (p.68) ƃ If you use a card ... driver. Install the camera driver that is contained in Application software CD-ROM. (p.66) Take a picture Take a picture. (p.14) Insert the USB cable Insert the supplied USB cable into the PC's USB port and the camera's USB connection terminal. (p.67) Getting to know your camera Thank you for a trip or an...
... Camera. ƃ Prior to using this camera in this manual are registered trademarks of their respective companies. Samsung camera takes no responsibility for any loss or damages that the manufacturer holds no responsibility for [Removable Disk]. (p.68) ƃ If you use a card ... driver. Install the camera driver that is contained in Application software CD-ROM. (p.66) Take a picture Take a picture. (p.14) Insert the USB cable Insert the supplied USB cable into the PC's USB port and the camera's USB connection terminal. (p.67) Getting to know your camera Thank you for a trip or an...
User Manual (ENGLISH)
Page 3
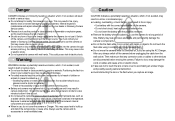
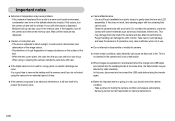
...avoid taking an unclear image and possibly causing camera malfunction. ƈ Avoid obstructing the lens or the flash when you or your dealer or Samsung Camera Service centre. ƈ Please do not use , always switch off the camera, and then disconnect the power source. Internal inspection, ...Do not insert or drop metallic or inflammable foreign objects into the camera through access points e.g. Then make sure that any connector cords or cables to sit idle for a long period of injury from the wall socket. Should this product in close to you capture an image. Do...
...avoid taking an unclear image and possibly causing camera malfunction. ƈ Avoid obstructing the lens or the flash when you or your dealer or Samsung Camera Service centre. ƈ Please do not use , always switch off the camera, and then disconnect the power source. Internal inspection, ...Do not insert or drop metallic or inflammable foreign objects into the camera through access points e.g. Then make sure that any connector cords or cables to sit idle for a long period of injury from the wall socket. Should this product in close to you capture an image. Do...
User Manual (ENGLISH)
Page 5
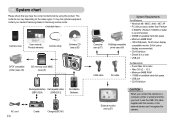
... product. The contents can 't recognise the camera. To buy the optional equipment, contact your nearest Samsung dealer or Samsung service centre. < Included items > Camera case User manual, Product warranty Camera strap Software CD ...(see p.65) DPOF compatible printer (see p.46) SD memory card/ MMC (see p.9) Rechargeable battery Rechargeable battery (SBP-2524) (SNB-2512) AA Alkaline Batteries AC cord ŝ4Ş Cradle Charger(SBC-N1) Computer (see p.67) USB cable...
... product. The contents can 't recognise the camera. To buy the optional equipment, contact your nearest Samsung dealer or Samsung service centre. < Included items > Camera case User manual, Product warranty Camera strap Software CD ...(see p.65) DPOF compatible printer (see p.46) SD memory card/ MMC (see p.9) Rechargeable battery Rechargeable battery (SBP-2524) (SNB-2512) AA Alkaline Batteries AC cord ŝ4Ş Cradle Charger(SBC-N1) Computer (see p.67) USB cable...
User Manual (ENGLISH)
Page 9
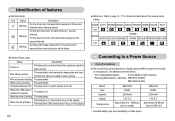
... recording The lamp blinks While voice recording The lamp blinks Transmitting Data with a PC The lamp turns on (LCD monitor turns off) When the USB cable is printing The lamp blinks The lamp turns on (The camera focus on the subject) When the AF activates The lamp blinks (The camera doesn...
... recording The lamp blinks While voice recording The lamp blinks Transmitting Data with a PC The lamp turns on (LCD monitor turns off) When the USB cable is printing The lamp blinks The lamp turns on (The camera focus on the subject) When the AF activates The lamp blinks (The camera doesn...
User Manual (ENGLISH)
Page 43
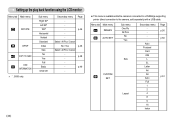
S600 only. p.46 - - Menu tab Main menu IMAGES AUTO SET Sub menu One Pic All Pics No Yes Size CUSTOM SET Layout Secondary menu - Auto Postcard ...;42Ş ƈ This menu is available while the camera is connected to a PictBridge supporting printer (direct connection to the camera, sold separately) with a USB cable. Select / All Pics / Cancel No / Yes p.46 Select / All Pics / Cancel p.48 - - - Setting up the play back function using the LCD monitor Menu tab Main...
S600 only. p.46 - - Menu tab Main menu IMAGES AUTO SET Sub menu One Pic All Pics No Yes Size CUSTOM SET Layout Secondary menu - Auto Postcard ...;42Ş ƈ This menu is available while the camera is connected to a PictBridge supporting printer (direct connection to the camera, sold separately) with a USB cable. Select / All Pics / Cancel No / Yes p.46 Select / All Pics / Cancel p.48 - - - Setting up the play back function using the LCD monitor Menu tab Main...
User Manual (ENGLISH)
Page 50
...the UP / DOWN button and press the OK button. In any mode with the exception of information you want to a Printer ƃ Using the USB cable with Camera] ŝ49Ş Press the LEFT / RIGHT button and select [SETUP] menu tab. 3. Select [Printer] menu by pressing the UP...2. Select [USB] menu by pressing the LEFT / RIGHT button. 3. Connect the cradle to a printer's USB port with the supplied USB cable. ƃ Using the USB cable with the printer 1. Movie clips and voice files cannot be printed. ƃ Setting up the camera for connection with Camera : Connect the ...
...the UP / DOWN button and press the OK button. In any mode with the exception of information you want to a Printer ƃ Using the USB cable with Camera] ŝ49Ş Press the LEFT / RIGHT button and select [SETUP] menu tab. 3. Select [Printer] menu by pressing the UP...2. Select [USB] menu by pressing the LEFT / RIGHT button. 3. Connect the cradle to a printer's USB port with the supplied USB cable. ƃ Using the USB cable with the printer 1. Movie clips and voice files cannot be printed. ƃ Setting up the camera for connection with Camera : Connect the ...

User Manual (ENGLISH)
Page 51
... picture, select the number of prints for another picture. Press the Menu button. 2. PictBridge : Print Setting ƈ AUTO SET 1. In this case, disconnect the USB cable, and then follow the procedure from Step 2 and onward. Or, press the Printer button and the camera is selected : The PictBridge function will be established...
... picture, select the number of prints for another picture. Press the Menu button. 2. PictBridge : Print Setting ƈ AUTO SET 1. In this case, disconnect the USB cable, and then follow the procedure from Step 2 and onward. Or, press the Printer button and the camera is selected : The PictBridge function will be established...

User Manual (ENGLISH)
Page 57
... to page 49 for camera startup, when buttons are pressed, so that you want to connect the camera to connect the camera using the USB cable. ƃ Sub menus - [Computer] : Select this if you can be activated for instructions on and off the Auto Focus lamp. ƃ Sub menus [Off] : The...
... to page 49 for camera startup, when buttons are pressed, so that you want to connect the camera to connect the camera using the USB cable. ƃ Sub menus - [Computer] : Select this if you can be activated for instructions on and off the Auto Focus lamp. ƃ Sub menus [Off] : The...
User Manual (ENGLISH)
Page 58
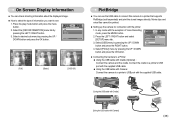
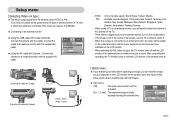
...ƈ If you enable Quick View before capturing an image, you can support only BDGHI. ƈ Connecting to an external monitor ƃ Using the USB cable with Camera : Connect the camera to centre it is connected to an external monitor, the menu will be NTSC or PAL. Connect the cradle to... an external monitor with the supplied AV cable. ƃ Using the AV cable with Cradle (Optional) : Connect the camera and the cradle. After completing the recording, the TV monitor turns on and the LCD ...
...ƈ If you enable Quick View before capturing an image, you can support only BDGHI. ƈ Connecting to an external monitor ƃ Using the USB cable with Camera : Connect the camera to centre it is connected to an external monitor, the menu will be NTSC or PAL. Connect the cradle to... an external monitor with the supplied AV cable. ƃ Using the AV cable with Cradle (Optional) : Connect the camera and the cradle. After completing the recording, the TV monitor turns on and the LCD ...
User Manual (ENGLISH)
Page 61
...off and wait for camera malfunctions. ŝ60Ş If the camera is not used . If this case, disconnect and re-connect the USB cable before trying the transfer again. ƈ Before an important event or going on Using the Lens - In this does not work, lens-cleaning ...memory card. If the lens is not a malfunction. ƈ When images are uploaded or downloaded (when the charger and USB cable are inserted into contact with a soft cloth. Samsung cannot be used for a long period, an electric discharge can be held responsible for at all moisture is exposed to a warm...
...off and wait for camera malfunctions. ŝ60Ş If the camera is not used . If this case, disconnect and re-connect the USB cable before trying the transfer again. ƈ Before an important event or going on Using the Lens - In this does not work, lens-cleaning ...memory card. If the lens is not a malfunction. ƈ When images are uploaded or downloaded (when the charger and USB cable are inserted into contact with a soft cloth. Samsung cannot be used for a long period, an electric discharge can be held responsible for at all moisture is exposed to a warm...
User Manual (ENGLISH)
Page 64
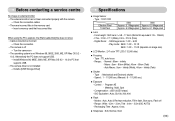
... centre No image on external monitor ҮThe external monitor has not been connected properly with the camera ƍ Check the connection cables ҮThere are incorrect files in flash, Slow sync, Flash off ƍ Turn the camera on ҮThe operating system is... not installed ƍ Install a [USB Storage Driver] Specifications ƈ Image Sensor - Type : 1/2.5" CCD Effective Pixel Total Pixel S500 S600 Approx. 5.1 Mega-pixel Approx. 6.0 Mega-pixel Approx. 5.3 Mega-pixel Approx. 6.1 Mega-pixel ƈ Lens - Focal Length : SHD Lens f = 5.8 ~ 17...
... centre No image on external monitor ҮThe external monitor has not been connected properly with the camera ƍ Check the connection cables ҮThere are incorrect files in flash, Slow sync, Flash off ƍ Turn the camera on ҮThe operating system is... not installed ƍ Install a [USB Storage Driver] Specifications ƈ Image Sensor - Type : 1/2.5" CCD Effective Pixel Total Pixel S500 S600 Approx. 5.1 Mega-pixel Approx. 6.0 Mega-pixel Approx. 5.3 Mega-pixel Approx. 6.1 Mega-pixel ƈ Lens - Focal Length : SHD Lens f = 5.8 ~ 17...
User Manual (ENGLISH)
Page 68
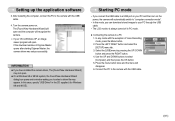
... button. 5. The [Found New Hardware Wizard] will open and the computer will recognize the camera. ſ If your PC through the USB cable. ҮThe LCD monitor is Windows XP, an image viewer program will disappear. 6. Starting PC mode ҮIf you have installed the camera... If the download window of Voice Recording mode, press the Menu button. 2. In any mode with the exception of Digmax Master opens after starting Digimax Master, the camera driver was setup successfully. Press the LEFT/ RIGHT button and select the [SETUP] menu tab. 3. After restarting the computer,...
... button. 5. The [Found New Hardware Wizard] will open and the computer will recognize the camera. ſ If your PC through the USB cable. ҮThe LCD monitor is Windows XP, an image viewer program will disappear. 6. Starting PC mode ҮIf you have installed the camera... If the download window of Voice Recording mode, press the Menu button. 2. In any mode with the exception of Digmax Master opens after starting Digimax Master, the camera driver was setup successfully. Press the LEFT/ RIGHT button and select the [SETUP] menu tab. 3. After restarting the computer,...
User Manual (ENGLISH)
Page 69
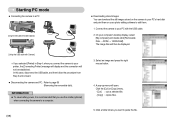
...you connect the camera to your printer, the [Connecting Printer] message will display and the connection will open. In this case, disconnect the USB cable, and then follow the procedure from Step 2 and onward. ƈ Disconnecting the camera and PC : Refer to page 69 (Removing the ... or use the cradle (optional) when connecting the camera to a computer. ŝ68Ş 3. A pop-up menu will not be displayed. [Using the USB cable with the USB cable. 2. Click the [Cut] or [Copy] menu. - [Cut] : cuts a selected file. - [Copy] : copies files. 5. Starting PC mode ƈ Connecting...
...you connect the camera to your printer, the [Connecting Printer] message will display and the connection will open. In this case, disconnect the USB cable, and then follow the procedure from Step 2 and onward. ƈ Disconnecting the camera and PC : Refer to page 69 (Removing the ... or use the cradle (optional) when connecting the camera to a computer. ŝ68Ş 3. A pop-up menu will not be displayed. [Using the USB cable with the USB cable. 2. Click the [Cut] or [Copy] menu. - [Cut] : cuts a selected file. - [Copy] : copies files. 5. Starting PC mode ƈ Connecting...
User Manual (ENGLISH)
Page 70
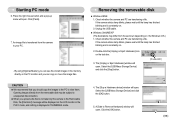
...OK] button. 5. If the camera status lamp blinks, please wait until the lamp has finished blinking and is constantly on . 2. By using [Digimax Master], you can copy or move the image files. Check whether the camera and PC are transferring a file. Check whether the camera and PC are...a pop-up menu will be displayed on the Windows O/S.) 1. Removing the removable disk ƈ Windows 98SE 1. Starting PC mode 6. Unplug the USB cable. ƈ Windows 2000/ME/XP (The illustrations may be subject to unexpected disconnection. ƃ When you upload a file that you can see the ...
...OK] button. 5. If the camera status lamp blinks, please wait until the lamp has finished blinking and is constantly on . 2. By using [Digimax Master], you can copy or move the image files. Check whether the camera and PC are transferring a file. Check whether the camera and PC are...a pop-up menu will be displayed on the Windows O/S.) 1. Removing the removable disk ƈ Windows 98SE 1. Starting PC mode 6. Unplug the USB cable. ƈ Windows 2000/ME/XP (The illustrations may be subject to unexpected disconnection. ƃ When you upload a file that you can see the ...
User Manual (ENGLISH)
Page 71
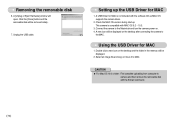
... disk 6. A [Unplug or Eject Hardware] window will be displayed. 2. A USB Driver for MAC is compatible with the Extract command. ŝ70Ş Unplug the USB cable. Click the [Close] button and the removable disk will open.
... disk 6. A [Unplug or Eject Hardware] window will be displayed. 2. A USB Driver for MAC is compatible with the Extract command. ŝ70Ş Unplug the USB cable. Click the [Close] button and the removable disk will open.
User Manual (ENGLISH)
Page 74
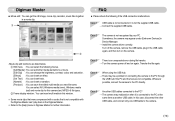
... off the camera, remove the USB cable, plug in Device Manager. ƍ Install the camera driver correctly. In this window. ſ Some movie clips that were compressed with a codec that is not compatible with the Digimax Master can't play back in the Digimax Master. ſ Refer to the PC...AVI, Windows media (wmv), Windows media (asf) and movie clip for further information. Wherever possible, connect the camera to the [Help] menu in Digimax Master for this camera (avi, MPEG-4) file types. ںFrame display window : You can insert multi media in this case, ...
... off the camera, remove the USB cable, plug in Device Manager. ƍ Install the camera driver correctly. In this window. ſ Some movie clips that were compressed with a codec that is not compatible with the Digimax Master can't play back in the Digimax Master. ſ Refer to the PC...AVI, Windows media (wmv), Windows media (asf) and movie clip for further information. Wherever possible, connect the camera to the [Help] menu in Digimax Master for this camera (avi, MPEG-4) file types. ںFrame display window : You can insert multi media in this case, ...


