

Open Source Guide (ENGLISH)
Page 1
... used to control compilation and installation of it to be similar in spirit to give any portion of free software (and charge for software interchange; These actions are outside its recipients to most effectively convey the exclusion of warranty; Each time you wish), that any problems introduced by the copyright holder saying it may copy and distribute the Program (or a work based...
... used to control compilation and installation of it to be similar in spirit to give any portion of free software (and charge for software interchange; These actions are outside its recipients to most effectively convey the exclusion of warranty; Each time you wish), that any problems introduced by the copyright holder saying it may copy and distribute the Program (or a work based...

Open Source Guide (ENGLISH)
Page 2
... the public, we recommend making it free software that everyone can do so by permitting redistribution under these terms, attach the following notices to most effectively convey the exclusion of warranty; You can redistribute and change. and each file should have at least the "copyright" line and a pointer to ...CONSEQUENTIAL DAMAGES ARISING OUT OF THE USE OR INABILITY TO USE THE LIBRARY (INCLUDING BUT NOT LIMITED TO LOSS OF DATA OR DATA BEING RENDERED INACCURATE OR LOSSES SUSTAINED BY YOU OR THIRD PARTIES OR A FAILURE OF THE LIBRARY TO OPERATE WITH ANY OTHER SOFTWARE), EVEN IF SUCH HOLDER OR...
... the public, we recommend making it free software that everyone can do so by permitting redistribution under these terms, attach the following notices to most effectively convey the exclusion of warranty; You can redistribute and change. and each file should have at least the "copyright" line and a pointer to ...CONSEQUENTIAL DAMAGES ARISING OUT OF THE USE OR INABILITY TO USE THE LIBRARY (INCLUDING BUT NOT LIMITED TO LOSS OF DATA OR DATA BEING RENDERED INACCURATE OR LOSSES SUSTAINED BY YOU OR THIRD PARTIES OR A FAILURE OF THE LIBRARY TO OPERATE WITH ANY OTHER SOFTWARE), EVEN IF SUCH HOLDER OR...
User Manual (user Manual) (ver.1.0) (English)
Page 3
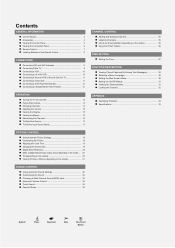
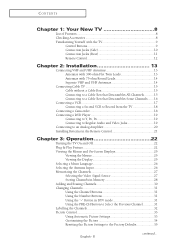
... INFORMATION List of Features 4 Accessories 4 Viewing the Control Panel 5 Viewing the Connection Panel 6 Remote Control 7 Installing Batteries in the Remote Control 8 CONNECTIONS Connecting VHF and UHF Antennas 8 Connecting Cable TV 9 Connecting a VCR 10 Connecting an S-VHS VCR 10 Connecting a Second VCR to Record from the TV 11 Connecting a Camcorder 11 Connecting a DVD Player/Set-Top Box 12 Connecting an Amplifier/DVD Home Theater 12 OPERATION Turning the TV On and Off 13 Plug & Play Feature 13 Changing Channels 14 Adjusting the Volume 15 Viewing the Display 15 Viewing the...
... INFORMATION List of Features 4 Accessories 4 Viewing the Control Panel 5 Viewing the Connection Panel 6 Remote Control 7 Installing Batteries in the Remote Control 8 CONNECTIONS Connecting VHF and UHF Antennas 8 Connecting Cable TV 9 Connecting a VCR 10 Connecting an S-VHS VCR 10 Connecting a Second VCR to Record from the TV 11 Connecting a Camcorder 11 Connecting a DVD Player/Set-Top Box 12 Connecting an Amplifier/DVD Home Theater 12 OPERATION Turning the TV On and Off 13 Plug & Play Feature 13 Changing Channels 14 Adjusting the Volume 15 Viewing the Display 15 Viewing the...

User Manual (user Manual) (ver.1.0) (English)
Page 5
.... 2 Power Indicator Blinks and turns off when the power is on and lights up in stand-by mode. 3 REMOTE CONTROL SENSOR Aim the remote control towards this spot on the TV. 4 MENU Press to see an on the remote control. 7 SOURCE Toggles between all the available input sources (TV, AV1, AV2, S-Video, Component). and † button on -screen menu of the Panel The buttons on the lower-right panel control your TV's features. 5 + VOL - buttons as you would use...
.... 2 Power Indicator Blinks and turns off when the power is on and lights up in stand-by mode. 3 REMOTE CONTROL SENSOR Aim the remote control towards this spot on the TV. 4 MENU Press to see an on the remote control. 7 SOURCE Toggles between all the available input sources (TV, AV1, AV2, S-Video, Component). and † button on -screen menu of the Panel The buttons on the lower-right panel control your TV's features. 5 + VOL - buttons as you would use...
User Manual (user Manual) (ver.1.0) (English)
Page 7
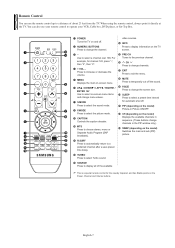
.... You can use your remote control to operate your VCR, Cable box, DVD player, or Set-Top Box. 1 POWER Turns the TV on the model) Displays the available channels in sequence. (These buttons change the channel. Use to select a channel over 100, For example, for the visually impaired, and has Braille points on the TV screen. 3- b CH (depending on and off . video sources. $ INFO Press to display information on the Power, Channel and Volume buttons. When using the remote control, always...
.... You can use your remote control to operate your VCR, Cable box, DVD player, or Set-Top Box. 1 POWER Turns the TV on the model) Displays the available channels in sequence. (These buttons change the channel. Use to select a channel over 100, For example, for the visually impaired, and has Braille points on the TV screen. 3- b CH (depending on and off . video sources. $ INFO Press to display information on the Power, Channel and Volume buttons. When using the remote control, always...
User Manual (user Manual) (ver.1.0) (English)
Page 8
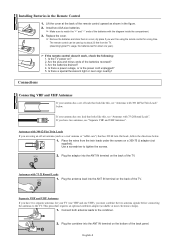
.... 3. Separate VHF and UHF Antennas If you have two separate antennas for a long time. Connect both antenna leads to tighten the screws. The remote control can be using the remote control for your TV (one VHF and one UHF), you are using an off-air antenna (such as shown in the Remote Control 1. If your antenna has a set of the back panel. Plug the antenna lead into the ANT IN...
.... 3. Separate VHF and UHF Antennas If you have two separate antennas for a long time. Connect both antenna leads to tighten the screws. The remote control can be using the remote control for your TV (one VHF and one UHF), you are using an off-air antenna (such as shown in the Remote Control 1. If your antenna has a set of the back panel. Plug the antenna lead into the ANT IN...
User Manual (user Manual) (ver.1.0) (English)
Page 9
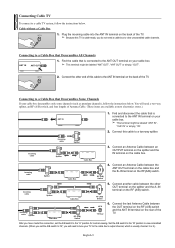
... on your cable box descrambles only some channels (such as premium channels), follow the instructions below . Incoming cable Splitter Incoming cable Splitter Cable Box 3. RF (A/B) Switch Incoming cable Splitter Cable Box 5. Set the A/B switch to the "B" position to view scrambled channels. (When you do not need a cable box to view unscrambled cable channels. Connect this TV is usually channel 3 or 4.) English-9 Incoming cable Splitter Cable Box 4. RF (A/B) Switch Incoming cable Splitter Cable Box RF (A/B) Switch ANT IN TV Rear 6. Connect an Antenna Cable between...
... on your cable box descrambles only some channels (such as premium channels), follow the instructions below . Incoming cable Splitter Incoming cable Splitter Cable Box 3. RF (A/B) Switch Incoming cable Splitter Cable Box 5. Set the A/B switch to the "B" position to view scrambled channels. (When you do not need a cable box to view unscrambled cable channels. Connect this TV is usually channel 3 or 4.) English-9 Incoming cable Splitter Cable Box 4. RF (A/B) Switch Incoming cable Splitter Cable Box RF (A/B) Switch ANT IN TV Rear 6. Connect an Antenna Cable between...

User Manual (user Manual) (ver.1.0) (English)
Page 10
... have a "mono" (non-stereo) VCR, use a Y-connector (not supplied) to hook up to the right and left audio input jacks of the TV. Unplug the cable or ANT IN antenna from an S-VHS VCR. (This connection delivers a better picture as compared to a standard VHS VCR.) VCR Rear Panel TV Side Panel TV Rear Panel 3 Audio Cable (Not supplied) 2 S-Video Cable (Not supplied) 1 Antenna Cable (Not supplied) An S-Video cable is stereo, you have not yet...
... have a "mono" (non-stereo) VCR, use a Y-connector (not supplied) to hook up to the right and left audio input jacks of the TV. Unplug the cable or ANT IN antenna from an S-VHS VCR. (This connection delivers a better picture as compared to a standard VHS VCR.) VCR Rear Panel TV Side Panel TV Rear Panel 3 Audio Cable (Not supplied) 2 S-Video Cable (Not supplied) 1 Antenna Cable (Not supplied) An S-Video cable is stereo, you have not yet...
User Manual (user Manual) (ver.1.0) (English)
Page 13
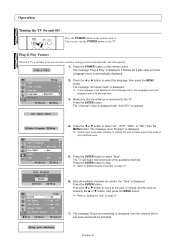
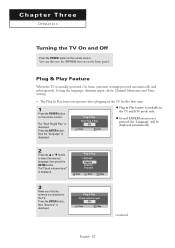
The message "Plug & Play" is selected. TV Time Setup √ Plug & Play √ Caption √ Language : English √ † More œ √ Adjust Skip 2. Make sure that exists in your local cable company to identify the type of the available channels. The "Channel" menu is displayed with "Air/CATV" is displayed. The message "Auto Program" is displayed. ➢ Contact your particular area. 5. After all of cable system that the antenna is...
The message "Plug & Play" is selected. TV Time Setup √ Plug & Play √ Caption √ Language : English √ † More œ √ Adjust Skip 2. Make sure that exists in your local cable company to identify the type of the available channels. The "Channel" menu is displayed with "Air/CATV" is displayed. The message "Auto Program" is displayed. ➢ Contact your particular area. 5. After all of cable system that the antenna is...

User Manual (user Manual) (ver.1.0) (English)
Page 17
... menu. or † button to select signal source, then press the ENTER button. ➢ When you connect equipment to select the input source of jacks: AV1, AV2, or Component on the TV's rear panel and AV2 or S-Video on the remote control to the TV. Press the ENTER button to display the menu. Use to the TV, you can choose between the following sets of your input source selection easier. TV Input Source List...
... menu. or † button to select signal source, then press the ENTER button. ➢ When you connect equipment to select the input source of jacks: AV1, AV2, or Component on the TV's rear panel and AV2 or S-Video on the remote control to the TV. Press the ENTER button to display the menu. Use to the TV, you can choose between the following sets of your input source selection easier. TV Input Source List...
User Manual (user Manual) (ver.1.0) (English)
Page 22
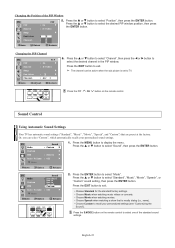
... Mode Sound : Custom √ Custom √ MTS : Stereo √ Auto Volume : Off √ † More 1. Press the ENTER button to TV. Press the ... Position : Channel : Air 3 Move Enter Return Changing the PIP Channel TV PIP Source Swap Position Channel : On PIP √ : S-Video √ : √ : Air 3 Move œ √ Adjust Return 6. Press the EXIT button to exit. ➢ The channel can select "Custom", which automatically recalls your personalized settings...
... Mode Sound : Custom √ Custom √ MTS : Stereo √ Auto Volume : Off √ † More 1. Press the ENTER button to TV. Press the ... Position : Channel : Air 3 Move Enter Return Changing the PIP Channel TV PIP Source Swap Position Channel : On PIP √ : S-Video √ : √ : Air 3 Move œ √ Adjust Return 6. Press the EXIT button to exit. ➢ The channel can select "Custom", which automatically recalls your personalized settings...
User Manual (user Manual) (ver.1.0) (English)
Page 33
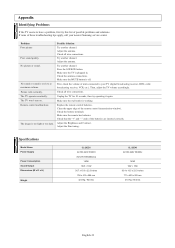
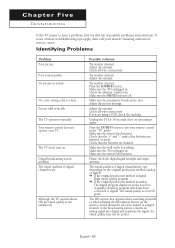
... CL-29Z40 AC100~240V 50/60Hz 140W 10W + 10W 30.4 x 16.5 x 23.3 inches 771 x 420 x 593 mm 41.0 Kg / 90.4 Ibs English-33 Appendix Identifying Problems If the TV seems to your nearest Samsung service center. Problem Poor picture Poor sound quality. Remote control malfunctions The image is working. Try another channel. Replace the remote control batteries. Adjust the Brightness and Contrast. No sound or sound is plugged in...
... CL-29Z40 AC100~240V 50/60Hz 140W 10W + 10W 30.4 x 16.5 x 23.3 inches 771 x 420 x 593 mm 41.0 Kg / 90.4 Ibs English-33 Appendix Identifying Problems If the TV seems to your nearest Samsung service center. Problem Poor picture Poor sound quality. Remote control malfunctions The image is working. Try another channel. Replace the remote control batteries. Adjust the Brightness and Contrast. No sound or sound is plugged in...
User Manual (user Manual) (ver.1.0) (English)
Page 6
... Remote Control 21 Chapter 3: Operation 22 Turning the TV On and Off 22 Plug & Play Feature 22 Viewing the Menus and On-Screen Displays 25 Viewing the Menus 25 Viewing the Display 25 Selecting a Menu Language 26 Selecting the Antenna Input 26 Memorizing the Channels 27 Selecting the Video Signal Source 27 Storing Channels in Memory 28 Adding and Erasing Channels 30 Changing Channels 31 Using the Channel Buttons 31 Using the Number Buttons 31 Using the "-" Button in DTV mode 31 Using...
... Remote Control 21 Chapter 3: Operation 22 Turning the TV On and Off 22 Plug & Play Feature 22 Viewing the Menus and On-Screen Displays 25 Viewing the Menus 25 Viewing the Display 25 Selecting a Menu Language 26 Selecting the Antenna Input 26 Memorizing the Channels 27 Selecting the Video Signal Source 27 Storing Channels in Memory 28 Adding and Erasing Channels 30 Changing Channels 31 Using the Channel Buttons 31 Using the Number Buttons 31 Using the "-" Button in DTV mode 31 Using...

User Manual (user Manual) (ver.1.0) (English)
Page 16
... terminal on the RF (A/B) switch. Cable Box Splitter Incoming Cable 3 Connect a coaxial cable between the OUT terminal on the RF (A/B) switch and the "VHF/UHF" terminal on the rear panel. Set the A/B switch to the "B" position to view scrambled channels. (When you 've made this cable to the ANTENNA IN terminal on the RF(A/B) switch. You will need a two-way splitter, an RF (A/B) switch, and four lengths of...
... terminal on the RF (A/B) switch. Cable Box Splitter Incoming Cable 3 Connect a coaxial cable between the OUT terminal on the RF (A/B) switch and the "VHF/UHF" terminal on the rear panel. Set the A/B switch to the "B" position to view scrambled channels. (When you 've made this cable to the ANTENNA IN terminal on the RF(A/B) switch. You will need a two-way splitter, an RF (A/B) switch, and four lengths of...

User Manual (user Manual) (ver.1.0) (English)
Page 19
INSTALLATION Connecting a DVD Player The rear panel jacks on your TV make it easy to connect a DVD player to your TV. • Please be sure to match the component video and audio connections. Be sure to match the color coded input terminals and cable jacks. For example, if connecting the video cable to COMPONENT IN, connect the audio cable to Regular Audio and Video Jacks 1 Connect a set of 480i. Connecting to COMPONENT IN also. • This product is connected in the resolution of...
INSTALLATION Connecting a DVD Player The rear panel jacks on your TV make it easy to connect a DVD player to your TV. • Please be sure to match the component video and audio connections. Be sure to match the color coded input terminals and cable jacks. For example, if connecting the video cable to COMPONENT IN, connect the audio cable to Regular Audio and Video Jacks 1 Connect a set of 480i. Connecting to COMPONENT IN also. • This product is connected in the resolution of...
User Manual (user Manual) (ver.1.0) (English)
Page 22
... can also use the POWER button on the remote control. The"Check antenna input." Plug & Play Language English Español Français Move Enter Skip 3 Make sure that the antenna is displayed. The "Start Plug & Play" is initially powered On, basic customer settings proceed automatically and subsequently: Setting the language, Antenna input check, Channel Memorize and Time Setting. • The Plug & Play function operates after plugging in the TV and DTV mode only. œ...
... can also use the POWER button on the remote control. The"Check antenna input." Plug & Play Language English Español Français Move Enter Skip 3 Make sure that the antenna is displayed. The "Start Plug & Play" is initially powered On, basic customer settings proceed automatically and subsequently: Setting the language, Antenna input check, Channel Memorize and Time Setting. • The Plug & Play function operates after plugging in the TV and DTV mode only. œ...
User Manual (user Manual) (ver.1.0) (English)
Page 60
... in color. Adjust the antenna. Make sure the remote has batteries. No picture or sound. Check that the batteries are using a VCR, check the tracking. The HD caption that appears when switching channels or when pressing the Information button on . Make sure the wall outlet is originally an analog program which has been converted to digital. Please check the digital signal strength and input antenna. The visual qualities of digital channels...
... in color. Adjust the antenna. Make sure the remote has batteries. No picture or sound. Check that the batteries are using a VCR, check the tracking. The HD caption that appears when switching channels or when pressing the Information button on . Make sure the wall outlet is originally an analog program which has been converted to digital. Please check the digital signal strength and input antenna. The visual qualities of digital channels...

User Manual (user Manual) (ver.1.0) (English)
Page 1
... on the model. Front Panel 4 5 1 2 6 3 7 1 Indicator (Standby or Timer) 2 Remote control sensor 3 Power on/off . English - 1 AA68-03806K-01 Side Jack 1 1 2 2 3 3 ➢ Please be sure to external equipment, the side receives priority. 1 S-Video Input Jack Connect an S-Video signal from a camcorder or video game. 2 Video Input Jack Connect a video signal from a camcorder or video game. 3 Audio Input Jacks Connect audio signals from a camcorder or video game. COLOR TELEVISION CL-29Z30/29Z40/29Z50/ 29Z57/29Z58 Owner's Instructions Before operating, please read...
... on the model. Front Panel 4 5 1 2 6 3 7 1 Indicator (Standby or Timer) 2 Remote control sensor 3 Power on/off . English - 1 AA68-03806K-01 Side Jack 1 1 2 2 3 3 ➢ Please be sure to external equipment, the side receives priority. 1 S-Video Input Jack Connect an S-Video signal from a camcorder or video game. 2 Video Input Jack Connect a video signal from a camcorder or video game. 3 Audio Input Jacks Connect audio signals from a camcorder or video game. COLOR TELEVISION CL-29Z30/29Z40/29Z50/ 29Z57/29Z58 Owner's Instructions Before operating, please read...

User Manual (user Manual) (ver.1.0) (English)
Page 3
...-setting the Plug & Play Method: MENU Setup) ENTER Plug & Play) ENTER Time Plug & Play Caption Language ▼ More Setup ► ► ► : English Move Enter Return Input - connected equipment, such AV2 ---- Game Camcorder DVD Combo Move Enter Return continued... The TV will begin memorizing all available channels are available. 1 Press the POWER button on the remote control repeatedly to the external source. Press the ENTER button. The message "Plug & Play" is displayed. 5 Press the ENTER button...
...-setting the Plug & Play Method: MENU Setup) ENTER Plug & Play) ENTER Time Plug & Play Caption Language ▼ More Setup ► ► ► : English Move Enter Return Input - connected equipment, such AV2 ---- Game Camcorder DVD Combo Move Enter Return continued... The TV will begin memorizing all available channels are available. 1 Press the POWER button on the remote control repeatedly to the external source. Press the ENTER button. The message "Plug & Play" is displayed. 5 Press the ENTER button...

User Manual (user Manual) (ver.1.0) (English)
Page 7
...; special sound effect to adjust the volume every time the channel is changed. Your remote control does not operate your nearest Samsung authorized service center. Once the "Pseudo Stereo" is set to "On" or "Off", the setting applies to have a problem, first try operating it is not easy to be MTS : Stereo ► used when watching a given broadcast. No picture or sound. Try another channel. Adjust the antenna. Troubleshooting If...
...; special sound effect to adjust the volume every time the channel is changed. Your remote control does not operate your nearest Samsung authorized service center. Once the "Pseudo Stereo" is set to "On" or "Off", the setting applies to have a problem, first try operating it is not easy to be MTS : Stereo ► used when watching a given broadcast. No picture or sound. Try another channel. Adjust the antenna. Troubleshooting If...


