

User Manual (ENGLISH)
Page 4
... ventilation. Do not allow anything metallic into the cabinet openings of the LCD monitor. 4 Never use your LCD monitor if the power cord has been damaged. Doing so may block the ventilation openings in the bottom of the LCD monitor. REFER SERVICING TO QUALIFIED SERVICE ...liquid crystal display (LCD) monitor; 3_E151MP171MPsaf.fm Page 2 Monday, August 27, 2001 10:14 AM Safety Instructions 1 Before connecting the AC power cord to the DC adapter outlet, make sure the voltage designation of the DC adapter corresponds to the local electrical supply. 2 Never insert anything...
... ventilation. Do not allow anything metallic into the cabinet openings of the LCD monitor. 4 Never use your LCD monitor if the power cord has been damaged. Doing so may block the ventilation openings in the bottom of the LCD monitor. REFER SERVICING TO QUALIFIED SERVICE ...liquid crystal display (LCD) monitor; 3_E151MP171MPsaf.fm Page 2 Monday, August 27, 2001 10:14 AM Safety Instructions 1 Before connecting the AC power cord to the DC adapter outlet, make sure the voltage designation of the DC adapter corresponds to the local electrical supply. 2 Never insert anything...
User Manual (ENGLISH)
Page 5
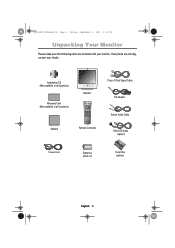
If any items are included with your dealer. Installation CD (Not available in all locations) Warranty Card (Not available in all locations) Monitor 15-pin D-Sub Signal Cable DC Adapter Stereo Audio Cable Manual Remote Controller RCA DTV Cable (option) Power Cord Batteries (AAA x 2) Tuner Box (option) English 3 4_E151MP171MPbody.fm Page 3 Friday, September 7, 2001 3:04 PM Unpacking Your Monitor Please make sure the following items are missing, contact your monitor.
If any items are included with your dealer. Installation CD (Not available in all locations) Warranty Card (Not available in all locations) Monitor 15-pin D-Sub Signal Cable DC Adapter Stereo Audio Cable Manual Remote Controller RCA DTV Cable (option) Power Cord Batteries (AAA x 2) Tuner Box (option) English 3 4_E151MP171MPbody.fm Page 3 Friday, September 7, 2001 3:04 PM Unpacking Your Monitor Please make sure the following items are missing, contact your monitor.
User Manual (ENGLISH)
Page 7
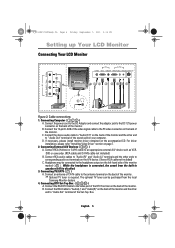
...3. Connecting TV/CATV ( 7 ) A. Connecting DTV Set-Top Box ( 8 9 10 ) A. Connect the RCA DTV Cable to the DC 12V power connector on the back of the monitor. Connect the power cord to the DC Adaptor and connect the adaptor jack to the Video port of the DTV Function on the back of... (L)" terminals and the other end to "Audio Out" terminal of the monitor. ➮ Optional TV tuner is connected, the sound from the local Samsung Monitor dealers. 4. Connect an antenna or CATV cable to corresponding audio out terminals on the back of the Set-Top Box. 4_E151MP171MPbody.fm Page 5 Friday...
...3. Connecting TV/CATV ( 7 ) A. Connecting DTV Set-Top Box ( 8 9 10 ) A. Connect the RCA DTV Cable to the DC 12V power connector on the back of the monitor. Connect the power cord to the DC Adaptor and connect the adaptor jack to the Video port of the DTV Function on the back of... (L)" terminals and the other end to "Audio Out" terminal of the monitor. ➮ Optional TV tuner is connected, the sound from the local Samsung Monitor dealers. 4. Connect an antenna or CATV cable to corresponding audio out terminals on the back of the Set-Top Box. 4_E151MP171MPbody.fm Page 5 Friday...

User Manual (ENGLISH)
Page 8
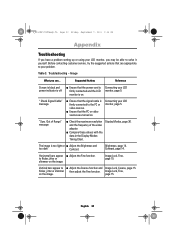
English 6 Please use a coin or screwdriver to tighten the two screws to "Antenna" port of the tuner box. 4 Insert the tuner box into tuner box housing on . 6 Connect the power cord of the monitor. 4_E151MP171MPbody.fm Page 6 Friday, September 7, 2001 3:04 PM Setting up Your LCD Monitor Connecting TV Tuner Box (option) 1 Unplug the DC adapter. 2 Remove cover of tuner box housing by sliding down. 3 Connect antenna or CATV cable to fix the tuner. 5 Put the tuner box housing cover back on the back of DC adapter then the monitor will be ready for TV function.
English 6 Please use a coin or screwdriver to tighten the two screws to "Antenna" port of the tuner box. 4 Insert the tuner box into tuner box housing on . 6 Connect the power cord of the monitor. 4_E151MP171MPbody.fm Page 6 Friday, September 7, 2001 3:04 PM Setting up Your LCD Monitor Connecting TV Tuner Box (option) 1 Unplug the DC adapter. 2 Remove cover of tuner box housing by sliding down. 3 Connect antenna or CATV cable to fix the tuner. 5 Put the tuner box housing cover back on the back of DC adapter then the monitor will be ready for TV function.
User Manual (ENGLISH)
Page 32
... the Brightness and too dark Contrast. Brightness, page 14. Image What you may be able to the PC or video sources. I Ensure that the power cord is firmly connected and the LCD monitor is on the image. Connecting your LCD monitor, page 5. The image is firmly connected to ...solve it yourself. English 30 Contrast, page 14. Suggested Actions Reference Screen is black and power indicator is off I Ensure that the signal cable is too light or I Check the maximum resolution and the frequency of the video adaptor.
... the Brightness and too dark Contrast. Brightness, page 14. Image What you may be able to the PC or video sources. I Ensure that the power cord is firmly connected and the LCD monitor is on the image. Connecting your LCD monitor, page 5. The image is firmly connected to ...solve it yourself. English 30 Contrast, page 14. Suggested Actions Reference Screen is black and power indicator is off I Ensure that the signal cable is too light or I Check the maximum resolution and the frequency of the video adaptor.
User Manual (ENGLISH)
Page 43
... available from that interference will not occur in a particular installation. Warning User must accept any UL Listed personal computer with Part 15 of Samsung 85 West Tasman Drive San Jose, CA 95134 USA Tel) 408-544-5124 Fax) 408-544-5191 Provided with this device must use ...responsible for help. Before making the connection, make sure the voltage rating of ICES-003. For 240 Volt applications use only UL Listed detachable power cord with IEC320 style terminations. Cet appareil Numérique de classe B respecte toutes les exigences du Règlemont ICES-003 sur les é...
... available from that interference will not occur in a particular installation. Warning User must accept any UL Listed personal computer with Part 15 of Samsung 85 West Tasman Drive San Jose, CA 95134 USA Tel) 408-544-5124 Fax) 408-544-5191 Provided with this device must use ...responsible for help. Before making the connection, make sure the voltage rating of ICES-003. For 240 Volt applications use only UL Listed detachable power cord with IEC320 style terminations. Cet appareil Numérique de classe B respecte toutes les exigences du Règlemont ICES-003 sur les é...

