
User Manual (ENGLISH)
Page 2
Adjust computer resolution and screen injection rate (refresh rate) in control panel of picture. But the pixels of RED, GREEN, BLUE and WHITE color seem to enjoy the best quality of computer as window termination button is applied, you can use it without uneasiness. • For example, the no. of the U.S. If excessive force is pressed. If you are 2,359,296 (15"), 3,932,160 (17"). 3. All rights reserved. Samsung Electronics Co...
Adjust computer resolution and screen injection rate (refresh rate) in control panel of picture. But the pixels of RED, GREEN, BLUE and WHITE color seem to enjoy the best quality of computer as window termination button is applied, you can use it without uneasiness. • For example, the no. of the U.S. If excessive force is pressed. If you are 2,359,296 (15"), 3,932,160 (17"). 3. All rights reserved. Samsung Electronics Co...

User Manual (ENGLISH)
Page 3
... English 2_E151MP171MPtoc.fm Page 1 Friday, July 20, 2001 10:55 AM Table of Contents Safety Instructions 2 Unpacking Your Monitor 3 Setting up Your LCD Monitor 4 Setting up an Ergonomic Workstation 4 Monitor Location 4 Workstation Height 4 Viewing Angle 4 Connecting Your LCD Monitor 5 Connecting TV Tuner Box (option 6 Plug and Play 7 Installing the Video Driver 7 Self-Test Feature Check (STFC 7 Getting Help 8 Warm-up Time 8 Adjusting Your LCD Monitor 9 User Controls 9 Automatic Save 10 Direct-Access Features 10 OSD Lock/Unlock 11 On Screen Display (OSD...
... English 2_E151MP171MPtoc.fm Page 1 Friday, July 20, 2001 10:55 AM Table of Contents Safety Instructions 2 Unpacking Your Monitor 3 Setting up Your LCD Monitor 4 Setting up an Ergonomic Workstation 4 Monitor Location 4 Workstation Height 4 Viewing Angle 4 Connecting Your LCD Monitor 5 Connecting TV Tuner Box (option 6 Plug and Play 7 Installing the Video Driver 7 Self-Test Feature Check (STFC 7 Getting Help 8 Warm-up Time 8 Adjusting Your LCD Monitor 9 User Controls 9 Automatic Save 10 Direct-Access Features 10 OSD Lock/Unlock 11 On Screen Display (OSD...

User Manual (ENGLISH)
Page 4
... Safety Instructions 1 Before connecting the AC power cord to the DC adapter outlet, make sure the voltage designation of the DC adapter corresponds to the local electrical supply. 2 Never insert anything to rest on the power cord, and keep the cord away from areas where people can cause problems. Don't use your LCD monitor in direct sunlight, and keep it away from heaters, stoves, fireplaces, and other sources...
... Safety Instructions 1 Before connecting the AC power cord to the DC adapter outlet, make sure the voltage designation of the DC adapter corresponds to the local electrical supply. 2 Never insert anything to rest on the power cord, and keep the cord away from areas where people can cause problems. Don't use your LCD monitor in direct sunlight, and keep it away from heaters, stoves, fireplaces, and other sources...

User Manual (ENGLISH)
Page 6
... advice given below your monitor. Tilt the screen English 4 Workstation height Place your LCD monitor so that exposes your monitor. Viewing angle Tilt the screen until you are comfortably seated. Monitor location Choose a position that the top of the screen is slightly below before you install your eye level when you feel comfortable working with your monitor to the least reflection from lights or windows, usually at a right angle...
... advice given below your monitor. Tilt the screen English 4 Workstation height Place your LCD monitor so that exposes your monitor. Viewing angle Tilt the screen until you are comfortably seated. Monitor location Choose a position that the top of the screen is slightly below before you install your eye level when you feel comfortable working with your monitor to the least reflection from lights or windows, usually at a right angle...
User Manual (ENGLISH)
Page 7
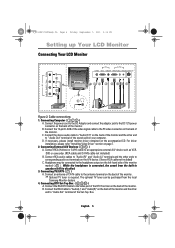
... the A/V device. (Stereo-RCA cable not included) C. 4_E151MP171MPbody.fm Page 5 Friday, September 7, 2001 3:04 PM Setting up Your LCD Monitor Connecting Your LCD Monitor 4 1 2 3 8 9 10 7 5 6 Figure 2. While the headphone is required. Cable connections 1. For driver installation, please refer "Installing Video Driver" section on the accompanied CD. Connect RCA audio cables to "Audio (R)" and "Audio (L)" terminals and the other end to " Audio Out" terminal of the sound card on the back of the...
... the A/V device. (Stereo-RCA cable not included) C. 4_E151MP171MPbody.fm Page 5 Friday, September 7, 2001 3:04 PM Setting up Your LCD Monitor Connecting Your LCD Monitor 4 1 2 3 8 9 10 7 5 6 Figure 2. While the headphone is required. Cable connections 1. For driver installation, please refer "Installing Video Driver" section on the accompanied CD. Connect RCA audio cables to "Audio (R)" and "Audio (L)" terminals and the other end to " Audio Out" terminal of the sound card on the back of the...

User Manual (ENGLISH)
Page 8
English 6 4_E151MP171MPbody.fm Page 6 Friday, September 7, 2001 3:04 PM Setting up Your LCD Monitor Connecting TV Tuner Box (option) 1 Unplug the DC adapter. 2 Remove cover of tuner box housing by sliding down. 3 Connect antenna or CATV cable to fix the tuner. 5 Put the tuner box housing cover back on the back of DC adapter then the monitor will be ready for TV function. Please use a coin or screwdriver to tighten the two screws to "Antenna" port of the tuner box. 4 Insert the tuner box into tuner box housing on . 6 Connect the power cord of the monitor.
English 6 4_E151MP171MPbody.fm Page 6 Friday, September 7, 2001 3:04 PM Setting up Your LCD Monitor Connecting TV Tuner Box (option) 1 Unplug the DC adapter. 2 Remove cover of tuner box housing by sliding down. 3 Connect antenna or CATV cable to fix the tuner. 5 Put the tuner box housing cover back on the back of DC adapter then the monitor will be ready for TV function. Please use a coin or screwdriver to tighten the two screws to "Antenna" port of the tuner box. 4 Insert the tuner box into tuner box housing on . 6 Connect the power cord of the monitor.

User Manual (ENGLISH)
Page 9
... new VESA® Plug and Play solution eliminates complicated and time consuming setup. Make sure that accompanies this product contains the necessary drivers for more information. Power Indicator 1 Turn off both your CD package for installing your monitor and computer are properly connected but the monitor screen remains dark and the power indicator is blinking, run the monitor self-test by checking if the source indicator LED labeled...
... new VESA® Plug and Play solution eliminates complicated and time consuming setup. Make sure that accompanies this product contains the necessary drivers for more information. Power Indicator 1 Turn off both your CD package for installing your monitor and computer are properly connected but the monitor screen remains dark and the power indicator is blinking, run the monitor self-test by checking if the source indicator LED labeled...
User Manual (ENGLISH)
Page 10
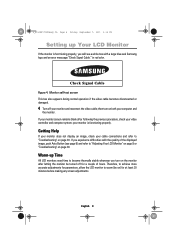
... video cable becomes disconnected or damaged. 4 Turn off for a couple of the displayed image, push Auto Button (see a white box with a large blue oval Samsung logo and an error messsage "Check Signal Cable." your monitor and reconnect the video cable; English 8 If you experience difficulties with the quality of hours. Warm-up Your LCD Monitor If the monitor is functioning properly. Getting Help If your monitor does not display an image, check your video controller and computer system; Check Signal Cable...
... video cable becomes disconnected or damaged. 4 Turn off for a couple of the displayed image, push Auto Button (see a white box with a large blue oval Samsung logo and an error messsage "Check Signal Cable." your monitor and reconnect the video cable; English 8 If you experience difficulties with the quality of hours. Warm-up Your LCD Monitor If the monitor is functioning properly. Getting Help If your monitor does not display an image, check your video controller and computer system; Check Signal Cable...

User Manual (ENGLISH)
Page 11
... volume. SyncMaster 151MP * * 17" : SyncMaster 171MP Figure 5. User control locations No. Name Description 1 PC I Increases or decreases the channel number. - I Moves the selector left or right on the front of the monitor. - I Selects video sources (Video/S-video/TV). 4 Audio I Turns ON/OFF the monitor. Power I Selects audio source (PC/Video/TV). I Activates full screen video window. All of these buttons to adjust the controls, an OSD shows you to easily adjust the characteristics of the image being displayed. I Selects video sources (Video/S-video...
... volume. SyncMaster 151MP * * 17" : SyncMaster 171MP Figure 5. User control locations No. Name Description 1 PC I Increases or decreases the channel number. - I Moves the selector left or right on the front of the monitor. - I Selects video sources (Video/S-video/TV). 4 Audio I Turns ON/OFF the monitor. Power I Selects audio source (PC/Video/TV). I Activates full screen video window. All of these buttons to adjust the controls, an OSD shows you to easily adjust the characteristics of the image being displayed. I Selects video sources (Video/S-video...

User Manual (ENGLISH)
Page 17
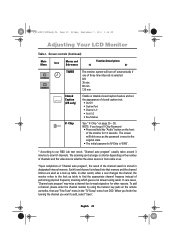
... best image by removing noises that create unstable images with the factory default values. Use the H-Position menu to your monitor to center the image on the screen. Image lock and position parameters are replaced with jitters and shimmers. If satisfactory results are not obtained using the Fine adjustment, use the Coarse adjustment and then use Fine again. 4_E151MP171MPbody.fm Page 15 Friday, September 7, 2001 3:04 PM Adjusting Your LCD Monitor Table 1. I Coarse I Reset Display current display mode...
... best image by removing noises that create unstable images with the factory default values. Use the H-Position menu to your monitor to center the image on the screen. Image lock and position parameters are replaced with jitters and shimmers. If satisfactory results are not obtained using the Fine adjustment, use the Coarse adjustment and then use Fine again. 4_E151MP171MPbody.fm Page 15 Friday, September 7, 2001 3:04 PM Adjusting Your LCD Monitor Table 1. I Coarse I Reset Display current display mode...

User Manual (ENGLISH)
Page 20
... number of TV tuner. Before installing the TV tuner, Menus are all in several different ways. English 18 The amount of time to perform "Channel auto program". 4_E151MP171MPbody.fm Page 18 Friday, September 7, 2001 3:04 PM Adjusting Your LCD Monitor TV/ Video functions and adjustments with the LNA (Low Noise Amplifier) Function icons Function name Setting bar Main menu...
... number of TV tuner. Before installing the TV tuner, Menus are all in several different ways. English 18 The amount of time to perform "Channel auto program". 4_E151MP171MPbody.fm Page 18 Friday, September 7, 2001 3:04 PM Adjusting Your LCD Monitor TV/ Video functions and adjustments with the LNA (Low Noise Amplifier) Function icons Function name Setting bar Main menu...

User Manual (ENGLISH)
Page 23
... Wide English 21 4_E151MP171MPbody.fm Page 21 Friday, September 7, 2001 3:04 PM Adjusting Your LCD Monitor Table 1. SOUND The monitor has a built-in PIP. Screen controls (Continued) Main Menu Icon Menus and Sub-menus Function Descriptions PICTURE This funtion is not working in high fidelity stereo audio amplifier. I Brightness Adjust the brightness of video or TV without affecting PC RGB's brightness. I Reset Picture parameters are replaced with the factory default values...
... Wide English 21 4_E151MP171MPbody.fm Page 21 Friday, September 7, 2001 3:04 PM Adjusting Your LCD Monitor Table 1. SOUND The monitor has a built-in PIP. Screen controls (Continued) Main Menu Icon Menus and Sub-menus Function Descriptions PICTURE This funtion is not working in high fidelity stereo audio amplifier. I Brightness Adjust the brightness of video or TV without affecting PC RGB's brightness. I Reset Picture parameters are replaced with the factory default values...
User Manual (ENGLISH)
Page 24
... performing physical frequency scanning which gives a lot slower tuning result. In rare cases, "Channel auto program" may miss a channel due to add, select "Save". English 22 When you finish fine tunning the channel you forgot V-Chip Password • Press and hold the "Audio" button on the remote controller, then use "Fine Tune" menu in designated internal memory. Screen controls (Continued) Main Menu Icon Menus...
... performing physical frequency scanning which gives a lot slower tuning result. In rare cases, "Channel auto program" may miss a channel due to add, select "Save". English 22 When you finish fine tunning the channel you forgot V-Chip Password • Press and hold the "Audio" button on the remote controller, then use "Fine Tune" menu in designated internal memory. Screen controls (Continued) Main Menu Icon Menus...

User Manual (ENGLISH)
Page 25
... is different, the monitor doesn't display. Bass: Emphasize low frequency audio. 4_E151MP171MPbody.fm Page 23 Friday, September 7, 2001 3:04 PM Adjusting Your LCD Monitor DTV functions and adjustments Function icons Function name Setting bar INPUT FORMAT Main menu Tool Tip Input Format Press menu Key Table 1. On, Off English 23 BRIGHTNESS Adjust the brightness of DTV without affecting PC RGB's brightness. CONTRAST Adjust the contrast of DTV without affecting PC RGB's contrast. SOUND I Bass I Treble...
... is different, the monitor doesn't display. Bass: Emphasize low frequency audio. 4_E151MP171MPbody.fm Page 23 Friday, September 7, 2001 3:04 PM Adjusting Your LCD Monitor DTV functions and adjustments Function icons Function name Setting bar INPUT FORMAT Main menu Tool Tip Input Format Press menu Key Table 1. On, Off English 23 BRIGHTNESS Adjust the brightness of DTV without affecting PC RGB's brightness. CONTRAST Adjust the contrast of DTV without affecting PC RGB's contrast. SOUND I Bass I Treble...
User Manual (ENGLISH)
Page 31
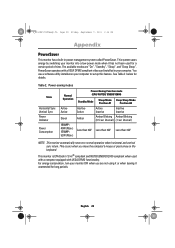
... computer's mouse or press a key on your monitor into a low-power mode when it unattended for details. Power-saving modes State Horizontal Sync Vertical Sync Power Indicator Power Consumption Normal Operation Active Active Green 151MP : 40W (Max.) 171MP : 52W (Max.) Power-Saving Function mode (EPA/ NUTEK/ ENERGY2000) Standby Mode Sleep Mode Deep Sleep Mode Position A1 Position A2 Inactive Active Active Inactive Inactive Inactive Amber Amber Blinking Amber Blinking (0.5 sec interval) (1 sec interval) Less than 3W...
... computer's mouse or press a key on your monitor into a low-power mode when it unattended for details. Power-saving modes State Horizontal Sync Vertical Sync Power Indicator Power Consumption Normal Operation Active Active Green 151MP : 40W (Max.) 171MP : 52W (Max.) Power-Saving Function mode (EPA/ NUTEK/ ENERGY2000) Standby Mode Sleep Mode Deep Sleep Mode Position A1 Position A2 Inactive Active Active Inactive Inactive Inactive Amber Amber Blinking Amber Blinking (0.5 sec interval) (1 sec interval) Less than 3W...
User Manual (ENGLISH)
Page 32
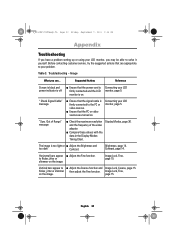
... your problem. Connecting your LCD monitor, page 5. "Sync. Vertical bars appear to the PC or video sources. Horizontal bars appear I Check the maximum resolution and the frequency of the video adaptor. Connecting your LCD monitor, page 5. Display Modes, page 36. Image Lock, Fine, on the image Image Lock, Fine, page 15. Troubleshooting - page 15. " Check Signal Cable" message I Adjust the Brightness and too dark Contrast. I Ensure that the power cord is firmly connected and the LCD monitor is too light or I Ensure that are turned on...
... your problem. Connecting your LCD monitor, page 5. "Sync. Vertical bars appear to the PC or video sources. Horizontal bars appear I Check the maximum resolution and the frequency of the video adaptor. Connecting your LCD monitor, page 5. Display Modes, page 36. Image Lock, Fine, on the image Image Lock, Fine, page 15. Troubleshooting - page 15. " Check Signal Cable" message I Adjust the Brightness and too dark Contrast. I Ensure that the power cord is firmly connected and the LCD monitor is too light or I Ensure that are turned on...
User Manual (ENGLISH)
Page 33
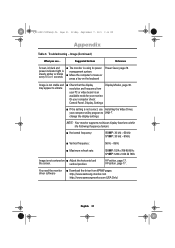
...... Image is not centered on the keyboard Power Saver, page 29. You need the monitor driver software I The monitor is not correct, use Installing the Video Driver, your computer utility program to vibrate I Adjust the horizontal and the screen. Suggested Actions Reference Screen is black and power indicator light is steady amber or blinks every 0.5 or 1 seconds I Download the driver from your PC or video board is an available mode for your computer check: Control Panel, Display, Settings I Move...
...... Image is not centered on the keyboard Power Saver, page 29. You need the monitor driver software I The monitor is not correct, use Installing the Video Driver, your computer utility program to vibrate I Adjust the horizontal and the screen. Suggested Actions Reference Screen is black and power indicator light is steady amber or blinks every 0.5 or 1 seconds I Download the driver from your PC or video board is an available mode for your computer check: Control Panel, Display, Settings I Move...
User Manual (ENGLISH)
Page 35
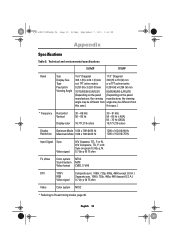
... (except U.S.A.) RGB Separate sync. 1080i, 720p, 480p, 480i (except U.S.A.) Video signal 0.7 Vp-p @ 75 ohm Video Color system NTSC * Referring to Preset timing modes, page 36. English 33 Video signal H/V Separate, TTL, P. Sync-on the panel manufacturer, the viewing manufacturer, the viewing angle may be different from angle may be different from this spec.) this spec.) * Frequency Horizontal Vertical 30 ~ 69 kHz 56 ~ 85 Hz Display color 16,777,216 colors 30 ~ 81...
... (except U.S.A.) RGB Separate sync. 1080i, 720p, 480p, 480i (except U.S.A.) Video signal 0.7 Vp-p @ 75 ohm Video Color system NTSC * Referring to Preset timing modes, page 36. English 33 Video signal H/V Separate, TTL, P. Sync-on the panel manufacturer, the viewing manufacturer, the viewing angle may be different from angle may be different from this spec.) this spec.) * Frequency Horizontal Vertical 30 ~ 69 kHz 56 ~ 85 Hz Display color 16,777,216 colors 30 ~ 81...
User Manual (ENGLISH)
Page 40
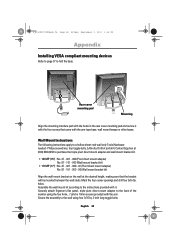
... four corner openings and drill four 5/8-dia. Assemble the wall mount kit according to the wall using the four 4mm, .7 pitch x 10mm screws provided with the holes in the rear cover mounting pad and secure it . English 38 Drill bit and drill. Securely attach Ergotron's flat panel, triple pivot direct mount adapter to a hollow sheet-rock wall only Tools/Hardware needed - Rear cover mounting pad Mounting Align the mounting interface...
... four corner openings and drill four 5/8-dia. Assemble the wall mount kit according to the wall using the four 4mm, .7 pitch x 10mm screws provided with the holes in the rear cover mounting pad and secure it . English 38 Drill bit and drill. Securely attach Ergotron's flat panel, triple pivot direct mount adapter to a hollow sheet-rock wall only Tools/Hardware needed - Rear cover mounting pad Mounting Align the mounting interface...
User Manual (ENGLISH)
Page 43
... and receiver. If this monitor is the same as the monitor and that to which can radiate radio frequency energy and, if not installed and used in accordance with the instructions, may not cause harmful interference, and (2) this device must use shielded signal interface cables to maintain FCC compliance for the product. I EN55024:1998 - User Information Changes or modifications...
... and receiver. If this monitor is the same as the monitor and that to which can radiate radio frequency energy and, if not installed and used in accordance with the instructions, may not cause harmful interference, and (2) this device must use shielded signal interface cables to maintain FCC compliance for the product. I EN55024:1998 - User Information Changes or modifications...


