User Manual (ENGLISH)
Page 2
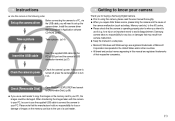
... software CD-ROM. (p.66) Take a picture Take a picture. (p.14) Insert the USB cable Insert the supplied USB cable into the PC's USB port and the camera's USB connection terminal. (p.67) Getting to know your PC, the images could be damaged. Check [Removable Disk] Open WindowŖs EXPLORER and search for a trip or an important event) to turn it (e.g. Install the camera driver that is contained in the following order Set up the camera driver Before connecting the camera...
... software CD-ROM. (p.66) Take a picture Take a picture. (p.14) Insert the USB cable Insert the supplied USB cable into the PC's USB port and the camera's USB connection terminal. (p.67) Getting to know your PC, the images could be damaged. Check [Removable Disk] Open WindowŖs EXPLORER and search for a trip or an important event) to turn it (e.g. Install the camera driver that is contained in the following order Set up the camera driver Before connecting the camera...
User Manual (ENGLISH)
Page 3
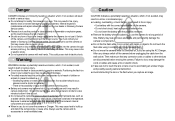
... or Samsung Camera Service centre. Danger DANGER indicates an imminently hazardous situation which, if not avoided, will result in death or serious injury. ƈ Do not attempt to modify this camera in fire. ҮDo not insert the battery with the polarities reversed. ƈ Remove the battery when not planning to use , do not cover the camera or Charger. After use, always switch...
... or Samsung Camera Service centre. Danger DANGER indicates an imminently hazardous situation which, if not avoided, will result in death or serious injury. ƈ Do not attempt to modify this camera in fire. ҮDo not insert the battery with the polarities reversed. ƈ Remove the battery when not planning to use , do not cover the camera or Charger. After use, always switch...
User Manual (ENGLISH)
Page 4
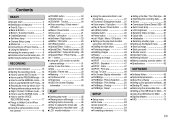
... 6 ƈBottom / 5-function button 7 ƈCradle(Optional) 7 ƈSelf-timer lamp 8 ƈCamera Status Lamp 8 ƈMode icon 8 ƃConnecting to a Power Source 8 ƈUsing the batteries 8 ƃInserting the memory card 9 ƃInstructions on how to use the memory card 10 ƃWhen Using the Camera for the First Time 12 RECORDING ƃLCD monitor indicator 13 ƃStarting the recording mode 14 ƈHow to use the AUTO mode 14 ƈHow to use the PROGRAM mode 14 ƈ...
... 6 ƈBottom / 5-function button 7 ƈCradle(Optional) 7 ƈSelf-timer lamp 8 ƈCamera Status Lamp 8 ƈMode icon 8 ƃConnecting to a Power Source 8 ƈUsing the batteries 8 ƃInserting the memory card 9 ƃInstructions on how to use the memory card 10 ƃWhen Using the Camera for the First Time 12 RECORDING ƃLCD monitor indicator 13 ƃStarting the recording mode 14 ƈHow to use the AUTO mode 14 ƈHow to use the PROGRAM mode 14 ƈ...
User Manual (ENGLISH)
Page 9
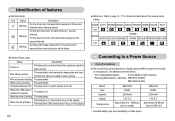
... rechargeable batteries : 2 X AA Alkaline (High Capacity) - MODE AUTO PROGRAM MANUAL NIGHT PORTRAIT CHILDREN MOVIE PLAY Icon SCENE MODE LANDSCAPE CLOSE UP SUNSET DAWN BACKLIGHT FIREWORKS BEACH & SNOW Icon Connecting to page 14~17 for a digital camera (Within a year from the date of features ƈ Self-timer lamp Icon Status Blinking Blinking Blinking Description For the 2 seconds, the lamp blinks quickly at 0.25-second intervals before taking a picture The lamp blinks while saving the image data and turns off...
... rechargeable batteries : 2 X AA Alkaline (High Capacity) - MODE AUTO PROGRAM MANUAL NIGHT PORTRAIT CHILDREN MOVIE PLAY Icon SCENE MODE LANDSCAPE CLOSE UP SUNSET DAWN BACKLIGHT FIREWORKS BEACH & SNOW Icon Connecting to page 14~17 for a digital camera (Within a year from the date of features ƈ Self-timer lamp Icon Status Blinking Blinking Blinking Description For the 2 seconds, the lamp blinks quickly at 0.25-second intervals before taking a picture The lamp blinks while saving the image data and turns off...

User Manual (ENGLISH)
Page 15
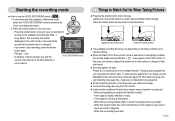
..., an image will be stored on the LCD monitor is incorrect, reset the date / time before taking a picture.) [ AUTO mode ] 5. Low Shutter speeds can manually configure all functions except the aperture value and shutter speed. 1. If the memory card is not moving object in the internal memory. Select the AUTO mode by using the LCD monitor. 7. INFORMATION ƃ If the auto focus frame turns to red when you do not need to insert the memory card. Press the + / - Larger Aperture values make the...
..., an image will be stored on the LCD monitor is incorrect, reset the date / time before taking a picture.) [ AUTO mode ] 5. Low Shutter speeds can manually configure all functions except the aperture value and shutter speed. 1. If the memory card is not moving object in the internal memory. Select the AUTO mode by using the LCD monitor. 7. INFORMATION ƃ If the auto focus frame turns to red when you do not need to insert the memory card. Press the + / - Larger Aperture values make the...
User Manual (ENGLISH)
Page 18
.... If you capture an image. ƈ Compose the image by pressing the Voice recording button twice. 2. REC:Shutter Exit - File type : *.wav * A distance of Movie clip mode, select the VOICE RECORDING mode by using the LCD monitor. ƈ Under certain conditions the auto focus system may make the picture dark. When photographing a subject that has little contrast. - Press the shutter button to confirm focus and flash battery charge. When the surroundings are...
.... If you capture an image. ƈ Compose the image by pressing the Voice recording button twice. 2. REC:Shutter Exit - File type : *.wav * A distance of Movie clip mode, select the VOICE RECORDING mode by using the LCD monitor. ƈ Under certain conditions the auto focus system may make the picture dark. When photographing a subject that has little contrast. - Press the shutter button to confirm focus and flash battery charge. When the surroundings are...
User Manual (ENGLISH)
Page 29
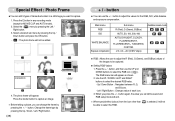
... pressing the Left / Right button. 3. button to adjust the values for MOVIE CLIP and AUTO mode). 2. Main menu RGB ISO WHITE BALANCE Exposure compensation Sub menu R (Red), G (Green), B (Blue) AUTO, 50, 100, 200, 400 AUTO, DAYLIGHT, CLOUDY, FLUORESCENT H, FLUORESCENT L, TUNGSTEN, CUSTOM. -2.0~0.0~+2.0 (0.5EV steps) Available camera mode ƈ RGB : Allows the user to adjust the R (Red), G (Green), and B (Blue) values of the images to capture. 1. button, and then use the + / - Left / Right Button : Changes value of frame-like...
... pressing the Left / Right button. 3. button to adjust the values for MOVIE CLIP and AUTO mode). 2. Main menu RGB ISO WHITE BALANCE Exposure compensation Sub menu R (Red), G (Green), B (Blue) AUTO, 50, 100, 200, 400 AUTO, DAYLIGHT, CLOUDY, FLUORESCENT H, FLUORESCENT L, TUNGSTEN, CUSTOM. -2.0~0.0~+2.0 (0.5EV steps) Available camera mode ƈ RGB : Allows the user to adjust the R (Red), G (Green), and B (Blue) values of the images to capture. 1. button, and then use the + / - Left / Right Button : Changes value of frame-like...
User Manual (ENGLISH)
Page 34
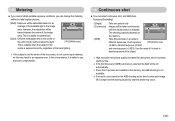
... to save each image file is selected, the flash will be metered for the AEB shooting as this circumstance, It is better to use a tripod for light. [ PROGRAM mode ] This is suitable for general use. [Spot] : Only the rectangular area in an exposure error. Metering ƈ If you cannot obtain suitable exposure conditions, you can select continuous shot, and AEB (Auto Exposure Bracketing). - [Single] : Take one picture only - [Continuous] : Images...
... to save each image file is selected, the flash will be metered for the AEB shooting as this circumstance, It is better to use a tripod for light. [ PROGRAM mode ] This is suitable for general use. [Spot] : Only the rectangular area in an exposure error. Metering ƈ If you cannot obtain suitable exposure conditions, you can select continuous shot, and AEB (Auto Exposure Bracketing). - [Single] : Take one picture only - [Continuous] : Images...

User Manual (ENGLISH)
Page 45
... to protect specific shots from being accidentally erased (Lock). Back: Set:OK : Image is displayed. - It also unprotects images that have been previously protected (Unlock). ƃ Protecting Images 1. Up / Down / Left / Right : Select an image - OK button : Your changes will be saved and the menu will disappear. Select a desired sub menu by pressing the UP / DOWN button and press the RIGHT button. 2. An image in LOCK mode will be protected from the delete function or [Delete] functions, but...
... to protect specific shots from being accidentally erased (Lock). Back: Set:OK : Image is displayed. - It also unprotects images that have been previously protected (Unlock). ƃ Protecting Images 1. Up / Down / Left / Right : Select an image - OK button : Your changes will be saved and the menu will disappear. Select a desired sub menu by pressing the UP / DOWN button and press the RIGHT button. 2. An image in LOCK mode will be protected from the delete function or [Delete] functions, but...
User Manual (ENGLISH)
Page 48
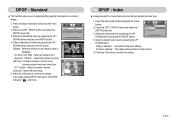
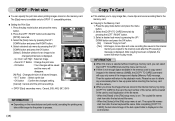
... UP / DOWN button and press the OK button. [Select] : Selection window for all pictures except movie and voice files. - W / T button : Select a number of prints for an image to print. - Press the OK button to embed printing quantity information on a stored image. 1. Zoom W / T Button : Select the number of prints. [All Pics] : Configure number of prints [Cancel] : Cancel the print setup. 5. DPOF : Standard ƈ This function allows you to confirm the setting. Press the play mode button and press the menu button. 2.
... UP / DOWN button and press the OK button. [Select] : Selection window for all pictures except movie and voice files. - W / T button : Select a number of prints for an image to print. - Press the OK button to embed printing quantity information on a stored image. 1. Zoom W / T Button : Select the number of prints. [All Pics] : Configure number of prints [Cancel] : Cancel the print setup. 5. DPOF : Standard ƈ This function allows you to confirm the setting. Press the play mode button and press the menu button. 2.
User Manual (ENGLISH)
Page 49
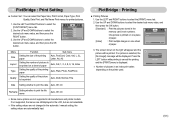
... CARD] menu but the menu can specify the print size when printing images stored on the LCD monitor. Zoom W / T Button : Change the print size. - Press the play mode button and press the menu button. 2. Exit:MENU Move: - [No] : Cancels "Copy to Card". - [Yes] : All images, movie clips and voice recording files saved in the internal memory are stored in the card to play mode. Select the [Size] menu by pressing the UP / DOWN button and press the OK button. [Select] : Selection window for DPOF 1.1 compatible printers. ƃ Setting the Print Size...
... CARD] menu but the menu can specify the print size when printing images stored on the LCD monitor. Zoom W / T Button : Change the print size. - Press the play mode button and press the menu button. 2. Exit:MENU Move: - [No] : Cancels "Copy to Card". - [Yes] : All images, movie clips and voice recording files saved in the internal memory are stored in the card to play mode. Select the [Size] menu by pressing the UP / DOWN button and press the OK button. [Select] : Selection window for DPOF 1.1 compatible printers. ƃ Setting the Print Size...
User Manual (ENGLISH)
Page 52
..., Fine Date Setting whether to print the date Auto, Off, On File Name Setting whether to cancel the printing and the [PRINT] menu is selected, the [No Image!] message will be printed. If not supported, the menus are still displayed in the LCD, but are not selectable. ſ If the setting values are not changed in the automatic / manual setting, the setting values are not supported in all manufacturer and printer models. The screen shown...
..., Fine Date Setting whether to print the date Auto, Off, On File Name Setting whether to cancel the printing and the [PRINT] menu is selected, the [No Image!] message will be printed. If not supported, the menus are still displayed in the LCD, but are not selectable. ſ If the setting values are not changed in the automatic / manual setting, the setting values are not supported in all manufacturer and printer models. The screen shown...
User Manual (ENGLISH)
Page 53
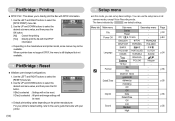
... Print : This allows you can use the setup menu in all camera modes, except Voice Recording mode. PictBridge : Reset ƈ Initialises user-changed configurations. 1. Date&Time dd/mm/yy - Use the UP and DOWN buttons to select the desired sub menu value, and then press the OK button. [No] : Cancel the printing [Yes] : Directly print the file with DPOF information. 1. RESET No Yes Exit:MENU Move: ſ Default print setting varies depending on the manufacturer and printer model...
... Print : This allows you can use the setup menu in all camera modes, except Voice Recording mode. PictBridge : Reset ƈ Initialises user-changed configurations. 1. Date&Time dd/mm/yy - Use the UP and DOWN buttons to select the desired sub menu value, and then press the OK button. [No] : Cancel the printing [Yes] : Directly print the file with DPOF information. 1. RESET No Yes Exit:MENU Move: ſ Default print setting varies depending on the manufacturer and printer model...
User Manual (ENGLISH)
Page 54
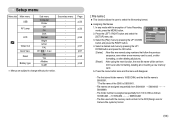
SETUP File Series Power Off Reset Language Format Date&Time Back: Set:OK 4. The folder number is S5000001. - Press the LEFT / RIGHT button and select the [SETUP] menu tab. 3. File names are assigned sequentially from 100 to select the file naming format. ƃ Assigning File Names 1. Setup menu Menu tab Main menu USB AF Lamp LCD Video Out Quick View Reset Battery type Sub menu Computer Printer Off On Dark Normal Bright NTSC PAL Off / 0.5, 1, 3 sec No Yes Alkaline Ni-MH Secondary...
SETUP File Series Power Off Reset Language Format Date&Time Back: Set:OK 4. The folder number is S5000001. - Press the LEFT / RIGHT button and select the [SETUP] menu tab. 3. File names are assigned sequentially from 100 to select the file naming format. ƃ Assigning File Names 1. Setup menu Menu tab Main menu USB AF Lamp LCD Video Out Quick View Reset Battery type Sub menu Computer Printer Off On Dark Normal Bright NTSC PAL Off / 0.5, 1, 3 sec No Yes Alkaline Ni-MH Secondary...

User Manual (ENGLISH)
Page 59
... camera menu and function settings will be restored to their defaults. Start up image ƈ You can set up a start up image, start up image : [Off], [LOGO], [User Image1], [User Image2] - The start -up image will be deleted by [DELETE] or [Format] menu. - The User images will not be deleted by are subject to change without prior notice. MYCAM Start Image Start Sound Shutter Sound Back: Set:OK ŝ58Ş Every camera working mode (with the [User Image] in the [RESIZE] menu in the play mode. - Use a saved image for DATE/TIME, LANGUAGE, and VIDEO...
... camera menu and function settings will be restored to their defaults. Start up image ƈ You can set up a start up image, start up image : [Off], [LOGO], [User Image1], [User Image2] - The start -up image will be deleted by [DELETE] or [Format] menu. - The User images will not be deleted by are subject to change without prior notice. MYCAM Start Image Start Sound Shutter Sound Back: Set:OK ŝ58Ş Every camera working mode (with the [User Image] in the [RESIZE] menu in the play mode. - Use a saved image for DATE/TIME, LANGUAGE, and VIDEO...
User Manual (ENGLISH)
Page 62
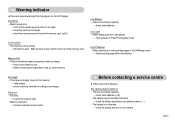
... memory card and format the memory card. (p.55) Card Locked! ҮThe memory card is locked ƍ SD memory card : Slide the write protect switch to the top of the memory card Memory Full! ҮThere is insufficient memory capacity to take an image ƍ Insert a new memory card ƍ Delete unnecessary image files to free up some memory Low Battery! ҮThere is low battery capacity ƍ Insert fresh batteries. (p.9) ҮThe battery may appear on the LCD display Card Error! ҮMemory card error ƍ Turn off the camera power...
... memory card and format the memory card. (p.55) Card Locked! ҮThe memory card is locked ƍ SD memory card : Slide the write protect switch to the top of the memory card Memory Full! ҮThere is insufficient memory capacity to take an image ƍ Insert a new memory card ƍ Delete unnecessary image files to free up some memory Low Battery! ҮThere is low battery capacity ƍ Insert fresh batteries. (p.9) ҮThe battery may appear on the LCD display Card Error! ҮMemory card error ƍ Turn off the camera power...
User Manual (ENGLISH)
Page 63
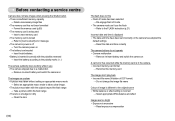
... default settings ƍ Reset the date and time correctly The camera buttons do not operate ҮCamera malfunction ƍ Remove /re-insert battery and switch the camera on A card error has occurred while the memory card is in the camera. ҮIncorrect memory card format ƍ Re-format the memory card The images don't play back ҮIncorrect file name (Violation of DCF format) ƍ Do not change the image file name Colour of image is different to the original scene ҮWhite balance...
... default settings ƍ Reset the date and time correctly The camera buttons do not operate ҮCamera malfunction ƍ Remove /re-insert battery and switch the camera on A card error has occurred while the memory card is in the camera. ҮIncorrect memory card format ƍ Re-format the memory card The images don't play back ҮIncorrect file name (Violation of DCF format) ƍ Do not change the image file name Colour of image is different to the original scene ҮWhite balance...
User Manual (ENGLISH)
Page 66
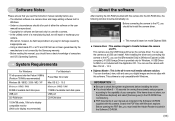
... and O/S (Operating Systems). After installing the driver and connecting this camera. Before opening the PDF files, you must install the Adobe Reader included in [Windows Explorer] or [My computer]. This camera uses the USB Storage Driver as a USB card reader. If the frame does not show, run . You can download, view, edit and save your digital images and movie clips with a camera. ҮIn the unlikely event of either the software or the user manual be...
... and O/S (Operating Systems). After installing the driver and connecting this camera. Before opening the PDF files, you must install the Adobe Reader included in [Windows Explorer] or [My computer]. This camera uses the USB Storage Driver as a USB card reader. If the frame does not show, run . You can download, view, edit and save your digital images and movie clips with a camera. ҮIn the unlikely event of either the software or the user manual be...
User Manual (ENGLISH)
Page 68
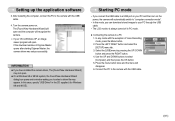
... camera with the USB cable. 4. If the download window of Voice Recording mode, press the Menu button. 2. In this mode, you to a USB port on . After restarting the computer, connect the PC to select [Computer], and then press the OK button. 5. Starting PC mode ҮIf you have installed the camera driver, The [Found New Hardware Wizard] may appear. Turn the camera power on your PC through the USB cable. ҮThe LCD monitor is Windows...
... camera with the USB cable. 4. If the download window of Voice Recording mode, press the Menu button. 2. In this mode, you to a USB port on . After restarting the computer, connect the PC to select [Computer], and then press the OK button. 5. Starting PC mode ҮIf you have installed the camera driver, The [Found New Hardware Wizard] may appear. Turn the camera power on your PC through the USB cable. ҮThe LCD monitor is Windows...
User Manual (ENGLISH)
Page 74
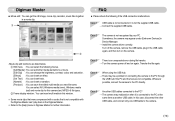
... if the USB connection malfunctions. Case 3 There is an unexpected error during file transfer. ƍ Turn the camera power off the camera, remove the USB cable, plug in the USB cable again, and then turn on again. Wherever possible, connect the camera to the PC directly. You can select AVI, Windows media (wmv), Windows media (asf) and movie clip for further information. Case 5 Are other USB cable, and connect only one USB cable to the camera. ŝ...
... if the USB connection malfunctions. Case 3 There is an unexpected error during file transfer. ƍ Turn the camera power off the camera, remove the USB cable, plug in the USB cable again, and then turn on again. Wherever possible, connect the camera to the PC directly. You can select AVI, Windows media (wmv), Windows media (asf) and movie clip for further information. Case 5 Are other USB cable, and connect only one USB cable to the camera. ŝ...


