English Manual
Page 12
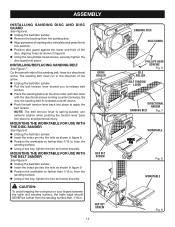
...holes as shown in figure 9. installing/REPLACING sanding belt See Figure 7. n Unplug the belt/disc sander. from the sanding surface. from the sanding surface. n Remove the backing from the sanding surface than 1/16 in the direction of the sanding belt, there is a directional arrow. n... disc DISC GUARD PHILLIPS HEAD SCREWS Fig. 6 iDLe roller 4 x36 BeLT TENSION lever DIRECTIONAL ARROW 4 x36SANDING BELT Fig. 7 INDEX PIN WORKTABLE Fig. 8 WORKTABLE Fig. 9 n Place the sanding belt over the drive roller and idler roller with plate and press firmly into place to apply...
...holes as shown in figure 9. installing/REPLACING sanding belt See Figure 7. n Unplug the belt/disc sander. from the sanding surface. from the sanding surface. n Remove the backing from the sanding surface than 1/16 in the direction of the sanding belt, there is a directional arrow. n... disc DISC GUARD PHILLIPS HEAD SCREWS Fig. 6 iDLe roller 4 x36 BeLT TENSION lever DIRECTIONAL ARROW 4 x36SANDING BELT Fig. 7 INDEX PIN WORKTABLE Fig. 8 WORKTABLE Fig. 9 n Place the sanding belt over the drive roller and idler roller with plate and press firmly into place to apply...
English Manual
Page 17
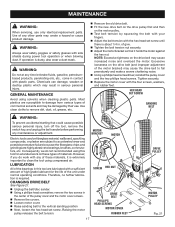
... important to bearings, brushes, commutators, etc. n Remove the old drive belt. n Test belt tension by their use only identical replacement parts. of the unit under normal operating conditions. Excessive looseness on the drive belt (and improper adjustment of the motor bracket) may be damaged by ...squeezing the belt with the four screws, washers, and rubber feet. Tighten securely....
... important to bearings, brushes, commutators, etc. n Remove the old drive belt. n Test belt tension by their use only identical replacement parts. of the unit under normal operating conditions. Excessive looseness on the drive belt (and improper adjustment of the motor bracket) may be damaged by ...squeezing the belt with the four screws, washers, and rubber feet. Tighten securely....


