English Manual
Page 12
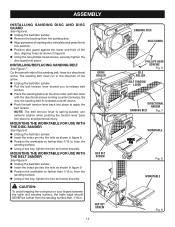
... backing from the sanding surface. n Unplug the belt/disc sander. NOTE: The belt tension lever is a directional arrow. Drive roller HEX set screw HEX set screw securely. assembly INSTALLING SANDING DISC AND DISC GUARD See Figure 6. n Unplug the belt/disc sander. n Position disc guard against the ..., aligning holes as shown in figure 8. The sanding belt must run in figure 9. Be sure the sanding belt is centered on both drums. n Push the belt tension lever back into place. n Place the sanding belt over the drive roller and idler roller with the disc sander See Figure...
... backing from the sanding surface. n Unplug the belt/disc sander. NOTE: The belt tension lever is a directional arrow. Drive roller HEX set screw HEX set screw securely. assembly INSTALLING SANDING DISC AND DISC GUARD See Figure 6. n Unplug the belt/disc sander. n Position disc guard against the ..., aligning holes as shown in figure 8. The sanding belt must run in figure 9. Be sure the sanding belt is centered on both drums. n Push the belt tension lever back into place. n Place the sanding belt over the drive roller and idler roller with the disc sander See Figure...
English Manual
Page 16
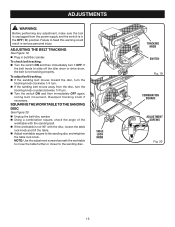
.... NOTE: Use the adjustment screws beneath the worktable to move the table further or closer to slide off the idler drum or drive drum, the belt is not tracking properly. adjustments WARNING: Before performing any adjustment, make sure the tool is unplugged from the disc, turn the... tracking knob counterclockwise 1/4 turn . To check belt tracking: n Turn the switch ON and then immediately turn it OFF. n Using a combination square, check the angle of the worktable with the ...
.... NOTE: Use the adjustment screws beneath the worktable to move the table further or closer to slide off the idler drum or drive drum, the belt is not tracking properly. adjustments WARNING: Before performing any adjustment, make sure the tool is unplugged from the disc, turn the... tracking knob counterclockwise 1/4 turn . To check belt tracking: n Turn the switch ON and then immediately turn it OFF. n Using a combination square, check the angle of the worktable with the ...
English Manual
Page 17
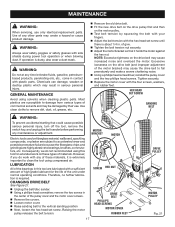
...extremely important to fail prematurely and make a severe chattering noise. motor BRACKEt motor screw hex nut drive belt PHILLIPS HEAD SCREWS motor cover rubber feet 17 drive pulley motor pulley Fig. 21 WARNING: Always wear safety goggles or safety glasses with your fingers. ... motor cover. Most plastics are susceptible to bearings, brushes, commutators, etc. Electric tools used on the drive belt (and improper adjustment of materials. n Adjust the belt tension with any time let brake fluids, gasoline, petroleumbased products, penetrating oils, etc., come in serious ...
...extremely important to fail prematurely and make a severe chattering noise. motor BRACKEt motor screw hex nut drive belt PHILLIPS HEAD SCREWS motor cover rubber feet 17 drive pulley motor pulley Fig. 21 WARNING: Always wear safety goggles or safety glasses with your fingers. ... motor cover. Most plastics are susceptible to bearings, brushes, commutators, etc. Electric tools used on the drive belt (and improper adjustment of materials. n Adjust the belt tension with any time let brake fluids, gasoline, petroleumbased products, penetrating oils, etc., come in serious ...


