Ryobi RTS10G Support Question
Ryobi RTS10G Support Question
Find answers below for this question about Ryobi RTS10G.Need a Ryobi RTS10G manual? We have 1 online manual for this item!
Question posted by fredmurrell on September 22nd, 2017
Ryobi Bt 3000 Table Saw Drive Belts Serial 000580 (about 20/25 Yrs Old)
I am having difficulty obtaining the correct drive belts for the above machine. the last belts I bought were made of black rubber. Although they fitted, they did not last long before they shredded. The original belts were made of a light brown transluclent material which was not rubber. Can you help?
Current Answers
Answer #1: Posted by BusterDoogen on September 22nd, 2017 8:54 AM
BusterDoogen

Member since:
October 30th, 2011 Points: 28,565,407

Member since:
October 30th, 2011 Points: 28,565,407
Go here for the belt.
I hope this is helpful to you!
Please respond to my effort to provide you with the best possible solution by using the "Acceptable Solution" and/or the "Helpful" buttons when the answer has proven to be helpful. Please feel free to submit further info for your question, if a solution was not provided. I appreciate the opportunity to serve you!
Related Ryobi RTS10G Manual Pages
User Manual - Page 3
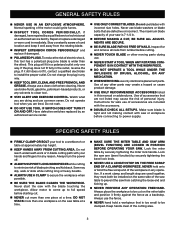
... ). Watch what you are defective or incorrect. Do not operate tool when you are not listed may slip, walk or slide while cutting long or heavy boards.
ALWAYS USE A CLAMP to a workbench or table at a time.
MAKE SURE THE MITER TABLE AND SAW ARM (BEVEL FUNCTION) ARE LOCKED IN POSITION BEFORE OPERATING YOUR...
User Manual - Page 4
... TURN THE MOTOR SWITCH ON AND OFF RAPIDLY.
Refer to them these instructions also.
4 Do not allow the saw blade to come to a complete stop before moving workpiece or changing settings.
THIS TOOL should have any part of the body in or near the cutting path of the blade.
NEVER...
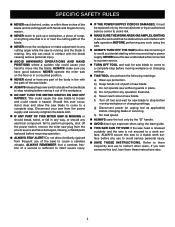
User Manual - Page 7
...of the workpiece.
Workpiece or Material The item on which a blade or cutting tool is not properly supported.
Cutterhead (planers and jointer planers) A rotating cutterhead ...being guided by a spinning object in the workpiece (requires a special blade).
Riving Knife/Spreader/Splitter (table saws) A metal piece, slightly thinner than 90° to feed the workpiece over , under, behind...
User Manual - Page 8
...
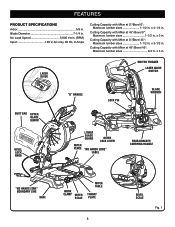
LOWER BLADE GUARD
MITER LOCK LEVER
"NO HANDS ZONE" LABEL
REAR BRACKET/ CARRYING HANDLE
"NO HANDS ZONE" BOUNDARY LINE
BASE
WORK CLAMP MITER
SCALE
MITER TABLE
THROAT PLATE
8
BEVEL SCALE
Fig. 1 x 3 in .
x 3-1/2 in . Blade Diameter 7-1/4 in .
User Manual - Page 9
... all operating features and safety rules.
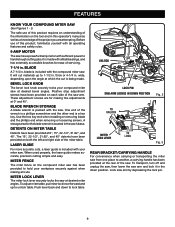
9 AMP MOTOR
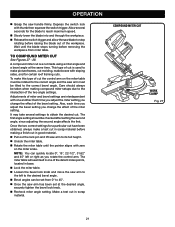
The saw arm. wide, depending upon the angle at 0°, 15°, 22-1/2°, 31.62°, and 45°. Positive stop adjustment screws have been provided on the tool and in . DETENTS ON MITER TABLE
Detents have been provided at which the cut materials...
User Manual - Page 10
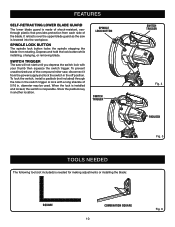
... blade guard as the saw will not start until you depress the switch lock with a long shackle of 5/16 in the off position. SWITCH TRIGGER
The saw is needed for making ...in another location. SPINDLE LOCK BUTTON
SWITCH TRIGGER
SWITCH TRIGGER
Fig. 4 PADLOCK
Fig. 5
TOOLS NEEDED
The following tool (not included) is lowered into the workpiece. Store the padlock key in the switch trigger...
User Manual - Page 11
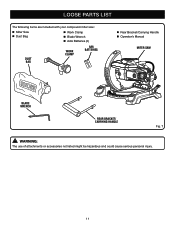
... Bag
Work Clamp Blade Wrench AAA Batteries (2)
DUST BAG
WORK CLAMP
AAA BATTERIES
Rear Bracket/Carrying Handle Operator's Manual
MITER SAW
BLADE WRENCH
REAR BRACKET/ CARRYING HANDLE
Fig. 7
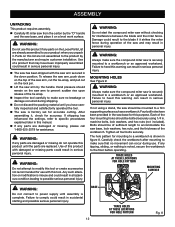
WARNING:
The use of attachments or accessories not listed might be hazardous and could cause serious personal injury...
User Manual - Page 12
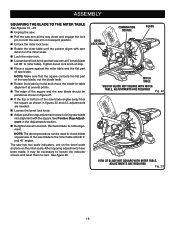
.... Damage could result to the blade if it on the saw has been shipped with this tool. If not using a stand, the saw base, lock washers, hex nuts, and the thickness of sufficient length to accommodate the saw should be bolted securely using 1/4 in figure 8. machine bolts, lock washers, and hex nuts (not included). Tighten...
User Manual - Page 13
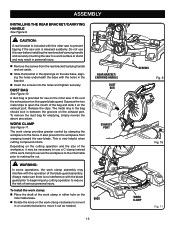
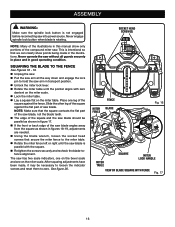
...the work clamp: Place the shaft of the work clamp in either hole on the
miter table base. Rotate the knob on the cutting operation and the size of serious personal injury....11. Always make sure there is very helpful when cutting compound miters.
It fits over the exhaust port on the miter saw blade. This is no interference with the operation of the bag and slide...
User Manual - Page 14
...por esta abertura. This is lowered, at the same time, and will teach you the correct position for more accurate cutting of material. ASSEMBLY
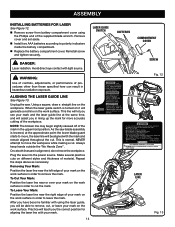
INSTALLING BATTERIES FOR LASER
See Figure 12.... battery compartment cover. EVITER L'EXPOSITION : Rayonnement laser émise de cet orifice. As the saw blade assembly is normal.
Using a square, draw a straight line on the work surface in ...
User Manual - Page 15
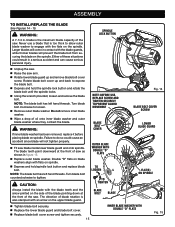
...front of these situations could cause an accident since blade will not tighten properly.
Fit saw blade inside lower blade guard and onto spindle. Turn blade bolt clockwise to tighten. The ...button and replace blade bolt.
Do not remove inner blade washer. Wipe a drop of the saw arm. Rotate lower blade guard up and back to do so could result in contact with...
User Manual - Page 16
... scale indicators, one on the miter scale. SOCKET HEAD SCREW(S)
FENCE
MITER BLADE FENCE
Fig. 16
MITER TABLE
SQUARE
MITER LOCK HANDLE
VIEW OF BLADE SQUARE WITH FENCE Fig. 17
16 See figure 20.
The saw blade.
NOTE: Make sure that we can clearly show only portions of the
square against the flat...
User Manual - Page 18
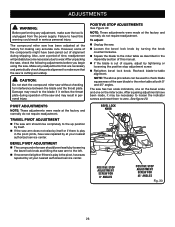
See figure 20. See Positive Stop Adjustment in the Adjustments section.
Retighten bevel lock knob.
NOTE: Make sure that the square contacts the flat part of saw blade. Recheck blade-to-table alignment. BEVEL LOCK KNOB
COMBINATION SQUARE
BLADE
MITER TABLE
VIEW OF BLADE NOT SQUARE WITH MITER TABLE, ADJUSTMENTS ARE REQUIRED Fig. 22
VIEW...
User Manual - Page 19
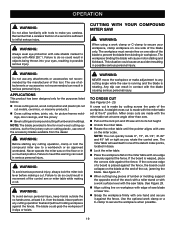
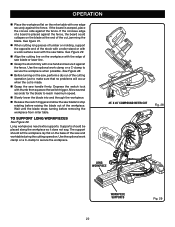
...workpiece. Use the optional work surface level with the saw table. CUTTING WITH YOUR COMPOUND MITER SAW
WARNING:
When using a work clamp or C-clamp to...25. See figure 31.
When cutting long pieces of lumber or molding, support the opposite end of saw on the miter scale. OPERATION
WARNING:
Do not allow familiarity with tools to make adjustment to any cutting angle while the saw...
User Manual - Page 20
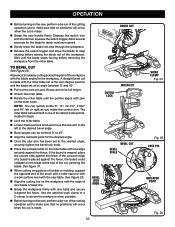
...table. If the concave edge of a board is placed against the fence. The miter table...table.
Loosen the bevel lock knob and move the saw...long...saw ...the saw, ...saw blade or laser line.
Grasp the workpiece firmly with the saw table.
A straight bevel cut is made with the miter table...saw arm to its full height.
Unlock the miter table.
Rotate the miter table...saw...
User Manual - Page 21
... been obtained, always make this type of the miter setting. COMPOUND MITER CUT
WORK CLAMP
Fig. 27
21 It may take several seconds for the blade to reach maximum speed.
Slowly lower the blade into and through the workpiece.
Release the switch trigger and allow the saw blade to the correct...
User Manual - Page 22
... firmly. Allow several seconds for the blade to secure the workpiece when possible. If the concave edge of saw table. See figure 31.
When cutting long pieces of lumber or molding, support the opposite end of the workpiece. Wait until the blade stops turning before raising the blade out of the ...
User Manual - Page 24
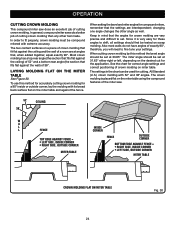
... cutting crown molding. changing one angle changes the other tool made. The crown molding is very easy for these angles to fine tune your settings.
The two contact surfaces on the miter table using the compound features of a room are at angles that fit flat against the fence.
All Standard (U.S.) crown molding with...
User Manual - Page 26
... of the saw and may be used to check blade squareness of the saw blade to the miter table at the ... make sure the tool is cutting accurately. After unpacking the saw, check the following adjustments before you begin using the saw .
... saw . See figure 20. TRAVEL PIVOT ADJUSTMENT
The saw arm should bevel easily by loosening the bevel lock knob and tilting the saw arm...
User Manual - Page 27
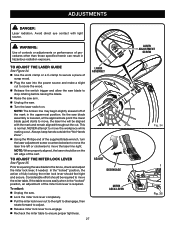
... is required.
In the "locked" position, the action of the mark in hazardous radiation exposure. If the table moves easily when in the "locked" position, an adjustment of scrap wood.
Plug the saw into the power source and make a slight cut to score the wood.
Release the switch trigger and...
Similar Questions

Rts23t Table Saw. Looking For Part Numbers For The Elevating Shaft And Block
Looking for part numbers for the elevating shaft and block for RTS23T table saw
Looking for part numbers for the elevating shaft and block for RTS23T table saw
(Posted by nbmills45 2 years ago)
Ryobi 10" Table Saw Dado Throat Plate
where can I find a dado throat plate for the Ryobi 10" table saw?
where can I find a dado throat plate for the Ryobi 10" table saw?
(Posted by Rick52757 2 years ago)

Movement Of Blade
Just bought ryobi reciprocating saw. Have not used it yet, but blade moves some up and down when loc...
Just bought ryobi reciprocating saw. Have not used it yet, but blade moves some up and down when loc...
(Posted by ron12345us 6 years ago)

Wiring Diagram For Ryobi Rts21 Table Saw Switch
I need to view the wiring diagram for the switch on the Ryobi RTS21 table saw. I had to disconnect t...
I need to view the wiring diagram for the switch on the Ryobi RTS21 table saw. I had to disconnect t...
(Posted by wolfsonjames 9 years ago)
